Welcome to Part 2 of the 15 part vCenter 5.1 Update 1 installation series. This post will guide you through the process of creating the vSphere 5.1 Update 1 vCenter SSL certificates. ALL production environments should use trusted SSL certs, not just “high security” environments. Key infrastructure services are probably running on vSphere, so security is paramount. After all, if your hypervisor gets p0wn3d, so will your VMs. Replacing vCenter SSL certificates is key to good security!
This is a tedious process, and each component has different ways of replacing the certificate. You can check out the official VMware guidance for vSphere 5.1 here. I’ve included a few simple script files in this post to help automate the process and reduce human error. The script at the bottom automates the whole request process, and is a superset of the various scripts earlier in the post. So I would suggest reading through the whole process then deciding which scripts, if any, you want to use. I prefer using only the last script, since it does everything.
Important: As mentioned in Part 1, VMware has released the vCenter Certificate Automation tool. This makes SSL certificate replacement easier, although not fully automated. This post will show you how to create all of the needed files in order to use the automation tool. I prefer using the automation tool and replacing all SSL certificates post-install, rather than doing it manually or by pre-staging.
For quick reference here are the other installments in this series:
Part 1 (SSO Service)
Part 3 (Install SSO Service SSL Certificate)
Part 4 (Install Inventory Service)
Part 5 (Install Inventory Service SSL Certificate)
Part 6 (Create vCenter and VUM Databases)
Part 7 (Install vCenter Server)
Part 8 (Install Web Client)
Part 9 (Optional SSO Configuration)
Part 10 (Create VUM DSN)
Part 11 (Install VUM)
Part 12 (VUM SSL Configuration)
Part 13 (VUM Configuration)
Part 14 (Web Client and Log Browser SSL)
Part 15 (ESXi Host SSL Certificate)
—
UPDATE 5/18/2013: I’ve updated the all-in-one certificate script at the end of this article. It now supports and automatically detects if you are using a subordinate CA, assuming you have the properly labeled CA files (root-1.cer and root-2.cer). If you only have a root CA, then it’s file should be called root.cer. It also silently overwrites any previous certificates, so you don’t have to click yes on each cert if you re-run the script.
UPDATE 5/4/2013: Added screenshots for scenarios when you have a subordinate CA. Also modified the concatenation command to put the certs in the proper order.
UPDATE 4/27/2013: Updated references to vSphere 5.1 Update 1, and made minor mods to the scripts for general cleanup. The process for Update 1 is exactly the same as prior versions of 5.1. I recommend using the vCenter Certificate Automation tool to replace the self-signed SSL certificates post-install.
UPDATE 4/7/2013: For compatibility with the VMware Certificate automation tool I’ve made a few changes. I added the creation of a vCenter Orchestrator certificate, and also the fully automated script at the bottom of the post creates the required chained “PEM” files for each service. You won’t use these PEM files if you manually replace certificates.
UPDATE 10/26/12: VMware has released guidance, in the form of several KB articles, on how to configure SSL certificates for vSphere 5.1. This is a complex process. Thankfully these new articles are a vast improvement over what was available at GA, and closely mirrors my original blog posts for the 5.1 GA release.
—
vCenter SSL Certificates
Certificates are tricky, and depending on how you “mint” them (OpenSSL root CA, Microsoft CA, commercial CA, etc.) the steps may differ significantly. This blog series assumes an online Microsoft Windows Server 2008 R2 Enterprise root CA (Server 2012 works as well) that has the web certificate services installed. VMware supports intermediate CAs, and I’ve tried to incorporate those instructions. However, I personally haven’t verified those steps.
The scope of this post will be only to create the vCenter 5.1 SSL certificate for all services. Follow-on posts cover the ins and outs of replacing the service specific SSL certificates, as the process differs for each service. For the official VMware KB article on creating the certificates, click here.
Although not mentioned in the VMware KB articles, “Pre-Staging” the SSL certificates is still the easiest method, when doing a clean install, to configure the SSL certificates. This eliminates some of the manual steps as many services (except the SSO) will automatically use the trusted certificates if they are in the right folder during the installation process. You can view a separate post here that I wrote which contains a script to automate the pre-staging process.To be clear, pre-staging is NOT required, but does reduce fresh installation time and effort.
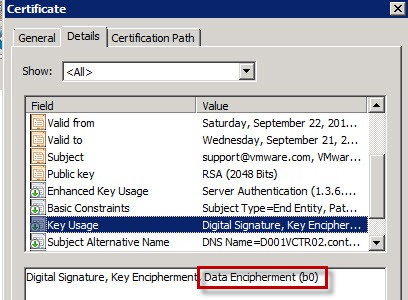
Per VMware KBs, the trusted SSL certificates should have the Data Encipherment key usage attribute. If you are using a Microsoft CA with the default “Web Server” certificate, your minted certificates will NOT have this property. You can check out my blog post here for how to create a custom certificate template that has this required key usage feature. You can see this Key Usage in the screenshot below. I’ve heard reports of SSL certificates without this property working, but VMware currently has this property as required in their KB articles so I would be safe and use it.
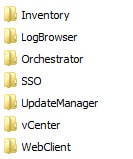
A single SSL certificate, even for all-in-one servers will NOT work. This is due to how various components (such as Inventory Service, vCenter, etc.) register with the SSO service. Multiple SSL certificates are required for a functioning system. For a complete installation of vCenter with VUM, you need seven certificates:
- Inventory Service
- SSO
- Update Manager
- vCenter
- Web Client
- Log Browser
- Orchestrator
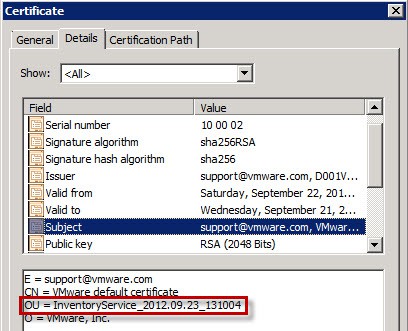
You will likely run into major problems if you try and use a commercial CA for your certificates. Many will ignore the “OU” field which the SSO service depends on, and must be unique in each certificate for each service. Without the required unique OU fields, you will be left with a non-functional system. You really need an internal CA where you can control the certificate templates, and validate the certificates are properly minted. The certificates also require the SAN (subject alternative name) field to be populated as well.
The key difference in each certificate is the “OU” property. This OU property must be unique, as this is the primary means the SSO service differentiates the SSL certificates for each service. Duplicate “OU” values is bad juju and will cause you a lot of grief, not to mention a smoking vCenter hole.
Configuration File Creation
1. Download and install the Windows OpenSSL binary. You need the OpenSSL 0.9.8y (or later) package. Remember to install the appropriate Visual C++ Redistributable package prior to installing OpenSSL. While you can use the 1.x OpenSSL binaries for this manual process, the new VMware certificate automation tool needs the legacy 0.9.8 version to properly calculate the hashes. So I would go with the older version to save you potential future headaches.
2. Install OpenSSL with the default path. You need a certificate directory to store all of the configuration files and resulting certificates. I created a directory called Certs on my D drive. In that directory you need to create a folder for each service that will be getting a SSL certificate. Each certificate is unique, organizing them by folder is critical.
3. VMware requires that all the vCenter certificates contain a SAN (subject alternative name) field in them. I’ve provided OpenSSL configuration files below for each of the services. Save each of the configuration files below into their respective directory.
Note that VMware has you adding the IP address of the server in the subjectAltName field. You can see the difference here. Through feedback and testing, I haven’t seen where leaving out the IP address causes issues. But feel free to add that field, but remember to change out all of your certificates should the server IP address change.
The following fields in red for each file need to be changed for your environment. Copy and paste the contents into Wordpad. I’ve also tweaked the configuration file to include clientAuth extended key usage, as VMware support has told some people to include the property.
subjectAltName = DNS:ServerShortName, DNS:Server.DomainName
CountryName = US (Two letters ONLY)
stateOrProvinceName = YourState
localityName = YourCity
0.organizationName = YourCompanyName
commonName = Server.DomainName
Inventory.cfg
[ req ]
 default_bits = 2048
 default_keyfile = rui.key
 distinguished_name = req_distinguished_name
 encrypt_key = no
 prompt = no
 string_mask = nombstr
 req_extensions = v3_req

[ v3_req ]
 basicConstraints = CA:FALSE
 keyUsage = digitalSignature, keyEncipherment, dataEncipherment
 extendedKeyUsage = serverAuth, clientAuth
 subjectAltName = DNS:ServerShortName, DNS:Server.DomainName

[ req_distinguished_name ]
 countryName = YourCountry
 stateOrProvinceName = YourState
 localityName = YourCity
 0.organizationName = YourCompanyName
 organizationalUnitName = vCenterInventoryService
 commonName = Server.DomainName
SSO.cfg
[ req ]
 default_bits = 2048
 default_keyfile = rui.key
 distinguished_name = req_distinguished_name
 encrypt_key = no
 prompt = no
 string_mask = nombstr
 req_extensions = v3_req

[ v3_req ]
 basicConstraints = CA:FALSE
 keyUsage = digitalSignature, keyEncipherment, dataEncipherment
 extendedKeyUsage = serverAuth, clientAuth
 subjectAltName = DNS:ServerShortName, DNS:Server.DomainName

[ req_distinguished_name ]
 countryName = YourCountry
 stateOrProvinceName = YourState
 localityName = YourCity
 0.organizationName = YourCompanyName
 organizationalUnitName = vCenterSSO
 commonName = Server.DomainName
vCenter.cfg
[ req ]
 default_bits = 2048
 default_keyfile = rui.key
 distinguished_name = req_distinguished_name
 encrypt_key = no
 prompt = no
 string_mask = nombstr
 req_extensions = v3_req

[ v3_req ]
 basicConstraints = CA:FALSE
 keyUsage = digitalSignature, keyEncipherment, dataEncipherment
 extendedKeyUsage = serverAuth, clientAuth
 subjectAltName = DNS:ServerShortName, DNS:Server.DomainName

[ req_distinguished_name ]
 countryName = YourCountry
 stateOrProvinceName = YourState
 localityName = YourCity
 0.organizationName = YourCompanyName
 organizationalUnitName = vCenterServer
 commonName = Server.DomainName
WebClient.cfg
[ req ]
 default_bits = 2048
 default_keyfile = rui.key
 distinguished_name = req_distinguished_name
 encrypt_key = no
 prompt = no
 string_mask = nombstr
 req_extensions = v3_req

[ v3_req ]
 basicConstraints = CA:FALSE
 keyUsage = digitalSignature, keyEncipherment, dataEncipherment
 extendedKeyUsage = serverAuth, clientAuth
 subjectAltName = DNS:ServerShortName, DNS:Server.DomainName

[ req_distinguished_name ]
 countryName = YourCountry
 stateOrProvinceName = YourState
 localityName = YourCity
 0.organizationName = YourCompanyName
 organizationalUnitName = vCenterWebClient
 commonName = Server.DomainName
VUM.cfg
[ req ]
 default_bits = 2048
 default_keyfile = rui.key
 distinguished_name = req_distinguished_name
 encrypt_key = no
 prompt = no
 string_mask = nombstr
 req_extensions = v3_req

[ v3_req ]
 basicConstraints = CA:FALSE
 keyUsage = digitalSignature, keyEncipherment, dataEncipherment
 extendedKeyUsage = serverAuth, clientAuth
 subjectAltName = DNS:ServerShortName, DNS:Server.DomainName

[ req_distinguished_name ]
 countryName = YourCountry
 stateOrProvinceName = YourState
 localityName = YourCity
 0.organizationName = YourCompanyName
 organizationalUnitName = VMwareUpdateManager
 commonName = Server.DomainName
LogBrowser.cfg
[ req ]
 default_bits = 2048
 default_keyfile = rui.key
 distinguished_name = req_distinguished_name
 encrypt_key = no
 prompt = no
 string_mask = nombstr
 req_extensions = v3_req

[ v3_req ]
 basicConstraints = CA:FALSE
 keyUsage = digitalSignature, keyEncipherment, dataEncipherment
 extendedKeyUsage = serverAuth, clientAuth
 subjectAltName = DNS:ServerShortName, DNS:Server.DomainName

[ req_distinguished_name ]
 countryName = YourCountry
 stateOrProvinceName = YourState
 localityName = YourCity
 0.organizationName = YourCompanyName
 organizationalUnitName = vCenterLogBrowser
 commonName = Server.DomainName
Orchestrator.cfg
[ req ]
 default_bits = 2048
 default_keyfile = rui.key
 distinguished_name = req_distinguished_name
 encrypt_key = no
 prompt = no
 string_mask = nombstr
 req_extensions = v3_req

[ v3_req ]
 basicConstraints = CA:FALSE
 keyUsage = digitalSignature, keyEncipherment, dataEncipherment
 extendedKeyUsage = serverAuth, clientAuth
 subjectAltName = DNS:ServerShortName, DNS:Server.DomainName

[ req_distinguished_name ]
 countryName = YourCountry
 stateOrProvinceName = YourState
 localityName = YourCity
 0.organizationName = YourCompanyName
 organizationalUnitName = VMwareOrchestrator
 commonName = Server.DomainName
Download Root Certificates
The root certificate(s) are required to properly create the required certificate files. Again, I’m assuming you have a Microsoft online CA, otherwise you are on your own to create your root certificate file.
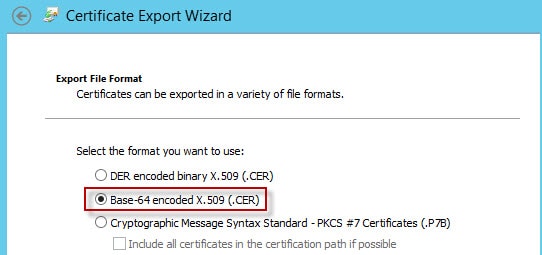
1. Go to the Microsoft CA home page that you used to mint the certificates and click on Download a CA certificate, certificate chain or CRL. Change the encoding method to Base 64 and click Download CA certificate chain. Change the file name to cachain.p7b.
2. Double click on the downloaded certificate, then locate the certificate in the console. If you have more than one certificate in the console, skip to step 3 below. If you have just one certificate, right click on the certificate and select All Tasks -> Export. Select Base-64 encoded and save the certificate with a filename of Root64.cer in the root of the Certs directory.
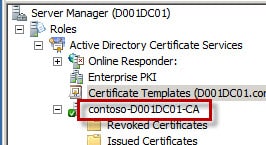
As you can see in my screenshot below, I have a root CA (D001DC02-CA) and a subordinate CA (D001DC01-CA). In this case extra steps are needed, so proceed to step 3.
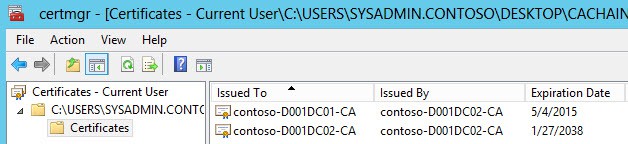
3. If you have a root and intermediate CAs (two or more certs in the console), you have some extra work. Export each certificate from the console as Base-64 and save into different files (e.g. Root64-1.cer and Root64-2.cer). You MUST save your Root CA as Root64-1.cer and the intermediary CA as Root64-2.cer.
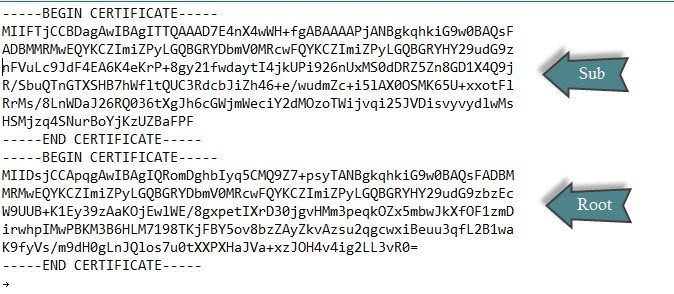
We also need a concatenated file of the CAs (Root64.cer), in reverse order. Reverse order means the root is at the bottom of the file, and the subordinate CA is at the top.
copy Root64-2.cer+Root64-1.cer Root64.cer
Root64.cer example with a root and subordinate CA (certificates have been shortened):
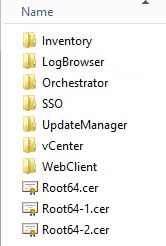
Don’t delete any of these root or intermediary files, as they will be used later in the installation process.
4. You should now have the following folder structure, assuming you have one or more subordinate CAs. If not, you will only have a Root64.cer certificate file.
Create CSRs
After you tweak and save your OpenSSL configuration files you need to generate the actual CSR files so you can submit that to your CA. First, we need to generate the RSA 2048 bit private keys. I have two scripts that help automate the certificate process. The script immediately below only automates the CSR process, as you may not be using a Microsoft CA which my fully automated script at the end of this post requires.
At the end of this post is a script that automates all of the certificate minting process, including creating the CSRs, PFX and PEM files. However, it requires the use of an online Microsoft enterprise CA in your domain. Read through all of the steps so you know what is needed, then feel free to use the automated scripts instead of typing all of the commands for each of the certificates.
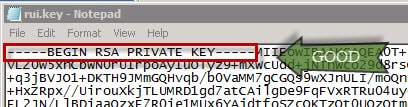
WARNING: vCenter is extremely picky about the format of the RSA private key file (rui.key) and you will most certainly have a smoking vCenter VM if you don’t have the right format. If the header of the RSA key file only reads “—–BEGIN PRIVATE KEY—–” then Houston, you have a major problem.
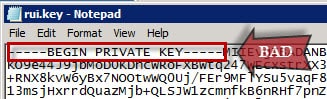
The format of your RSA private key file should have a header of “—–BEGIN RSA PRIVATE KEY—–“. This is the one and ONLY format that vSphere will accept.
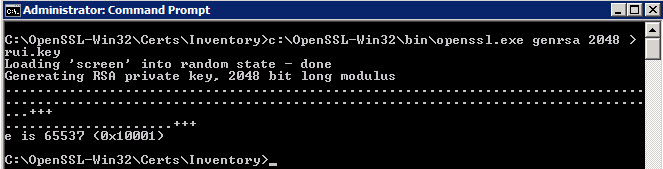
1. Use the following OpenSSL command to create a file called rui.key. Run this in each directory, as each certificate should have a unique private key. Note, these steps differ ever so slightly from the VMware KB, but produce the same results. These steps produce the RSA key in the proper format from the get-go, without having to convert them like the KB article has you do.
c:\OpenSSL-Win32\bin\openssl.exe genrsa 2048 > rui.key
Note: I’ve added a script at the bottom of this post that automates the entire certificate process, after you create the OpenSSL configuration files. Scroll down to the end if you wish to try that out instead of individual commands that are in the next several steps.
2. Using the RSA private key and the service-specific configuration file we need to generate CSRs (certificate signing request) for each service. Run the command below in each service certificate folder, changing the name of the configuration file for each invocation.
c:\OpenSSL-Win32\bin\openssl.exe req -out rui.csr -key rui.key -new -config inventory.cfg

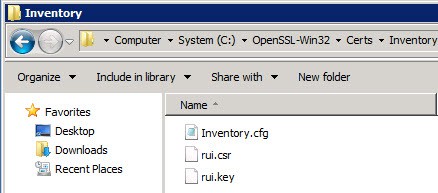
3. After running both commands you should now see rui.csr and rui.key files in each service folder.
Create_CSR.bat
Set OpenSSL_BIN=c:\OpenSSL\bin\openssl.exe
Set Cert_Path=D:\Certs

CD /d %Cert_Path%\vcenter\
%OpenSSL_BIN% genrsa 2048 > rui.key
%OpenSSL_BIN% req -out rui.csr -key rui.key -new -config vcenter.cfg

CD /d %Cert_Path%\Inventory\
%OpenSSL_BIN% genrsa 2048 > rui.key
%OpenSSL_BIN% req -out rui.csr -key rui.key -new -config inventory.cfg

CD /d %Cert_Path%\SSO\
%OpenSSL_BIN% genrsa 2048 > rui.key
%OpenSSL_BIN% req -out rui.csr -key rui.key -new -config SSO.cfg

CD /d %Cert_Path%\UpdateManager\
%OpenSSL_BIN% genrsa 2048 > rui.key
%OpenSSL_BIN% req -out rui.csr -key rui.key -new -config VUM.cfg

CD /d %Cert_Path%\webclient\
%OpenSSL_BIN% genrsa 2048 > rui.key
%OpenSSL_BIN% req -out rui.csr -key rui.key -new -config webclient.cfg

CD /d %Cert_Path%\LogBrowser\
%OpenSSL_BIN% genrsa 2048 > rui.key
%OpenSSL_BIN% req -out rui.csr -key rui.key -new -config LogBrowser.cfg

CD /d %Cert_Path%\Orchestrator\
%OpenSSL_BIN% genrsa 2048 > rui.key
%OpenSSL_BIN% req -out rui.csr -key rui.key -new -config Orchestrator.cfg
Mint Certificates
There are a couple of ways you can mint the SSL certificates from a Microsoft CA. One is using the traditional web interface. The other, is a command line method to automate the process. I prefer the command line, as it’s faster and less error prone.
–Command Line Method–
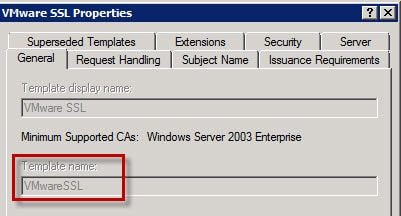
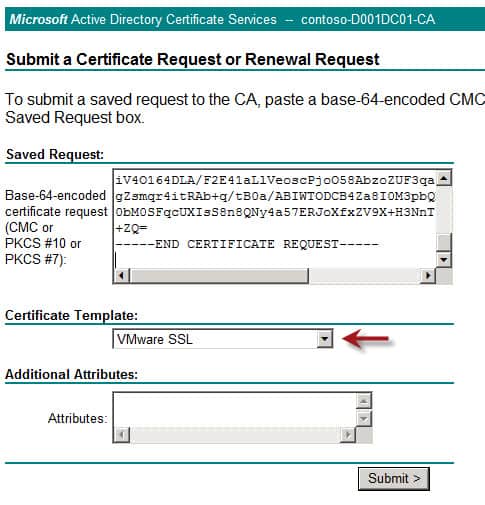
1. To use the command line method you need to know the hostname of your CA, the “name” of your CA (see first screenshot below), and the certificate “template name” which may NOT the same as the certificate “template display name”. The “template name” is usually the template display name without any spaces (see screenshot below).
Select the appropriate certificate template (e.g. “VMware SSL”) that has the additional key usage property (dataEncipherment). You can check out my blog post here for how to create a custom certificate template that has this key usage feature.
2. In the first certificate directory run the following command, of course changing the properties as needed for your CA. This will produce the rui.crt file, a newly minted SSL certificate.
certreq -submit -config “D001DC01\Contoso-D001DC01-CA” -attrib “CertificateTemplate:VMwareSSL” rui.csr rui.crt
3. Repeat the minting process for the remaining certificates…or use my script at the bottom of this post to automate the process.
–Web Method–
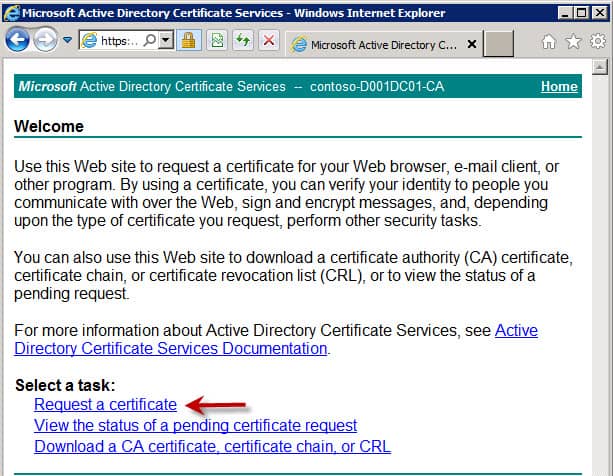
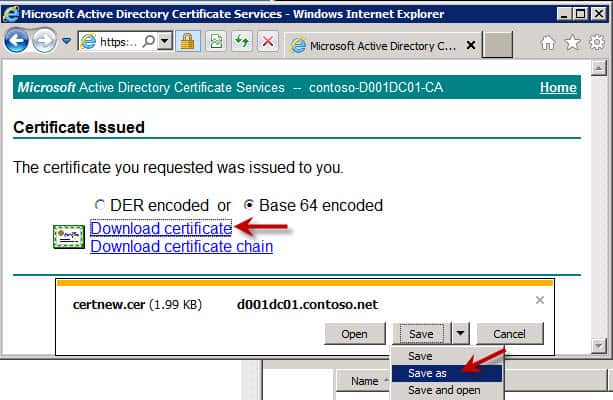
1. If you want to create the certificate the old fashion method then open the first rui.csr file with NotePad and copy the contents to the clipboard.

2. To create the certificate submit the CSR to the Microsoft CA then download the certificate. Navigate to the homepage of the Microsoft CA (https://YourCAServer/certsrv) and you should see a screen just like the one below. Select “Request a certificate.”
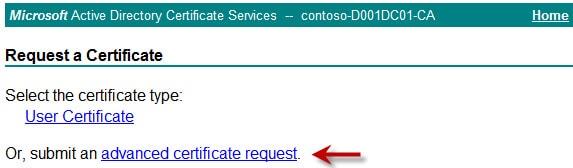
4. Select the second option shown below:
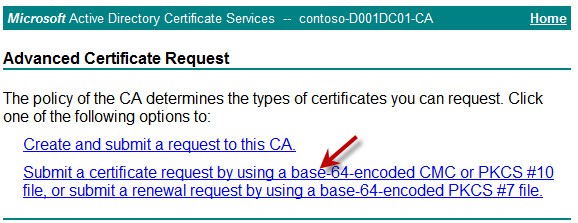
5. Paste the CSR you generated from OpenSSL into the request window. Change the certificate template to “VMware SSL” or whatever you have defined as your SSL certificate template with the additional key usage property. Again, you can check out my blog post here for how to create a custom certificate template that has this required key usage feature.
If you only see “User” and “Basic EFS” options, then the account you are using lacks the proper permissions on the CA to request certificates. Use a more privileged account to perform the request.
6. Submit the certificate request (Base 64 encoded) then Save As and use a file of rui.crt and place it into the appropriate folder (e.g. D:\Certs\Inventory) directory. If the saved file is mangled, you probably have the enhanced IE security enabled. Turn it off and re-submit the request and it should properly save.
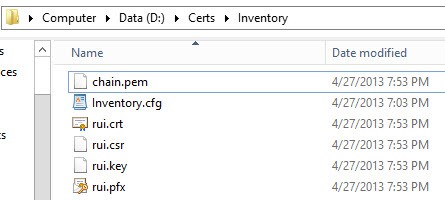
7. Repeat the web-based minting process for the remainder of the certificates. Each folder should have the following files:

Certificate Validation
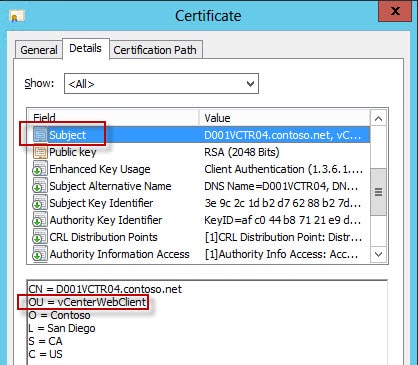
To validate the certificates have all of the right fields, double click on each rui.crt file and it should open up. Click on the Details tab and verify that the “OU” sub-field of the Subject name matches the service for which you created the certificate for. I would also double check the Subject Alternative Name to ensure both the short hostname and the server’s FQDN is listed.
Creating PFX Files
This process is also covered in the fully automated script below, but in case you want to manually do it you can follow the procedures here.
1. To create the required PKCS#12 PFX files use the following command for each service (note that “testpassword” is required by VMware. Do NOT try and use a custom password!). Notice that we also embed the root certificate into the PFX file (-certfile). Also, do NOT change the friendly name (-name) of “rui” to anything else. The Profile Driven storage service will likely not function and die with an unhelpful error message.
C:\openssl-Win32\bin\openssl pkcs12 -export -in rui.crt -inkey rui.key -certfile D:\certs\root64.cer -name rui -passout pass:testpassword -out rui.pfx
2. To make life a little easier below is a little batch file that automates the PFX creation process. Of course change any paths that you need to. As I mentioned before, the script at the end of this post automates the entire process including PFX creation.
Create_PFX.bat
CD /d D:\certs\SSO
C:\openssl-Win32\bin\openssl pkcs12 -export -in rui.crt -inkey rui.key -certfile D:\certs\root64.cer -name rui -passout pass:testpassword -out rui.pfx
CD /d D:\certs\Inventory
C:\openssl-Win32\bin\openssl pkcs12 -export -in rui.crt -inkey rui.key -certfile D:\certs\root64.cer -name rui -passout pass:testpassword -out rui.pfx
CD /d D:\certs\vCenter
C:\openssl-Win32\bin\openssl pkcs12 -export -in rui.crt -inkey rui.key -certfile D:\certs\root64.cer -name rui -passout pass:testpassword -out rui.pfx
CD /d D:\certs\UpdateManager
C:\openssl-Win32\bin\openssl pkcs12 -export -in rui.crt -inkey rui.key -certfile D:\certs\root64.cer -name rui -passout pass:testpassword -out rui.pfx
CD /d D:\certs\WebClient
C:\openssl-Win32\bin\openssl pkcs12 -export -in rui.crt -inkey rui.key -certfile D:\certs\root64.cer -name rui -passout pass:testpassword -out rui.pfx
CD /d D:\certs\LogBrowser
C:\openssl-Win32\bin\openssl pkcs12 -export -in rui.crt -inkey rui.key -certfile D:\certs\root64.cer -name rui -passout pass:testpassword -out rui.pfx
CD /d D:\certs\Orchestrator
C:\openssl-Win32\bin\openssl pkcs12 -export -in rui.crt -inkey rui.key -certfile D:\certs\root64.cer -name rui -passout pass:testpassword -out rui.pfx
C:\openssl-win32\bin\openssl pkcs12 -in rui.pfx -info
When you run that command you will be prompted a few times to enter the password, which is ‘testpassword’. Validate all of the fields look appropriate.

Create JKS KeyStore
Note: If you want to use the VMware vCenter certificate automation tool, you don’t need to create the JKS keystore. So you can skip this section. I recommend you use this tool instead of manually replacing certificates.
1. We need to create an empty JKS keystore the SSO service will use. In an elevated command prompt enter the command below to create the keystore:
“C:\Program Files\VMware\Infrastructure\jre\bin\keytool.exe” -v -importkeystore -srckeystore D:\certs\sso\rui.pfx -srcstoretype pkcs12 -srcstorepass testpassword -srcalias rui -destkeystore D:\certs\sso\root-trust.jks -deststoretype JKS -deststorepass testpassword -destkeypass testpassword
2. To add your Root CA certificate to the store enter this command. If you have intermediate CAs, for this command use the Root64-1.cer file (not Root64.cer), which should be the root CA certificate.
“C:\Program Files\VMware\Infrastructure\jre\bin\keytool.exe” -v -importcert -keystore D:\certs\sso\root-trust.jks -deststoretype JKS -storepass testpassword -keypass testpassword -file D:\certs\Root64.cer -alias root-ca
When prompted to confirm you trust the certificate, enter yes.
3. If you have intermediary certificate authorities, you have a bit more work to do. You first need to get the hash of your Root64-2.cer file (intermediate CA public certificate). If you have additional intermediate CAs, repeat the process for each one:
openssl x509 -subject_hash -noout -in D:\certs\Root64-2.cer
4. To import the intermediate CA certificates into the JKS keystore run the following command, replacing YourHash with the output of the hash command in the previous step:
keytool -v -importcert -noprompt -trustcacerts -keystore D:\certs\sso\root-trust.jks -deststoretype JKS -storepass testpassword -keypass testpassword -file D:\certs\Root64-2.cer -alias intermediate-YourHash.0
5. You can now validate that the keystore has all of the required certificates by running the following command:
“C:\Program Files\VMware\Infrastructure\jre\bin\keytool.exe” -list -v -keystore D:\certs\sso\root-trust.jks
6. The SSO service needs a copy of the JKS so enter the following command:
copy D:\certs\sso\root-trust.jks D:\certs\sso\server-identity.jks
Automated Certificate Batch File
Below is the batch file that will create the private RSA keys, create CSRs based on the OpenSSL configuration file, get a minted certificate from a MS CA, then create the PFX file with the VMware password, and makes the PEM files needed for the vCenter certificate automation tool. Fully automated!
To successfully execute the script you need the following:
- All certificate directories created
- All OpenSSL configuration files created
- Root CA Only: Export the root CA certificate to root64.cer
- Root and subordinate CA: Export root CA to root64-1.cer and subordinate to root64-2.cer
- Have read and enroll permissions on the Microsoft CA template you want to use
- OpenSSL installed (0.9.8 strongly recommended)
The certreq command is very picky about the format of the CA name and certificate template. See the steps above for screenshots and more details on what to put there. It is not as obvious as it may first appear. The script assumes all certificates were minted from the root CA. Modifications would be needed if an intermediary CA is used.
Depending on the security and delegation in your environment, you may not have the rights to request a certificate from the enterprise CA. If that’s the case, find someone in the organization which does have the proper permissions to run the script below. After you run the script each directory should have the same files as shown below.
Summary
Once you have created all of the certificate files you can proceed to Part 3 if you want to manually install your SSL certificates (not recommended) or skip to Part 4 if you want to use the VMware vCenter certificate automation tool (highly recommended).
vCenter5.1_CertRequest.bat
:: Script to request vCenter 5.1 SSL certificates from a Microsoft CA
:: Modify these variables for your paths and CA information
:: Place your root64-1.cer and root64-1.cer (if using an intermediate CA)
:: in the Cert_Path directory. OpenSSL config files must already exist.
:: Also creates the chain.pem files for the VMware Certificate automation tool
::
:: Written by Derek Seaman, derekseaman.com
::

:: Certificate Authority Template name
Set Cert_Template=VMware-SSL

:: Certificate Authority Name
Set CA_Name=D001DC01\Contoso-D001DC01-CA

:: Path to OpenSSL
set OPENSSL_CONF=c:\OpenSSL\bin\openssl.cfg
Set OpenSSL_BIN=c:\OpenSSL\bin\openssl.exe

:: Path to your vcenter services directory with the config files
Set Cert_Path=D:\certs

:: Do not change anything below here
Set Root_CA_Cert=%Cert_Path%\Root64-1.cer
Set Sub_CA_Cert=%Cert_Path%\Root64-2.cer
Set CA_Chain=%Cert_Path%\Root.cer

if exist %Sub_CA_Cert% (
copy /B  %Sub_CA_Cert% + %Root_CA_Cert% %CA_Chain%
Set CA_Cert_Chain=%CA_Chain%
) Else (
Set CA_Cert_Chain=%Cert_Path%\root64.cer
)

CD /d %Cert_Path%\vcenter
%OpenSSL_BIN%  genrsa 2048 > rui.key
%OpenSSL_BIN%  req -out rui.csr -key rui.key -new -config vcenter.cfg
certreq -submit -q -f -config "%CA_NAME%" -attrib "CertificateTemplate:%Cert_Template%" rui.csr rui.crt
%OpenSSL_BIN%  pkcs12 -export -in rui.crt -inkey rui.key -certfile %CA_Cert_Chain% -name rui -passout pass:testpassword -out rui.pfx
copy /B rui.crt + %CA_Cert_Chain% chain.pem

CD /d %Cert_Path%\Inventory
%OpenSSL_BIN%  genrsa 2048 > rui.key
%OpenSSL_BIN%  req -out rui.csr -key rui.key -new -config inventory.cfg
certreq -submit -f -q -config "%CA_NAME%" -attrib "CertificateTemplate:%Cert_Template%" rui.csr rui.crt
%OpenSSL_BIN%  pkcs12 -export -in rui.crt -inkey rui.key -certfile %CA_Cert_Chain% -name rui -passout pass:testpassword -out rui.pfx

copy /B rui.crt + %CA_Cert_Chain% chain.pem
CD /d %Cert_Path%\SSO
%OpenSSL_BIN%  genrsa 2048 > rui.key
%OpenSSL_BIN%  req -out rui.csr -key rui.key -new -config SSO.cfg
certreq -submit -f -q -config "%CA_NAME%" -attrib "CertificateTemplate:%Cert_Template%" rui.csr rui.crt
%OpenSSL_BIN%  pkcs12 -export -in rui.crt -inkey rui.key -certfile %CA_Cert_Chain% -name rui -passout pass:testpassword -out rui.pfx

copy /B rui.crt + %CA_Cert_Chain% chain.pem
CD /d %Cert_Path%\UpdateManager
%OpenSSL_BIN%  genrsa 2048 > rui.key
%OpenSSL_BIN%  req -out rui.csr -key rui.key -new -config VUM.cfg
certreq -submit -f -q -config "%CA_NAME%" -attrib "CertificateTemplate:%Cert_Template%" rui.csr rui.crt
%OpenSSL_BIN%  pkcs12 -export -in rui.crt -inkey rui.key -certfile %CA_Cert_Chain% -name rui -passout pass:testpassword -out rui.pfx

copy /B rui.crt + %CA_Cert_Chain% chain.pem
CD /d %Cert_Path%\webclient
%OpenSSL_BIN%  genrsa 2048 > rui.key
%OpenSSL_BIN%  req -out rui.csr -key rui.key -new -config webclient.cfg
certreq -submit -f -q -config "%CA_NAME%" -attrib "CertificateTemplate:%Cert_Template%" rui.csr rui.crt
%OpenSSL_BIN%  pkcs12 -export -in rui.crt -inkey rui.key -certfile %CA_Cert_Chain% -name rui -passout pass:testpassword -out rui.pfx

copy /B rui.crt + %CA_Cert_Chain% chain.pem
CD /d %Cert_Path%\LogBrowser
%OpenSSL_BIN%  genrsa 2048 > rui.key
%OpenSSL_BIN%  req -out rui.csr -key rui.key -new -config LogBrowser.cfg

certreq -submit -f -q -config "%CA_NAME%" -attrib "CertificateTemplate:%Cert_Template%" rui.csr rui.crt
%OpenSSL_BIN%  pkcs12 -export -in rui.crt -inkey rui.key -certfile %CA_Cert_Chain% -name rui -passout pass:testpassword -out rui.pfx
copy /B rui.crt + %CA_Cert_Chain% chain.pem
CD /d %Cert_Path%\Orchestrator

%OpenSSL_BIN%  genrsa 2048 > rui.key
%OpenSSL_BIN%  req -out rui.csr -key rui.key -new -config Orchestrator.cfg
certreq -submit -f -q -config "%CA_NAME%" -attrib "CertificateTemplate:%Cert_Template%" rui.csr rui.crt
%OpenSSL_BIN%  pkcs12 -export -in rui.crt -inkey rui.key -certfile %CA_Cert_Chain% -name rui -passout pass:testpassword -out rui.pfx
copy /B rui.crt + %CA_Cert_Chain% chain.pem


Great job
How can i get to Active Directory certificate Service web interface ?
Great article, but no where did this process create a rui.crt file. Did I miss that somewhewre?
Zubrania: If the AD certificate server has the web services installed you go to http://YourCA/certsrv
Jonathon: Had a typo in the article..fixed that. Thanks! rui.crt is actually the certificate you download from the CA (which I had originally called rui.cer).
I figured that out after a while 🙂 Thanks for updating, still a great article.
The SSO configuration files are for the SSO server, so you use the FQDN of your SSO server.
I see you added a batch file to generate the CSRs. I’ll take you a step further. You can use this command below to actually submit the CSR to your MS CA and get back the cert. Saves some copy and paste time. Obviously you need to change the template attribute to match yours. I didnt spend time to figure out how to specify the specific CA, so I get a pop up to ok for each one, but a few quick enters and you’re done.
certreq -submit -attrib “CertificateTemplate:vSphereSSL” rui.csr rui.crt
Tim, thanks for the tip! To specify the CA name you can use:
certreq -submit -config “D001DC01\Contoso-001DC01-CA” -attrib “CertificateTemplate:VMwareSSL” rui.csr rui.crt
Tim,
I added a new batch file at the end of my post based on your command line, but also adding the CA name. Full certificate process is now scripted. Thanks for the input.
hi i’m getting “cannot load VC certificate” for the VC install (vcregtool.log) “Invalid DER-encoded certificate data”
I have the correct BEGIN/END RSA PRIVATE KEY statements.
I have checked my openssl.cnf against your .cfg examples and they are the same (only the names were changed to protect the innocent).
I create my certs on Linux using openssl 0.9.8. These Linux based certs work in all other instances ( even picky progs like Oracle and WebSphere).
I notice in your posts you use 1.0.1c. Any idea how important that is ?
or perhaps have i walked into another trap. I am currently upgrading, in dev, from 4.1 to 5.1. The prod system is 5.0 so my testing may in vain anyway.
H
double clicking on rui.key presents the windows can’t open this file dialog, in notepad though, it appears to be preperly formatted.
the rui.crt file begins with te following. should that get removed ? no other service has needed it so far.
“Certificate:
Data:
Version: 3 (0x2)
Serial Number:
c2:d7:ca:40:6b:62:e7:98
Signature Algorithm: sha512WithRSAEncryption
“
h
No that’s totally the wrong format for a rui.crt file. It should start with “—-BEGIN CERTIFICATE—-” and have nicely formatted base-64 text. And it should easily open in Windows Explorer.
Derek, Thank you for this walk through! When I attempt to run the batch file at the end of your post I am getting a Certificate Request Processor error. “The RPC server is unavaliable. 0x800706ba (win32:1722)” I did download open ssl 64 bit, I’m not sure if this stems from that difference?
Brian, the RPC error would have nothing to do with OpenSSL. That sounds like a firewall issue on the CA.
i was getting the same. Mistake i did was that in the ca name parameter i put domaincaname, whereas it should be cahostnamecaname. After making the change the batch ran successfully.
May I just confirm that the ca_certificates.crt is just the “root” CA certificate. So if there is a root and an 1 intermediate CA, then the C:\ProgramData\VMware\SSL folder will contain the ca_certificates.crt (a copy of the root) and then two hash.0 certificates, one for Root and one for Intermediate. All three files are the same base64 format. There is no need to include a copy of the actual certificate that was generated. Therefore, the folder will contain three files (in a Root + 1 Intermediary CA). Thanks
on your step 7 how to create the vmwaressl cert template?
Oh, this is fun. The hash of the root CA certificate is different in different versions of openssl? If I generate the hash using the version on the VCSA (version 0.9.8j-fips), I get a different value than when I generate the hash using the Windows version of OpenSSL (version 1.0.1c). Is that strange? I can copy it from one to the other and back again, checking the hash each time, and it’s always the same on the VCSA and always the same on the Windows server, but they aren’t the same as each other. I did check for DOS line endings, but there aren’t any.
Oh, I figured it out. There are two different hashing mechanisms. In the newer version of openssl, need to use -subject_hash_old to get the same hash as the version of openssl on the VCSA.
Hi, this walkthrough is very helpfull!
I’m unable to automate fully the certificates creation. When I use the certreq command, it doesn’t create the rui.crt file. It only submits it to the pending requests.
I’m not sure, but I think it’s because I don’t have a Template Name (I don’t know how to have one)
Ya you need to use a template name. “WebServer” may work, but I wrote an article here how to create a new template:
https://www.derekseaman.com/2012/09/create-vmware-windows-ca-certificate.html
Hi Derek, in step #15 you’ve said ” Repeat the hashing process for any intermediary CAs, such that the full certificate chain has a set of files named with their hash value. “
Can you please clarify that for us please … for example:
1. for all those certificates we created (Inventory, SSO, VCenter) we should copies of certificates with names from hash values?
2. Should we place those “hashvalue.0” in directories like “C:\ProgramData\VMware\SingleSignOn\SSL” or in a SSL root directory “C:\ProgramData\VMware\SSL”
3. In directories like this one “”C:\ProgramData\VMware\SingleSignOn\SSL” should we place both “ruii.crt” and “hashvalue.0” certs or only one if only one which one?
Thank you very much!
Dejan, No you don’t need to place hash files for the service certificates. The hashvalue.0 files are only needed in one directory, the one called out in the installation steps. The service SSL directories should have the rui.crt, rui.key and rui.pfx files.
Hi,
Thanks for this guide. I’m working through it slowly. A quick question regarding the hash file. I changed the root64.cer to the hash value with .0 at the end. but it still shows as a certificate file, where as your screenshot shows it as a white icon… Is this OK, if not can you please advise how to solve it?
Thank you
H
@H Limbada: Explorer is probably hiding the file extensions. Make sure file extensions are not hidden. You could also open a command prompt and look at the directory listings to ensure it ends in .0.
Hi,
This has been a great help!!! I have found an issue with Step 14. When using OpenSSL 0.98x, the following x509 command option “-subject_hash_old” will display an error. After installing OpenSSL 1.0.1c the command stated in step 14 worked properly.
Thanks, Greg
Hi
When I type
c:\OpenSSL-Win32\bin\openssl.exe genrsa 2048 > rui.key
I get the following prompt:
WARNING: can’t open config file: /usr/local/ssl/openssl.cnf
Loading ‘screen’ into random state – done
Generate RSA private key, 2048 bit long modulus
……………………………..+++
is 65537 (0x10001)
When I open the rui.key it does start correctly as indicated above. My concern is that it is trying to access some linux directory even though I’m on Server 2012.
I’ve installed the 2008 C++ Redistributable package & OpenSSL 32-Bit Lib.
Is the rui.key still workable with?
Thanks, but unfortunately it does help so much :
C:\OpenSSL-Win32\Certs\Inventory>c:\OpenSSL-Win32\bin\openssl.exe req -out rui.c
sr -key rui.key -new -config inventory.cfg
error on line -1 of inventory.cfg
2172:error:02001002:system library:fopen:No such file or directory:.\crypto\bio\
bss_file.c:169:fopen(‘inventory.cfg’,’rb’)
2172:error:2006D080:BIO routines:BIO_new_file:no such file:.\crypto\bio\bss_file
.c:172:
2172:error:0E078072:configuration file routines:DEF_LOAD:no such file:.\crypto\c
onf\conf_def.c:197:
Any other idea ?
Hi Derek, Great Article, I’m trying to replace the certificates, had no problem with 4.1 but hell this is a completely different cake….. We also have a root ca with 2 intermediate ca’s and after using the new certificates (hash.0 files created), etc…. the SSO server always stops when starting the service. DO you have some settings on how I can increase logging to find out where the certificate is failing. Would be nice to see what kind of error is causing the issue. invalid chain, missing attribute, etcc.. thx for the good work. Pascal
Hi Derek,
I’ve been reading your SSL steps in parallel to VMwares’ KB….
Could you just confirm whether your CA was a single root CA or whether your cachain.p7b ended up displaying several Subordinate CAs?
My current cachain.p7b shows the RootCA and 2 Subordinates (or intermediates).
Your steps were not clear what to do with these subordinates and after some reading around I noticed that VMware’s KB (2037432) does actually state the following:
“This assumes there are no intermediate certificates in the Certificate Authority. If there are two or more levels in the Certificate Authorities, before exporting the certificate into Base-64 encoded X.509 (.CER) if you have multiple certificates on the p7b file, you won’t be able to export them to Base64 at the same time. Instead you will have to export them one by one. For example, create files C:\certs\Root64-1.cer and C:\certs\Root64-2.cer etc. You can then concatenate the two files into one, which can be done from the Windows command prompt:
C:\certs>more Root64-1.cer > Root64.cer
C:\certs>more Root64-2.cer >> Root64.cer”
I can only guess that this is how VMware deals with subordinate/intermediate CAs……
currently generating the Root64.cer using VMware’s method…. guess I’ll update you with regards to whether it works or not! =)
It seems this way of concatenating the intermediate certs seems to work….. =)
Here’s a gotcha relating to steps 12 – 14 in a scenario where there are intermediate CAs in a CA chain. Starting with a pkcs7 (.p7b) file containing the certificate chain, the command “openssl pkcs7 -inform DER -in myChain.p7b -print_certs > ca_certificates.crt” will create a file with all the certificates in the chain in PEM format. This appears to be ok until you get to the very end of this long installation process (post #14) and find that the log browser service still doesn’t work after fixing up its CA chain. It turns out that the above openssl command puts comments in the output file: lines listing the subject and issuer of each certificate. This causes the log browser to consider the file invalid as indicated in its log. See C:\Program Files\VMware\Infrastructure\vSphereWebClient\logbrowser\log\com.vmware.vide.ws.product-yyyy-mm.i.log. Removing the comments and restarting makes the log browser happy but wipes out any previous configuration done in vCenter. Ouch.
If you also download the individual CA certificates in DER format (Microsoft .cer), the command “openssl x509 -inform DER -in myCACert1.cer -outform PEM -out myCACert1.pem” will create the required PEM file without the comments. The PEM files for all of the certificates in the CA chain can then be concatenated to create a correctly formateed ca_certificates.crt.
Hello Derek,
Followed entire steps mentioned by you. vCenter Installation was successful. However after rebooting the VC VM, VMWare VirtualCenter Management Webservices is not starting. VMWare VirtualCenter Server is however started. Please let me know your thoughts.
Thanks,
Abhi
hello abhi,
have you got an answer for this problem because i have exactly the same problem
thanks and best regards
Hi Derek,
Thanks for pulling these information together in this incredible blog.
I am trying to replace the SSL certificates on a vCenter 5.1 virtual appliance with ones signed by my Windows Enterprise CA. I have done everything up to step 12. However I am not sure where to find the equivalent of “C:\ProgramData\VMware\” directory on Linux?
Could you please give me some pointers on that? And do you know if indeed this procedure will work for the virtual appliance?
Thanks in advance.
Last week I replaced my six vCenter SSL certificates in the course of a tech support case with VMware. I had initially prestaged the certificates based on this series of blog posts. To replace the certificates, I followed VMware’s instructions starting at http://kb.vmware.com/kb/2034833. In the first part of the “resolution path” at http://kb.vmware.com/kb/2037432, the OpenSSL configurations for creating the certificate requests are described in steps 3 – 9. Take note in particular of the subjectAltName configurations, where VMware recommends including “DNS:ServerIPAddress”. I questioned the support technician about this, since including IP addresses as subject alternative names is both unusual and not recommended. Beyond this, all new certificates would be required with a change in the vCenter server’s IP address. Furthermore, the OpenSSL documentation states that the specification should read “IP:ServerIPAddress” rather than “DNS:ServerIPAddress”. VMware tech support stuck with the recommendations in their documentation. Although I did not attempt to escalate this question, I believe their thinking around this is fuzzy. They did say that omitting the IP address in the subject alternative name would not break vCenter functionality, but might result in a warning message during installation. I intend when time permits to create another new set of certificates without the IP address in the subject alternative name, but have not yet done so.
@Jeffry: Thanks for the information on the IP address. I also questioned VMware about that, since it is quite unusual. The information I got back mirrored what you said. Not a hard requirement, but some vCenter components may access servers via IP address and thus may get some certificate warnings. VMware should update the software to only use FQDNs for accessing secure services, IMHO.
@Jeffry: VMware updated their SSL cert whitepaper, and have “IP” field for the SAN. http://www.vmware.com/files/pdf/techpaper/vsp_51_vcserver_esxi_certificates.pdf
I’m part way through testing new certificates without the IP addresses in their Subject Alternative Names. With regard to creation of the PKCS12 files in step 10 above, the friendly names really have to be “rui”, i.e. “-name rui”. I had been using mnemonic friendly names for each of the six certificates, and I found that in this case the VMware vSphere Profile-Driven Storage Service won’t run after the new vCenter Server certificate is put in place. When started, it stops after about 7 seconds with the completely unhelpful service specific error “Incorrect function” in the Windows System event log. The only symptom of this is the lack of data in the Storage Views tab in the vSphere client. There may be other issues, but rather than proceeding further, I’m going to regenerate all the PKCS12 files using the friendly name “rui” and start over.
@Simon: The OU property must be unique for each of the certificates. GoDaddy may not support a custom OU property field. I would contact their SSL certificate support staff and ask them.
@Derek, I have asked them, they say no public CA can do this with a internal FQDN.
Answer from GoDaddy Support: “The OU portion of the request gets stripped from the request on our end. The domain control validated is inserted by the server. The OU field should have no bearing on whether the SSL works or not, the server should only be looking at the common name field.”
I’m now installing the vCenter anyways with your manual, hopefully it works.
@Simon: Ya clearly GoDaddy doesn’t know vCenter depends on the OU field.
@Derek, the installation is failed an I get the error “Failed to connect to VMware Lookup Service https://vcenter.intern.company.local:7444/lookupservice/sdk – SSL certificate verification failed.”
I’m now in contact with VMware – maybe they have a solution. But I think the problem is GoDaddy. I have asked them if it’s possible to generate Certs with the OU that we need for vCenter.
I’ll keep you up to date.
Derek,
Question for you.
We created all of these custom .cfg on each folder.
Do we need to point the OpenSSL to those individual cfg prior to do step 4?
Because if we do, we need to do:
set OPENSSL_CONF=c:\Certs\[vCenter Components Folder]\[Custom File name].cfg
or we can just use the default, openssl.cfg located on the bin directory?
Hi Derek,For some reason I kept getting error when I issued command:openssl.exe req -out rui.csr -key rui.key -new -config sso.cfgIt stated:Loading ‘screen’ into random state – doneproblems making Certificate Request4040:error:0D06407A:asn1 encoding routines:a2d_ASN1_OBJECT:first num too large:.cryptoasn1a_object.c:109:4040:error:0B083077:x509 certificate routines:X509_NAME_ENTRY_create_by_txt:invalid field name:.cryptox509x509name.c:285:name=countryName_defaultI have tried using OpenSSL 0.9.8. (32 and 64-bit) and also OpenSSL 1.0 (32 and 64-bit)Do you by any chance know what’s going on there?I’m stuck right now.Thanks!!
@iamxCPx: The country name must only be two characters (e.g. US or NZ).
I did. 🙂
[ req_distinguished_name ]
countryName = US
countryName_default = AU
countryName_min = 2
countryName_max = 2
stateOrProvinceName = CO
stateOrProvinceName_default = Some-State
etc…
I tried the VMware KB and it was the same thing.
This has driving me insane. Lol.
Been spending time on this for a good 4+ hours trying to make sure I didn’t misspelled anything and I didn’t.
I ended up opening a case with VMware. Hopefully they know what’s up.
Just want to give an update.
I finally has finished setting up the SSL on vCenter, vCenter SSO, vCenter Inventory Service that lives on a separate VM.
It took about 8 hours with VMware support on the line trying to go through their KB one by one.
The lesson I learned from this that I can share with everyone:
1. FOLLOW Derek recommendation above to “Pre-Staging” your SSL certificates. 🙂
2. The VMware KB is not designed for SSO and Inventory Service to live in a different servers. There are too many miss-typed or reference too. I have concluded that those instructions are for people that installed those components in one vCenter Server.
3. If you can live with it, install all vCenter components in one VM servers and beef it up. Splitting them up is a nightmare. VMware Engineer that helped me from Europe after the one in India finished their shift, agreed with me. He has helped many customers with the same problem as mine. He said they will fix it on VMware 6.0, it will be easier in regards to SSL.
Hope that helps.
Cheers!
Hey @IamxCPx,
I ran into this issue as well with a new vCenter install in my lab recently. I went through my .cfg file and couldn’t find ANY variations with what Derek had. To be on the safe side, I recreated my .cfg files. Not sure what the problem was (I couldn’t find an errant character in the cfg files) but starting over with new .cfg files resolved the problem for me.
I had the same thing… One of the KB articles or blogs (I've had multiple ones open) had me using Wordpad to copy and paste some things in and out of to generate the cfg files. Unfortunately, it was capitalizing the 'C' in country…which OpenSSL did NOT appreciate. So whatever you do, use Notepad, Notepad++, or whatever.
VMware's instructions also indicate using only two characters for even the stateOrProvinceName…in my case 'NH' instead of 'New Hampshire'.
@iamxcpx: No, the steps in the blog are complete. No need to set a variable.
Nicely done. This will help me tremendously. I do have to say that VMware simplicity is gone. This makes me want to rip out VM and use one of their competitors. I honestly don’t have the time for this kind of setup. I can only imagine the problems associated with this configuration when things go wrong.
Hi Derek,
I have to say Fantastic post. Keep up the good work.
I’m having some issues with the keystore part. I get the following output:
“C:\Program Files\VMware\Infrastructure\jre\bin\keytool.exe” -v -importcert
-keystore D:\Install\certs\testvcc01\sso\root-trust.jks -deststoretype JKS -stor
epass testpassword -keypass testpassword -file D:\Install\certs\testvcc01\Root64
-1.cer -alias root-ca
keytool error: java.security.NoSuchAlgorithmException: 1.2.840.113549.1.1.10 Sig
nature not available
java.security.NoSuchAlgorithmException: 1.2.840.113549.1.1.10 Signature not avai
lable
at java.security.Signature.getInstance(Signature.java:193)
at sun.security.x509.X509CertImpl.verify(X509CertImpl.java:431)
at sun.security.x509.X509CertImpl.verify(X509CertImpl.java:389)
at sun.security.tools.KeyTool.addTrustedCert(KeyTool.java:1919)
at sun.security.tools.KeyTool.doCommands(KeyTool.java:818)
at sun.security.tools.KeyTool.run(KeyTool.java:172)
at sun.security.tools.KeyTool.main(KeyTool.java:166)
Any ideas?
Thanks.
Regards,
Arif
Hi Derek, first of all great thanks for your blog, it’s amazing!
When try to install vcenter server i get this error
“Setup Failed to validate vmware vCenter inventory service, error occurred while talking to the vcenter single sign on admin service”
In vminst.log i get
ThumbprintTrustManager] Server certificate chain is not trusted
Maybe i was little beat confused about directory c:\programdata\VMware\SSL
actualy, follow your doc, it contains ca_certificates.crt that is the copy of root64.cer that is certificate from enterprise domain CA without any intermediate ca, and another file tha is hashvalue.0 compute fro root64.cer with openssl last version with command _hash_old like you suggest on your blog
where i get a mistake?
Many thanks
Hi,
VMware's KB2037432 seems to mention that the DN has to be unique and that by changing OU that's how they achieve unique certificates, has anyone tried or had sucess changing the CN instead for each services using aliases to get unique certs? I wanna try getting my certs from Entrust and it will only accept one OU.
When we run the "certreq -submit…" command in the batch file, we get the error "Certificate Request Processor: Class not registered 0x80040154" . It does create the rui.cer and the rui.key file. The vCenter server is Win 2008 R2 x64 as is the MS CA. Any idea what would be causing this?
I figured out the answer to my earlier question about getting the "‘class not registered’ 0x80040154" error when running the certreq command. The problem is that when you transferred to the new Web site, it seemed to 'eat' all the backslashes. In your post, it wasn't clear that the parameter for the 'CA_Name' is the short server name the CA name. So it should be [ -config “D001DC01Contoso-D001DC01-CA” ]. Your work is amazing though. I really appreciate these posts.
Yes, the import process removed all backslashes. I’m slowly putting them back..but missed that one. Thanks!
Thank you for a life saving post.
I found if exclusivley using OpenSSL for cert creation and signing (not Microsoft), then my CFG files needed to add " x509_extensions = usr_cert" under the "[ req ]" section, and popultae "[ user_cert ]" details with those duplicated from the "[ v3_req ]" entries in the respecive CFG files. This then gave me the correct SSL cert as per your screenshots above.
The command I used within the respective directories (with the now modified CFG files) were
— C:OpenSSL-Win32-0_9_8ybinopenssl.exe genrsa 2048 > rui.key
— C:OpenSSL-Win32-0_9_8ybinopenssl.exe req -out rui.csr -key rui.key -new -config vCenter.cfg
— C:OpenSSL-Win32-0_9_8ybinopenssl.exe x509 -req -sha1 -days 3650 -CA Root64.cer -CAkey Root64.key -CAserial serial -extfile vCenter.cfg -extensions usr_cert -in rui.csr -out rui.crt
I of course had the CA root cert and key in the folder, and also the serial file … which I got from OpenSSL when I created my original CA cert
So the CFG file would look like this
[ req ]
<as per your file>
x509_extensions = usr_cert
[ v3_req ]
<as per your file>
[ usr_cert ]
<as per v3_req above>
[ req_distinguished_name ]
<as per your file>
Can we skip this part and keep the self signed certs?
Maybe this is in the comments somewhere already, but I will post anyway hoping this helps someone else out… I had a hell of a time trying to issue certs via scripting. If you are having problems with RPC server unavailable, try the following!
instead of using:
:: Certificate Authority Name
Set CA_Name=D001DC01Contoso-D001DC01-CA
Try using this instead (use full FQDN of server hosting the CA)
Set CA_Name=D001DC01.contoso.netContsoo-D001DC01-CA
———————-
The REAL test is verifying whatever pings properly with the following command:
certutil -ping -config <insert CA name here>
Maybe Derek's formatting will work for some, but mine only worked when I did FQDN of the server hosting my CA… hope this helps SOMEONE!
Thanks for another wonderful article…to which I found my way over from your using SSL Automation Tool article.
I just went through my personal SSL-hell. Couple of points/questions I thought I'd throw out.
1. DO NOT let your certs expire otherwise, you cannot use the SSL Automation Tool. One of the VMware engineers I spoke with indicated everything will be fine even if the certs expire…it wasn't entirely accurate. Everything stayed running, but had to uninstall ALL my vCenter components and reinstall them…while also whacking the entire SSO database and setting that up again.
2. I know setting up the VMware-SSL CA template has you enable BOTH serverAuth and clientAuth for key usage… is there a reason the CFG files do not call for you to use that? VMware had me adjust my cfg files as in line thirteen: extendedKeyUsage = serverAuth, clientAuth
For my vSphere 5.5 Toolkit I've included both ServerAuth and ClientAuth parameters in the certificate generation process.