A few weeks ago I wrote a blog post on how to track who’s in each room of your house using Home Assistant and the Bermuda BLE Trilateration add-on. As part of that project, I vibe coded a Bluetooth IRK Capture tool and released it on Github. Grabbing your phone or watch Bluetooth IRK is needed to accurately track your room-level presence.
This post goes into a bit more depth than the usage instructions on my Github IRK Capture page. In this post I cover the various options to install my IRK capture tool, and then how to use it with your Apple devices and Android phones/watches.
If you are interested in the complete blog post for how to do room-level presence detection in Home Assistant check out my post Home Assistant: Track Who’s in Each Room with ESPHome + Bermuda BLE.
Please take note that while your ESP32 device is running the IRK Capture package it can NOT act as a Bluetooth proxy. You would need to re-flash your ESP32 to a ‘base’ ESPHome image that has the Bluetooth proxy feature enabled. Personally, I have a dedicated ESP32 sitting on the shelf that I pull out as needed to capture IRKs.
My IRK Capture package has been successfully tested with Apple iPhones, iPads and watches with the ’26 OS family. I also used a Samsung Galaxy S25+ and Galaxy Watch8 Classic. It also uses the ESP-IDF framework, which should enable this package to run on any ESP32 that has Bluetooth and is supported by ESPHome. I’ve personally used a C3, C6 and basic ESP32.
Installing ESPHome Device Builder
Before we get started capturing Bluetooth IRKs, we need to install the ESPHome Device Builder in Home Assistant. Thankfully this is quick and painless.
- Login to Home Assistant and go to Settings.
- Click on Add-ons.
- In the lower right click on Add-on store.
- Search for “ESP” and click on “ESPHome Device Builder” (not the dev/beta versions).
- Follow the prompts to install it.
IRK Capture Package Install Options
In this blog post I’ll cover two methods for deploying my IRK capture package on your ESP32 device. On my Github page I have a third option, which is a single (large) YAML file that you can use. That’s more advanced, so I left that out of this post. The two options below are the easiest.
Option 1 (Recommended): This option pulls the configuration YAML and IRK Capture components live from Github when you compile the code. This requires no mucking with the Home Assistant filesystem, and is the quickest deployment method. In addition, whenever I update the Github repo, rebuilding the firmware will always grab the latest version. All you need is about 24 lines of YAML which I provide in a template form. Just change a few variables and you are ready to flash.
Option 2 (Advanced): This option directs you to download all of the configuration YAML locally to your Home Assistant installation. You will need Home Assistant filesystem access, such as via Studio Code Server. The IRK Capture component is still downloaded at build time from Github. Should any future revisions change the YAML, you will need to manually update the files. This is only for advanced users that wish to customize the accompanying YAML.
Note: If you use either the Seeed ESP32-C3 or Seeed ESP32-C6, I’ve built dedicated IRK capture YAML files. You can find those IRK YAML files in my repos: ESPHome-Seeed-Xiao-ESP32-c3-Config and ESPHome-Seeed-Xiao-ESP32-C6-Config. These can be easily used with Option 2 as drop-in replacement files.
Option 1: Remote ESPHome Device Builder Package
This is the simplest installation method, and is my recommended method for most users. It pulls all components directly from my public GitHub repo without requiring any local file downloads or modifying files in the Home Assistant configuration directory. This only needs about 24 lines of YAML from my template in ESPHome device builder. By using this configuration whenever you rebuild the firmware it will automatically pull any updates I’ve made on Github.
- Go to ESPHome Builder and in the lower right click on NEW DEVICE.
- Select New Device Setup.
- Enter the desired name of your ESP32 device (e.g. IRK Capture) and click NEXT.

4. Click SKIP THIS STEP.
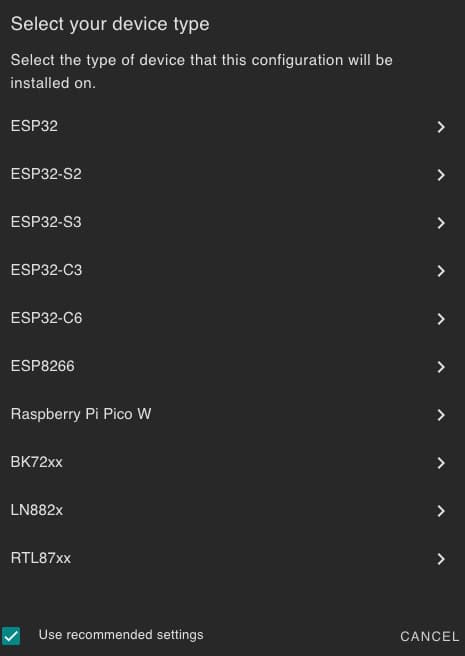
5. From the list of device types, select the one that most closely matches the ESP32 device you want to flash with this tool.
6. On the Configuration created window click SKIP.
7. In ESPHome click Edit on the new device.
8. Copy the API and OTA encryption keys plus the “board” type to a safe place, such as your clipboard history.
9. Delete ALL of the contents in the device editor.
10. Copy the contents of my irk-capture-device-remote.yaml file from Github and paste it into your blank ESPHome device configuration window.
11. Paste the API and OTA values from your clipboard into their respective fields.
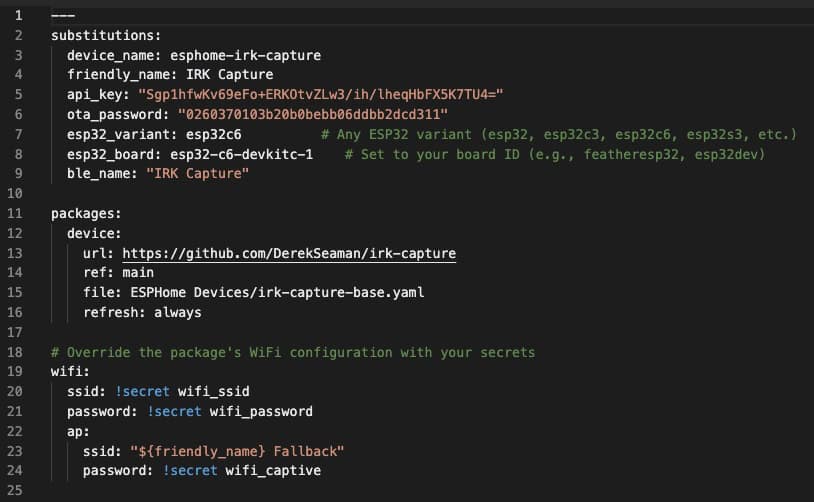
12. Change the esp32_board variable to that of the ESP32 device you are flashing (use the clipboard value unless you know what you are doing).
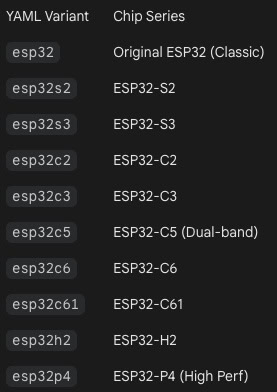
13. The esp32_variant variable must match the same chipset type as your ‘board’. Refer to the table below for the valid variant values (as of January 2026).
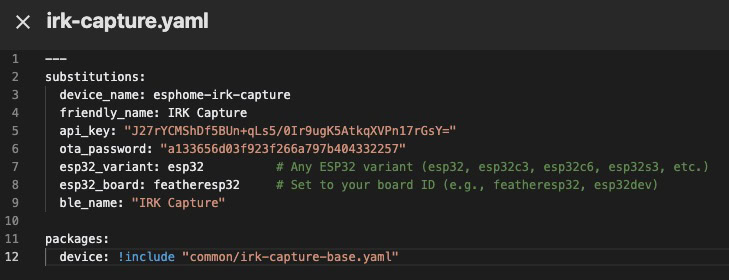
14. Your finished ESPHome device configuration file should look similar to the image below.
15. Save your YAML configuration. Click the “X” to close the device window.
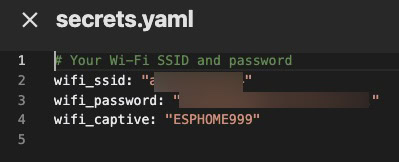
16. On the ESPHome landing page click on SECRETS in the upper right. Modify the Wi-Fi secrets as needed to connect to your SSID.
17. Locate your ESP32 IRK device on the ESPHome landing page. Click on the three dots and select Validate.
18. Verify that the configuration is valid. If not, modify as needed to fix any errors.

19. Using Chrome, Microsoft Edge or Brave (or another browser that supports serial device connections via the browser) go to the ESPHome Device builder landing page in Home Assistant. Plug your ESP32 device via USB into your local computer.
20. Click on the three dots for your ESP32 device on the ESPHome device landing page and select Install.
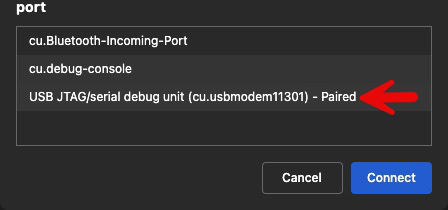
21. Select Plug into this computer. Select the serial port that looks like your ESP32 device. Depending on browser and OS, it may or may not be entirely obvious. If it’s not listed, click Cancel and follow the guide to download the appropriate drivers for your OS. On macOS Tahoe I didn’t have to install any drivers for a base ESP32, C3 or C6.
22. Wait for the flashing process to complete.
23. IMPORTANT: After the flashing is complete, either power cycle your ESP32 or do a ‘Restart Device‘ from the ESPHome device interface. This will randomize the BLE MAC address.
Option 2: Local ESPHome Device Builder Package
This installation method has you download all of the needed YAML configuration files locally to your Home Assistant installation. When you build the firmware only the IRK Capture package code is downloaded from Github. This is more for advanced users, and could require manual file updates for future updates.
- Go to ESPHome Builder and in the lower right click on NEW DEVICE. Click CONTINUE.
- Select New Device Setup.
- Enter the desired name of your ESP32 device (e.g. IRK Capture).
4. Click NEXT.
5. From the list of device types, select the one that most closely matches the ESP32 device you want to flash with this tool.
6. On the Configuration created window click SKIP.
7. In ESPHome click Edit on the new device.
8. Copy the API and OTA encryption keys plus the “board” type to a safe place, such as your clipboard history.
9. Delete ALL of the contents in the device editor.
10. Copy the contents of my irk-capture-device.yaml file from Github and paste it into your blank ESPHome device configuration window.
11. Paste the API and OTA values from your clipboard into their respective fields.
12. Change the esp32_board variable to that of the ESP32 device you are flashing (use the clipboard value unless you know what you are doing).
13. The esp32_variant variable must match the same chipset type as your ‘board’. Refer to the table below for the valid variant values.
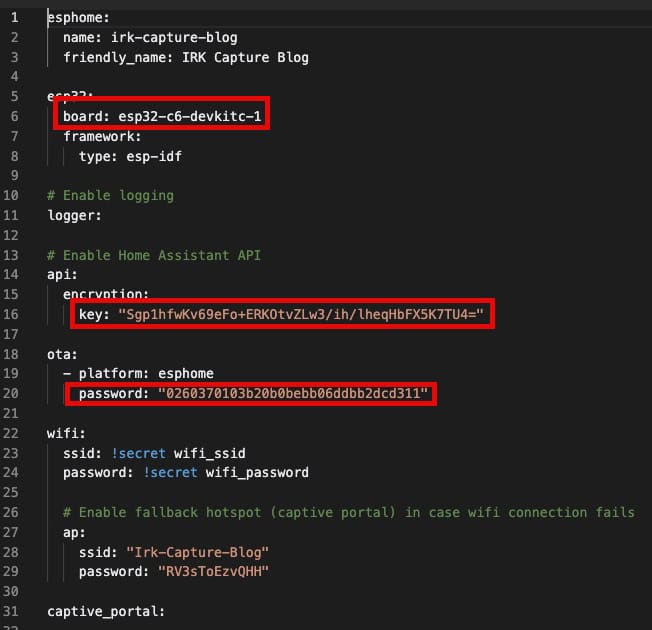
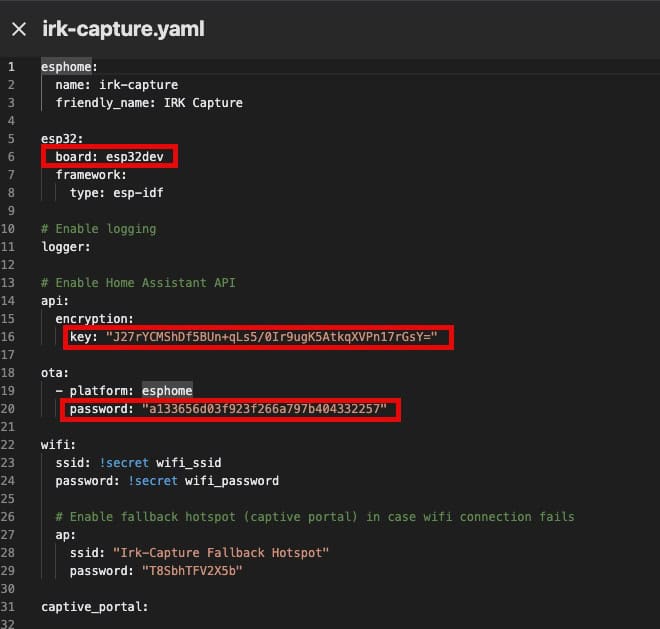
14. Your finished ESPHome device configuration file should look similar to the image below:
15. Save your YAML configuration. Click the “X” to close the device window.
16. On the ESPHome landing page click on SECRETS in the upper right. Modify the Wi-Fi secrets as needed to connect to your SSID.
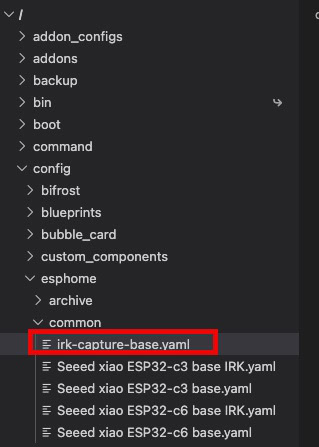
17. On my Github repo download the irk-capture-base.yaml file to your PC. Using the tool of your choice (such as Studio Code Server), locate the /config/esphome/common directory in the Home Assistant filesystem. Create the ‘common‘ directory if it doesn’t already exist. Copy the irk-capture-base.yaml file to the common directory.
18. Locate your ESP32 IRK device on the ESPHome landing page. Click on the three dots and select Validate.
19. Verify that the configuration is valid. If not, modify as needed to fix any errors.
20. Using Chrome, Microsoft Edge or Brave (or another browser that supports serial device connections via the browser) go to the ESPHome Device builder landing page in Home Assistant. Plug your ESP32 device via USB into your local computer.
21. Click on the three dots for your ESP32 device on the ESPHome device landing page and select Install.
22. Select Plug into this computer. Select the serial port that looks like your ESP32 device. Depending on browser and OS, it may or may not be entirely obvious. If it’s not listed, click Cancel and follow the guide to download the appropriate drivers for your OS. On macOS Tahoe I didn’t have to install any drivers for a base ESP32, C3 or C6.
23. Wait for the flashing process to complete.
24. IMPORTANT: After the flashing is complete, either power cycle your ESP32 or do a ‘Restart Device‘ from the ESPHome device interface. This will randomize the BLE MAC address.
Using the IRK Capture Package
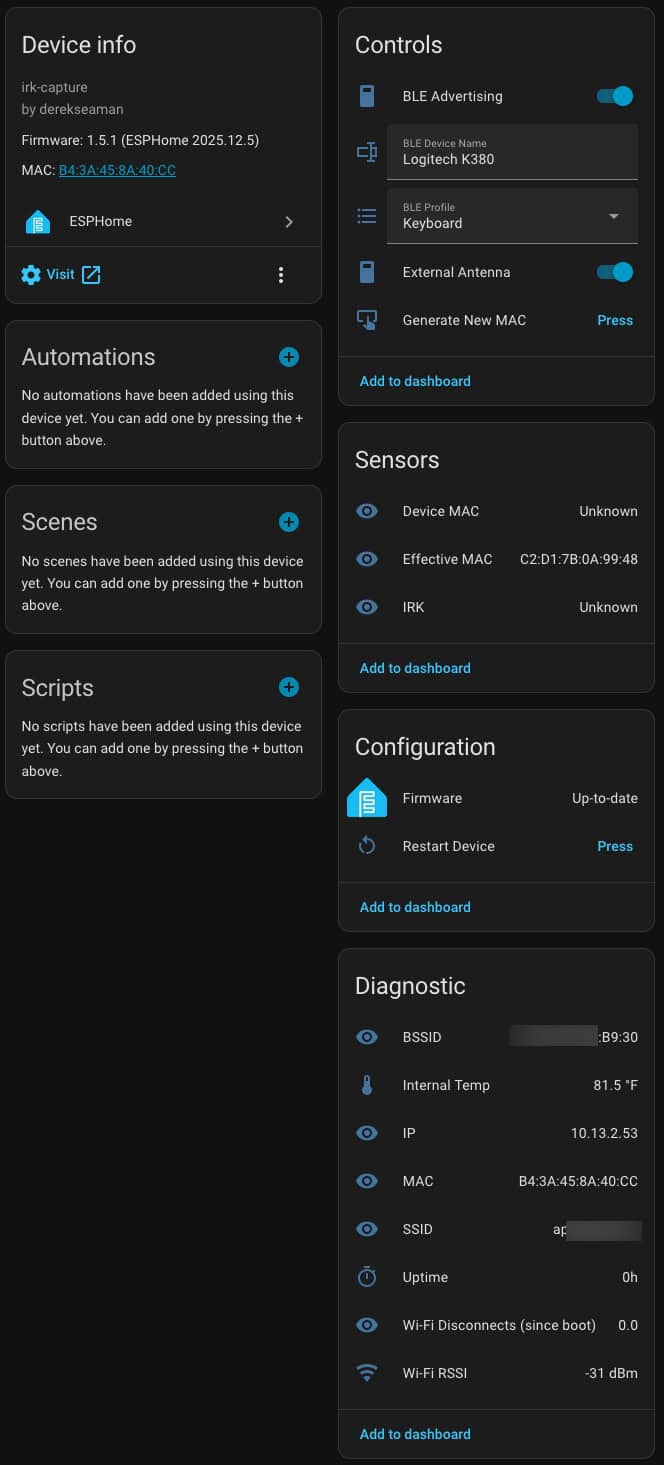
In Home Assistant go to Settings -> Devices & Service -> ESPHome. Your new ESP32 IRK Capture device should be available to add. After it’s added, click on it from the list of ESP32 devices. When you open the device you should see a screen similar to the one below.
Depending on the device you want to capture the IRK from, the process varies. In this post I’ll cover Apple devices, Android phones and (some) Android watches.
IRK Capture Logs
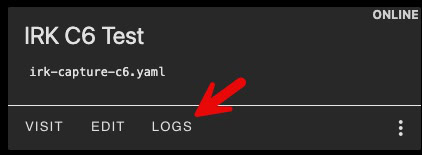
If you run into issues capturing your IRK, you can review the IRK Capture logs for more information. To see the live logs open ESPHome Builder in Home Assistant. Find your IRK Capture device and click on Logs. I prefer connecting wirelessly. Towards the bottom of the logs you should see some details about the IRK Capture configuration.
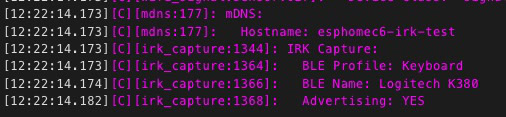
Verify near the bottom you see Advertising: YES. This means your ESP32 is now ready to capture Bluetooth IRKs.
Apple Devices (iPhone, Watch, iPad)
- Ensure the “Heart Sensor” profile is selected in the BLE Profile drop down on the ESPHome device page. If it’s not selected, select Heart Sensor and wait 20-30 seconds for the ESP32 to reboot. After the reboot the Effective MAC will change.
- Open Bluetooth settings on your Apple device and look for the advertised device. The default name is “IRK Capture“.
- Tap on the device name to pair. Depending on the device/OS, pairing may not complete or show as not connected. This can be normal
- To view the captured IRK check the ESP32 logs in ESPHome Device Builder or view the “IRK” text sensor in Home Assistant. The IRK will be in format:
xxxxxxxxxxxxxxxxxxxxxxxxxxxxxxxx

5. Important: Forget or unpair the “IRK Capture” device (or whatever name you used).
6. If you need to capture IRKs from multiple devices, I suggest a ‘Restart Device‘ (or full power cycle of your ESP32) between each capture to avoid potential issues. Wait about 30 seconds for the ESP32 to reboot. The Effective MAC will change after each restart.
Android Phones
- Ensure the “Keyboard” profile is selected in the BLE Profile drop down on the ESPHome device page. If it’s not selected, select Keyboard and wait 20-30 seconds for the ESP32 to reboot. The Effective MAC will change after the restart.
- Open Bluetooth settings on your Android phone and look for “Logitech K380“.
- Tap on the device name to pair. Depending on the device/OS, pairing may not complete or show as not connected. This can be normal
- To view the captured IRK check the ESP32 logs in ESPHome Device Builder or view the “IRK” text sensor in Home Assistant. The IRK will be in format:
xxxxxxxxxxxxxxxxxxxxxxxxxxxxxxxx
5. Important: Forget or unpair the “IRK Capture” device (or whatever name you used).
6. If you need to capture IRKs from multiple devices, I suggest a ‘Restart Device‘ (or full power cycle of your ESP32) between each capture to avoid potential issues. Wait about 30 seconds for the ESP32 to reboot.
Android Watches
Android watches can be a tough nut to crack, as some need ‘reverse’ pairing, which my module does not support. By reverse pairing I mean that your ESP32 device would need to accept a pairing request from your Android watch. This is ‘backwards’ from how most devices pair and is unsupported by my package.
- Install the app “Gear Tracker II“ on your Android watch.
- Ensure the “Heart Sensor” profile is selected in the BLE Profile drop down on the ESPHome device page. If it’s not listed, select it and wait 20-30 seconds for the ESP32 to reboot. The Effective MAC will change after the reboot.
- Open the Gear Tracker II app on your watch and pair it to the advertised ESP32 device name (IRK Capture).
- To view the captured IRK check the ESP32 logs in ESPHome Device Builder or view the “IRK” text sensor in Home Assistant. The IRK will be in format:
xxxxxxxxxxxxxxxxxxxxxxxxxxxxxxxx - Important: Forget or unpair the “IRK Capture” device (or whatever name you used).
- If you need to capture IRKs from multiple devices, I suggest a ‘Restart Device‘ (or full power cycle of your ESP32) between each capture to avoid potential issues.
Troubleshooting Tips
If you run into issues capturing your IRKs, surf over to my IRK Capture for ESPHome page on Github and scroll to the bottom for advanced troubleshooting tips. If all else fails and you can’t get it to work, you can open an Issue on my Github page.
Home Assistant Private BLE Integration
In order to use the captured IRK within Home Assistant, you need to use the Private BLE Device integration.
- In Home Assistant go to Settings -> Devices & services.
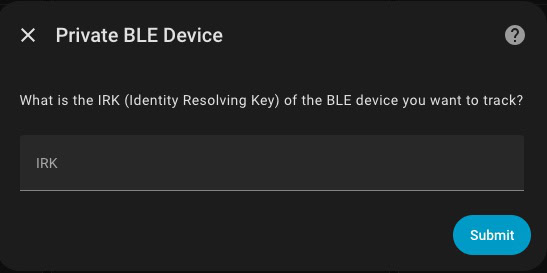
- Click on Add integration and search for Private BLE Device. Click on it then paste in your captured IRK.
3. If you are using packages like Bermuda BLE Trilateration, your device will now show up as available.
Summary
If you are familiar with ESPHome, then using my IRK Capture package should be fairly straight forward. If you are brand new to ESPHome and flashing ESP32 devices, there is a minor learning curve. But hopefully this post, along with my Github repo, will enable you to capture your Bluetooth IRKs so that you can do room-level presence detection with Home Assistant.


