This post covers my vibe coding experience to create an open source ESPHome Bluetooth IRK (Identity Resolving Key) capture tool. Many modern smart devices—including iPhones and Apple Watches—use Bluetooth Resolvable Private Addresses (RPA) to protect your privacy. Instead of broadcasting a fixed Bluetooth address that could be used to track you, these devices constantly change their MAC address.
While great for privacy, this makes home presence detection challenging. The solution is Private BLE Device tracking in Home Assistant. By obtaining your device’s Identity Resolving Key (IRK), Home Assistant can identify which rotating addresses belong to your device, enabling reliable presence detection at home without compromising your privacy protection elsewhere. Your device’s IRK can be used in combination with Bermuda BLE Trilateration for room-level presence detection. You can see a whole blog post on how that works: Home Assistant: Track Who’s in Each Room with ESPHome + Bermuda BLE.
Vibe Coding my ESPHome C++ Project
A few months ago I used Visual Studio Code and Claude CLI to write a couple of Shell scripts to accompany a blog post on Synology iSCSI LUN creation for Proxmox Backup Server. That was a simple project which turned out really well, and saved me a bunch of time.
With a bit of VS Code + Claude experience under my belt, I was determined to make a production quality Bluetooth IRK capture package for ESPHome. After a few days of spending quality time with Claude, ChatGPT 5 Codex, and Gemini 3, I’m very happy with the results.
My Vibe Coding Starting Point
A few days before I started my project, I found through Reddit a proof of concept ESPHome package based on the Arduino framework that could capture Bluetooth IRKs. However, I wanted to use the ESP-IDF framework for broader compatibility and use with my Seeed ESP32-C6 devices. I forked Kyle’s project, and went to town with AI to completely rebuild it and try to make it production ready code with excellent documentation.
At first I tried to use Claude CLI to convert the code from using the Arduino framework to ESP-IDF with NimBLE. It was probably more operator error than Claude’s fault, but I ended up going in circles trying to debug issues in the converted code. It would compile in ESPHome, but was failing to capture IRKs from my test devices.
I then started over from scratch and used ChatGPT with the forked code and fresh instructions. Unlike Claude CLI which was integrated in VS Code, I used my Raycast subscription to access ChatGPT which necessitated copying/pasting code into VS code. But not before too long (just a few hours), I had a working beta code base using ESP-IDF + NimBLE that could capture IRKs from my iPhone, Apple Watch, iPad, and a test Android device. With working code, I shifted to Claude CLI inside VS for most of my remaining work.
Making the Code 'Production' Ready
Even though I used ChatGPT to build most of the C++ beta code, I was still using Claude CLI in VS Code to do all of my source code management and commits to my public Github repo. That was a huge time saver, and the auto generation of release notes and changes was simply fabulous.
After releasing a public ‘main’ build that was functional, I was determined to clean up the code base, make it compatible with dual core ESP32 devices, and really make the code production ready. Overkill for this project? Yes, but I wanted a deep vibe coding experience.
During the dev cycle of the production code base, I alternated between ChatGPT-5 codex and Gemini 3 for doing code reviews, then using Claude CLI in VS code to carry out the suggested code changes and do all the Github commits. Both AIs found several issues during the code review that needed fixing. I’m not a C++ programmer, but I do vaguely know enough coding concepts to determine if a suggested code fix made sense or not. It was very enlightening to get code review suggestions from ChatGPT Codex and Gemini 3, then see what Claude had to say about the suggestions. Several times I determined that suggested fixes were not worth it.
I also periodically compiled my code verify it would actually compile. Any errors I just copy/pasted into my AI of choice, then had Claude do the fixes. This process was very efficient, and usually resulted in quickly swatting the bugs and get working code.
Let's add some Linting
Towards the end of code review process, Gemini 3 recommended that I include linting and setup Github actions to do automated linting for each commit. Code linting is basically standardizing on the visual formatting of the code. I setup linting for C++, Python, Yaml, and Markdown. Claude CLI found and fixed a few linting errors, all without me touching the code. Gemini 3 also walked me through setting up Github actions, which performs automated Linting checks any time code is uploaded. Very handy!
The End Result
I spent one day getting working proof-of-concept code on the ESP-IDF framework, then spent another few days of doing code reviews, thorough testing, and all of the documentation. The C++ portion of Kyle’s PoC based on the Arduino framework was 292 lines. My C++ code expanded to 2,226 lines, which is quite the jump! I also added a new BLE emulated device, a keyboard, which seems to be more compatible with Android phones than a heart rate sensor.
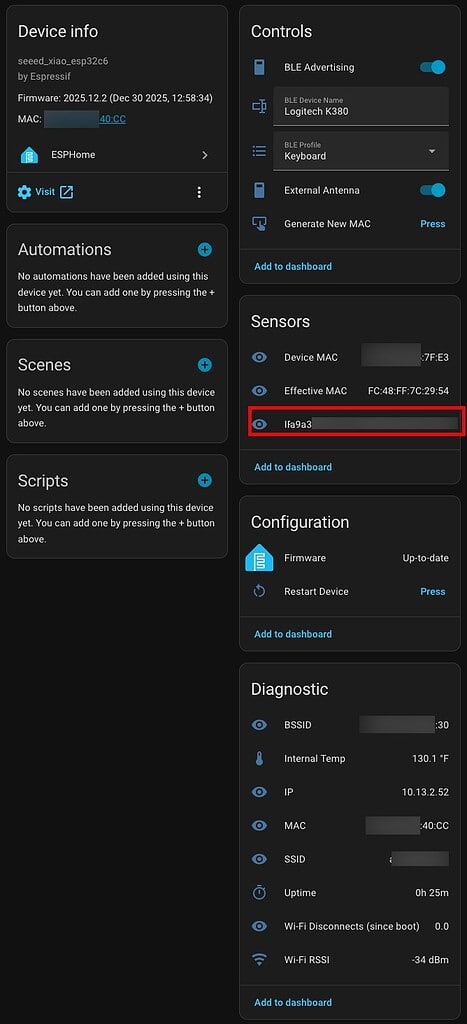
As you can see from the ESPHome device page, everything comes together to let you control the IRK Capture package and display all of the IRKs (red box). If you want to try out my IRK Capture package, check out my public Github repo. It has a full set of instructions for installing and using the package. If you want to check out my full room-level presence detection post see: Home Assistant: Track Who’s in Each Room with ESPHome + Bermuda BLE
Summary
For not knowing the first thing about C++ programming, I can attest that vibe coding can work! There is certainly an art to using the tools and various AI models to get the results you want. But I am very happy with the results and glad that I’m able to contribute to the ESPHome community.
By sharing this package with the community, it makes it easier for Home Assistant users to do room-level presence detection with both Apple and Android devices. Enjoy!


