This installment of the 15 part vSphere 5.1 Installation covers some basic VUM configuration that most people will want to do. In Part 12 we configured VUM to use trusted SSL certificates. Now that the under the covers configuration of VUM is done, we need to perform some basic GUI configuration to make VUM useful. Every environment is different, and VUM is quite customizable, so the steps below are just basic guidance for a vanilla VUM setup. Creating custom baselines, tweaking remediation options, and other settings are not covered below.
Before we get started, listed below are the other related articles in this series:
Part 1 (SSO Service)
Part 2 (Create vCenter SSL Certificates)
Part 3 (Install vCenter SSO SSL Certificate)
Part 4 (Install Inventory Service)
Part 5 (Install Inventory Service SSL Certificate)
Part 6 (Create vCenter and VUM Databases)
Part 7 (Install vCenter Server)
Part 8 (Install Web Client)
Part 9 (Optional SSO Configuration)
Part 10 (Create VUM DSN)
Part 11 (Install VUM)
Part 12 (VUM SSL Configuration)
Part 14 (Web Client and Log Browser SSL)
Part 15 (ESXi Host SSL Certificate)
VUM Configuration
1. If you haven’t already installed the vSphere 5.1 vSphere Client for Windows, now is the time. After that is installed, connect to your vCenter server and click on the Plug-Ins menu. You should now see an available plug-in.

2. Click on Download and Install. Run through the installation wizard using all default values.
3. After the installation is completed, close the vSphere client.
4. Reconnect to the vCenter server using the vSphere client. If all goes well you should NOT get an SSL certificate warning and you should see a Update Manager tab in vCenter.


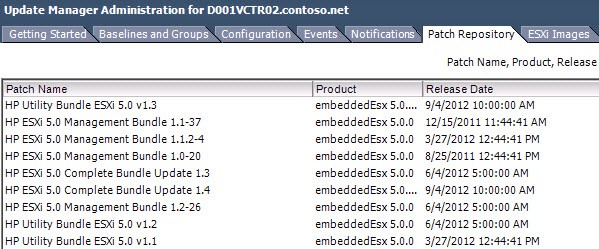
6. Once the VUM Admin page opens click on Configuration. Add a Download Source and use the following URLs:
HP:
http://vibsdepot.hp.com/index.xml
Dell:
http://vmwaredepot.dell.com/index.xml
Validate the URL then click OK.
7. After the URL is added, click on Download Now and wait a minute or two.
8. If you open the Patch Repository tab and sort by vendor you should now see some HP patches listed.
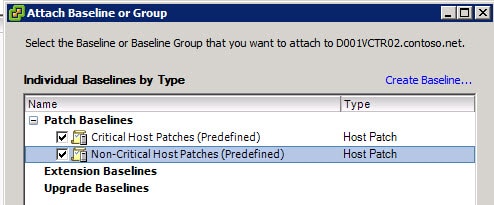
9. You can create your own patch baselines, which is out of the scope of this article. But I would recommend you at least attach the host and VM critical patch baselines. Switch to the Hosts and Cluster view, then click on the Update Manager tab.
10. Right click in the left pane and select Attach. I would recommend you select both baselines, unless you build your own.
And there you go…a pretty vanilla VUM configuration. You will probably want to tweak some remediation settings, and possibly schedule regular scans (say weekly) for updates for both VMs and ESXi hosts. Next up is Part 14, which fixes the LogBrowser service SSL issue.
Note: When using VUM if you try and import a patch file, you will likely get an SSL security warning. You will notice that a self-signed VMware certificate is presented for you to trust. I’ve seen mentioned elsewhere that for now users are unable to change this particular certificate to a trusted one. So just “ignore” the error, as much as it may pain you.


i know this is hp link http://vibsdepot.hp.com/index.xml Derek do you know the link for Dell server?