If you want to create vCenter and VUM Databases for vSphere 5.1 Update 1, you have come to the right spot. Database creation must be done prior to starting the vCenter installation, as one of the first prompts is selecting the vCenter DSN, which must be tied back to a database in SQL server. I’ve included a couple SQL and PowerShell scripts to help automate the process.
Before we get started, listed below are the other related articles in this series:
Part 1 (SSO Service)
Part 2 (Create vCenter SSL Certificate)
Part 3 (Install SSO Service SSL Certificate)
Part 4 (Install Inventory Service)
Part 5 (Install Inventory Service SSL Certificate)
Part 7 (Install vCenter Server)
Part 8 (Install Web Client)
Part 9 (Optional SSO Configuration)
Part 10 (Create VUM DSN)
Part 11 (Install VUM)
Part 12 (VUM SSL Configuration)
Part 13 (VUM Configuration)
Part 14 (Web Client and Log Browser SSL)
Part 15 (ESXi Host SSL Certificate)
—
UPDATE 4/28/2013: Since SQL 2012 is now officially supported with vSphere 5.1 Update 1, I’ve added additional references and download links to the appropriate SQL 2012 resources. The DSN script also configures the ODBC connector appropriately for your version of SQL server.
—
Create vCenter and VUM Databases
1. On your vCenter server you must install the appropriate SQL Native Client. The ODBC configuration uses the Native Client to communicate back to your SQL server. Since vCenter requires a 64-bit server you need the 64-bit native SQL client. Download and install the appropriate native client, depending on the back-end version of SQL server you are using.
64-bit Microsoft SQL Server 2008 R2 SP2 native client
64-bit Microsoft SQL Server 2012 native client
2. Install the SQL Server native client on your vCenter server using all default values.
3. On your SQL server you need to create the vCenter and VUM databases. I’ve included a sample script below that does the trick. Of course you will need to modify the vCenter service account name, database names and paths to suit your environment.
Cut and paste the script into SQL Server Management Studio and execute it. If you use the same service account here as you did for the SSO installation you can either comment out the CREATE LOGIN statement below, or just ignore the warning when you run the script since the login already exists. No harm done trying to add a login that already exists.
/* Creates vCenter server and VUM databases. */
/* Change login name to vCenter service account */

EXEC('CREATE LOGIN [contoso\svc-vctr02-001]FROM WINDOWS')

USE MSDB
EXEC sp_grantdbaccess 'contoso\svc-vctr02-001'
EXEC sp_addrolemember db_owner, 'contoso\svc-vctr02-001'

USE master
create database "D001-vCenter Server"
on
( name = 'D001-vCenter Server',
filename = 'K:\Microsoft SQL Server\MSSQL\Data\D001-vCenter_Server.mdf',
size = 2000MB,
filegrowth = 500MB )
log on
( name = 'D001-vCenter Server log',
filename = 'L:\Microsoft SQL Server\MSSQL\Data\Logs\D001-vCenter_Server.ldf',
size = 200MB,
filegrowth = 20MB )
COLLATE SQL_Latin1_General_CP1_CI_AS;

create database "D001-vCenter VUM"
on
( name = 'D001-vCenter VUM',
filename = 'K:\Microsoft SQL Server\MSSQL\Data\D001-vCenter_VUM.mdf',
size = 250MB,
filegrowth = 25MB )
log on
( name = 'D001-vCenter VUM log',
filename = 'L:\Microsoft SQL Server\MSSQL\Data\Logs\D001-vCenter_VUM.ldf',
size = 25MB,
filegrowth = 2MB )
COLLATE SQL_Latin1_General_CP1_CI_AS;

EXEC('ALTER AUTHORIZATION ON DATABASE::"D001-vCenter Server" TO [contoso\svc-vctr02-001]')
EXEC('ALTER AUTHORIZATION ON DATABASE::"D001-vCenter VUM" TO [contoso\svc-vctr02-001]')

GO
Create vCenter ODBC Connector
On the vCenter server you now must create a 64-bit DSN for vCenter to use. You can create it manually through the ODBC GUI, but for consistency I like to script it, so I’ve included a sample PowerShell script below. I saved the script as vCenter-DSN.ps1. The script requires three arguments, with a fourth optional one:
- FQDN of the SQL server
- Database name (enclose in quotes if it has spaces)
- Version of SQL server (2008 or 2012)
- Optional: Encrypt (if SQL encryption is configured)
If you want a quick guide on configuring SQL transport encryption you can check out my article here. Again, for security I would strongly suggest you use SQL SSL encryption. Unlike the SSO/JDBC SQL SSL encryption issues, using the ODBC connector for SSL with the vCenter/VUM databases works like a charm.
1. Save the PowerShell script below and execute it in an elevated PowerShell command prompt, using your settings:
Example:
.\vCenter-DSN.ps1 D001SQL02.contoso.net “D001-vCenter Server” 2012 Encrypt
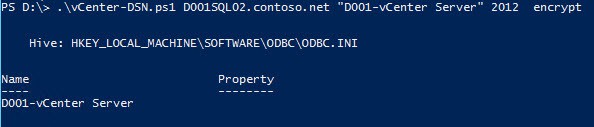
vCenter-DSN.ps1
## Creates a 64-bit System DSN for vCenter Server.
## Supports SQL Server 2008(R2) and SQL 2012
$DSNName = $args[1]
$DBName = $args[1]

If($args[0] -eq $NULL) { echo "Must specify FQDN of SQL server."; Exit}
If($args[1] -eq $NULL) { echo "Must specify Database name."; Exit}
If($args[2] -eq $NULL) { echo "Must specify SQL Version (2008 or 2012)"; Exit}
if($args[3] -eq "encrypt") { $Encrypt = "Yes" } Else { $Encrypt = "No" }

$HKLMPath1 = "HKLM:\SOFTWARE\ODBC\ODBC.INI\" + $DSNName
$HKLMPath2 = "HKLM:\SOFTWARE\ODBC\ODBC.INI\ODBC Data Sources"
md $HKLMPath1 -ErrorAction silentlycontinue

set-itemproperty -path $HKLMPath1 -name Description -value $DSNName
set-itemproperty -path $HKLMPath1 -name Server -value $args[0]
set-itemproperty -path $HKLMPath1 -name LastUser -value "Administrator"
set-itemproperty -path $HKLMPath1 -name Trusted_Connection -value "Yes"
set-itemproperty -path $HKLMPath1 -name Encrypt -value $Encrypt
set-itemproperty -path $HKLMPath1 -name Database -value $DBName

md $HKLMPath2 -ErrorAction silentlycontinue

if ($args[2] -eq 2008) {
set-itemproperty -path $HKLMPath2 -name "$DSNName" -value "SQL Server Native Client 10.0"
set-itemproperty -path $HKLMPath1 -name Driver -value "C:\WINDOWS\system32\sqlncli10.dll"
}

Else {
set-itemproperty -path $HKLMPath2 -name "$DSNName" -value "SQL Server Native Client 11.0"
set-itemproperty -path $HKLMPath1 -name Driver -value "C:\WINDOWS\system32\sqlncli11.dll"
}
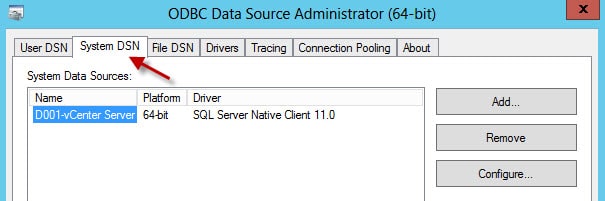
2. At this point you test the ODBC connection to avoid any vCenter installation issues. In the Windows Start screen search box type ODBC and select ODBC Data Sources (64-bit). When the ODBC Administrator appears click on System DSN and you should see the DSN the script created.
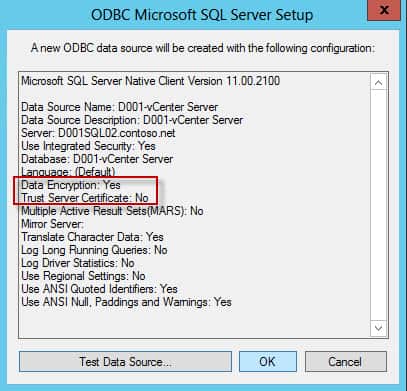
3. Click on the Configure button and run through the wizard (without changing any settings) and you should arrive at the summary screen below. In my case I require data encryption, so that option is set to Yes.
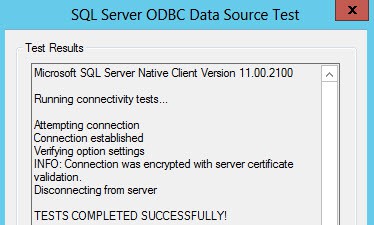
4. Click on Test Data Source.. and you should see a successful connection message. If you have configured SQL transport encryption it will also note that the connection was encrypted and that the server certificate was validated (not self-signed).
At this point you have now successfully configured vCenter and VUM databases and setup the vCenter DSN. We will configure the VUM DSN when we do the VUM installation. Part 7 in this series is installing the vCenter 5.1 server using the database and DSN you created.


Very helpful articles so far. Really helped get me out of a jam! Thanks 🙂
Wow, this is a first for VMware to make an install this difficult. I’m punting for now so I can do some testing, hopefully the self signed certs will work better. Early looking forward to VMware resolving this one!
Hey mate,
Whenever I try to read the VMWare articles and KBs, I always get confused, dizzy, angry, sad and then crying, in that order. However, your articles give me strength, confidence, potency, happiness and laughter… Keep them coming!
Xiao Feng
Great blog posts! Keep ’em coming! I was thinking about going forward with self-signed certs for now, and then adding trusted certs later. Do you see any issues with that, assuming Vmware fixes the vCenter cert issues, doing it in this fashion? I plan on coming back to your blog and checking for updates and then using your posts to complete the trusted cert install.
Is SQL Server 2008 R2 SP2 supported for vCenter 5.1?
Anonymous, R2 SP2 is NOT listed as a choice in the VMware Interop matrix. But given that R2 SP1 is listed, I would feel confident in just a newer service pack. I would not go from 2008 R2 to SQL 2012, for example.
Where can I download 64bit iso for VMware Vcenter 5.1.0a? I have been looking on vmware but cannot find it.
Thank you so much Derek !!
this is really helping me ^^
I have juste one question : can i use the same SQL server for the SSO service and the Vcenter service ? I mean : i have no choice, the SSO, inventory service and Vcenter have to be on the same VM, could it be a problem ?
@Anonymous: Yes you can use a single SQL server for all of the vCenter/SSO/VUM databases.
Hi Derek, for me its not 100% clear why you use svc account for VCDB and VUM. Most people installed both with local admin and the owner was the same. I have seen problems with jdbc, where running VC and SQL, and webservices under local admin instead of local system solved the issue. Is it that you do the same, but you don’t want to use admin, but a svc account?
Thanks
Hello,
I'm trying to get thru this ODBC thing and it keeps failing on me. Do you know why is I keep getting the certificate chain was issued by an authority that is not trusted when tried test the connection to the DATABASE via ODBC? I used the Microsoft self sign cert, so I guess it didn't work. How can I make to be trusted?
Trying to install the native client on the vCenter server I was getting an error message stating that the 64 bit version of the native client was not supported on my OS. The error log indicated that the OS was a 32-bit machine (not true, Server 2008 R2 Datacenter). A restart solved the problem… just in case anybody else had a brief moment of panic.