Now that vCenter 5.1 Update 1 is installed it is now time to create the VUM DSN. VUM, known as VMware Update Manager, lets you automate the patching process of ESXi hosts, update VMware tools, and also update some VM appliances. You still have to manage VUM via the legacy Windows vSphere client, as VMware did not make a plug-in for the Web Client. I would strongly suspect vSphere .Next will have a web integrated VUM client.
Before we get started, listed below are the other related articles in this series:
Part 1 (SSO Service)
Part 2 (Create vCenter SSL Certificates)
Part 3 (Install vCenter SSO SSL Certificate)
Part 4 (Install Inventory Service)
Part 5 (Install Inventory Service SSL Certificate)
Part 6 (Create vCenter and VUM Databases)
Part 7 (Install vCenter Server)
Part 8 (Install Web Client)
Part 9 (Optional SSO Configuration)
Part 11 (Install VUM)
Part 12 (VUM SSL Configuration)
Part 13 (VUM Configuration)
Part 14 (Web Client and Log Browser SSL)
Part 15 (ESXi Host SSL Certificate)
Creating the VUM DSN
The first step to get VUM working is creating the ODBC DSN that the installer will use to connect to the database. Unlike vCenter which uses a 64-bit DSN, VUM uses a 32-bit DSN. So the PowerShell script below has been modified from the vCenter script to create a 32-bit DSN, otherwise the script is the same as the one I presented for vCenter. I saved the script as VUM-DSN.ps1. The script requires three arguments, with a fourth optional one:
- FQDN of the SQL server
- VUM database name (enclose in quotes if it has spaces)
- Version of SQL server (2008 or 2012)
- Optional: Encrypt (if SQL encryption is configured)
If you want a quick guide on configuring SQL transport encryption you can check out my article here. Again, for security I would strongly suggest you use SQL SSL encryption. Unlike the SSO/JDBC SQL SSL encryption issues, using the ODBC connector for SSL with the vCenter/VUM databases works like a charm.
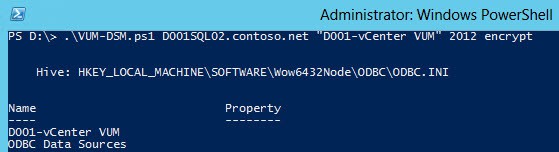
1. Save the PowerShell script below and execute it in an elevated PowerShell command prompt, using your settings:
Example:
.\VUM-DSN.ps1 D001SQL02.contoso.net “D001-vCenter VUM” 2012 Encrypt
## Creates a 32-bit System DSN for VMware Update Manager.
## Supports SQL Server 2008(R2) and SQL 2012
$DSNName = $args[1]
$DBName = $args[1]

If($args[0] -eq $NULL) { echo "Must specify FQDN of SQL server."; Exit}
If($args[1] -eq $NULL) { echo "Must specify VUM Database name."; Exit}
If($args[2] -eq $NULL) { echo "Must specify SQL Version (2008 or 2012)"; Exit}
if($args[3] -eq "encrypt") { $Encrypt = "Yes" } Else { $Encrypt = "No" }

$HKLMPath1 = "HKLM:\SOFTWARE\Wow6432Node\ODBC\ODBC.INI\" + $DSNName
$HKLMPath2 = "HKLM:\SOFTWARE\Wow6432Node\ODBC\ODBC.INI\ODBC Data Sources"
md $HKLMPath1 -ErrorAction silentlycontinue

set-itemproperty -path $HKLMPath1 -name Description -value $DSNName
set-itemproperty -path $HKLMPath1 -name Server -value $args[0]
set-itemproperty -path $HKLMPath1 -name LastUser -value "Administrator"
set-itemproperty -path $HKLMPath1 -name Trusted_Connection -value "Yes"
set-itemproperty -path $HKLMPath1 -name Encrypt -value $Encrypt
set-itemproperty -path $HKLMPath1 -name Database -value $DBName
md $HKLMPath2 -ErrorAction silentlycontinue

if ($args[2] -eq 2008) {
set-itemproperty -path $HKLMPath2 -name "$DSNName" -value "SQL Server Native Client 10.0"
set-itemproperty -path $HKLMPath1 -name Driver -value "C:\WINDOWS\system32\sqlncli10.dll"
}

Else {
set-itemproperty -path $HKLMPath2 -name "$DSNName" -value "SQL Server Native Client 11.0"
set-itemproperty -path $HKLMPath1 -name Driver -value "C:\WINDOWS\system32\sqlncli11.dll"
}
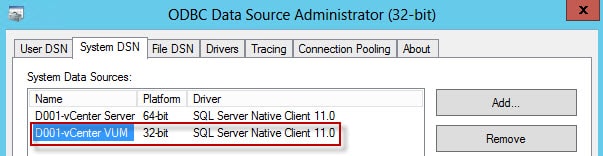
2. At this point you test the ODBC connection to avoid any vCenter installation issues. In the Windows Start screen search box type ODBC and select ODBC Data Sources (32-bit). Or, you can launch the same GUI via the command line:
c:\windows\syswow64\odbcad32.exe
3. When the ODBC Administrator appears click on System DSN and you should see two DSNs. In the Windows Server 2012 ODBC GUI it will now show both 32-bit and 64-bit DSNs.
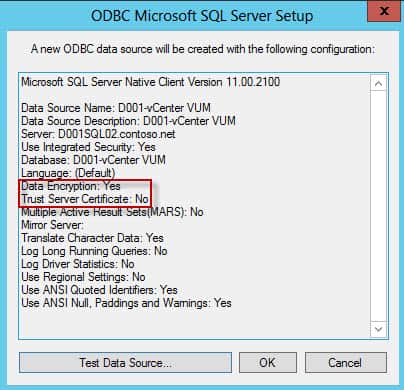
4. Click on the Configure button and run through the wizard (without changing any settings) and you should arrive at the summary screen below. In my case I require data encryption, so that option is set to Yes. Since most people probably don’t have SQL setup for encryption (you should!) this will be a No for you.
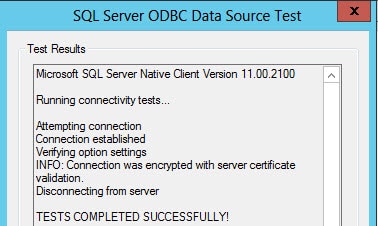
5. Click on Test Data Source.. and you should see a successful connection message. If you have configured SQL transport encryption it will also note that the connection was encrypted and that the server certificate was validated (not self-signed).
Congratulations! You are now ready to start the installation process for VUM, which is covered in Part 11.


