Welcome to the vSphere 5.1 Update 1 VUM SSL certificate replacement procedures. In Part 11 we installed VMware vCenter Update Manager (VUM) 5.1 Update 1. Recently VMware released the vCenter Certificate automation tool, which helps lessen the pain associated with replacing the self-signed certificates with trusted certificates. I recommend you use that tool, instead of pre-staging certificates or replacing them manually.
However, in v1.0 of the VMware tool it does NOT support updating the VUM SSL certificate if you’ve registered VUM to vCenter using the vCenter FQDN. Since I would consider it a best practice to use the vCenter FQDN (vice IP address), we need to manually replace the VUM certificate until an update to the tool is released. I recommend replacing the VUM certificate only after you’ve gone through all 15 parts of this install series, and run the VMware vCenter certificate automation tool. If you have completed all those steps, then proceed with this article. If not, then jump ahead to Part 13 and come back here later.
If you want to refer to the official VMware article for replacing the VUM SSL certificate, you can find the procedure here. Thankfully it’s not difficult, so you shouldn’t have any problems.
Before we get started, listed below are the other related articles in this series:
Part 1 (SSO Service)
Part 2 (Create vCenter SSL Certificates)
Part 3 (Install vCenter SSO SSL Certificate)
Part 4 (Install Inventory Service)
Part 5 (Install Inventory Service SSL Certificate)
Part 6 (Create vCenter and VUM Databases)
Part 7 (Install vCenter Server)
Part 8 (Install Web Client)
Part 9 (Optional SSO Configuration)
Part 10 (Create VUM DSN)
Part 11 (Install VUM)
Part 13 (VUM Configuration)
Part 14 (Web Client and Log Browser SSL)
Part 15 (ESXi Host SSL Certificate)
Updating VUM SSL Certificate
1. Backup all the files in the directory below. Copy the rui.key, rui.crt and rui.pfx files from your D:\Certs\VUM directory and replace the files in this directory:
C:\Program Files (x86)\VMware\Infrastructure\Update Manager\SSL
2. Stop the VMware vSphere Update Manger Service.

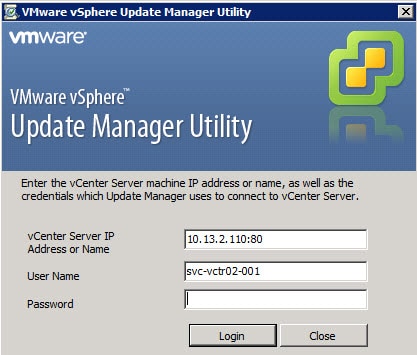
3. In the C:\Program Files (x86)\VMware\Infrastructure\Update Manager directory launch the VMwareUpdateManagerUtility.exe application.
4. Login to the vCenter server using proper credentials.
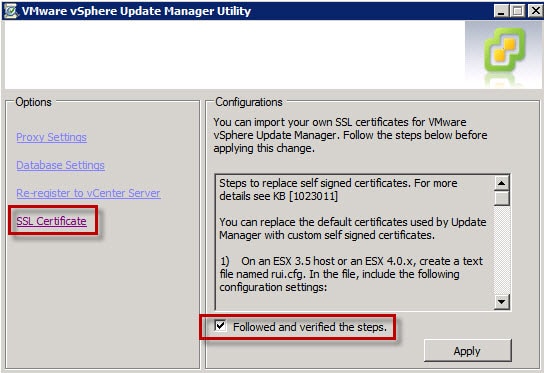
5. Click on the SSL Certificate option on the left side then check the box on the right side and click Apply.
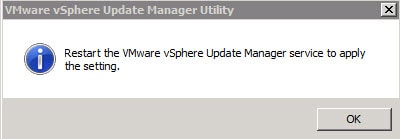
6. If all goes well you should see the window below. Restart the service as directed.


Hello Derek, thanks a lot for this very useful blog post.
I was able to succesfully deploy pre-staged certificates for all vSphere 5.1.0A components. No problem at all.
But as I tried to import an ESXi image to VUM I got a typical vCenter certificate warning.
I tested it by navigating to https://vum-hostname.domain:9087 (VUM SSL port)
and got: “There is a problem with this website’s security certificate.”
The certificate used is a VMware self-signed one and is stored in
C:\Program Files (x86)\VMware\Infrastructure\Update Manager\SSL\vmware-vum.keystore
——————————————————————————–
..\> keytool -list -keystore vmware-vum.keystore
Enter keystore password: (IS EMPTY)
***************** WARNING WARNING WARNING *****************
* The integrity of the information stored in your keystore *
* has NOT been verified! In order to verify its integrity, *
* you must provide your keystore password. *
***************** WARNING WARNING WARNING *****************
Keystore type: JKS
Keystore provider: SUN
Your keystore contains 2 entries
vum-server, Nov 15, 2012, trustedCertEntry,
Certificate fingerprint (MD5): XX:XX:XX:XX:XX:XX:XX:XX:XX:XX:XX:XX:XX:XX:XX:XX
vum-jetty, Nov 15, 2012, PrivateKeyEntry,
Certificate fingerprint (MD5): D1:4F:80:74:A6:27:1E:9B:77:4A:B2:03:70:78:1F:78
——————————————————————————–
vum-server is my trusted pre-staged certificate from our internal CA
vum-jetty is a VMware self-signed certificate
Is it possible to replace it with a trusted one also?
or probably use the certificate for both vum-server and vum-jetty?
How do we have to proceed?
May I contact you per e-mail?
Best regards, Denis
Hello Derek, thanks a lot for this very useful blog post.I was able to succesfully deploy pre-staged certificates for all vSphere 5.1.0A components. No problem at all.But as I tried to import an ESXi image to VUM I got a typical vCenter certificate warning.I tested it by navigating to https://vum-hostname.domain:9087 (VUM SSL port)and got: “There is a problem with this website’s security certificate.”The certificate used is a VMware self-signed one and is stored inC:Program Files (x86)VMwareInfrastructureUpdate ManagerSSLvmware-vum.keystore——————————————————————————–..> keytool -list -keystore vmware-vum.keystoreEnter keystore password: (IS EMPTY)***************** WARNING WARNING WARNING ****************** The integrity of the information stored in your keystore ** has NOT been verified! In order to verify its integrity, ** you must provide your keystore password. ****************** WARNING WARNING WARNING *****************Keystore type: JKSKeystore provider: SUNYour keystore contains 2 entriesvum-server, Nov 15, 2012, trustedCertEntry,Certificate fingerprint (MD5): XX:XX:XX:XX:XX:XX:XX:XX:XX:XX:XX:XX:XX:XX:XX:XXvum-jetty, Nov 15, 2012, PrivateKeyEntry,Certificate fingerprint (MD5): D1:4F:80:74:A6:27:1E:9B:77:4A:B2:03:70:78:1F:78——————————————————————————–vum-server is my trusted pre-staged certificate from our internal CAvum-jetty is a VMware self-signed certificateIs it possible to replace it with a trusted one also?or probably use the certificate for both vum-server and vum-jetty?How do we have to proceed?Best regards,Denis
I am having this same problem, cert error on uploading ESXi image after following the 5.5 cert process on this website. I can find nothing for a resolution on the internets.
IN step 1 you mention C:\Program Files\VMware\Infrastructure\Update Manager\SSL, for me the SSL folder is in (x86). Did anything go wrong with installing?
Regards
if you pre-stage the SSL certs, then the installation will pick it up….. whilst the https://vum-hostname.domain:9087 page shows the vmware self-signed cert, when you add in the vsphere client plug in you will get a pop up window with the vcenter/VUM certificate – if you view this certificate you will see that it's actually the signed certificate you pre-staged.
Here's something interesting, I have followed your guide and successfully certified all components of vcenter 5.1 U1a. However, the update manager in the webclient doesn't work. everything works fine in the thick client and the extension loads successfully in the webclient but when I click on the update manager tab, I get the error "There was an error connecting to VMware vSphere Update Manager."_in the VMware-vum-server.log I have the below__2013-06-14T13:16:38.122+08:00 [11472 error 'Ufa.HTTPService'] Failed to read request
Hei Derek! Need to say, awesome post. Followed it and all works great, but in the final part I got the same error as Matt. The update manager dont work in the webclient, error: There was an error connecting to VMware vSphere Update Manager. The thick client and the extension loads successfully. Any idea?