This blog post details my lessons learned doing a fresh Home Assistant installation in early 2023. Here, I provide guidance pulled from many sources, and my own experience using Home Assistant. I’ve been big into the smart home for a few years using various platforms such as SmartThings, Hubitat, Apple HomeKit, HomeBridge, Scrypted, etc. Each has its pros and cons. Being new to HA most of my automations are running on Hubitat with z-wave and a few Zigbee devices. However, I was curious about Home Assistant so I took the plunge a few weeks ago.
Home Assistant is (mostly) no longer a science project of endlessly editing YAML files, understanding Node-RED, or trying to communicate with devices via MQTT. In recent years the developers did a huge push for usability and giving users the ability do to a lot via the UI without coding. I was actually shocked how smooth the process it. Not perfect, for sure, but it feels like a pretty polished project vs. a thrown together product. I’m moving forward with Home Assistant as my smart home platform of choice.
More Home Assistant Related Posts
I’ve written a number of posts related to Home Assistant which you might find useful:
Home Assistant: Proxmox VE 8.0 Quick Start Guide
Home Assistant: Ultimate Backup Guide
Home Assistant: Ultimate Restore Guide
Home Assistant: Frigate VM on Proxmox with PCIe Coral TPU
Home Assistant: Monitor Proxmox with Glances
Home Assistant: Installing InfluxDB (LXC)
InfluxDB 1.x Automated Backups
Home Assistant: InfluxDB Data Management (LXC)
Home Assistant: Installing Grafana (LXC) with Let’s Encrypt SSL
InfluxDB + Chronograf: Configuring Let’s Encrypt SSL
Hands On: Beelink Mini-PCs for Proxmox, Home Assistant and Plex
How to Use this Guide
This post goes over the basics to get you off on the right foot, plus a number of recommended settings and integrations that nearly any HA user needs. After you first install HA, it will auto-discover many of your smart home devices and list integrations you can configure. STOP! Don’t be tempted to start configuring devices before you have your HA “optimally” configured. In fact, this whole post doesn’t mention a single smart device integration, but focuses on building a solid platform that will scale, be secure, is backed up, and easy to manage.
Only after you get the basics of HA in place and you know your way around the UI, would I then TIP TOE slowly into smart device integrations. I will provide my lessons learned on how best to do this in a future post. Just mindlessly configuring integrations without paying attention to the details will likely burn you in the long run.
Home Assistant Install Options
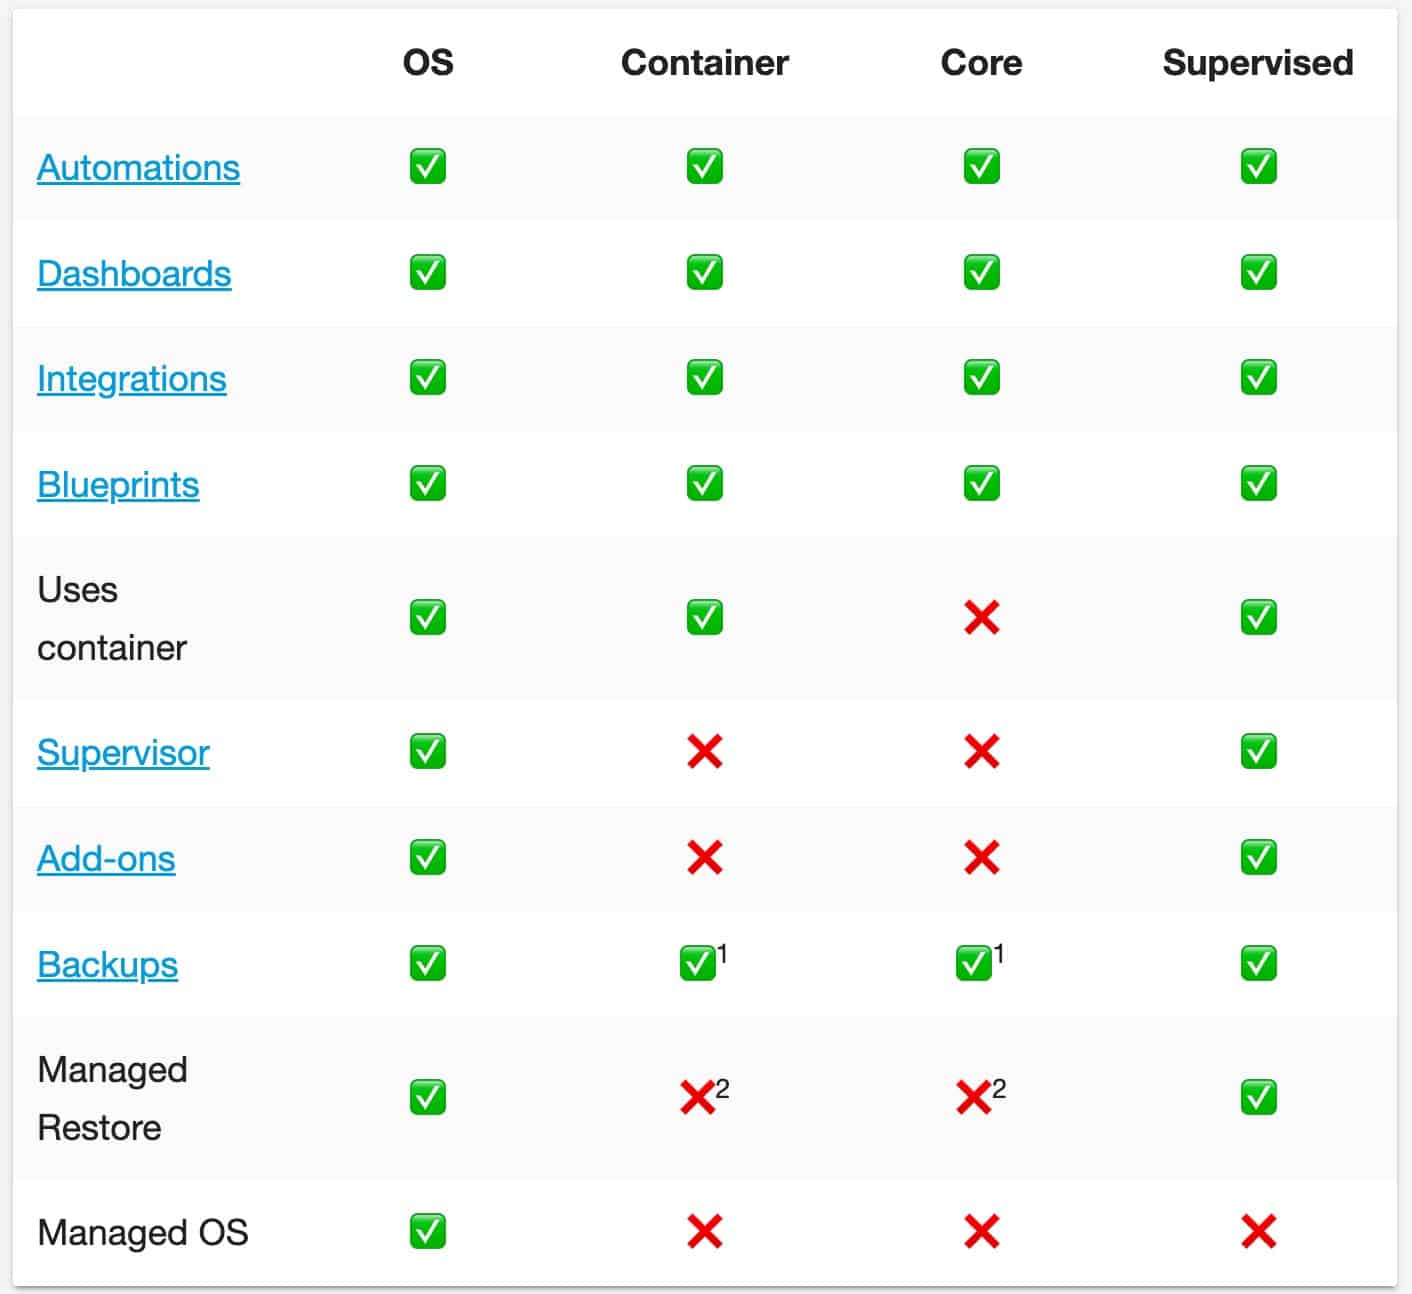
Deciding which type of install of HA that you want is a bit tricky as you have several options: HAOS, Supervised, Core, and Container. For the most turnkey solution you want HAOS (Home Assistant OS). HAOS features:
- Easiest method
- Full HA experience
- OS is fully managed
- Many pre-built install images
If HAOS on bare metal is not appealing, then the next best option is HAOS as a VM on a free hypervisor such as Proxmox. I would shy away from supervised or container, unless you KNOW those are the best fit for you and you are super nerdy. A deep dive discussion is out of the scope for this post, so do additional research if you are unsure what option will work best for you. I have additional information below, including a YouTube video link by Everything Smart Home channel that covers all four options. You can also check out the Home Assistant Installation Methods wiki.
Tip: The requirements for a home automation server are very different from your typical home lab. You want something that is highly reliable, simple to maintain, secure, and enough performance to do the job but not be overpowered and use excess power. HAOS gives you the best pre-packaged experience.
Proxmox Tip: HA uses a database (SQLite or MariaDB) to store information. And you might add on InfluxDB for detailed stats. But databases are very sensitive to power-loss data corruption. This is less of an issue on bare metal, but as a VM, it’s much more risky. It’s important to change the virtual disk cache setting in Proxmox for your HAOS to from “none” to “write through”. I’ve seen reports of unrecoverable DB corruption if you don’t change this setting.

The table below comes directly from the Home Assistant website, along with a bit more of an explanation of the options. You can check out that information here.
The YouTube video below by Everything Smart Home does an awesome job of explaining all the options.

Home Assistant Hardware Platforms
Choosing the right hardware platform for Home Assistant is key if you want to do more than tinker around with HA to see if you like it or not. You also have to decide if you want a dedicated HA server, or co-locate other services/VMs or Docker containers.
I wrote a blog post about my hands-on experience with a few Beelink mini-PCs. I personally have two of them, both running Proxmox and a number of services including Home Assistant. Check out my post:
Hands On: Beelink Mini-PCs for Proxmox, Home Assistant and Plex
Raspberry Pi and Home Assistant Yellow (Thumbs Down)
One popular HA platform is the Raspberry Pi. This was a good choice. However, due to supply chain constraints, and the plethora of cheap Intel-based mini-PCs, I would look at RPi alternatives. More performance, and likely for similar or less money.
If you already have a RPi laying around, a RPi 4 with at least 4GB of RAM is where I’d start. Also, I would urge you to NOT use the internal SD card as your data drive. If you want to get more advanced and use add-ons like InfluxDB and MariaDB, these will KILL your SD card. Get a decent USB SSD (need not be large capacity) or NVMe drive (NOT a USB memory stick…they suck too). Even if you don’t want to use these databases, SD cards in general and not reliable and you are just asking for trouble. Use a SSD or NVMe drive! Your poor SD card WILL die at some point.
If you want an all-in-one solution that supports Zigbee and Thread Home Assistant Yellow tries to fit the bill. However, it has severe supply chain constraints, as do the Raspberry Pi 4 Compute Module (CM4) that it needs. You are also limited to Raspberry Pi 4 compute power which honestly is only good for tinkering with HA and not something I’d use in the long run. I’d give a hard pass on Home Assistant Yellow.
If you are using a Raspberry Pi and following best practices of NOT relying solely on a SD card, see the great video below on how to install HAOS on a RPi 4 with external USB storage.

Mini-PCs (Bare Metal)
If you are going to run HAOS bare metal, then the hardware requirements in terms of CPU, RAM and Disk are actually quite minimal. HA barely uses any CPU on (think less than 4% steady state), and a mini-PC with 8GB of RAM would be a great start. Popular options are used mini and ultra-mini PCs on Amazon. Used Dell Optiplex micro PCs can be had for $150 or less, depending on specs. Those would more than sufficient for bare metal HAOS.
When shopping for a good value for a HAOS server it would be wise to look up the Geekbench 6 (or 5) multi-core scores. You can then use this to compare processors in different options to make a better informed purchasing decision. CPUmark (not Passmark) can be useful as well. Google can easily find scores for any CPU you are looking at.
Mini-PCs (Proxmox)
If you want to virtualize your HAOS server, and possibly run other containers like InfluxDB, Grafana, Scrypted, etc. then you will want a bit of a spec bump over the HAOS bare metal specs. CPU is still not really a concern, but RAM could become tight with just 8GB. So I’d splurge for 16GB for a Proxmox server.
If in the long run you want to run over services like Plex on your server, then bump up the specs accordingly. Intel NUCs are great, but possibly not the best bang for the buck. Amazon has a good selection of Beelink mini-PCs. I personally got a Beelink SEI-12 Pro i5-1240P (12th Generation Intel Alder Lake) because I intend to eventually run Plex and other services on it. Way overkill for just HAOS and a few containers. If you want a more economical Beelink mini-PC that is perfect for a HAOS VM and a few containers, check out the Beelink Mini S12 Pro. It uses the Intel 12th Gen N100 CPU, which is perfect for HAOS.
Check out a complete Proxmox and Home Assistant how-to guide:
Zigbee & Thread Radios
If you want to control Zigbee or Thread devices via Home Assistant you will need a USB radio. The folks behind Home Assistant are offering the Home Assistant SkyConnect USB dongle. As of now, this stick requires using HAOS (Home Assistant OS). It supports Zigbee out of the box. A future firmware update will enable Thread/Matter in addition to Zigbee. The Sonoff Zigbee dongle (ZBDongle-P) is highly praised by the HA community as well.
Initial Setup Tips & Tricks
After you install Home Assistant you will be eager to start playing with devices that it discovers on your network. I urge you to use self restraint and get the fundamentals of HA setup. You will thank me later. This section will cover several settings that you should consider making to your HA setup.
If you want a HAOS on Proxmox install guide, check out my post Home Assistant: Proxmox Quick Start Guide.
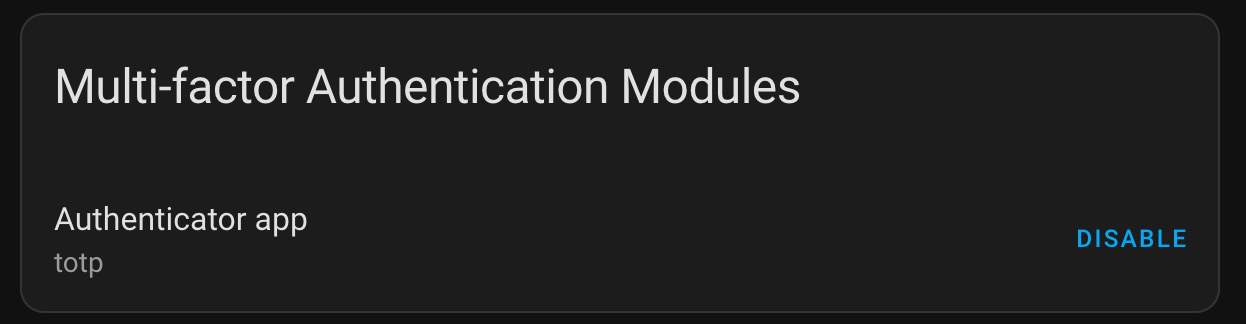
Multi-Factor Authentication
Security should be a top concern. I strongly suggest you enable multi-factor authentication. To setup MFA click on your profile name in the lower left, scroll through the profile options and enable Mult-factor Authentication Modules. I use Authenticator app and store the codes in 1Password.
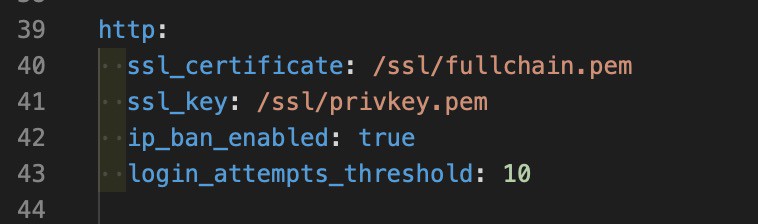
Enable IP Ban
A security best practice is to enable IP ban and set a login attempt threshold. This is done under the http: section in the configuration.yaml file. Add the content of lines 42 and 43 to your configuration.yaml file and restart HA.
Note: Best do this step after we install the recommended text editor (VS Code). That integration mades the rare occasion you need to edit HA files much easier and helps prevent typos. Also, this is one of the RARE times I had to edit a YAML file.
Use Secrets File
Note: This tip is just informational, and at this point you have no action to take. Only when certain integrations or features use API keys or passwords do you need to remember this tip.
—
As you progress through adding integrations and devices to your HA setup, you may need to store API keys or passwords in the configuration.yaml file. This is not a great idea, as sometimes it’s helpful to share your configuration file with the community or another user. You don’t want your secrets leaking. The secrets file is a dedicated file to store API keys, passwords, etc. that is then referenced in your configuration.yaml file, keeping your config file sanitized. You can find out more here.
Enable Advanced Mode
Many of the configuration changes you will need to make are hidden by default. To enable “Advanced Mode” click on your profile name in the lower left, scroll through the profile options and turn on Advanced Mode.

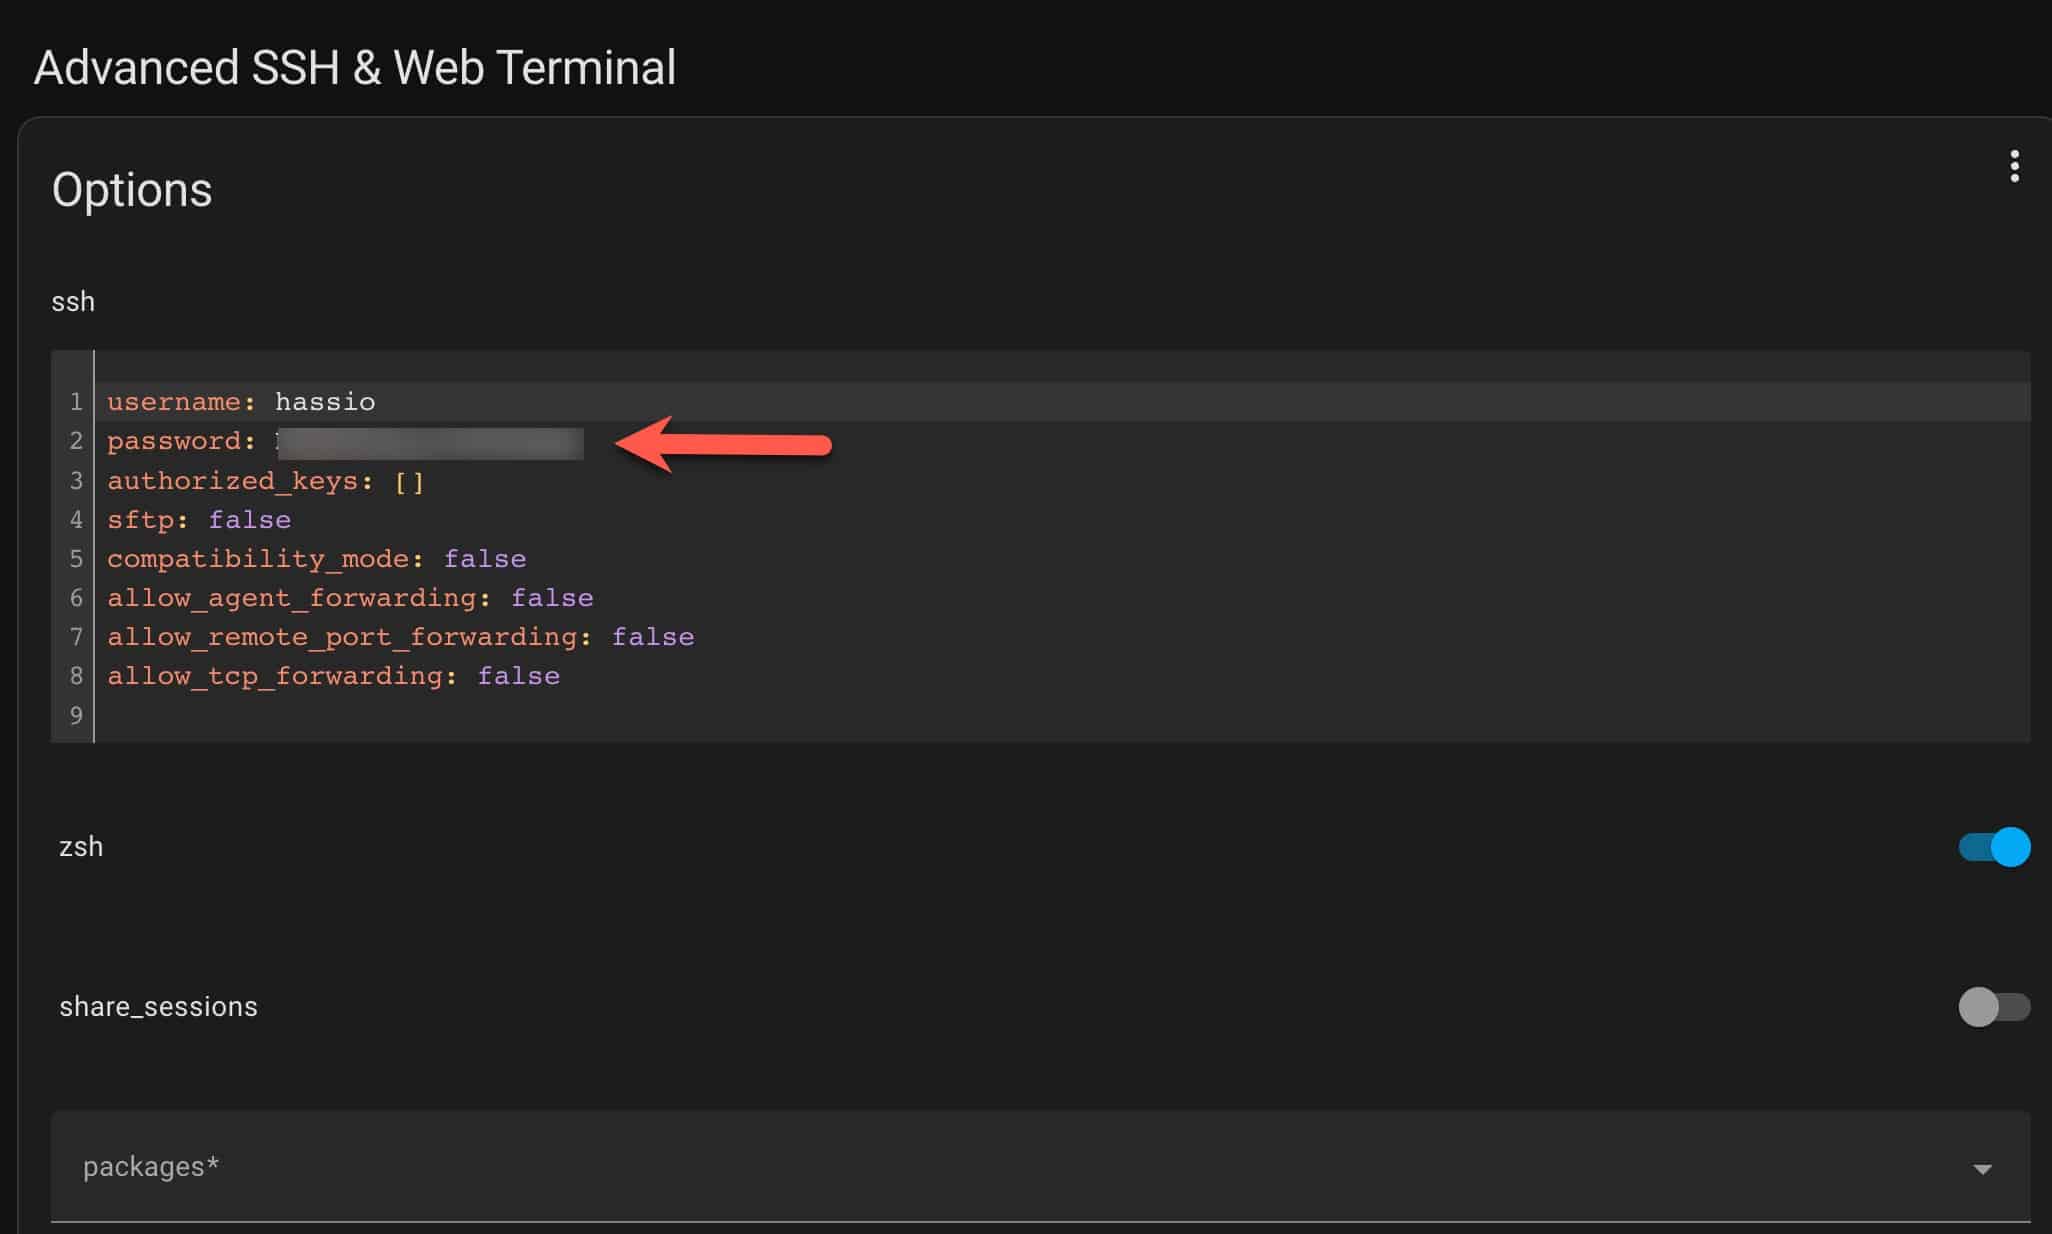
Enable SSH
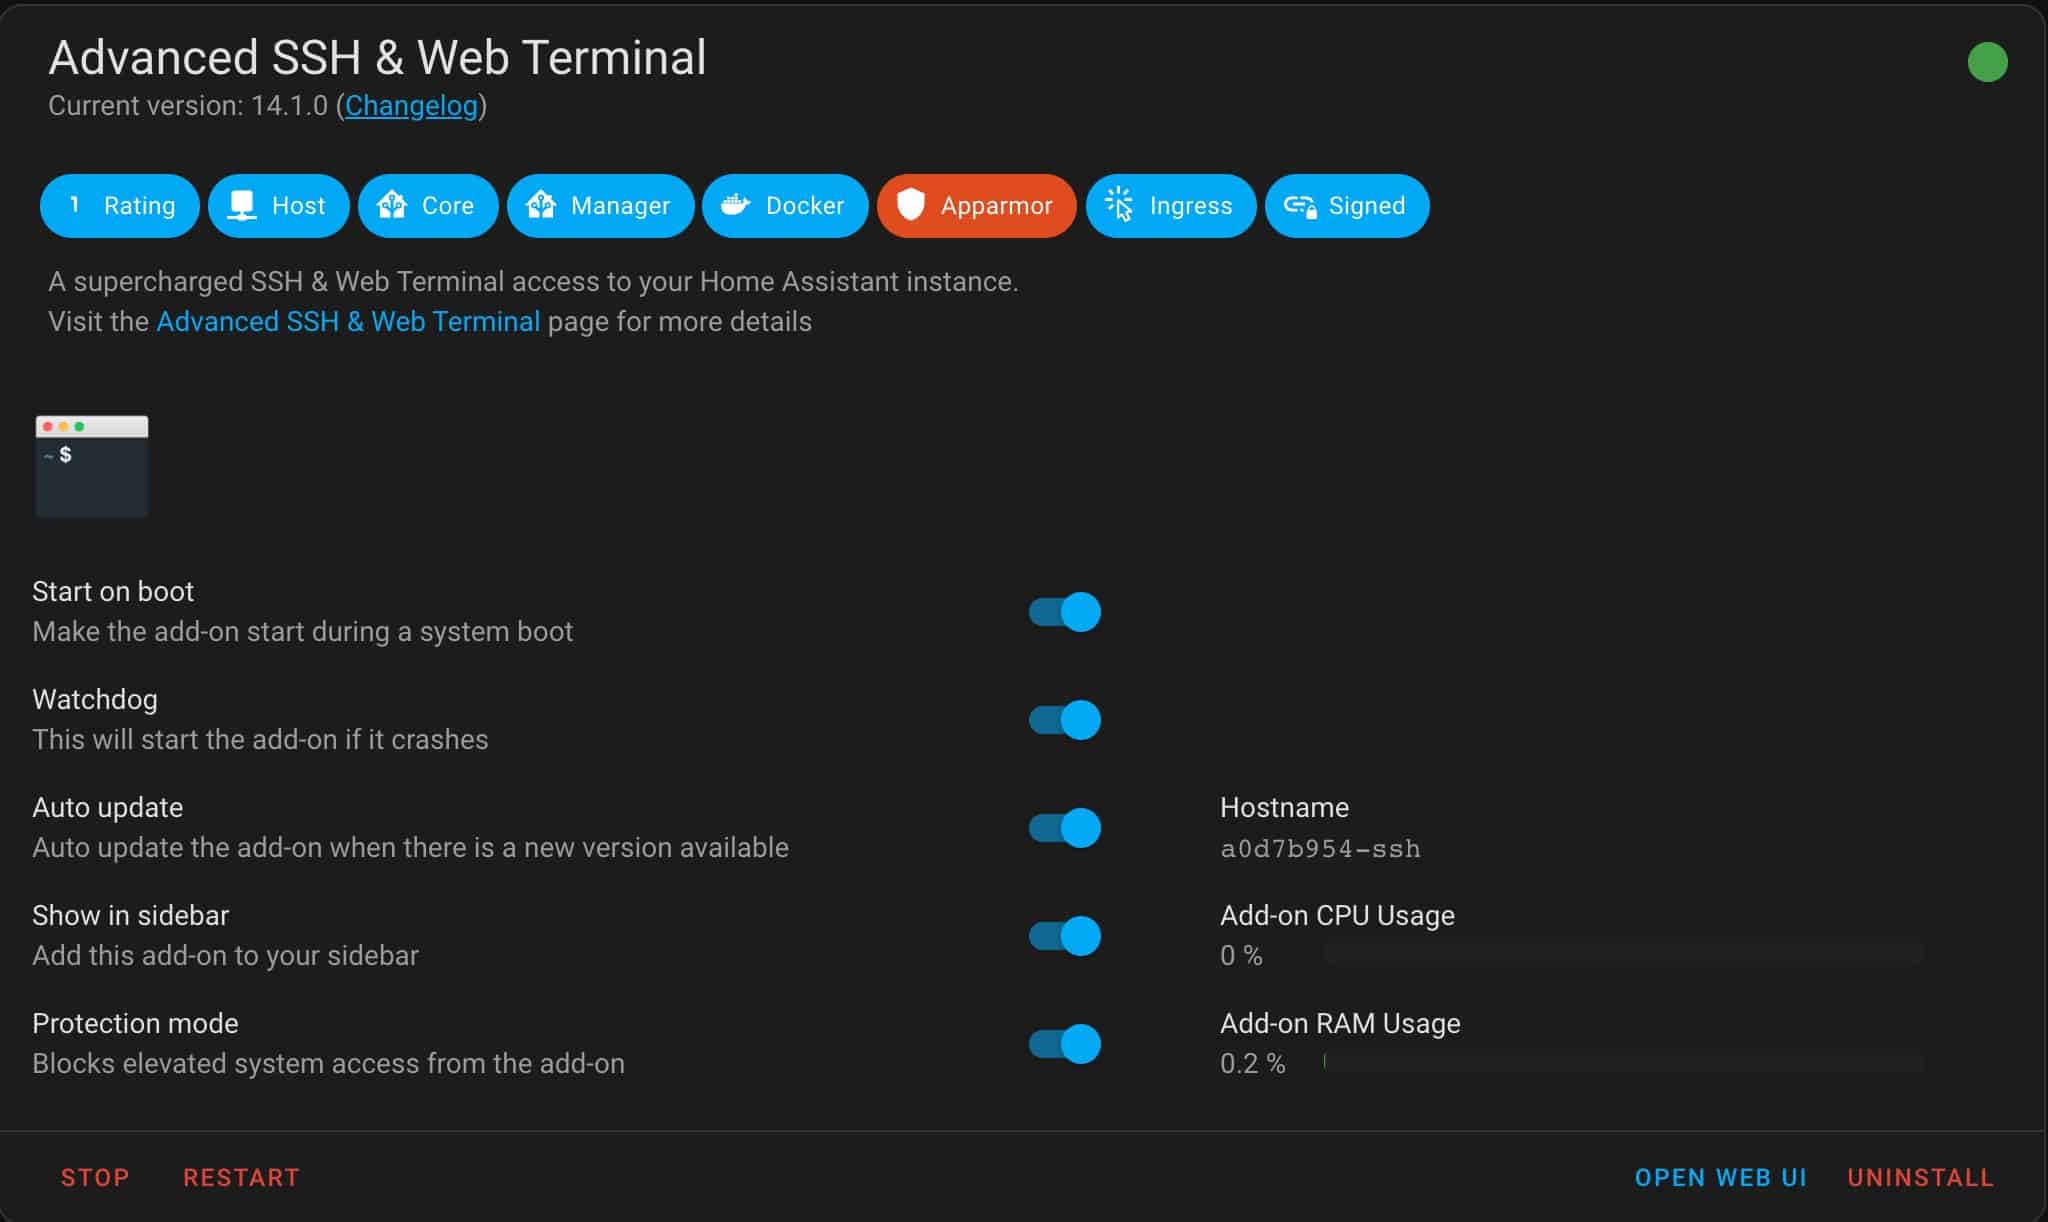
If you are running HAOS (Home Assistant OS), out of the box there’s no way to SSH into your HA server. While you probably won’t be regularly SSHing, it can be absolutely critical if things go wrong and HA won’t start.
The most recommended add-on for enabling SSH is “Advanced SSH & Web Terminal“. Add this by going into Settings -> Add-ons -> Add-on Store (lower right corner, blue button). Search for SSH and use the community add-on “Advanced SSH & Web Terminal“. Install it, then click on the Configuration tab at the top. The only parameter you need to change is the password. Make it long and super complex. Click Save. Go back to the Info tab and enable all of the options. Click Start. Use your favorite SSH client and verify you can login. Username is hassio.

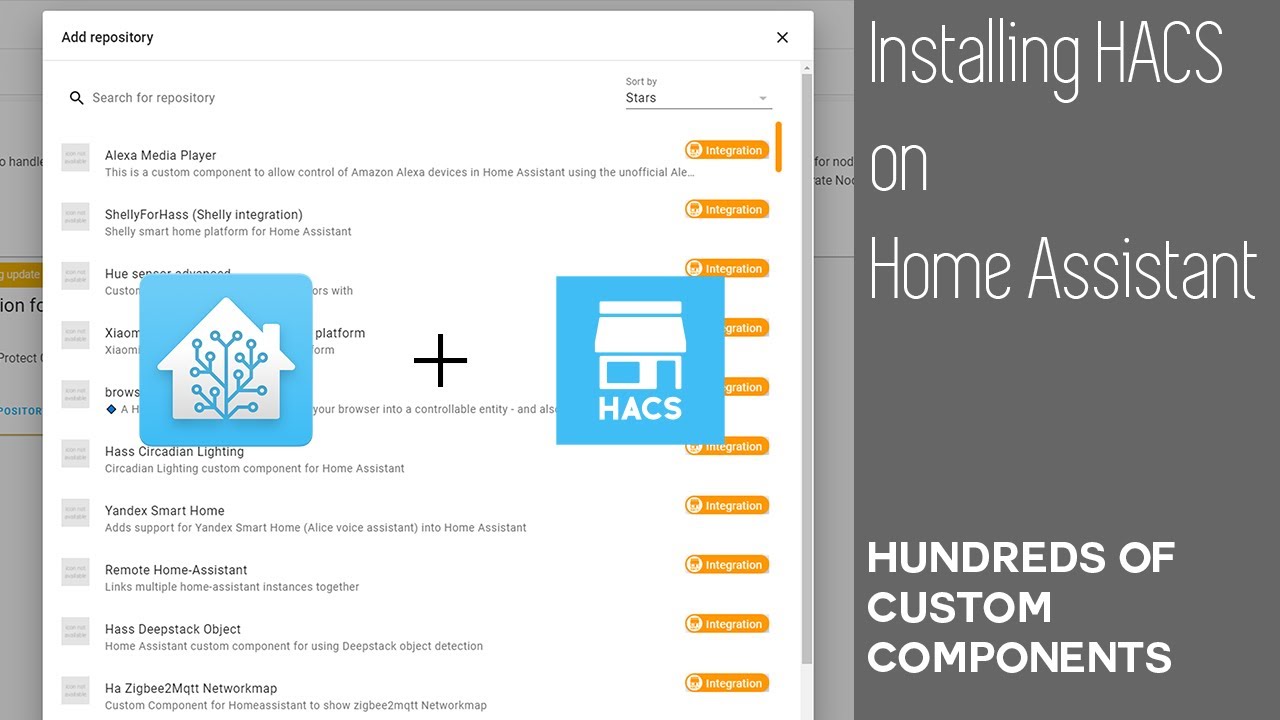
Install HACS
Home Assistant Community Store, or HACS, is a powerful integration for Home Assistant that allows users to download and install custom add-ons, integrations, themes, elements, and a lot more.
HACS enables a ton of community driven functionality that is otherwise not possible. You can find the full installation and configuration guide on hacs.xyz. Be sure to install this AFTER you enable SSH.
Install Home Assistant Companion Apps
The brains of Home Assistant are running on your server. However, by installing the HA companion apps on your phone and computer, you enable a lot of functionality. For the mobile app, this enables location awareness, among other things, so that you can trigger automations based on where you are (home, work, away), etc. It also exposes many phone sensors/states to HA, such as focus mode (iOS), WiFi SSID, battery state/level, cellular carrier, etc. Android users get a lot more sensors than iOS users, from what I’ve read.
Installing the Home Assistant app on your computer is also recommended. Why? Probably not super useful for location data, but it does expose a lot of sensors, such as Focus Mode (macOS), number of displays, Frontmost app, battery level, SSID, active audio, etc.
These can be used in automations, such as automatically turning on/off a desk light based on the screen state of your computer. Or turn your desk light off when your computer is shutdown. If you use macOS, check out this great article for more ideas.
Remote Backups
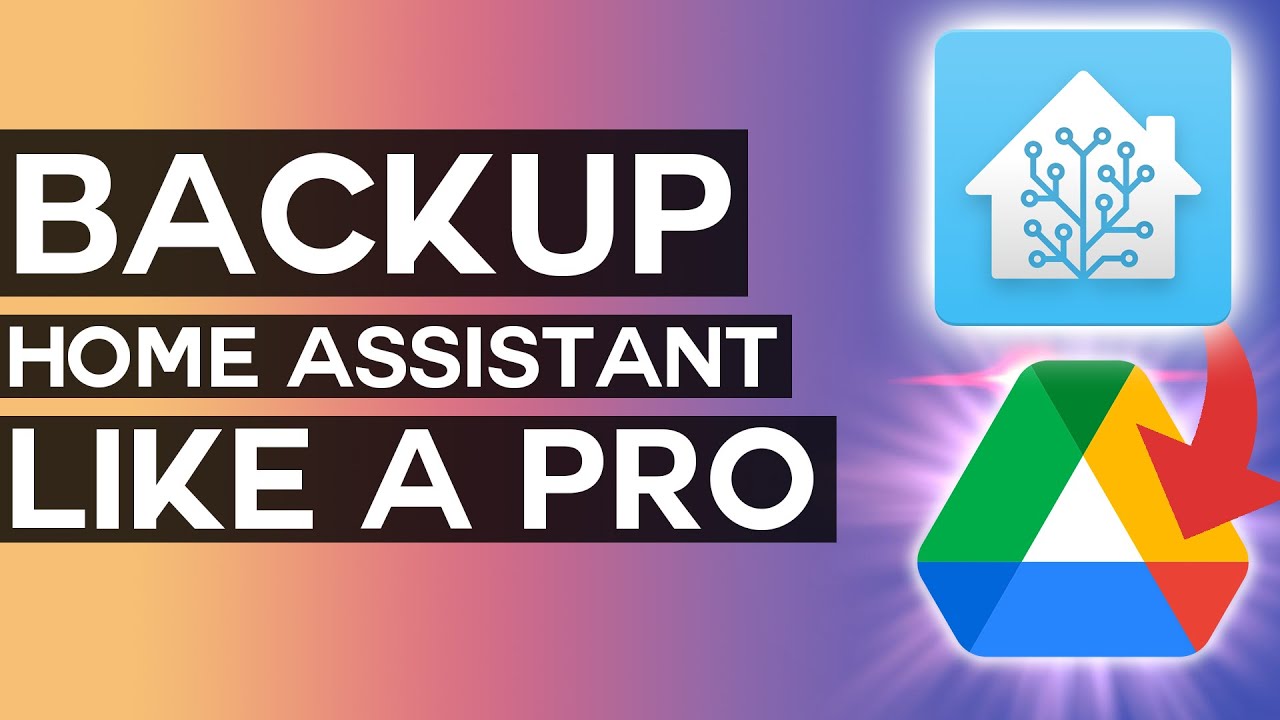
Backing up Home Assistant is absolutely critical. You want backups stored outside of HA, and preferably outside of your house as well. The best option is the Google Drive add-on. It has the most features, best UI, and can even stop user-selected integrations before a backup to ensure data consistency (e.g. influxDB, etc.). It also has a one-click on demand backup in the UI, which is pretty sweet. I strongly urge using the Google Drive option.
Installation: Settings -> Add-ons -> Add-on store. Search for Google.
Check out my HA backup/restore guides:
Home Assistant: Ultimate Backup Guide
Home Assistant: Ultimate Restore Guide
Tip: I’d personally do nightly backups and keep them at least 14 days. You can enable the “Generational” option where you can specify how many daily, weekly, monthly and yearly backups to keep. Awesome feature! Also, be SURE to setup a backup password for Google drive and keep it safe. There’s also a great “advanced” tutorial here to setup features like backup monitoring and alerts when there are failures.
Finally, Everything Smart Home YouTube channel has a great short video on the Google Backup extension. Check it out.

Samba Share
Although probably not something you need often, having a Samba Share on your HA server can help in a pinch. How? Imagine that HA died due to an update of some sort. Yes you have SSH enabled, but maybe you need to upload or download a file. Or you want to use a better editor like VS Code on the config files when HA won’t start. Installing the Samba Share extension gives you just that. Samaba can also be used when restoring Home Assistant and your backup file is over 1GB.
Installation: Settings -> Add-ons -> Add-on store. Search for Samba.
From a Mac you can access the Samba share by smb://IP and from Windows use \\IP.
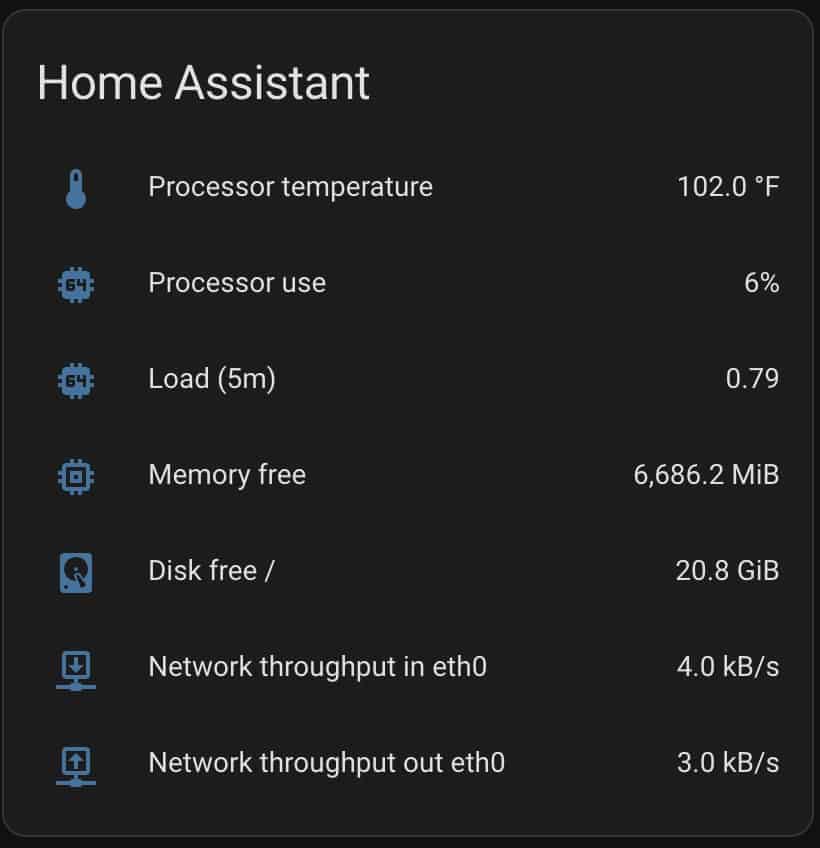
System Monitoring
System monitoring is very important, and even more so on lower end hardware like a Raspberry Pi. HA has a lightweight built in system monitoring feature. It requires editing of your configuration.yaml file, but don’t let that scare you away. Their article has great instructions and I just threw in all possible resources. Super easy. If you HAOS instance is virtualized, you will get limited data here. If you are using Proxmox, check out my guide on using Glances to pull in host hardware metrics into Home Assistant: Home Assistant: Monitor Proxmox with Glances
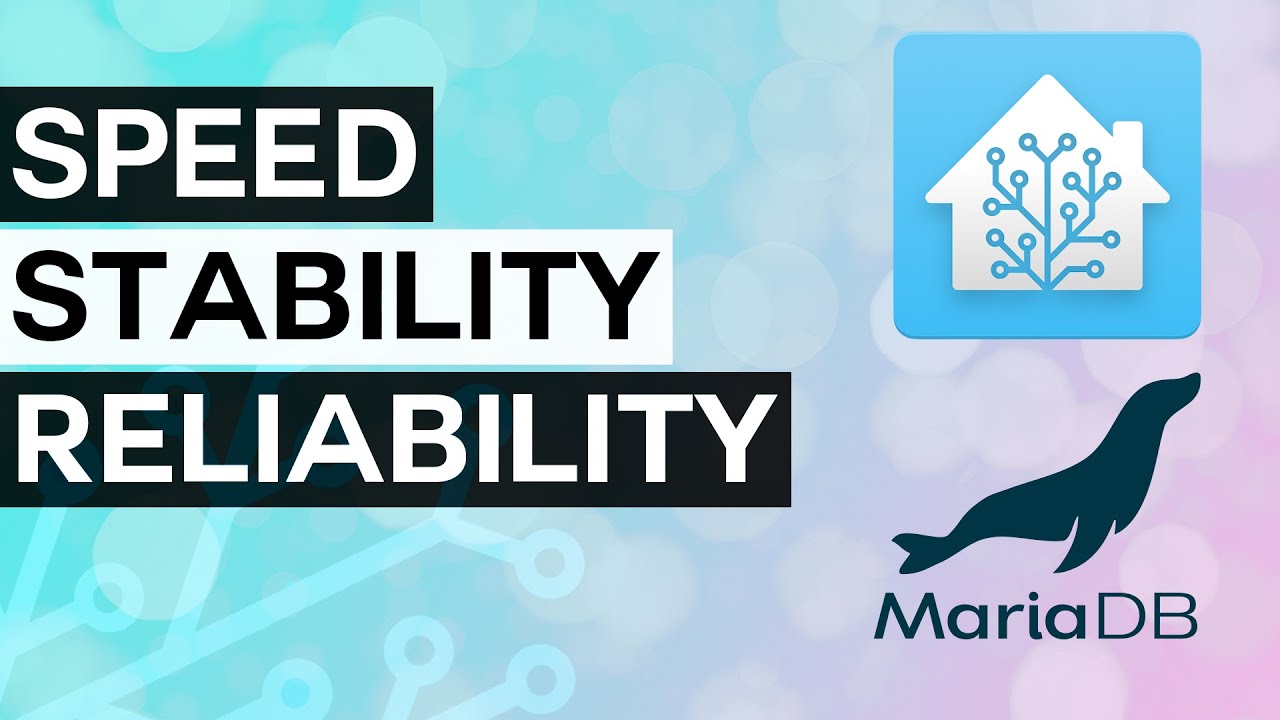
Replace SQLite with MariaDB (Optional)
By default HA installs SQLite as the database of choice for recorder and other data. By default it keeps about 10 days worth of metrics you can use for dashboards. As of HA 2023.4, the HA team put a lot of work into optimizing the built-in SQLite database. So the need for switching to MariaDB is probably much less than it was before. If you just want to keep things simple, I’d skip MariaDB.
If your HAOS instance is running on a SD card, do NOT even think about MariaDB. Stick with SQLite. If you know what you are doing and really want a different database engine, MariaDB is great.
Enable Home Assistant Cloud
Home Assistant, out of the box, is not cloud connected. However, if you want to leverage Alexa, Google Assistant, webhooks, use remote access, or more, I strongly suggest looking at Home Assistant Cloud. In the US it costs $65/yr, with a free 30 day trial. While I don’t need remote access via their cloud (I use WireGuard on my Firewalla), I do use the webhooks feature on a daily basis with Geofency for precise location tracking. Plus, it helps support the great team behind HA and further develop the platform. Win win.
Optional Add-Ons
Many people will find many of the following optional add-ons useful. Consider how you will want to use Home Assistant and see if any of these are temping to try out.
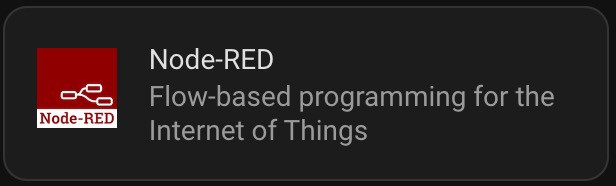
Node-RED Automations (Advanced)
HA automations have come a very long ways, from being entirely configured via manually editing YAML files to now having a great UI baked into HA that can do pretty complex automations with just a few clicks. I would suggest starting with the built-in automation function as it has a lower learning curve.
However, some people swear by the Node-RED add-on. Node-RED is a visual flow “scripting” engine that has nothing to do with Home Assistant as it has many uses outside of HA. However, HA has deep hooks into Node Red so you can visually build highly complex automations. I only mention it here so that you are aware of it, not as the first option I’d suggest for starting your automation adventure. To install Node-RED go to Settings -> Add-ons, and search the add-on store for Node-Red. Click install.

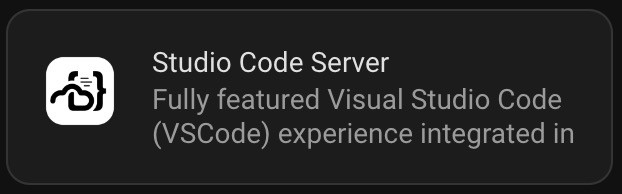
Visual Studio Code (Must Have)
One of the best programming environments out there is Microsoft Visual Studio Code. HA has an add-on that runs a local instance of VScode on your HA server and is accessible via the HA web UI. For the relatively rare occasions you do need to edit a file, this is a great way to ensure syntax is correct. Plus it has Github integration if you want that as well. To install VScode server go to Settings -> Add-ons -> Add-on store and search for Studio Code server. You can then add VS Code to the left sidebar for easy access.
Let's Encrypt + Cloudflare DDNS
If you want to access HA via HTTPS with a trusted certificate, then the Let’s Encrypt add-on is great. I use it in combination with the CloudFlare DDNS integration to automate the requesting of, and installation of a trusted wildcard SSL certificate on my HA server. I use CloudFlare as my DNS server, so this setup is perfect for me.
- Install Cloudflare integration (Settings -> Devices & Services -> Add Integration).
- Setup letsencrypt integration using Cloudflare DNS validation. (Install via Settings -> Add-ons -> Add-on store and search for Letsencrypt).
- On my firewall (Firewalla Gold Plus) I setup a custom DNS entry of ha.mydomain.com and pointed it to the private IP address of my HA server.
- When at home I point my browser ha.mydomain.com and it redirects the HTTPS connection to my internal private IP.
- In HA network settings (Settings -> System -> Network) I set the external/internal address to: https://ha.mydomain.com:8123
- Update the server URL in the Home Assistant companion apps.
I don’t have external access enabled to HA (NO port forwarding). Make sure you also set the add-on to Start on Boot (so your certificate will renew), and optionally enable Auto update.
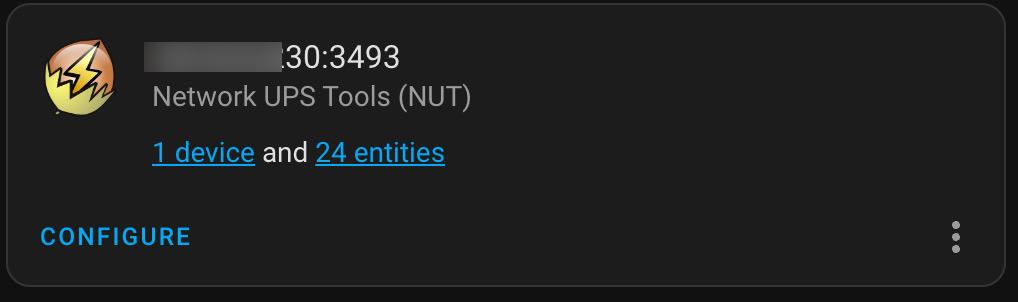
Network UPS Tools
If you are running HAOS on bare metal this is a great add-on to gracefully power down HAOS when you go on UPS power. If you are running Proxmox, you should configure NUT on the Proxmox host, and Proxmox can then gracefully shutdown the HAOS VM.
I have a Synology NAS which is powered by a cheap UPS that has a direct USB connection to my Synology. This allows the Synology to gracefully power down during a power outage. But what if I want to monitor the UPS state or gracefully shutdown HA during a power outage? That’s where Network UPS Tools (NUT) comes into play.
Install it by going to Settings -> Devices & Services -> Add integration. Search for NUT.
You can now configure the UPS service on your Synology to also be a server. Once you do this you can point the HA NUT instance to that Synology NUT server instance. HA will then display many sensors such as battery charge, load, status, etc.

InfluxDB + Grafana (Intermediate)
Home Assistant will keep about 10 days worth of sensor data. If you want long term storage of sensor data, you will use InfluxDB. To do cool graphing and dashboards you will use Grafana. Grafana allows you to query, visualize, alert on and understand your metrics. Create, explore, and share dashboards.
You can install InfluxDB inside HAOS, or run it outside of HA. I prefer running InfluxDB and Grafana outside of HAOS. Why? The InfluxDB can grow quite large and you don’t want to bloat your main HAOS backups. Restoring backups over 1GB are a bit painful. I like running InfluxDB and Grafana in LXC containers on Proxmox.
Useful InfluxDB and Grafana guides:
Home Assistant: Installing InfluxDB (LXC)
InfluxDB 1.x Automated Backups
Home Assistant: InfluxDB Data Management (LXC)
Configuring InfluxDB + Chronograf for LetsEncrypt SSL
Home Assistant: Installing Grafana (LXC) with SSL

Watchman
As you build out your HA system, add/remove devices, and have lots of automations, things can get a bit wonky. This can happen more on HA than other platforms, like Hubitat. (IMHO, this is an area the HA developers need to pay a lot more attention to if they want wider adoption of the platform).
The watchman is a custom integration for Home Assistant, which collects all the Home Assistant entities (sensors, timers, input_selects, etc.) mentioned in your yaml configuration files as well as all the services. Having a list of all entities, the integration checks their actual state one by one and reports those are not available or missing. This is a lightweight add-on that can really help keep HA running smoothly.

Ongoing Maintenance
These are some beginner tips once you have HA up and running and want to keep things up to date, secure, and error free.
Home Assistant Updates
Once you have HA setup, over time there will be updates available. You might be inclined to either 1) Ignore updates and go months without installing them or 2) Be super eager and just push install and pray everything works post-upgrade.
Frankly, neither approach is good. I certainly recommend keeping up on HA updates, which are released monthly. I would strongly advise to NOT install the monthly patch for at least a week, maybe two after they are released. Bug/issues can be common, so this gives the community time to fix them.
Even if you wait a few weeks to update ALWAYS read the release notes for EACH update you are installing. There are often “breaking” changes that may impact you. You can avoid frustration by reading the release notes and taking any needed action. I would always wait for at least the .2 patch for any monthly release.
Review Logs
Even if you aren’t experiencing any obvious problems with HA, peering into the system logs could reveal issues that might cause you issues down the road. Go to Settings -> System -> Logs. In the upper right hand corner of the Logs screen you can change the various log types that you can view. “Core” and “Supervisor” logs are the most important. Before you start installing other integrations, review the logs. Then pretty frequently after you do a lot of config changes, just make sure the logs look clean. After the monthly HA updates also look at your logs. This will let you spot issues before they become showstoppers.
Summary
Home Assistant can be daunting to delve into. But it has come a long ways in terms of features, usability, stability and speed. It’s not perfect for sure, but now in early 2023 I feel that it’s in a great position to really take off. Making choices about hardware, hypervisor and add-ons are key. Once you have the fundamentals configured, you can then start configuring each of the integrations and doing home automation.