If you value security and want to use InfluxDB 1.x and Chronograf with trusted SSL certificates from LetsEncrypt, this post is for you! This tutorial assumes you are running InfluxDB 1.x and Chronograf either in a LXC container or a traditional VM. If you are using Docker, the procedure would be fairly different and out of scope for this post.
This post covers:
Installing certbot for Cloudflare DNS
Obtaining a trusted LetsEncrypt wildcard certificate for InfluxDB 1.x and Chronograf
Modifying your Home Assistant and Grafana instances to use InfluxDB SSL.
This procedure is written using the python certbot with cloudflare DNS package. I was unable to use procedures based on snapcertbot inside the LXC container. I managed to get the base snapd installed, however the last step of pulling down the certbot package failed. LXC containers have unique security restrictions that cause snapd issues.
If you aren’t using Cloudflare DNS, then you will need to use a different certbot package and use the appropriate parameters for your DNS provider. Certbot automatically installs a cron job that will handle automatic renewal of your certificate. So you don’t need to do anything for renewals, as they are automatic.
DNS Redirect
Since we are configuring the InfluxDB server for a trusted SSL certificate you will want to access your InfluxDB server via FQDN from inside your home network. This will prevent any browser warnings. This also allows Home Assistant to connect to the FQDN of your InfluxDB server over SSL without any errors. It also keeps all traffic (including DNS queries) within your home network. To do this you need to configure a DNS redirect rule on your router, firewall, Pi-hole, AdGuard server or with NextDNS.
What is a DNS redirect rule? Basically when your home computer does a DNS query for influxdb.mydomain.com we want the private internal IP address of your InfluxDB server returned, not a public IP address of your ISP’s modem. This means your router/firewall will intercept that request to the public DNS server and respond with the private (internal) IP of your InfluxDB server. See the diagram below for the traffic flow.
Before proceeding create a DNS direct rule that points the FQDN of your InfluxDB server to the private (internal) IP address of your InfluxDB server. You should not create a record in your public DNS Cloudflare zone that has the private IP of your InfluxDB server. Do the redirect on an internal device.
InfluxDB SSL Certificates
1. Open a SSH session to your InfluxDB LXC 2. Type the following commands:
5. Run the following command but change the domain (use both the ‘flat’ domain mydomain.com and the wildcard *.mydomain.com). Change the email address to a real address that Letsencrypt can send notifications to. If you get a txt record mismatch error it might be due to slow DNS propagation. You can increase the wait from 30 seconds to whatever value you want.
Warning: If you get a failure, be careful how many times you re-attempt. Letsencrypt has a threshold of attempts for production that you can’t exceed or it will deny issuing a certificate. If you get a failure, try the —staging (two dashes) option until you get a success. Staging is not rate limited. You can then remove the –staging option to obtain a real certificate once you have success in staging.
7. Now we need to set permissions. Because we need certificates for both InfluxDB and Chronograf, we need to do a little dance with unix groups so that both services can access the certificates.
Note: You may run into a situation were the mydomain.com letsencrypt directory has numbers after it (e.g. /etc/letsencrypt/live/mydomain.com-0001), due to failed attempts or dry runs. This will cause the permissions commands, below, to fail due to dangling symlinks. If that happens, the best solution is to delete the Influxdb LXC container and rebuild it. Certbot is pretty complicated under the hood and it’s quicker to start over than fix certbot.
8. Open the influxdb.conf file with nano so we can modify a few parameters.
nano /etc/influxdb/influxdb.conf
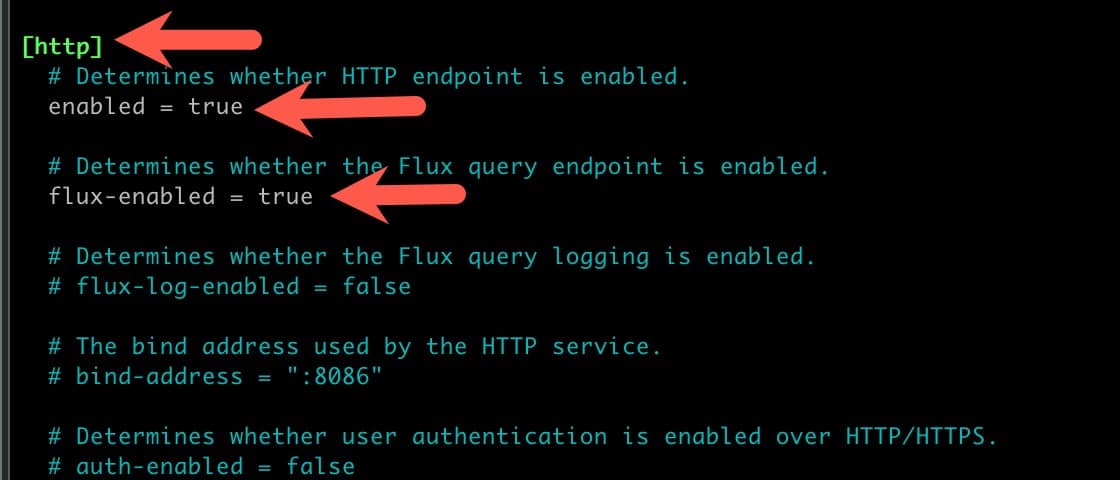
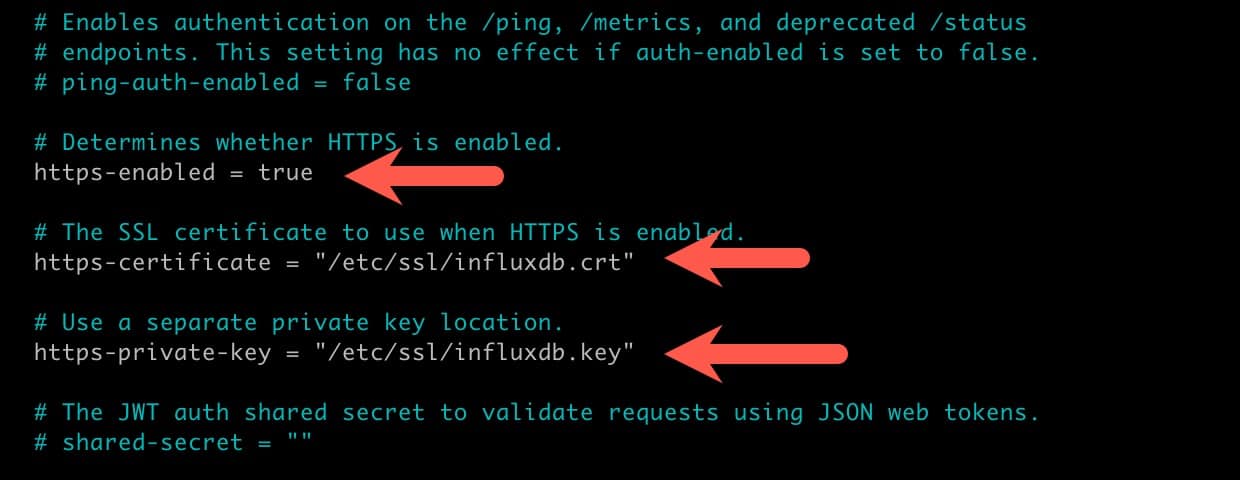
9. In Nano open search (^W) and search for [http] and modify each of the five parameter lines as shown below. Make sure you remove the # before each parameter you change.
10. Save and exit Nano. Verify InfluxDB can see the certificates:
ls -l /etc/ssl/influxdb.*
11. Restart the InfluxDB service and review the logs using the commands below. Make sure there are no permission errors or other issues in the logs. If the service takes a while to start, it is very likely failing. Address any errors before proceeding.
					systemctl restart influxdb
journalctl -u influxdb
Chronograf SSL Configuration
1. The Chronograf package has a separate SSL configuration file. Run the command below to open the empty config file.
nano /etc/default/chronograf
2. Paste the following lines into Nano. Save and exit.
4. If all is well, you will see a line that reads https://[::]:8888. Note the S in HTTPS. If you do not see this, troubleshoot as needed and do not proceed until it is working.
5. At this point we can browse to https://YourFQDN.com:8888 and it should load without any SSL errors. If you haven’t yet configured InfluxDB you will see the welcome screen, otherwise you should get the login window.
Home Assistant InfluxDB SSL Configuration
If you’ve already configured Home Assistant for InfluxDB, then you only have a couple of tweaks to make to the configuration to use SSL. Open your configuration.yaml file on Home Assistant. In my example below, modify lines 9 and 10 to change their values to true. Save the config file and restart Home Assistant. Check the Home Assistant core logs for any InfluxDB connection errors.
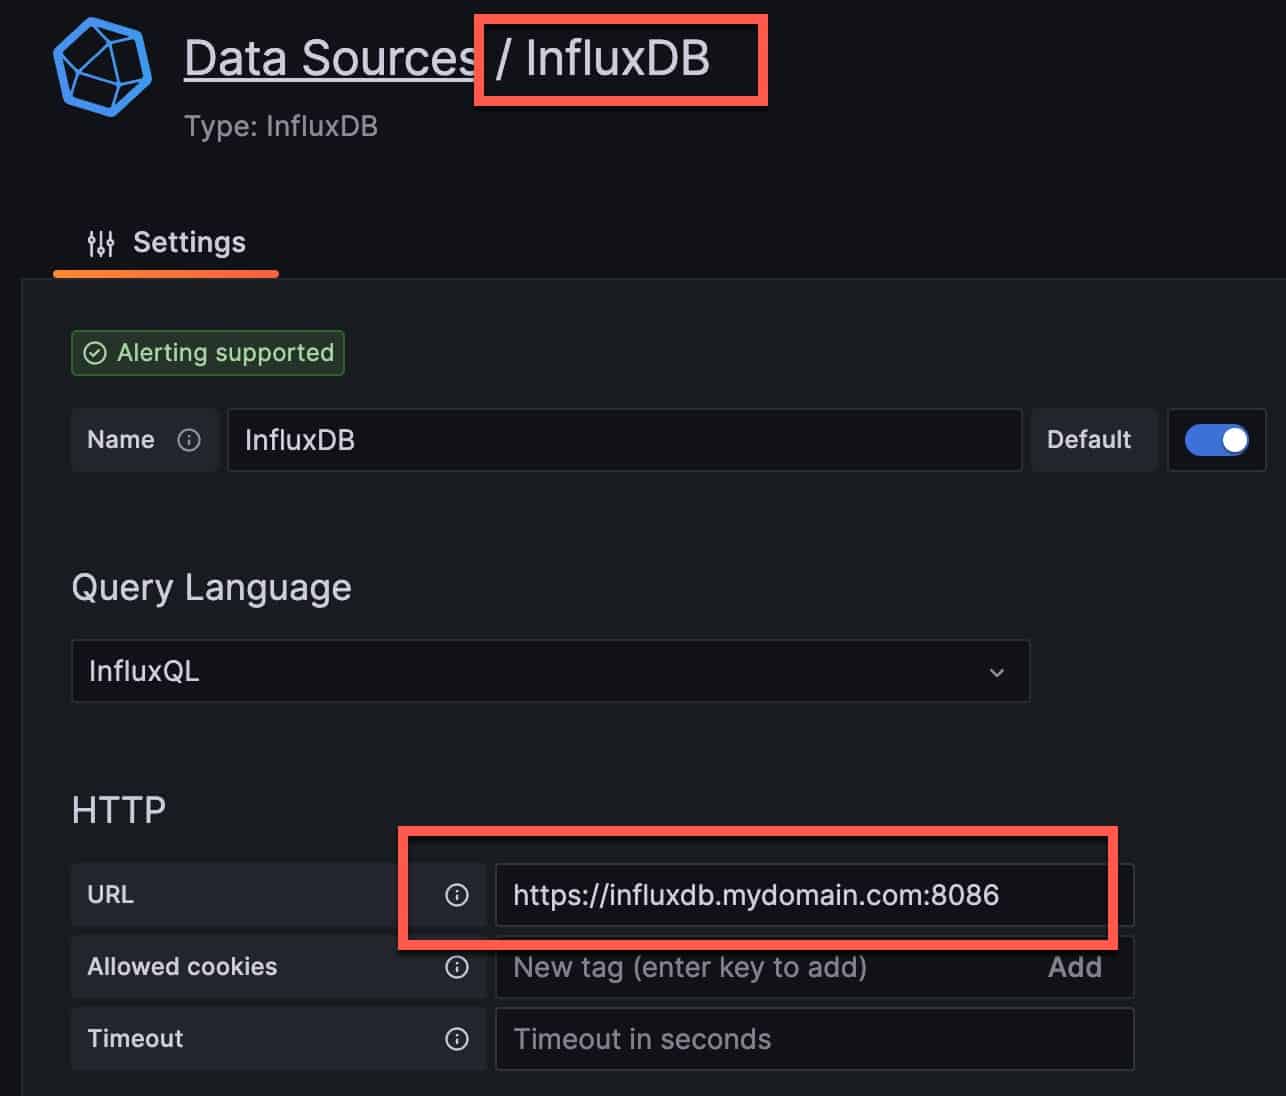
If you already have Grafana installed and running, we will need to modify the Data source configuration to now use HTTPS instead of HTTP. In Grafana open the Data Sources configuration for your InfluxDB. Modify the URL to use the FQDN of your InfluxDB server and change the protocol to HTTPS. At the bottom of the screen click Save & test.
Summary
Configuring InfluxDB and Chronograf for SSL is a bit tedious, but not too difficult. By using certbot we have trusted SSL certificates from LetsEncrypt which will auto-renew as needed. Now you can configure any services that use InfluxDB to use SSL, such as Home Assistant and Grafana.