A very popular NVR solution that integrates well with Home Assistant is Frigate. It provides fantastic object and person detection from your camera streams. The Frigate project is a Docker container, so it’s easy to deploy. You can run Frigate within Home Assistant, but I prefer to run it in a separate dedicated VM on Proxmox. This blog post will walk you through building a Ubuntu VM on Proxmox dedicated to Frigate and optionally use a Google Coral PCIe TPU for object detection.
In order to boost the performance of Frigate I purchased an A+E Key m.2 PCIe Google Coral TPU. I pulled the m.2 WiFi card from my Beelink SEi12 Pro and replaced it with the Coral TPU. The m.2 Coral TPU is preferred to the USB version for a couple of reasons. First, PCIe passthrough can be more stable than trying to pass through a USB device. Second, the PCIe version has built-in thermal throttling which the USB version omits. Performance wise, USB and m.2 seem very similar from numbers I’ve seen.
It is possible to also use your GPU with Frigate to help offload some ffmpeg CPU load. However, in my testing with a single camera the CPU load was unchanged on my 12th Gen CPU when adding ffmpeg GPU offload. My VM has 1 vCPU and at the Proxmox level it uses about 15% CPU utilization with one camera detection stream at 1280×720. Per Frigate System page the ffmpeg process is only using 3% of the VM’s CPU.
In addition, doing GPU passthrough and trying to get the very latest Intel drivers on Ubuntu to work is exceptionally challenging and seems very brittle even if you can get it to work. So for the purpose of this series, I won’t touch GPU passthrough.
This blog post will be using the following stack:
- Frigate 0.12.0
- Ubuntu 22.04
- Proxmox 7.4 with 6.2 Kernel
- Google Coral m.2 PCIe TPU
- EmpireTech 4MP IP PoE Camera
- Intel 12th Generation i5-1240P CPU
This post is not a Frigate camera configuration tutorial. The camera configuration within Frigate is very environment specific, and Frigate has a ton of configuration options. At the time of this post I am using the latest Frigate version (0.12.0) which can leverage built-in go2rtc, which I use in my example. So if you look at Frigate config tutorials on other sites, make sure it’s for 0.12 (or later) and uses go2rtc.
Tutorial Sections
This tutorial is pretty long as it covers a lot of ground:
- Promox Host PCIe Passthrough
- Deploy Ubuntu 22.04 VM for Frigate
- Mount Second Drive for Media (Optional)
- Install Docker and QUMU Agent
- Coral PCIe TPU Passthrough (Optional)
- Home Assistant MQTT Setup
- Home Assistant Frigate Integration Install
- Camera Configuration (IPC-T5442T-ZE)
- Frigate Configuration File
- Frigate Docker Compose
- Verify Frigate Functionality
- Home Assistant Frigate Integration
Proxmox Host PCIe Passthrough
First we need to modify the configuration of the Proxmox host where the Frigate VM will be running. Login to Proxmox and open a shell.
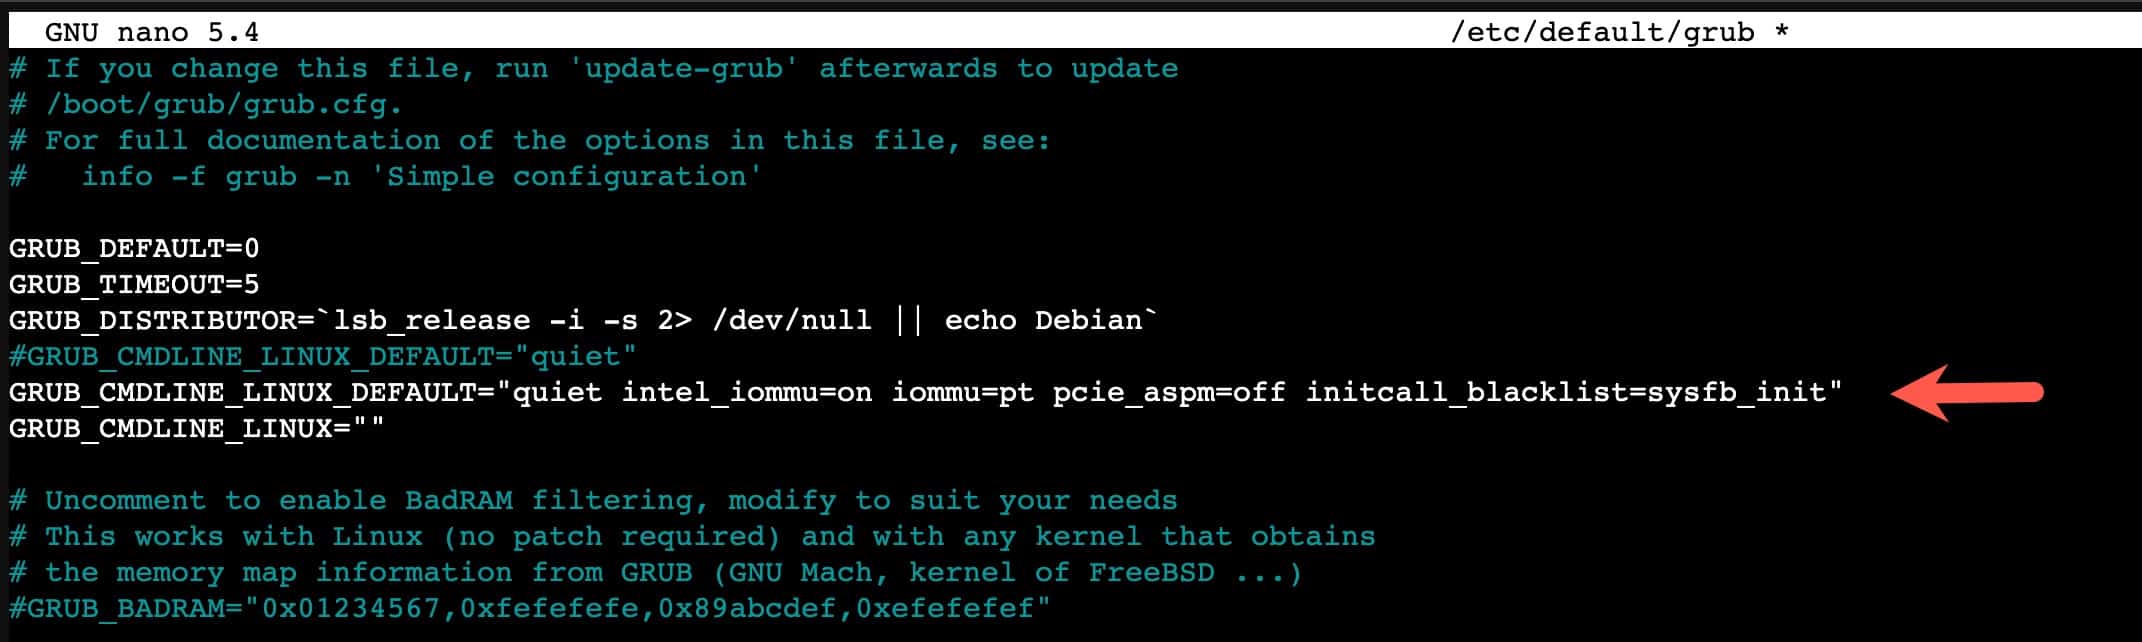
1. Modify the GRUB configuration by running the following command:
nano /etc/default/grub
2. Comment out the existing GRUB_CMDLINE_LINUX_DEFAULT and paste the following line under the commented out line. Save and exit Nano.
GRUB_CMDLINE_LINUX_DEFAULT="quiet intel_iommu=on iommu=pt pcie_aspm=off initcall_blacklist=sysfb_init"
3. Run the following command to update GRUB.
update-grub
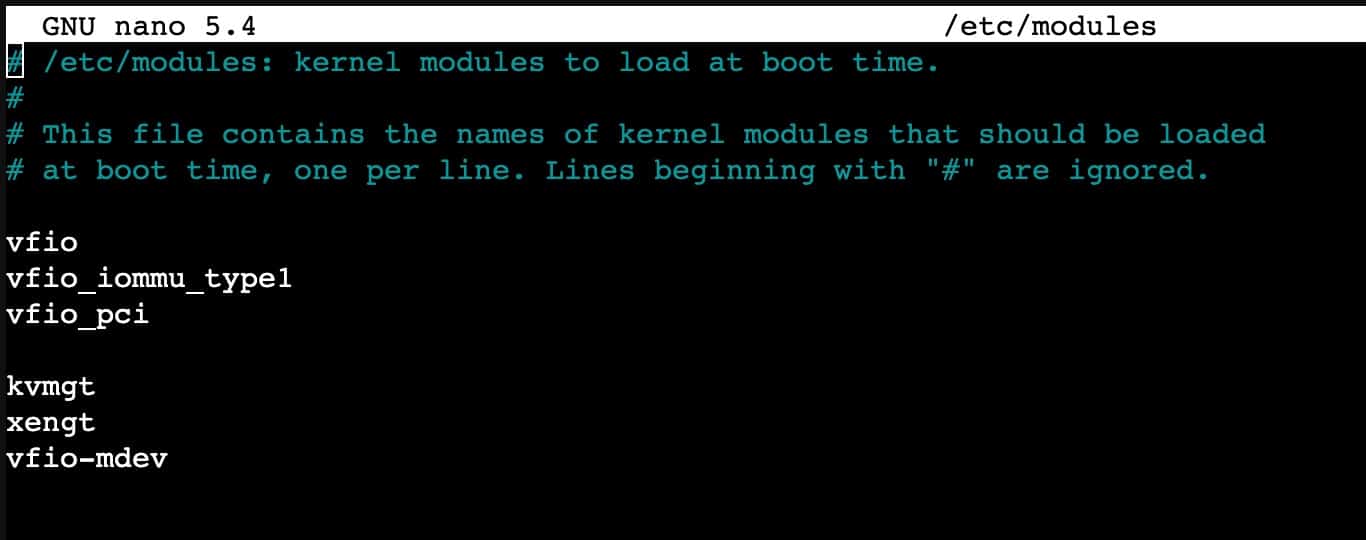
4. Let’s modify the kernel modules file.
nano /etc/modules
5. Add the following lines to the file, then save and exit nano.
					vfio
vfio_iommu_type1
vfio_pci

kvmgt
xengt
vfio-mdev
6. Run the following command to update the Kernel.
update-initramfs -u -k all
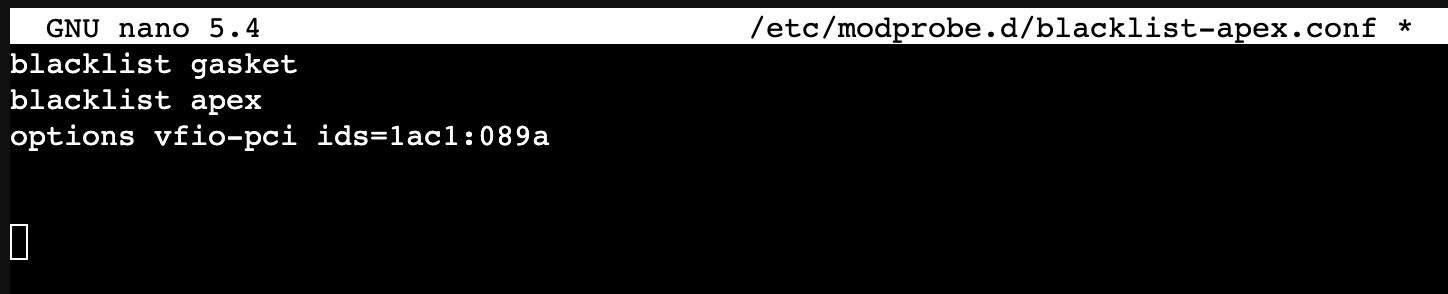
7. Now we need to blacklist the Coral devices so the Proxmox host won’t load the drivers:
nano /etc/modprobe.d/blacklist-apex.conf
8. Add the following lines to the blacklist file:
					blacklist gasket
blacklist apex
options vfio-pci ids=1ac1:089a
9. Save and exit nano, then run the following command:
update-initramfs -u -k all
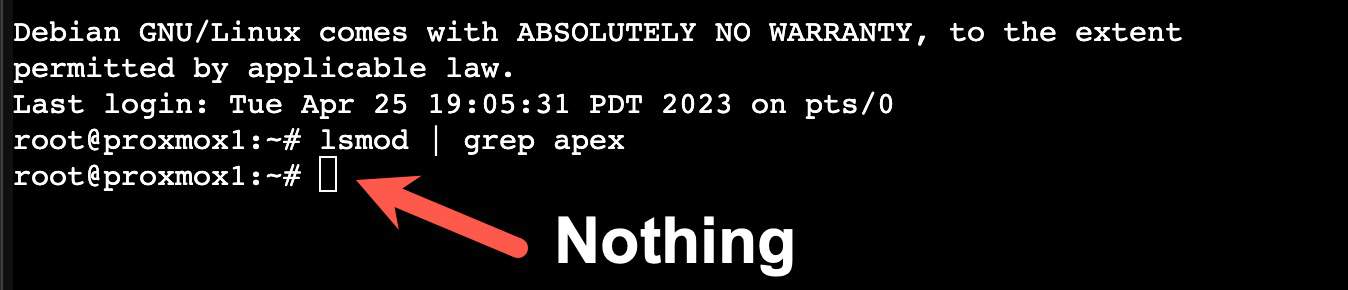
10. Reboot the Proxmox host. After it reboots open a shell again and run the following command. It should NOT print anything.
lsmod | grep apex
Deploy Ubuntu 22.04 VM for Frigate
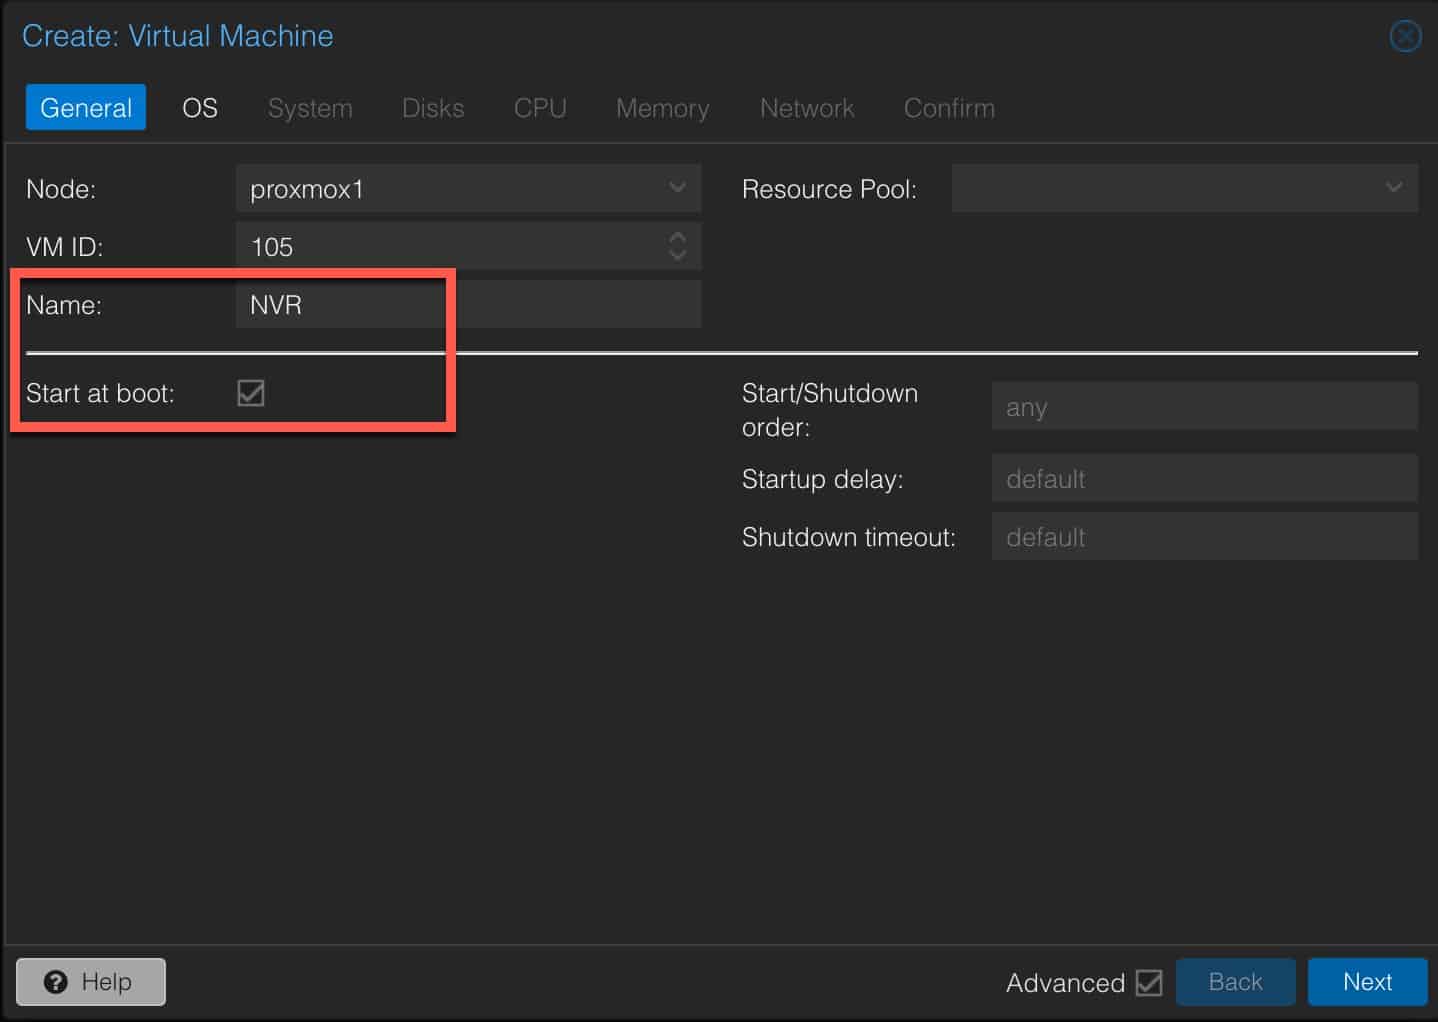
1. Login to your Proxmox server. Create a new VM with the following General settings. Use any Name you wish. Check the Start at Boot box.
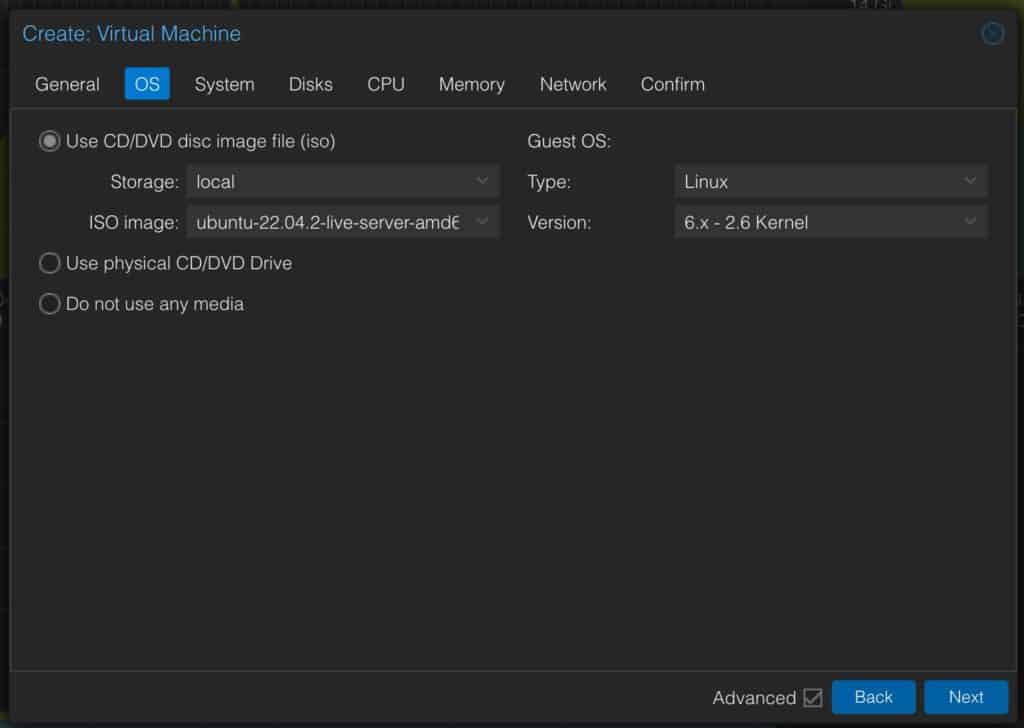
2. Download the Ubuntu 22.04 ISO. Upload it to a Proxmox datastore. On the OS page mount your Ubuntu 22.04 ISO.
3. On the System page configure:
- Graphic Card: Standard VGA
- BIOS: OVMF (UEFI)
- EFI Storage: <pick your storage>
- Qemu Agent: Check
- Pre-Enroll keys: UNCHECK (SUPER CRITICAL)

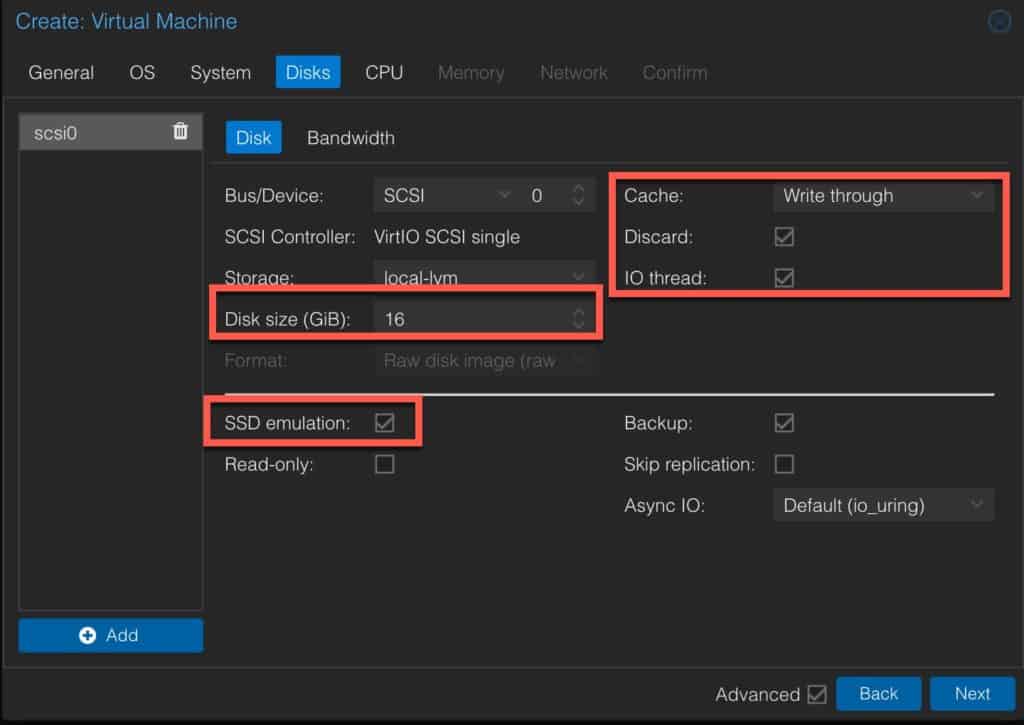
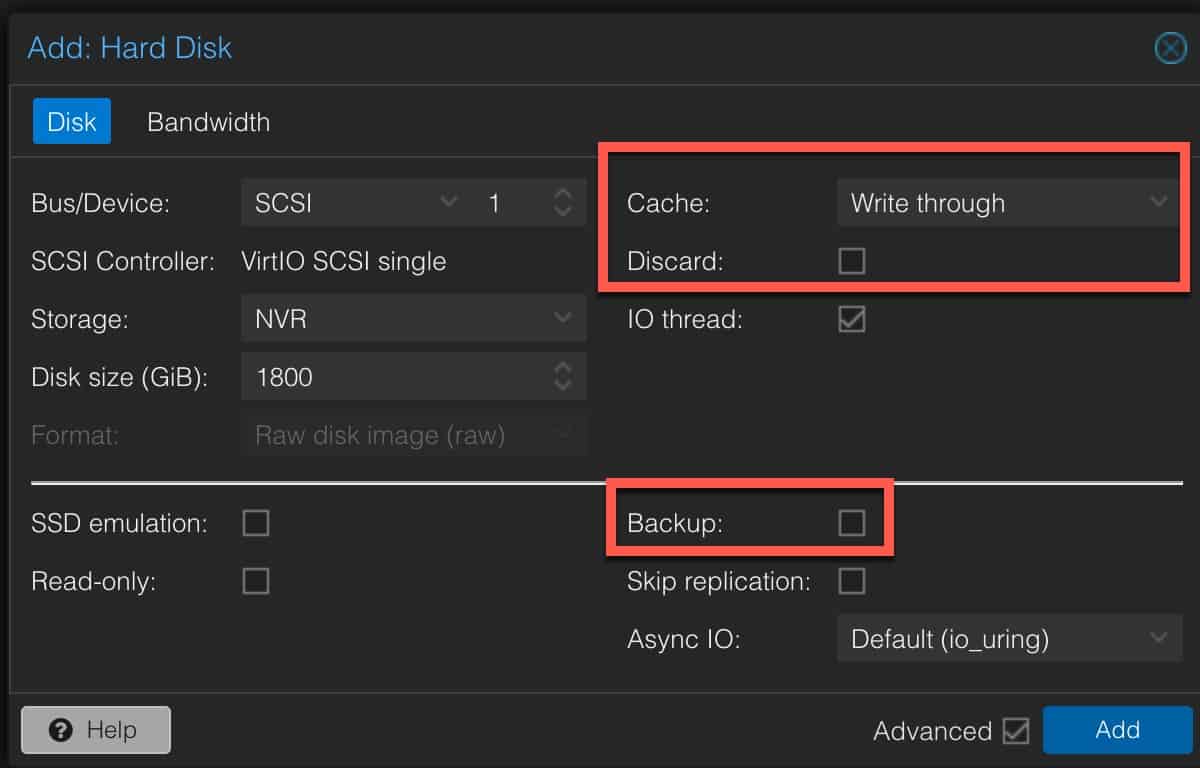
4. On Disks configure the following:
- Disk size: 16GB (or more if you wish)
- SSD emulation: Check
- Cache: Write through
- Discard: Check
- IO thread: Check
Note: If you have separate NVR storage add that virtual disk now. I highly recommend a spinning disk that’s designed for video surveillance like Seagate SkyHawk. 2.5″ SkyHawk drives are no longer made (just 3.5″), but Ebay may have factory sealed 2TB 2.5″ SkyHawk drives. I added a 1.7TB virtual drive.
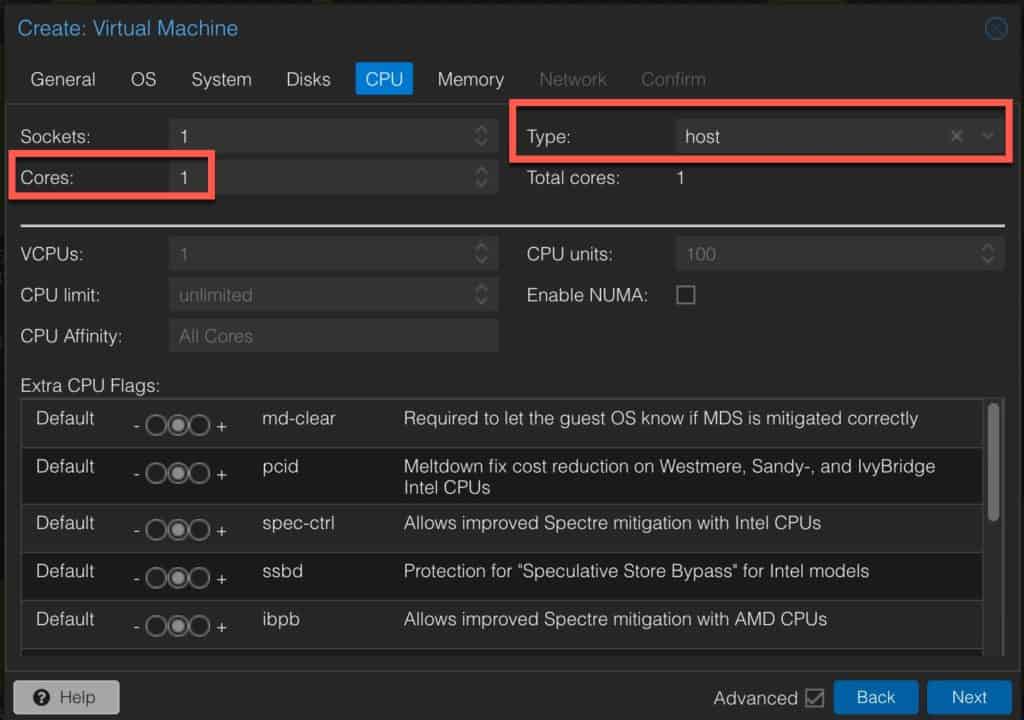
5. On the CPU page configure:
- Cores: 1
- Type: host
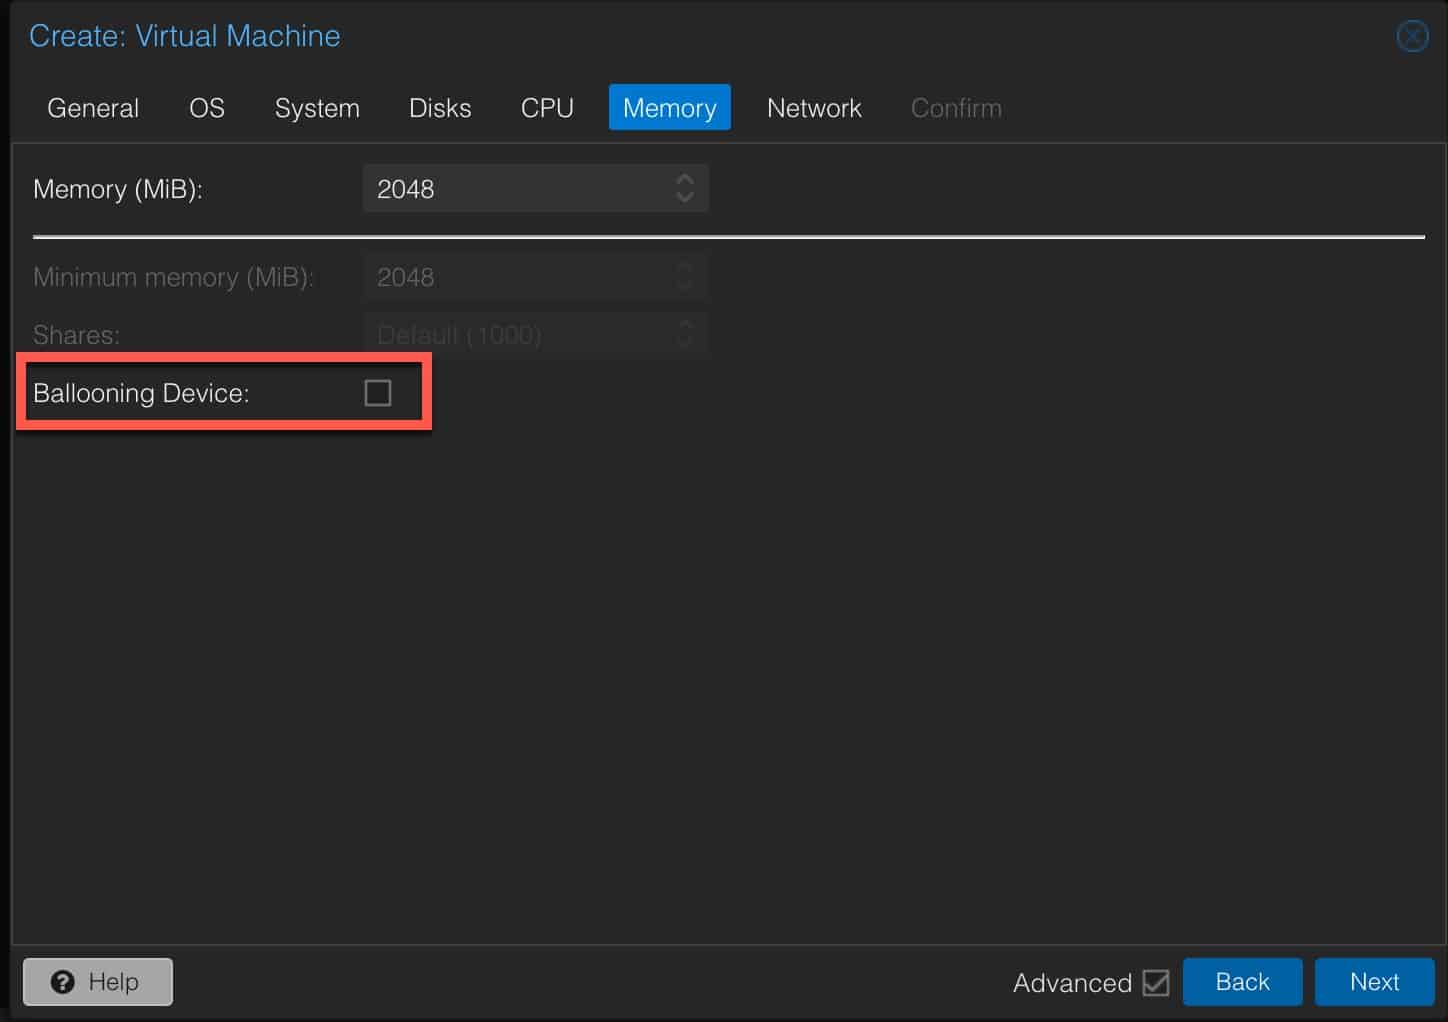
6. On the Memory page configure:
- Memory: 2048
- Ballooning Device: un-check
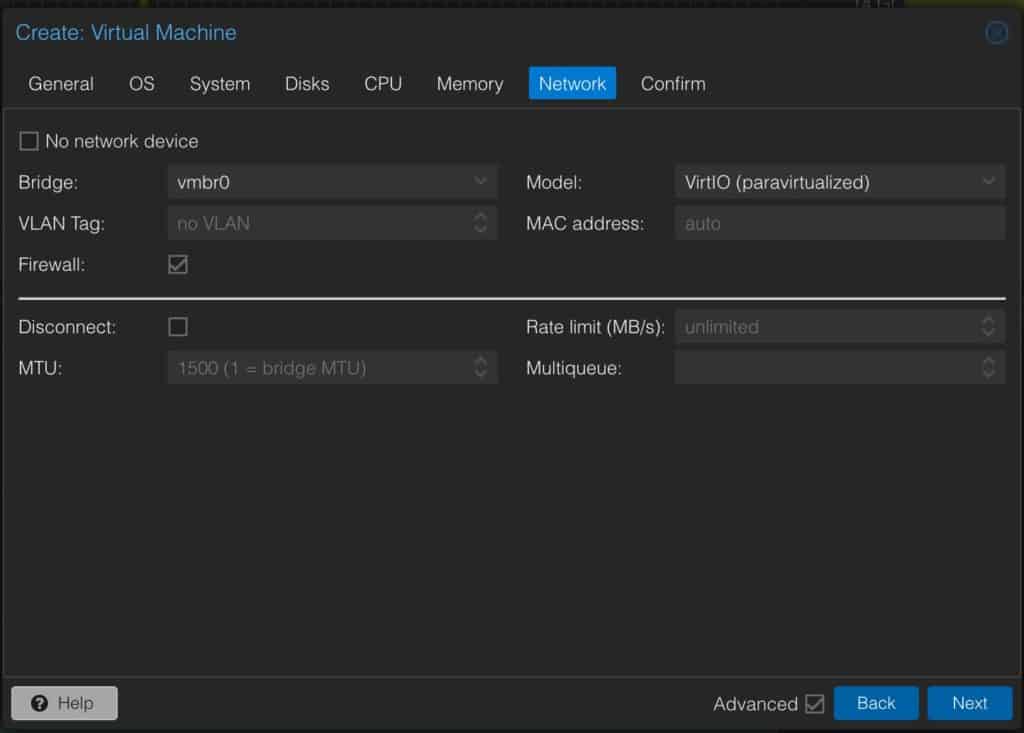
7. On the Network page configure as needed (usually defaults are OK).
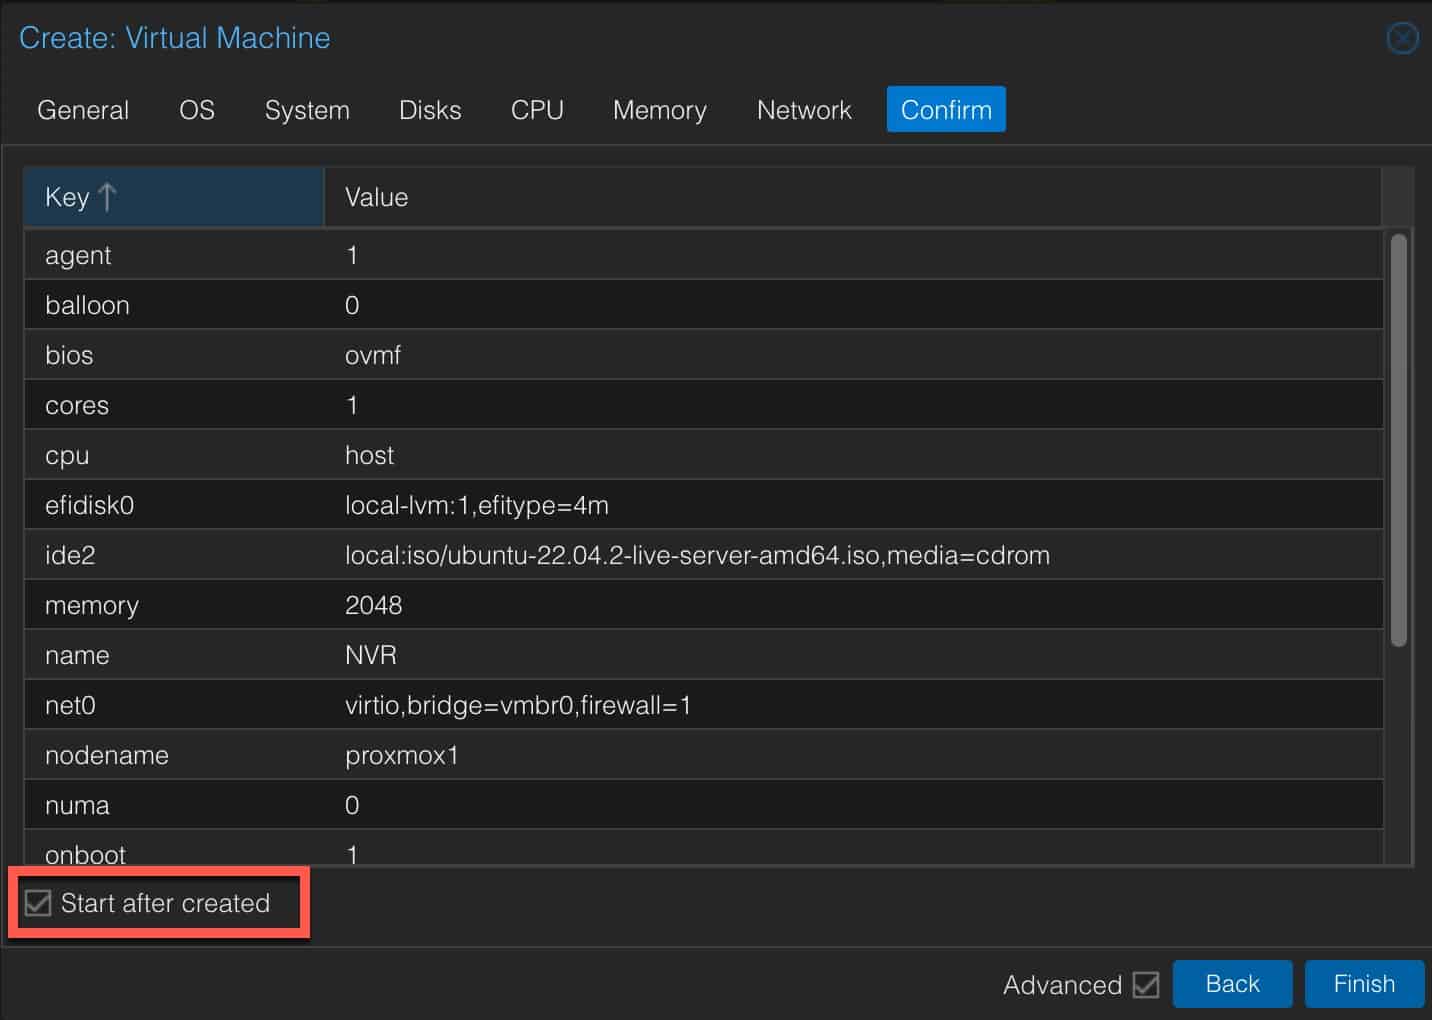
8. Check the summary page and tick the box to Start after created.
					agent 1
balloon 0
bios ovmf
cores 1
cpu host
efidisk0 local-lvm:1,efitype=4m
ide2 local:iso/ubuntu-22.04.2-live-server-amd64.iso,media=cdrom
memory 2048
name NVR
net0 virtio,bridge=vmbrO,firewall=1
numa 0
onboot 1
ostype l26
scsiO NVR:16,discard=on,ssd=on,iothread=on,cache=writethrough
scsihw virtio-scsi-single
sockets 1
start 1
vga std
9. Once the VM powers on, connect to the console in the Proxmox UI. Wait for the Language selection window to appear. Select your language.
10. If you are prompted to update the installer, do so.
11. Select your keyboard language.
12. Select Ubuntu Server (NOT minimized)
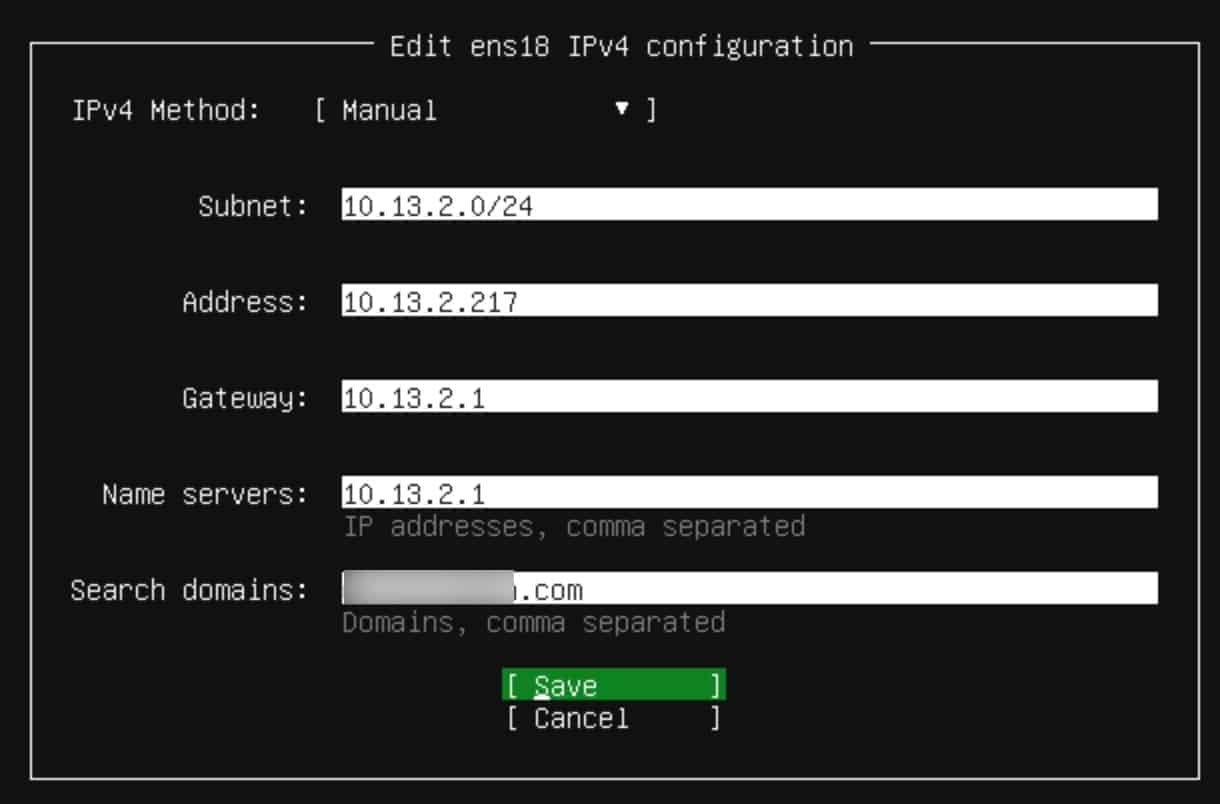
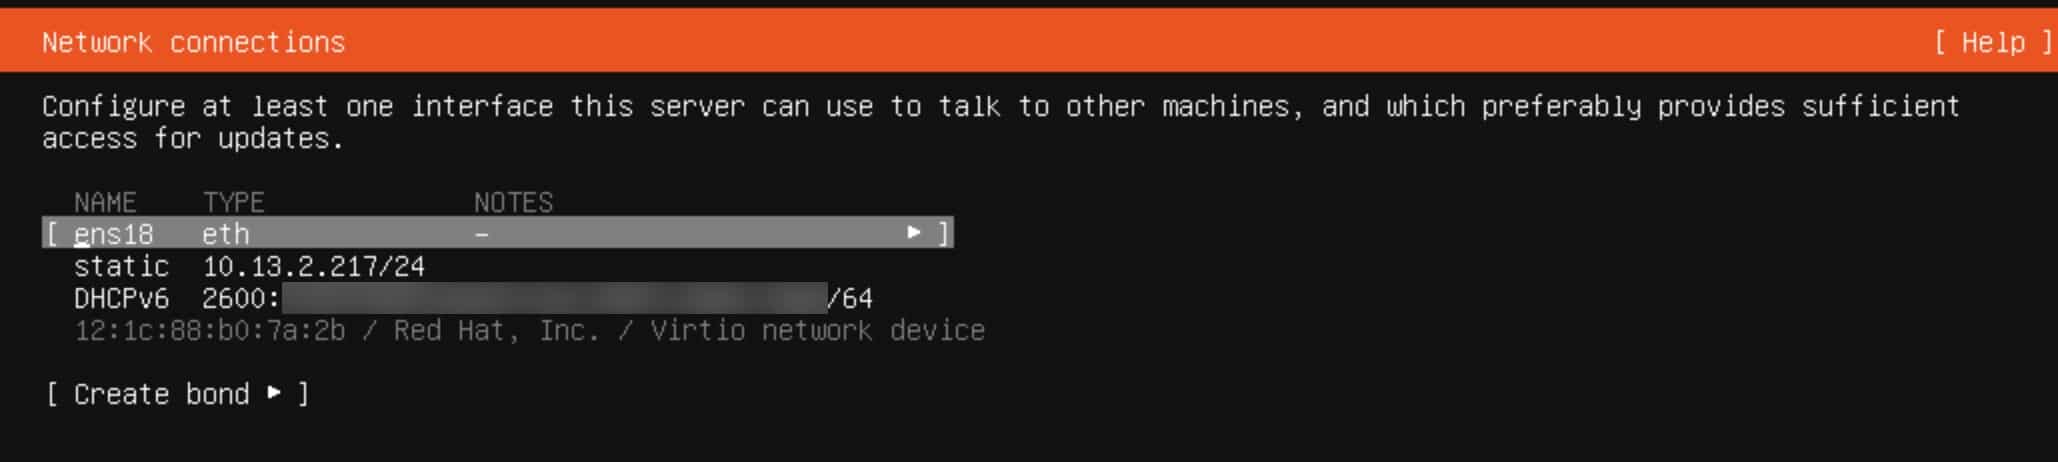
13. On the Network connections screen tab to your network interface name (e.g. ens18). Press enter on the interface name and select Edit IPv4.
14. Select Manual and enter the appropriate network info. Tab to Save and press Enter. If you want to setup IPv6, repeat the network configuration process a second time. I use IPv6 DHCP. Once back on the main Network connections screen tab to Done and press Enter.
15. Skip the proxy address, unless you need it.
16. On the Configure Ubuntu archive mirror press Enter on Done.
17. On the Guided Storage configuration screen tab to Done and press Enter.
18. On the Storage configuration tab to ubuntu-lv under USED DEVICES and press ENTER. Tab to Edit and press ENTER.
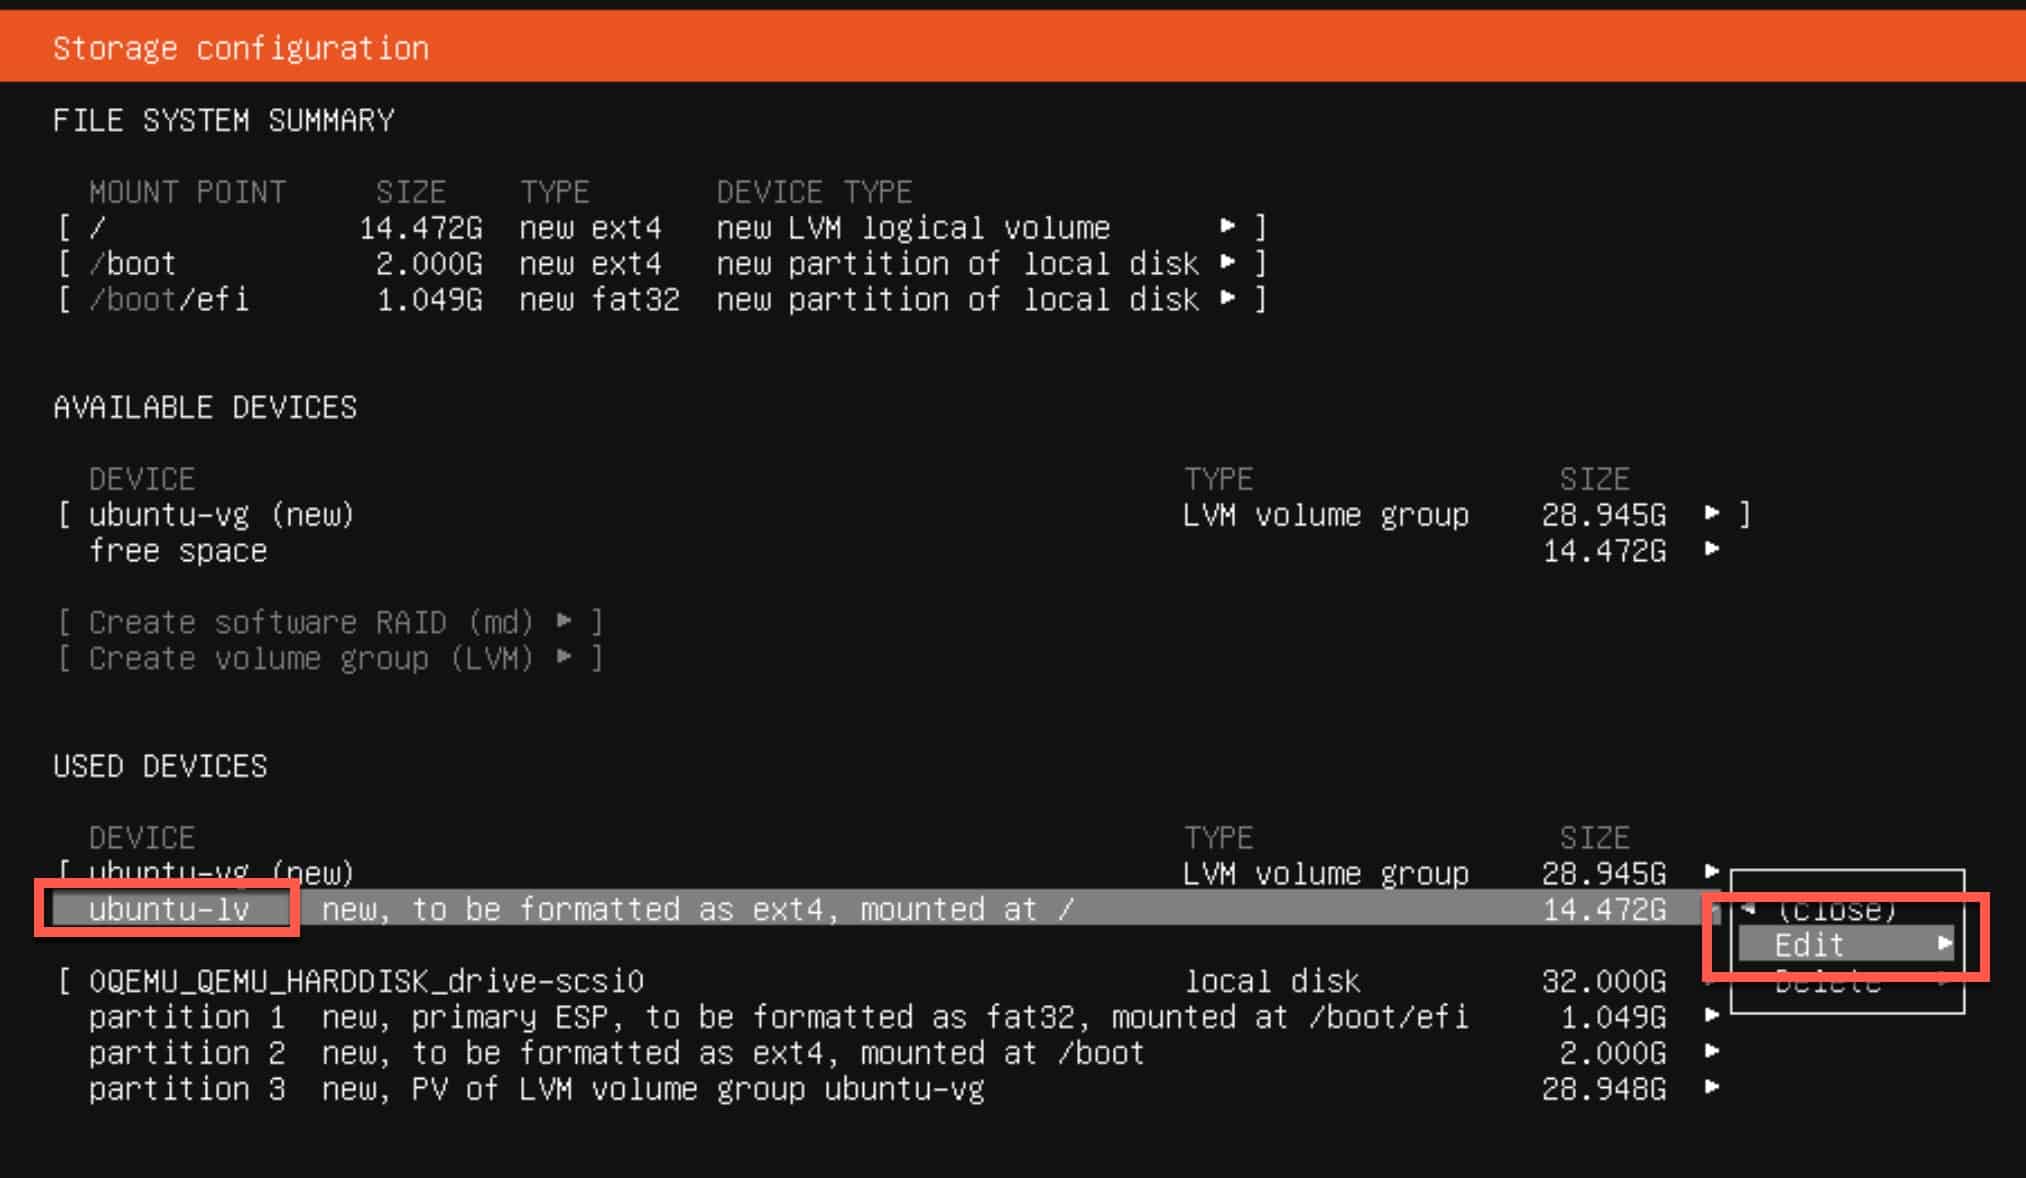
19. Change the Size value to match the max stated value. Tab to Save and press ENTER.
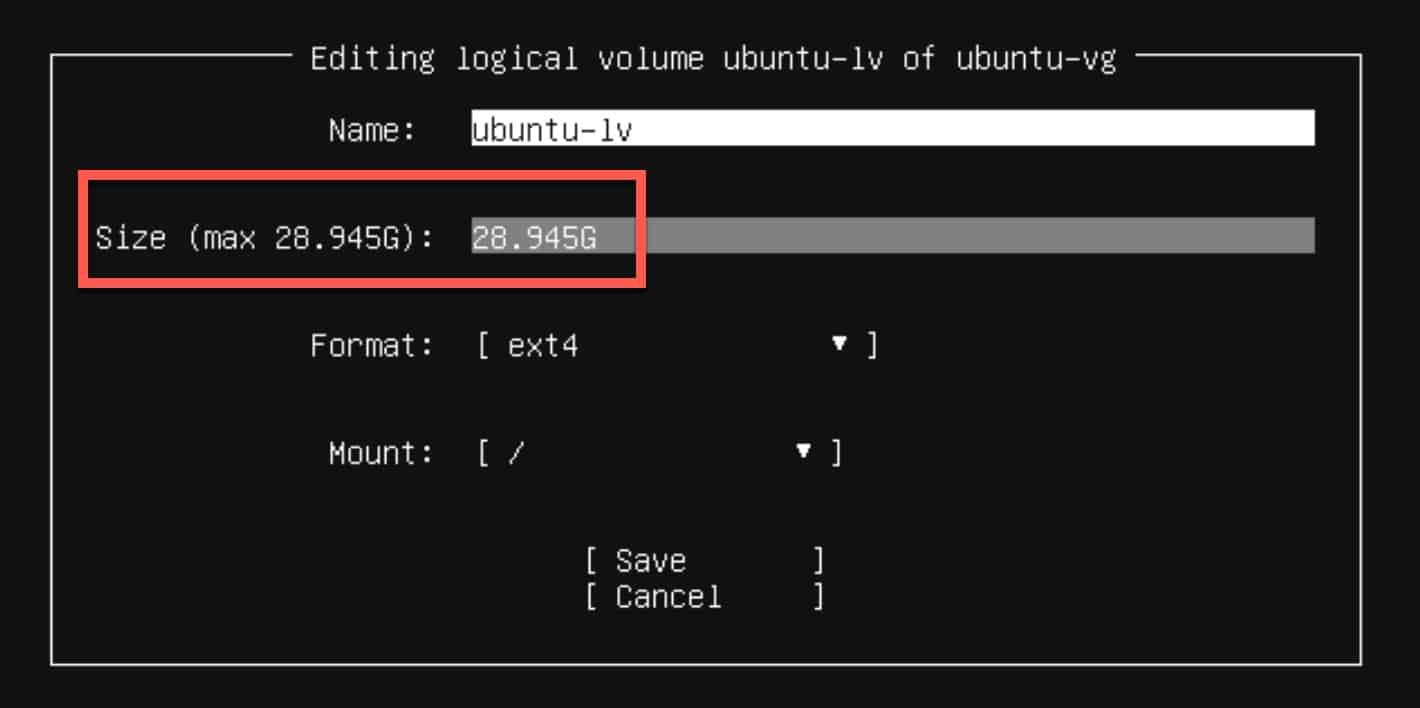
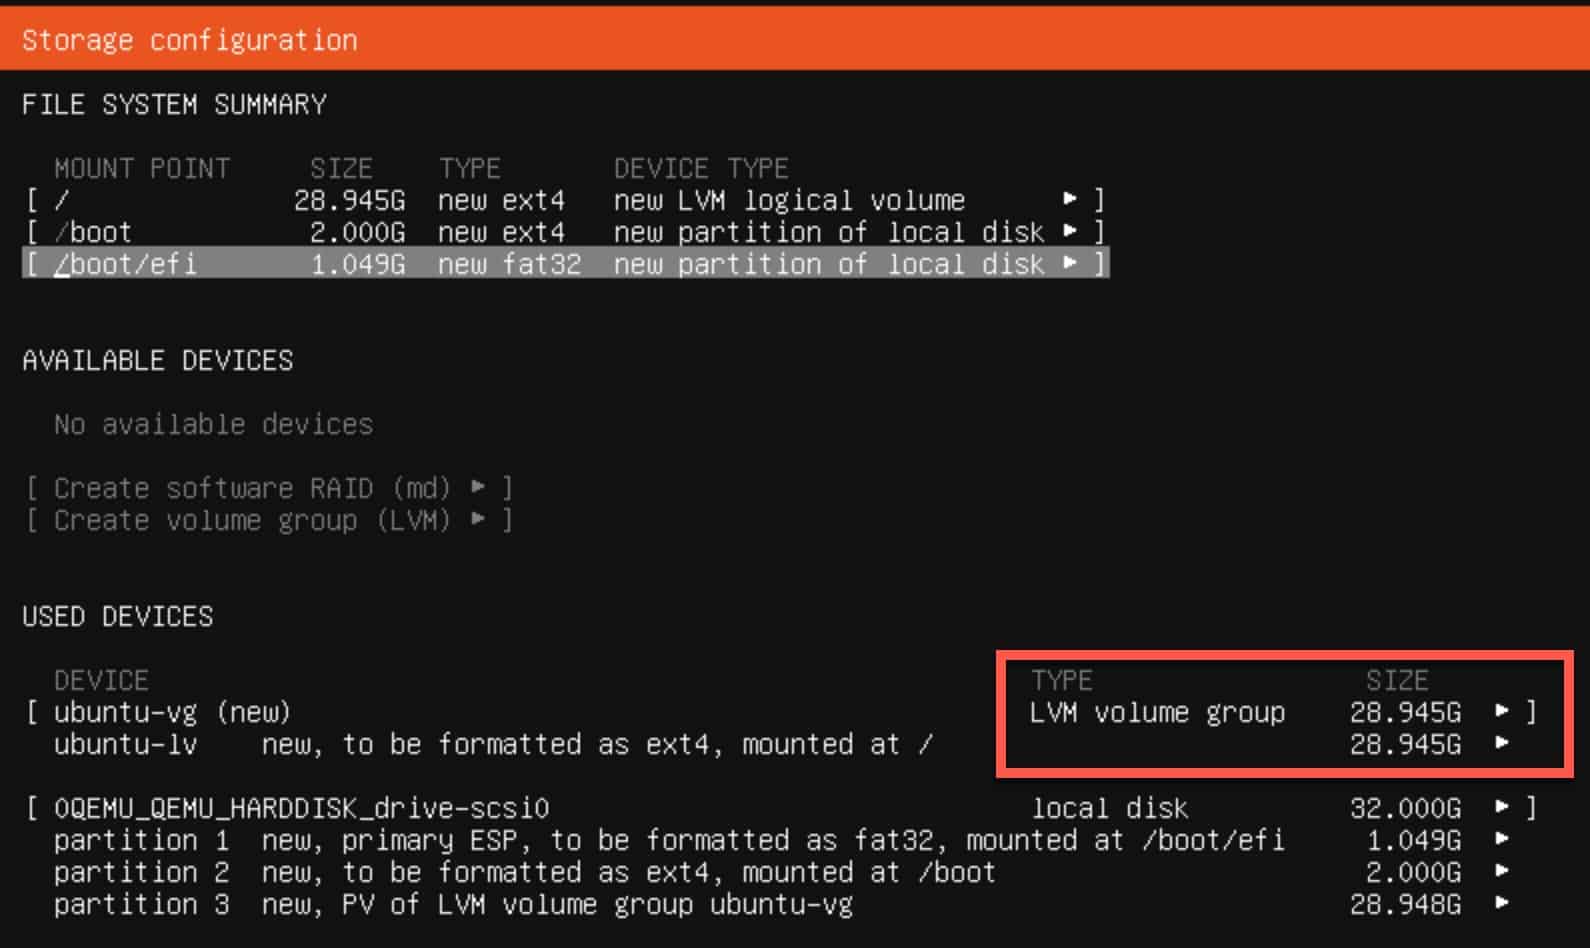
20. Tab to Done on the Storage configuration page.
21. On the Confirm Destructive action windfow tab to Continue and press ENTER.
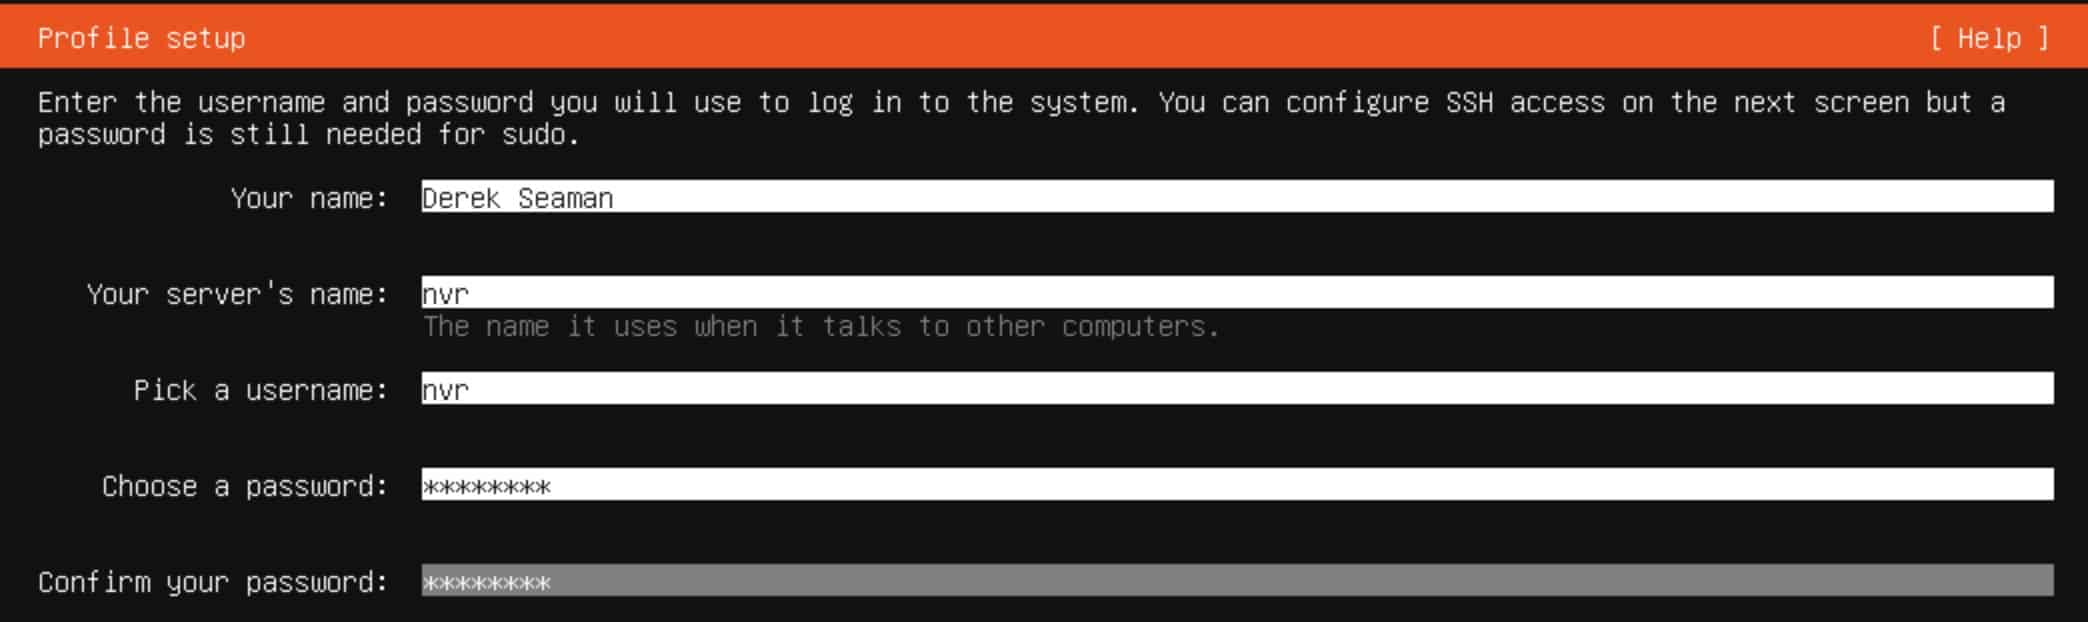
22. On the Profile setup enter the appropriate information.
23. Skip the Upgrade to Ubuntu Pro.
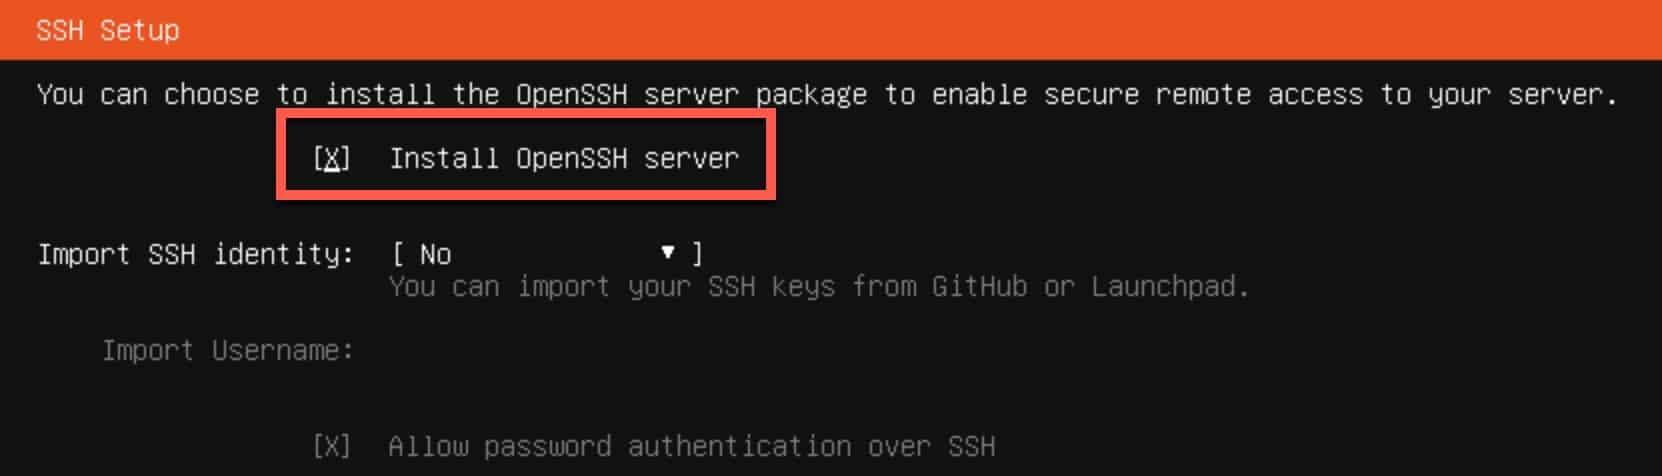
24. On the SSH Setup screen tick the box to install OpenSSH server.
25. Skip the Featured Server Snaps.
26. Once the install is complete reboot.
Mount Second Drive for Media (Optional)
In my Beelink Mini PC I’ve installed a dedicated spinning NVR drive. It’s a (now discontinued) 2TB Seagate Skyhawk that I got factory fresh from ebay. The Skyhawk line is purpose built for video surveillance. It is strongly recommended to NOT store your Frigate video on a SSD.
I added a second virtual disk to the NVR VM in Proxmox using the following configuration. I specifically un-checked the Backup box, so that my Proxmox backup server would not backup my videos.
1. Login to your new Ubuntu NVR VM.
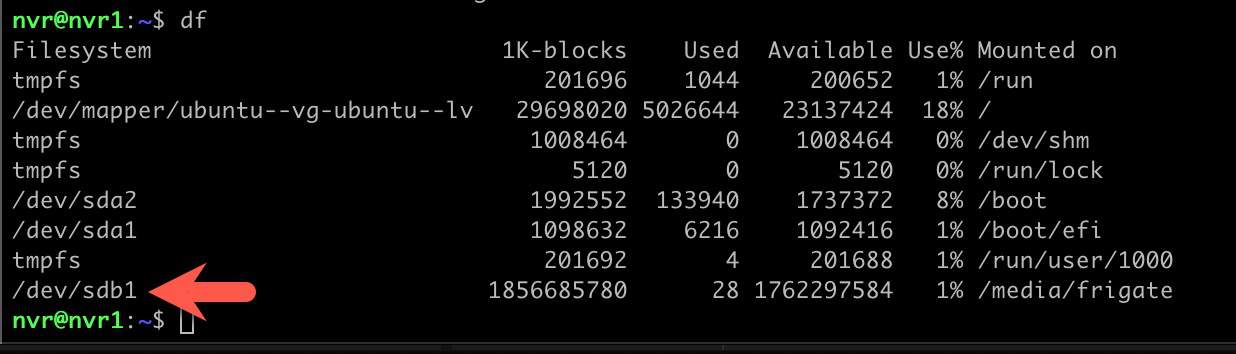
2. Run the following command to list all disks mounted to the Frigate VM. Locate the device name for the new disk (/dev/sdb in my case).
sudo fdisk -l

3. Now we need to partition the raw disk by running the following command:
sudo cgdisk /dev/sdb
- Press any key when prompted.
- Press ENTER on New
- Press ENTER on First Sector
- Press ENTER on Size in sectors
- Press ENTER on Current Type
- Enter a Partition Name (e.g. frigate)
- Arrow over to Write, press enter, then confirm
- Arrow over to Quit and press enter
4. Let’s format the drive (note the addition of the 1 in the device name). Press ENTER to confirm.
sudo mkfs -t ext4 /dev/sdb1
5. Create a mount point, using whatever name and location you want.
sudo mkdir /media/frigate
6. Edit the fstab so the drive will auto mount at boot.
sudo nano /etc/fstab
7. At the end of the file add the following line, save and exit nano.
/dev/sdb1 /media/frigate ext4 defaults 0 0
8. Mount the drive:
sudo mount /media/frigate
9. Verify the drive is mounted and has the expected size:
df
Install Docker and QEMU Agent
1. SSH into your new Ubuntu NVR VM.
2. Run the following commands setup the Docker repos.
sudo apt-get update
sudo apt-get install \
    ca-certificates \
    curl \
    gnupg
sudo install -m 0755 -d /etc/apt/keyrings
curl -fsSL https://download.docker.com/linux/ubuntu/gpg | sudo gpg --dearmor -o /etc/apt/keyrings/docker.gpg
sudo chmod a+r /etc/apt/keyrings/docker.gpg
echo \
  "deb [arch="$(dpkg --print-architecture)" signed-by=/etc/apt/keyrings/docker.gpg] https://download.docker.com/linux/ubuntu \
  "$(. /etc/os-release && echo "$VERSION_CODENAME")" stable" | \
  sudo tee /etc/apt/sources.list.d/docker.list > /dev/null
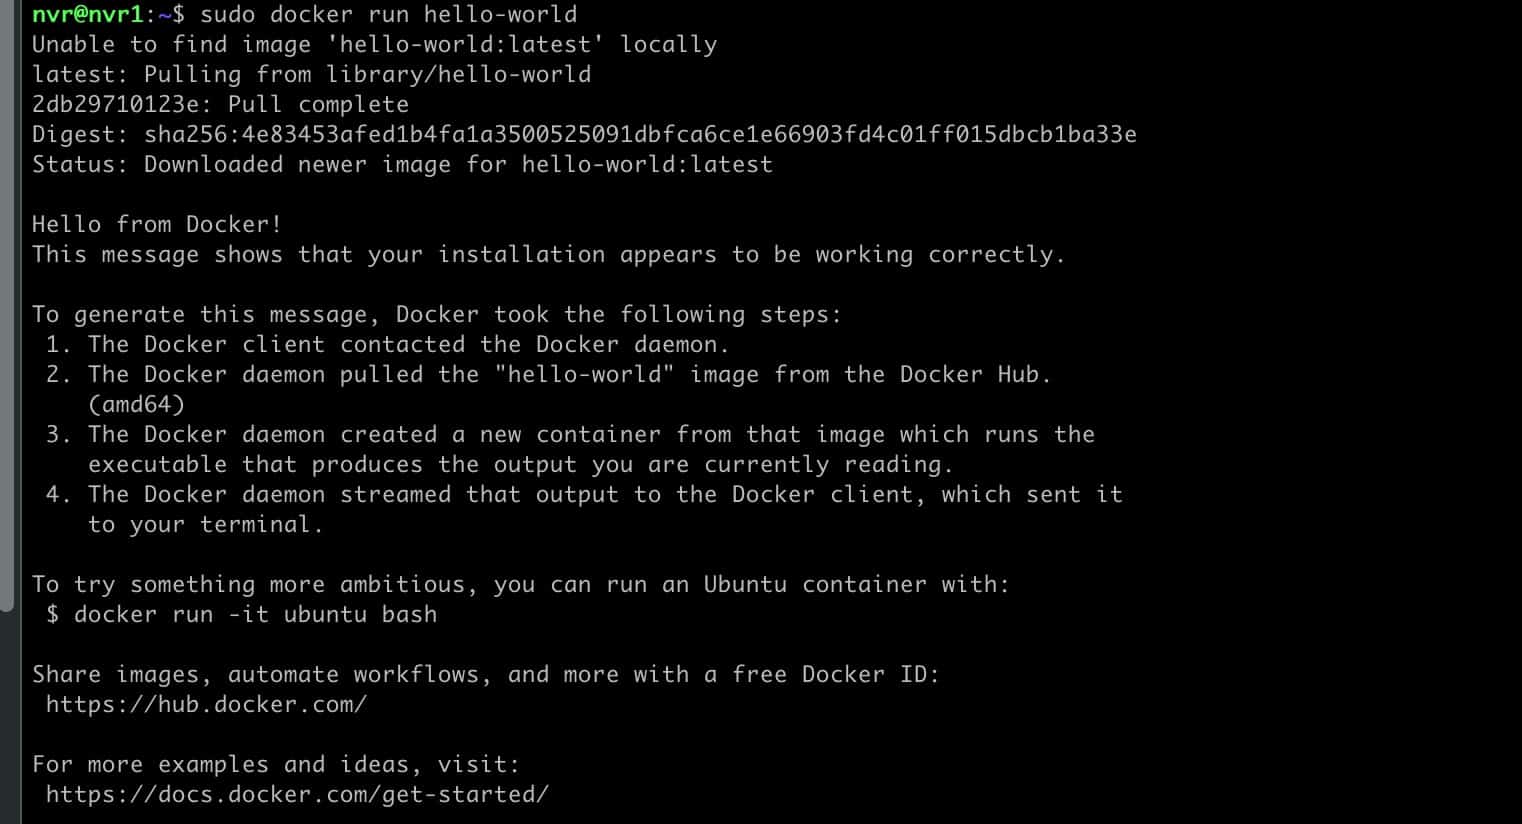
3. After the repos are setup let’s install Docker. The hello-world test will verify that Docker is running and pulled down an image.
sudo apt-get update
sudo apt-get install docker-ce docker-ce-cli containerd.io docker-buildx-plugin docker-compose-plugin
sudo docker run hello-world
4. I like setting up Docker to store the app config files under /home/docker.
sudo mkdir -p /home/docker/frigate
5. Install the QEMU agent and update all the packages:
					sudo apt-get upgrade
sudo apt install qemu-guest-agent
sudo systemctl enable qemu-guest-agent
sudo reboot
Optional: Connect this Docker instance to your Portainer server by installing a Protainer agent. I really like Portainer (free) to manage Docker containers. But many like Docker CLI or Docker compose. Any of these options work.
Coral PCIe TPU Passthrough (Optional)
If you have a Google Coral TPU on a PCIe card, we now need to pass that through to the Frigate VM. If you do not have a TPU, skip this section.
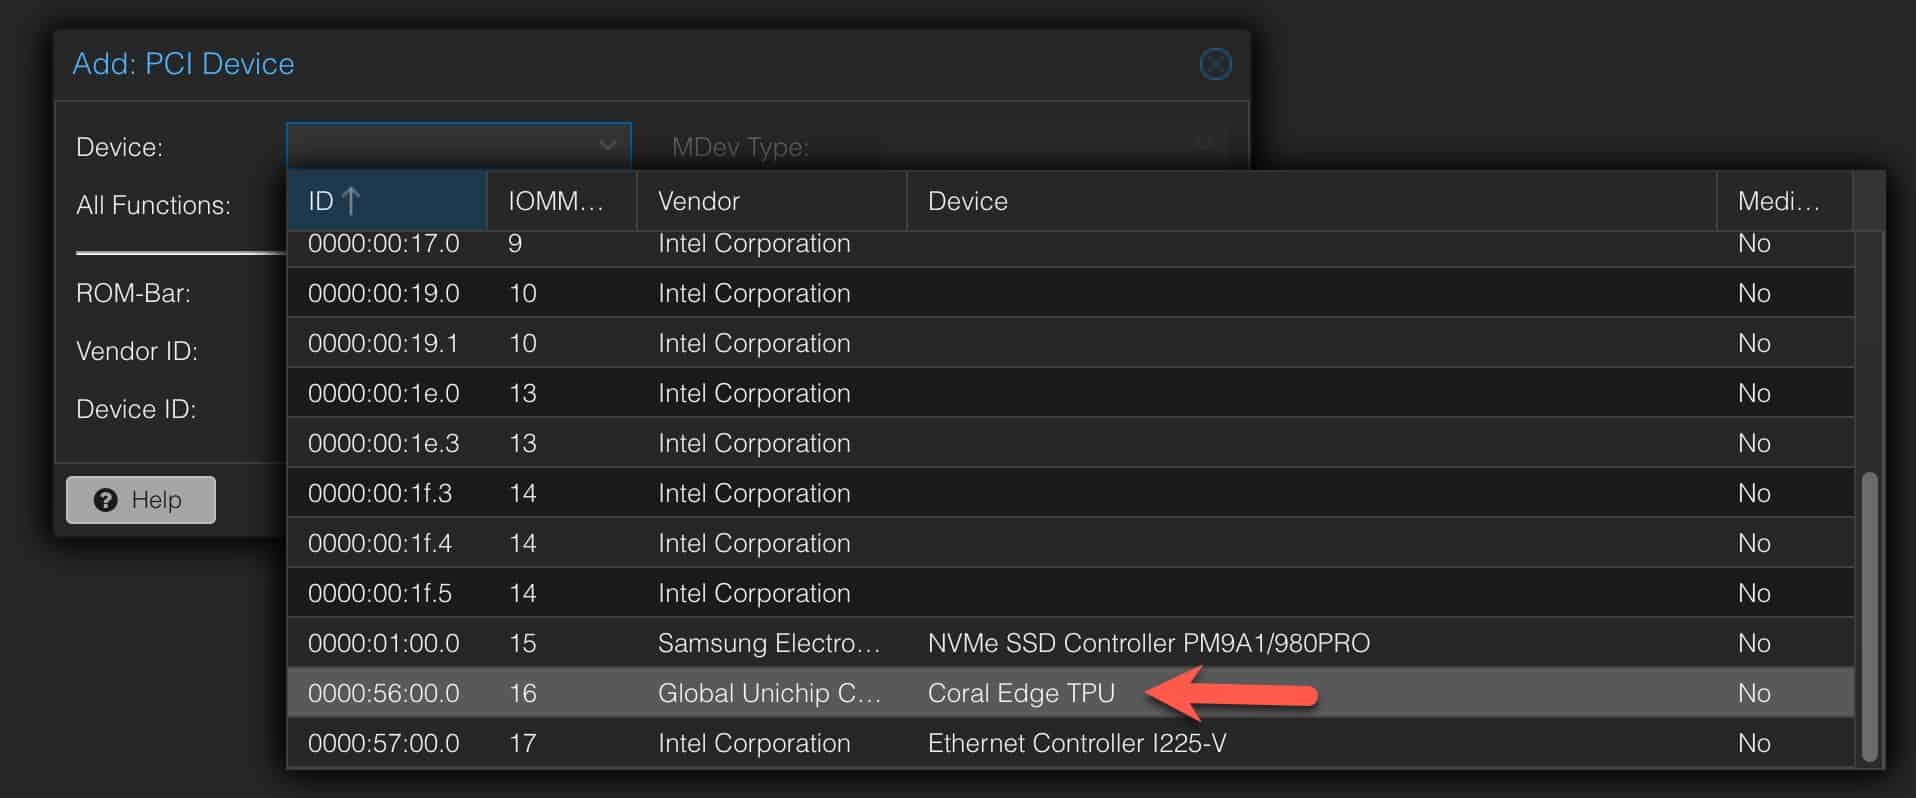
1. Power down the Frigate VM. In the Proxmox console locate the Frigate VM, click on it, then click on Hardware, then Add -> PCI Device. Locate your Coral TPU and add it. Power on the VM.
2. After the VM boots, SSH in and run the following command. Verify that you see the TPU listed.
lspci -nnk | grep 089a

3. Let’s start the driver installation:
echo "deb https://packages.cloud.google.com/apt coral-edgetpu-stable main" | sudo tee /etc/apt/sources.list.d/coral-edgetpu.list
curl https://packages.cloud.google.com/apt/doc/apt-key.gpg | sudo apt-key add -
sudo apt-get update
4. Install the PCIe drivers and TPU runtime:
sudo apt-get install gasket-dkms libedgetpu1-std
5. If you see a Secure Boot Config window STOP! Something is wrong…secure boot will disable the needed drivers. Re-check your VM configuration.
6. Reboot the VM.
7. SSH into the NVR VM and run the following commands:
					sudo sh -c "echo 'SUBSYSTEM==\"apex\", MODE=\"0660\", GROUP=\"apex\"' >> /etc/udev/rules.d/65-apex.rules"
sudo groupadd apex
sudo adduser $USER apex
10. Reboot the NVR VM again.
11. Run the following command and verify you still see the TPU PCIe device:
lspci -nn | grep 089a

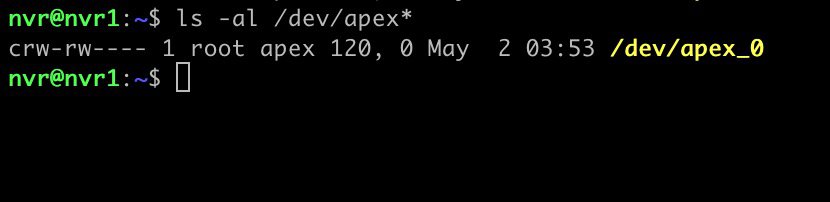
12. Run the following command and verify /dev/apex_0 is listed. If it is not, you have a problem and need to troubleshoot. One of the first things I’d look at is making sure secure boot is NOT enabled for the VM. Secure boot will prevent the apex drivers from loading. To verify secure boot is disabled, reboot the NVR VM and on the Proxmox VM boot screen press ESC. Go into the virtual BIOS and ensure Secure Boot is disabled.
ls -al /dev/apex*
Home Assistant MQTT Setup
If you have already installed and configured a MQTT broker in Home Assistant, you can skip this section.
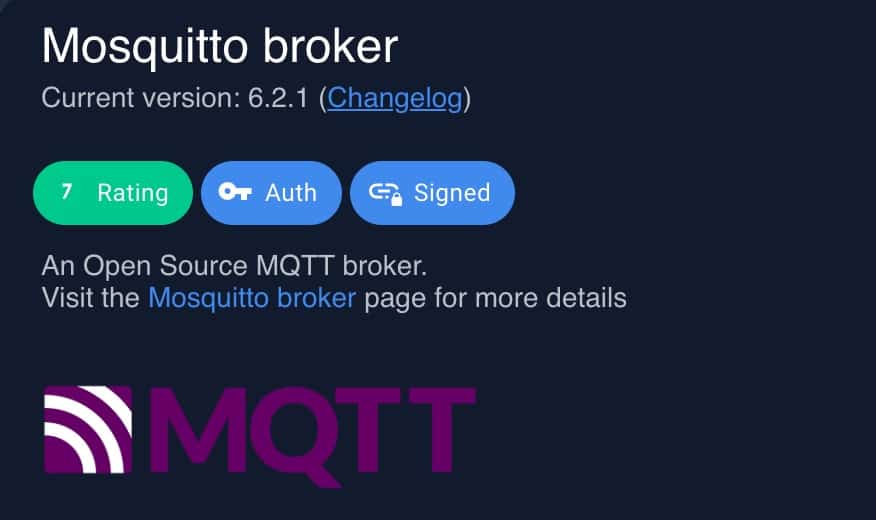
- In Home Assistant go to Settings -> Add-ons.
- Click on Add-on Store. Search for MQTT and click on Mosquito broker.
- Click on Install.
- After it installs, enable Watchdog.
- Click on Start.
- Click on Settings in the lower left, then Devices & Services.
- MQTT should be auto-discovered. Click CONFIGURE.
- Click Submit.
- Click on Settings in the lower left, then People.
- Click on ADD PERSON in the lower right.
- Enter a name (e.g. mqtt), allow the person to login, enter a password and click CREATE twice.
- Save this password in a safe place. This will be used by Frigate and any other MQTT service.
Home Assistant Frigate Integration Install
- In Home Assistant ensure HACS is already installed.
- Click on this Frigate Add-ons: The official repository link then click on ADD REPOSITORY.
- Add the repository.
- Search for Frigate in the HACS Integrations and install it.
- Add the Frigate Lovelace card: HACS -> Frontend -> Explore & Add Integrations -> Frigate Card
- Open configuration.yaml and add the following:
lovelace:
  resources:
    - url: /hacsfiles/frigate-hass-card/frigate-hass-card.js
      type: module

7. Restart Home Assistant.
Camera Configuration (IPC-T5442T-ZE)
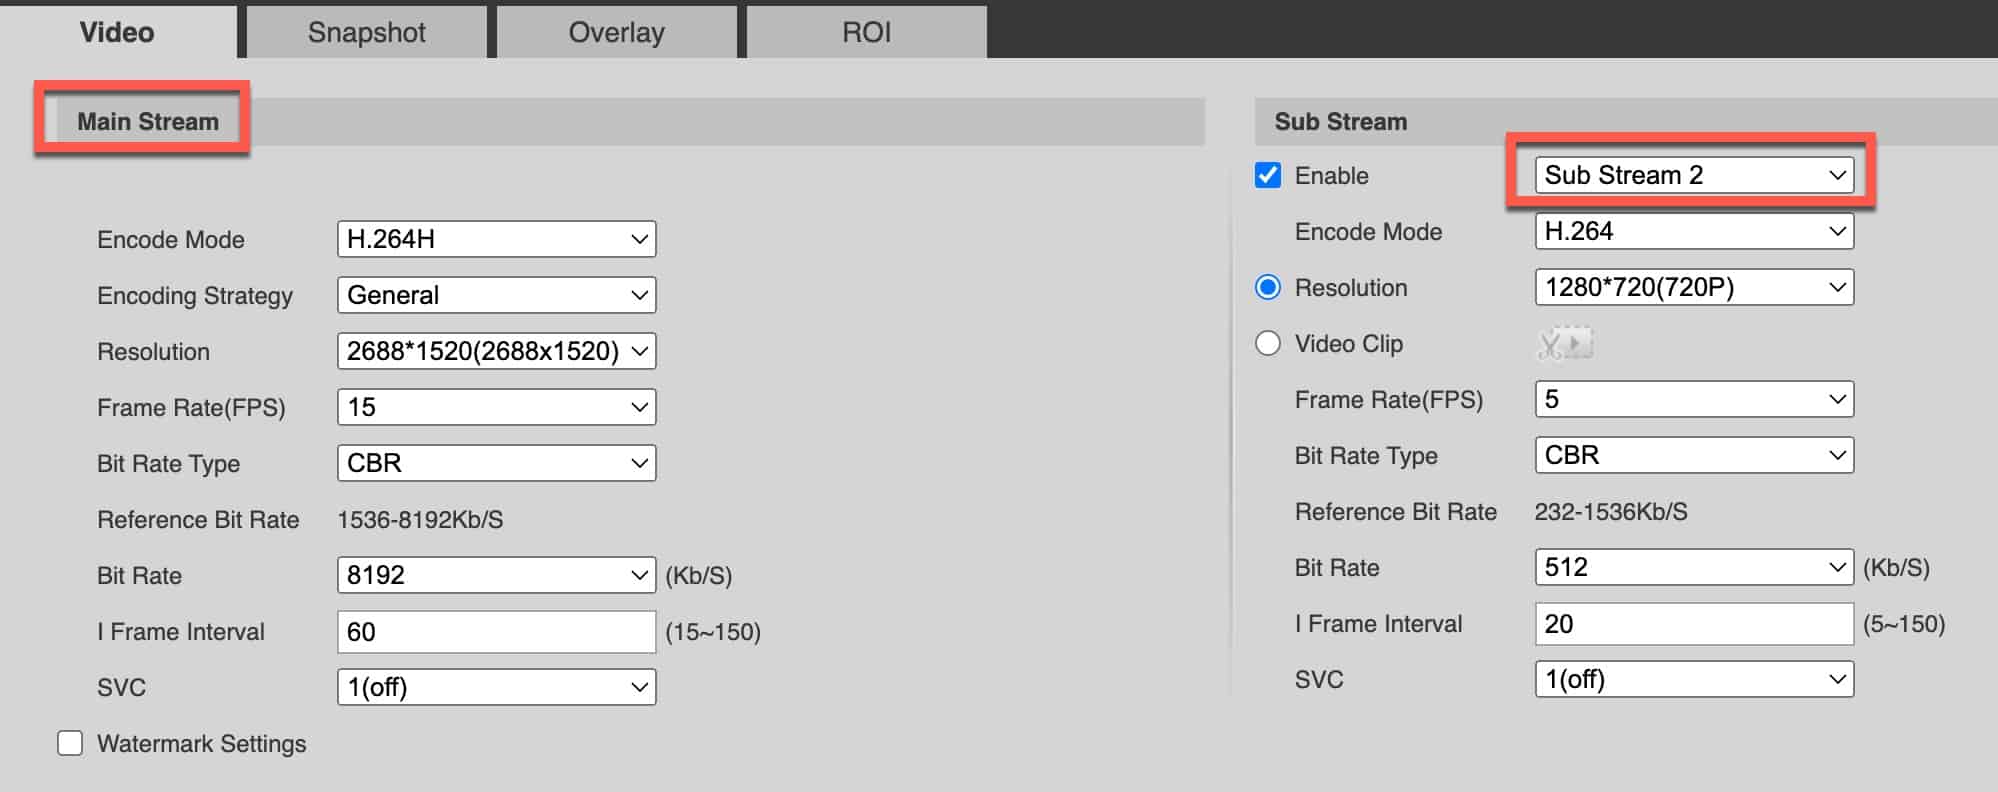
Every camera will have their own unique optimal settings. In my case the following settings for my Dahua work very well. Use the best practices for your particular camera. Just for reference, my IP camera is at 10.13.2.231. I also configured a user named ‘feed’ with a complex password to use for the video feed.
Frigate Configuration File
Before we deploy the Docker container we need a valid Frigate configuration file. Much of the configuration will be unique to your camera(s), what you want to detect, etc. It’s not within the scope of this post to go into depth on Frigate configuration files. But my configuration should at least get you pointed in the right direction. Note that the IP of my Frigate VM is 10.13.2.217. As noted in the post introduction, I’m using Frigate 0.12 and its newly supported built-in go2rtc feature. Many Frigate tutorials on the internet are for older versions, so watch out. Use tutorials for 0.12 (or later).
# ~/docker/frigate/config.yml
# yaml-language-server: $schema=http://10.13.2.217:5000/api/config/schema.json

ui:
  use_experimental: false
  live_mode: mse

mqtt:
  host: ha.xyz.com
  port: 1883
  user: mqtt
  password: password1234
  topic_prefix: frigate
  client_id: frigate
  stats_interval: 60

record:
  expire_interval: 10

# Only enable this if you are using GPU pass-through with Intel GPUs
#ffmpeg:
#  hwaccel_args: preset-vaapi

# Only enable the detector if you are using coral PCIe passthrough
detectors:
  coral:
    type: edgetpu
    device: pci

logger:
  default: info

rtmp:
  enabled: false

live:
  height: 720
  quality: 1

birdseye:
  enabled: True
  restream: false
  width: 1280
  height: 720
  quality: 1
  mode: continuous

go2rtc:
  streams:
    garage:
      - rtsp://feed:password1234@10.13.2.231:554/cam/realmonitor?channel=1&subtype=0
    garage_sub:
      - rtsp://feed:password1234@10.13.2.231:554/cam/realmonitor?channel=1&subtype=2
    webrtc:
      candidates:
        - 10.13.2.217:8555
        #- stun:8555

cameras:
  garage:
    ffmpeg:
      inputs:
        - path: rtsp://127.0.0.1:8554/garage_sub
          input_args: preset-rtsp-restream
          roles:
            - detect
        - path: rtsp://127.0.0.1:8554/garage
          input_args: preset-rtsp-restream
          roles:
            - record
    detect:
      width: 1280
      height: 720
      fps: 5
    objects:
      track:
        - person
        - car
      filters:
        person:
          min_score: 0.4
          threshold: 0.5
          min_area: 700
    snapshots:
      enabled: true
      timestamp: true
      bounding_box: true
      crop: True
      height: 500
      retain:
        default: 30
    record:
      enabled: True
      retain:
        days: 45
        mode: motion
      events:
        retain:
          default: 5
          mode: motion
        pre_capture: 10
        post_capture: 30
Frigate Docker Compose
After you have a valid Frigate config file, we need to setup the Docker compose file. It is pretty straight forward and you should only really need to change a few parameters:
- shm_size (depends on number of cameras)
- config.yml Frigate config file path location in your host VM
- Media Frigate media folder location in your VM
- Frigate RTSP password
If you have followed this guide exactly, no changes should be needed except the RTSP password. If you are using Portainer you can just copy and paste your modified file into a new stack and then deploy the stack. If you prefer Docker compose via CLI, just save the docker compose file as frigate-compose.yml in /home/docker/frigate.
Note: If you aren’t using the Coral PCIe TPU, remove the devices section in the compose file (lines 11-12).
# ~/docker/frigate/frigate-compose.yml

version: "3.9"
services:
  frigate:
    container_name: frigate
    privileged: true
    restart: unless-stopped
    image: ghcr.io/blakeblackshear/frigate:stable
    shm_size: "384mb" # update for your cameras based on calculation
    devices:
      - /dev/apex_0:/dev/apex_0 # passes a PCIe Coral
    volumes:
      - /etc/localtime:/etc/localtime:ro
      - /home/docker/frigate:/config
      - /media/frigate:/media/frigate
      - type: tmpfs # Optional: 1GB of memory, reduces SSD/SD Card wear
        target: /tmp/cache
        tmpfs:
          size: 1000000000
    ports:
      - "5000:5000"
      - "8554:8554" # RTSP feeds
      - "8555:8555/tcp" # WebRTC over tcp
      - "8555:8555/udp" # WebRTC over udp
    environment:
      FRIGATE_RTSP_PASSWORD: "rtsppassword"
If you want to use Docker compose run the command below to start the container. Be patient for the container to start the first time as the docker image needs to be downloaded. Give it a few minutes to start up.
sudo docker-compose -f /home/docker/frigate/frigate-compose.yml up -d
Verify Frigate Functionality
Assuming your Frigate Docker container has started and your configuration is correct, you can now access the Frigate web UI via:
http://<yourVMIP>:5000
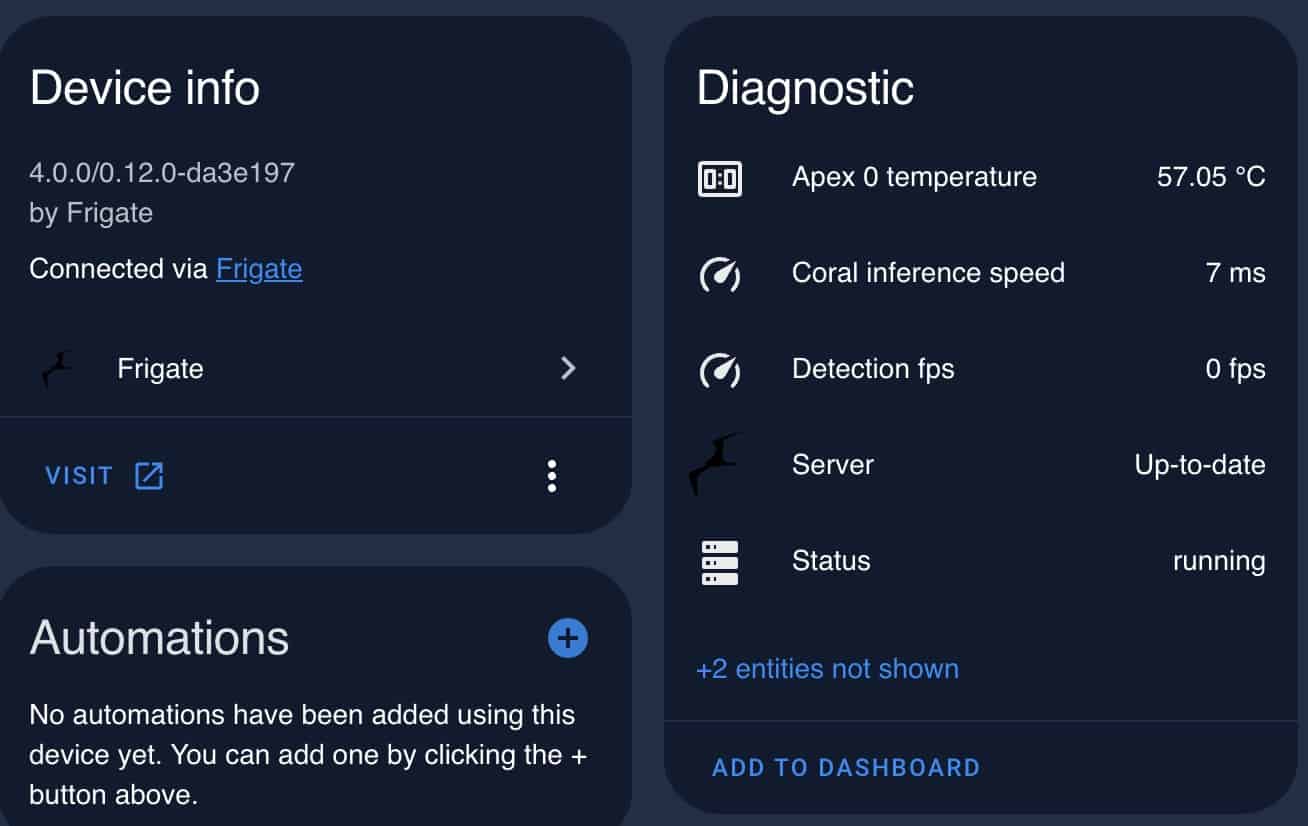
If you don’t see a working camera feed in Frigate, go to the Logs view and review for any errors. You can make config changes directly in Frigate now, and restart the service all within the UI. If everything is working and the TPU is detected, your logs will look similar to this:
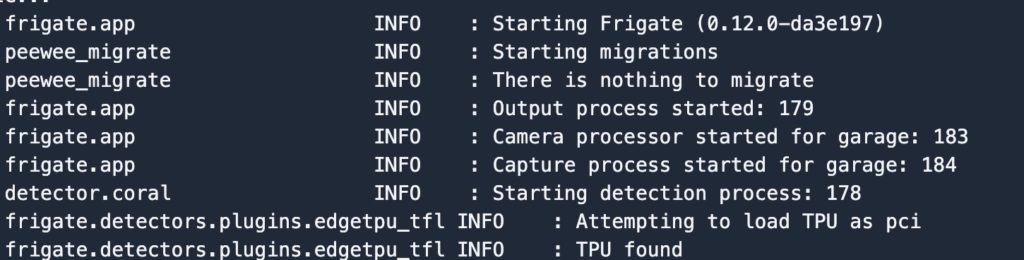
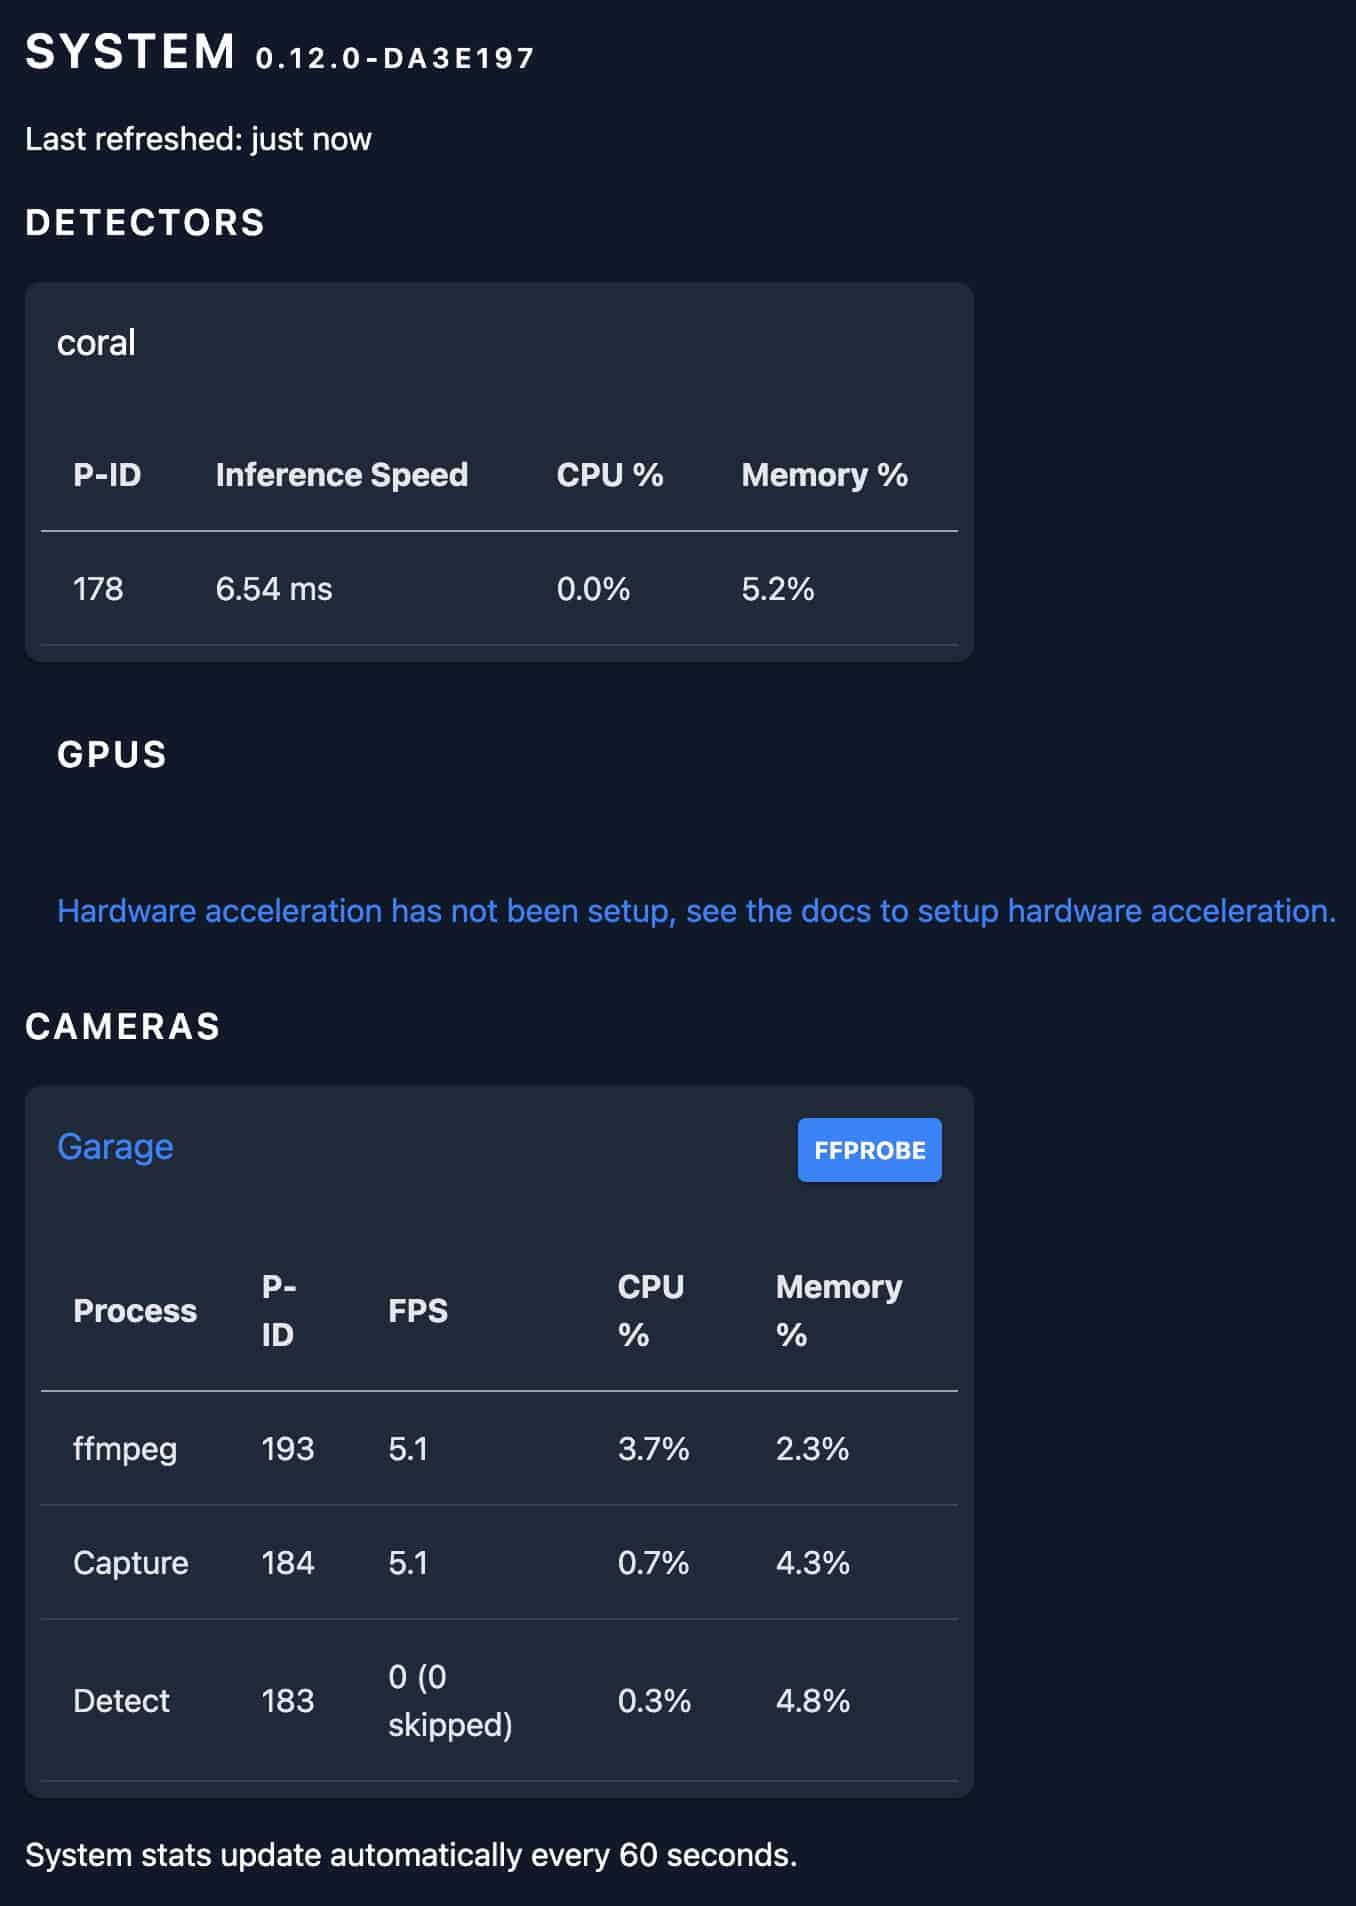
You can also review the System page and review TPU inference speed and camera CPU utilization stats.
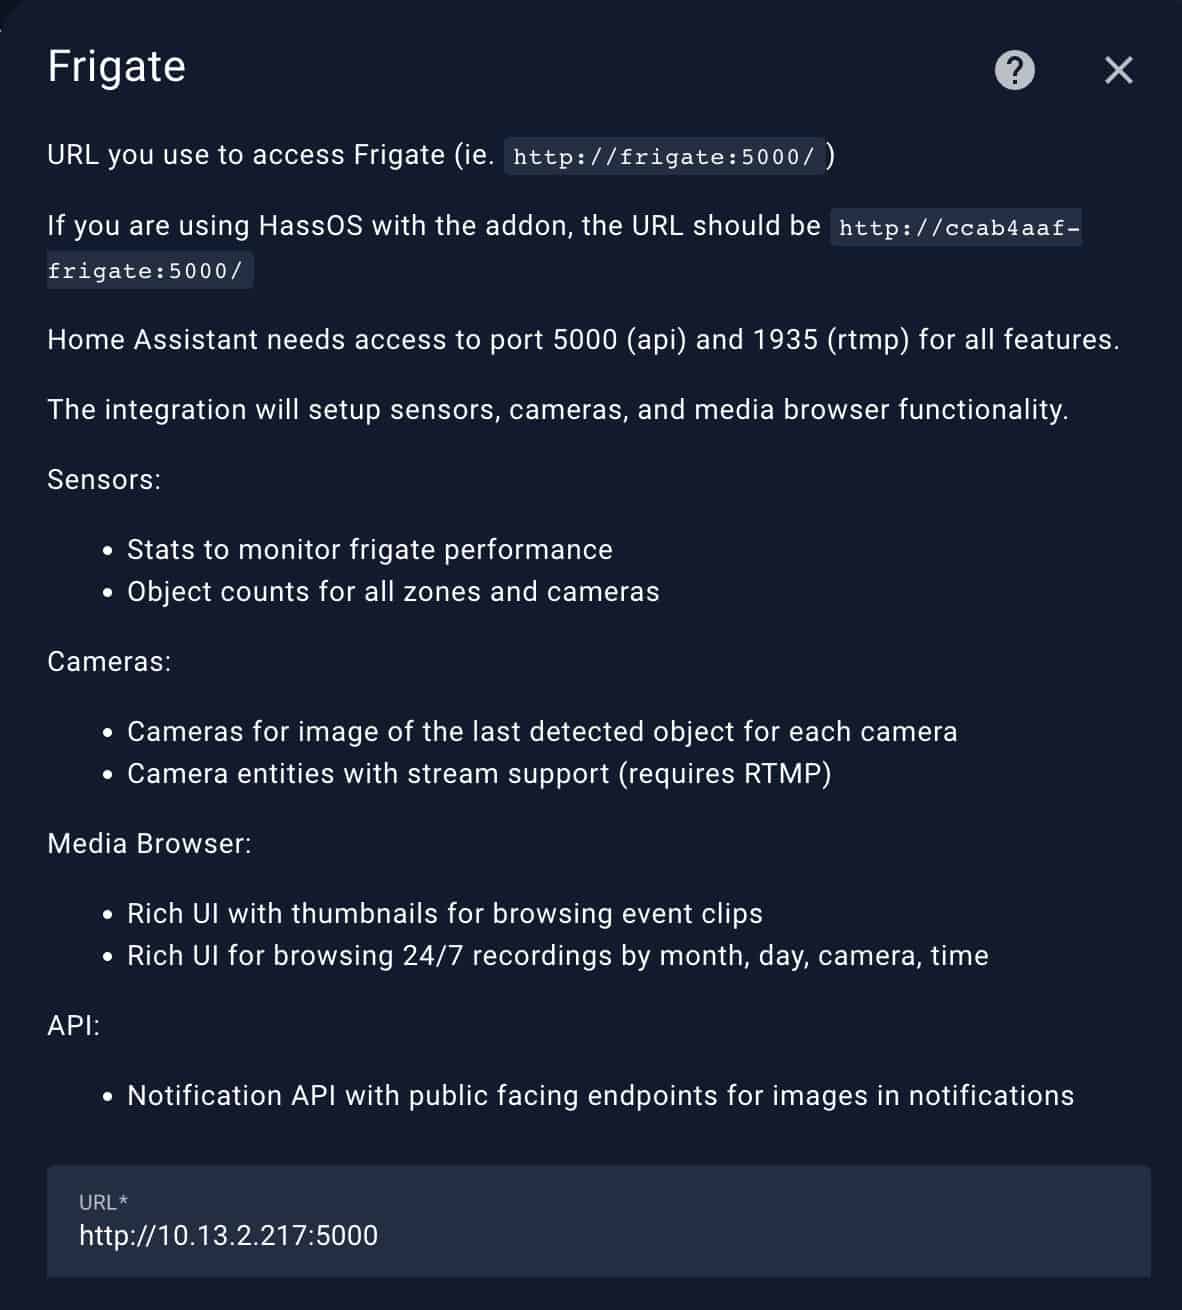
Home Assistant Frigate Integration
- In Home Assistant go to Settings -> Devices & Services -> Add Integration -> Frigate.
- Enter the IP address of your NVR VM and use port 5000.
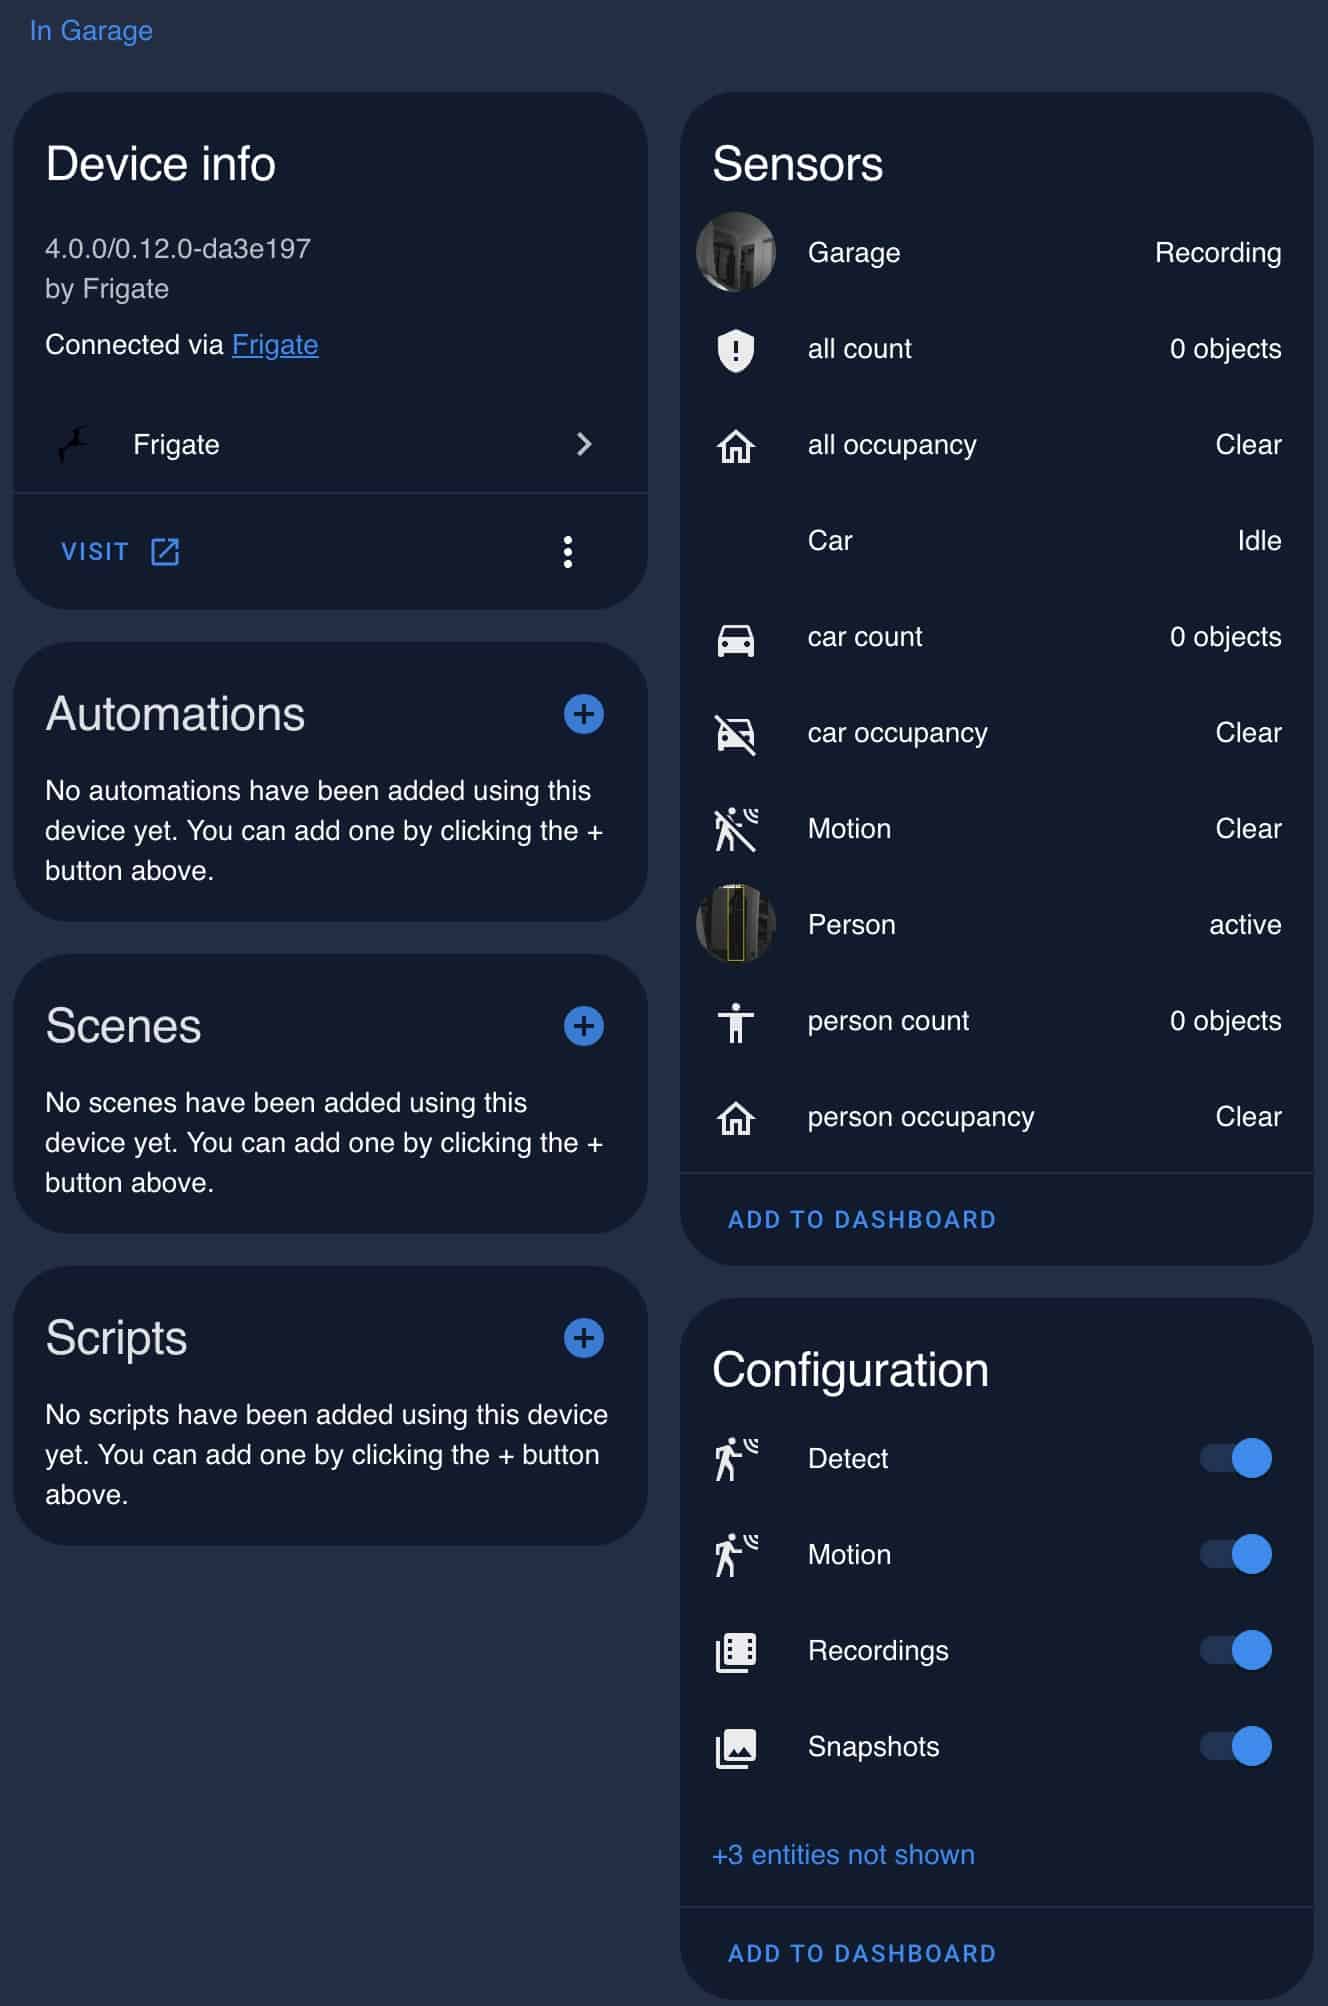
3. If everything works as planned, you will now see your camera added to HA. You can also modify the exposed entities and view some diagnostic information for Frigate in HA as well.
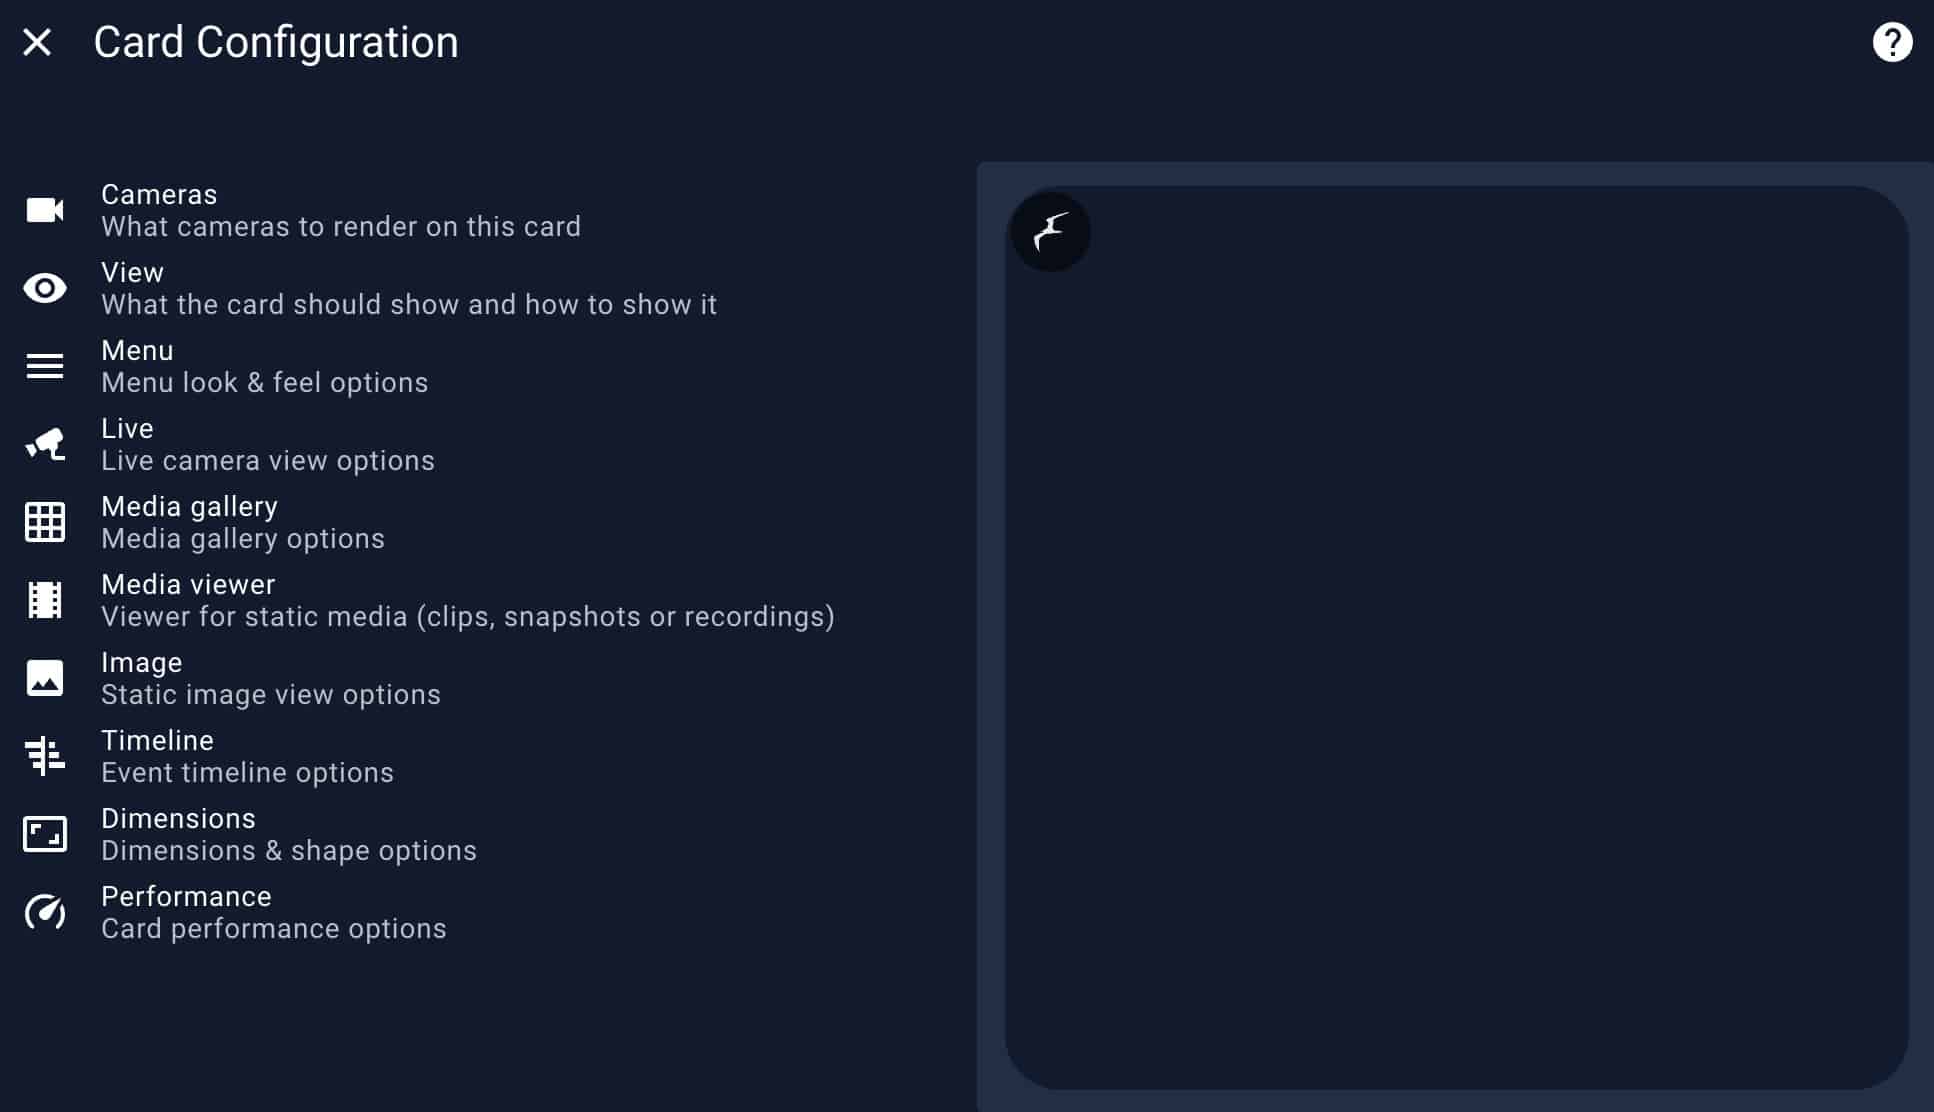
4. Now you can add the Frigate card to your dashboard. It has a huge amount of configuration options. So you can really go to town on customizing your camera dashboard views.
Summary
Frigate is a great NVR solution that has deep Home Assistant integration. Although you can run Frigate within HAOS, I prefer using a dedicated VM. This post covered deploying an Ubuntu 22.04 VM on Proxmox with Google Coral TPU passthrough. Although this process is a big long, it has been super stable. GPU passthrough could theoretically help lower CPU utilization, however in my configuration it did not. Plus, GPU passthrough was very fragile. Trying to get the right version of Ubuntu, Linux kernel and Intel drivers to all work together was too tedious for me. And even when I was testing it, ffmpeg would randomly die, likely due to Intel driver issues.


I am going to install a coral tpu on my beelink gtr 6. It runs proxmox. I will use the wifi m.2 slot. Do you know if beelink wifi slot has 2 channels active so both channels on the tpu can be used
I”m not sure. I just got the single TPU PCIe card, not dual. I would be skeptical, but don’t know 100%.
I also have a ASUS PN53 as a home server and use the double-channel TPU. I asked ASUS support before I bought it and they confirmed that both channels were active and for sure they are. The speed difference is amazing, but probably overkill with a moderate amount of cameras
Could you include the steps for the USB version even though that is not preferred?
I don’t have the USB version and I only write guide that I can do hands on testing.
Hey Derek! Great guide! I have a very similar configuration as you (Google Coral M2 version, Proxmox, Ubuntu VM) but I had to use Ubuntu 18.04.6 in order to get the Google Coral drivers to compile the PyCoral library. Is this library not needed for Frigate and Google Coral to run properly?
If yes, then I can finally upgrade to Ubuntu 22.04!
Docker compose command should be:
sudo docker compose -f /home/docker/frigate/frigate-compose.yml up -d
Great guide!!!
Does these steps apply to the mini PCIE version of the TPU as well. I installed it with pcie adapter and it is detected by proxmox.
It should be the same as I think the adapter is just physical.
First, thank you for making this detailed guide. You stated “I prefer to run it [Frigate] in a separate dedicated VM on Proxmox”. Is this for performance and/or flexibility? I’m just getting started with smart home security and looking to setup something similar to what you have detailed.
Love the guide — wondering how you update go2rtc.
Thanks for the guidance. Very well and described in detail. My server runs on a Ryzen 5600u processor. Has anyone been able to make it work with AMD drivers.
Great tutorial Thank you.
I have an issue where after a reboot Ithere is IO error on the VM staring up. When
removing and attempting to addthe PCI Device the Coral is not listed. A full shutdown the
only solution to bring it back. Any suggestions?
Has anyone gotten webrtc feeds to work in frigate? I used the frigate proxmox ip in config but cant get webrtc feed to show in frigate.
Curious on why we use ubuntu server vs ttek lxc docker script to run frigate?
Any chance you have upgraded to Ubuntu 24.04 and it all still works for you? I am setting up for the first time and can’t get things to work.
Just to add to step 4. Install the PCIe drivers and TPU runtime. If you see a secure boot config message, it usually does not have anything to do with your VM configuration. I ran into this issue where Proxmox was failing to boot 50% of the time and I’ve seen this message a couple of times as well. I could not figure it out why this was happening. After hours of debugging and searching Google, I finally found that you have to disable secure boot in your bios settings. Once I did this, my boot problems went away, as well as any secure boot messages like the one you would normally see here if one pops up here. Hopefully, this will help others who use your guide and run into this issue.
Thank you, I’ll have a go when I get back home.
Hi, I am getting an error at step 4 of Coral PCIe TPU Passthrough
sudo apt-get install gasket-dkms libedgetpu1-std
Reading package lists… Done
Building dependency tree… Done
Reading state information… Done
libedgetpu1-std is already the newest version (16.0).
The following NEW packages will be installed:
gasket-dkms
0 upgraded, 1 newly installed, 0 to remove and 0 not upgraded.
Need to get 0 B/48.0 kB of archives.
After this operation, 256 kB of additional disk space will be used.
Do you want to continue? [Y/n] Y
Selecting previously unselected package gasket-dkms.
(Reading database … 130369 files and directories currently installed.)
Preparing to unpack …/gasket-dkms_1.0-18_all.deb …
Unpacking gasket-dkms (1.0-18) …
Setting up gasket-dkms (1.0-18) …
Loading new gasket-1.0 DKMS files…
Deprecated feature: REMAKE_INITRD (/usr/src/gasket-1.0/dkms.conf)
Building for 6.8.0-39-generic
Building initial module for 6.8.0-39-generic
Deprecated feature: REMAKE_INITRD (/var/lib/dkms/gasket/1.0/source/dkms.conf)
ERROR: Cannot create report: [Errno 17] File exists: ‘/var/crash/gasket-dkms.0.crash’
Error! Bad return status for module build on kernel: 6.8.0-39-generic (x86_64)
Consult /var/lib/dkms/gasket/1.0/build/make.log for more information.
dpkg: error processing package gasket-dkms (–configure):
installed gasket-dkms package post-installation script subprocess returned error exit status 10
Errors were encountered while processing:
gasket-dkms
needrestart is being skipped since dpkg has failed
E: Sub-process /usr/bin/dpkg returned an error code (1)
The following outputs work:
nvr@nvr:~$ lspci -nnk | grep 089a
00:10.0 System peripheral [0880]: Global Unichip Corp. Coral Edge TPU [1ac1:089a]
Subsystem: Global Unichip Corp. Coral Edge TPU [1ac1:089a]
nvr@nvr:~$ lspci -nn | grep 089a
00:10.0 System peripheral [0880]: Global Unichip Corp. Coral Edge TPU [1ac1:089a]
Though apex is not being created
nvr@nvr:~$ ls -al /dev/apex*
ls: cannot access ‘/dev/apex*’: No such file or directory
Also confirmed secure boot is disabled by going into the VM bios.
I’m getting the exact same error. Any update?
I figured this out, but it was a difficult one, and honestly, I am unsure what I did.
Here is what I wrote down at the time:
Do a reboot at every step, for me this just started working, not 100% what I did but doing a reboot when it said to, seemed to get things going.
Ensure you are using “/home” and not “~” in some of the above commands
Also
sudo apt update
sudo apt upgrade
sudo apt install devscripts debhelper -y
this one below is what I missed in all my Google searching as the coral install kept failing as it wasn’t installed. It seems gasket-dkms is depreciated in 24
sudo apt install dkms
❯ git clone https://github.com/google/gasket-driver.git
Cloning into ‘gasket-driver’…
…
❯ cd gasket-driver; debuild -us -uc -tc -b; cd ..
for above add “-d” to force it to build
…
dpkg-deb: building package ‘gasket-dkms’ in ‘../gasket-dkms_1.0-18_all.deb’.
I upgraded to Ubuntu 24.04.3 LTS and unfortunately it broke my Coral drivers. Been trying to run the commands above but I get an error when trying to run the following:
> cd gasket-driver; debuild -us -uc -tc -b; cd ..
I get this message:
dh: error: unable to load addon dkms: Can’t locate Debian/Debhelper/Sequence/dkm s.pm in @INC (you may need to install the Debian::Debhelper::Sequence::dkms modu le) (@INC entries checked: /etc/perl /usr/local/lib/x86_64-linux-gnu/perl/5.38.2 /usr/local/share/perl/5.38.2 /usr/lib/x86_64-linux-gnu/perl5/5.38 /usr/share/pe rl5 /usr/lib/x86_64-linux-gnu/perl-base /usr/lib/x86_64-linux-gnu/perl/5.38 /usr /share/perl/5.38 /usr/local/lib/site_perl) at (eval 13) line 1.
BEGIN failed–compilation aborted at (eval 13) line 1.
I thought I installed dkms by running the command ‘sudo apt install dkms’ which ran successfully (says i’m on the newest version 3.0.11-lubuntu13).
I figured it out after finding this Github issue post. Thank goodness someone else figured it out for us, never would have figured it out myself.
Here is the Github issue page:
https://github.com/google-coral/edgetpu/issues/808
Here are the additional commands I ran:
❯ sudo apt install dh-dkms
❯ git clone https://github.com/google/gasket-driver.git
❯ cd gasket-driver; debuild -us -uc -tc -b; cd ..
The driver should build properly now. Next you have to install the .deb file.
❯ sudo dpkg -i gasket-dkms_1.0-18_all.deb
Then run this command to get the apex_0 directory to appear:
❯ sudo modprobe apex
❯ lsmod | grep apex
If you run this command, youshould see the apex_0 directory now:
❯ ls -al /dev/apex*
Thanks!
Thanks for this. My USB TPU failed recently. I had a PCI from way back and was able to add it to proxmox server and pass it to HAOS with Frigate running as an App (was add-on).!