Sometimes you have the need to build a new Home Assistant installation and restore your old configuration. Maybe your SD card died, or you want to migrate Home Assistant to a more powerful server. In fact, you can even do cross-platform migrations (e.g. from a Raspberry Pi 4 to a Proxmox VM on an Intel processor) seamlessly. That’s pretty cool.
Home Assistant has a built-in backup and restore functionality, but it’s not super polished. So you might run into issues or headaches so this post attempts to cover various restore options and some lessons learned.
This post focuses on Home Assistant OS (HAOS), which is a fully managed solution for Home Assistant. This is different from Supervised (you provide your own OS), container, and other options. Those solutions would have a different restore workflow.
Update October 21, 2023: Minor updates to reflect new HAOS screens.
Update June 19, 2023: Significant updates covering the new NAS restore option built into HA 2023.6. This post now covers two flavors of Google Drive restores (under 1GB, over 1GB) plus NAS restores of any size.
Ultimate Backup Guide
I’ve published the Home Assistant: Ultimate Backup Guide, featuring HA 2023.6 which enables native NAS backups. Check it out if you want to use the 3-2-1 backup strategy with backups going to your local NAS and Google Drive.
Backup Options
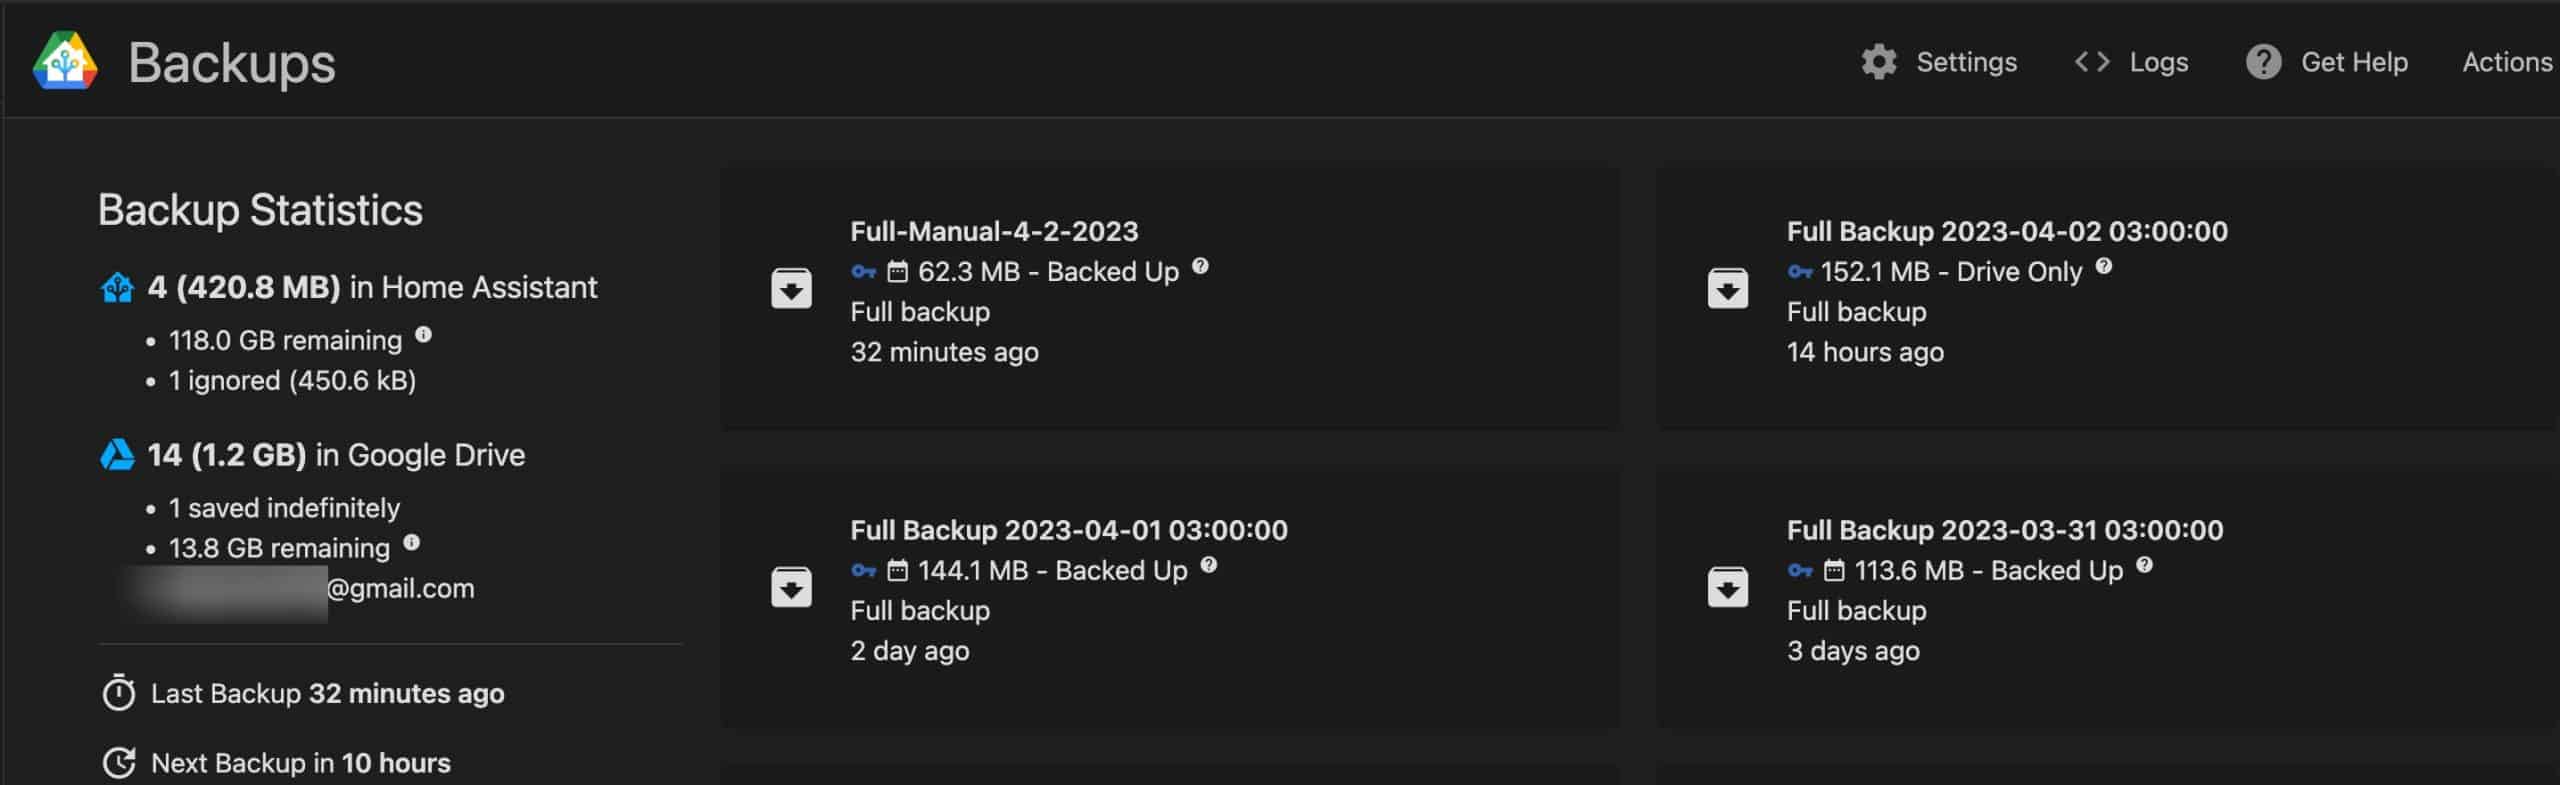
As mentioned in my Home Assistant: Getting Started Guide implementing backups for Home Assistant is critical. Without any add-ons, Home Assistant backups are just stored locally. If your storage media dies (and your Raspberry Pi SD card WILL at some point), then you are out of luck. For that reason, I strongly urge doing remote backups to the cloud, and if you have one, a NAS. IMHO, the best option is the Google Drive add-on. This is a robust tool which, shockingly, backups your HA configuration to Google Drive for safe keeping. You can setup complex scheduling and rotation schemes.
As of Home Assistant 2023.6, it now supports native NAS (SMB/NFS) backups. This is a great compliment to the Google Drive backups. Thankfully, this feature doesn’t really change the restore process that much and even can make it easier. This post covers Google Drive only backups, and also backups stored on a NAS.
Restoring Home Assistant
Depending on the type of backup you want to restore from (Google Drive or NAS), and the backup size, I cover three scenarios:
- Google Drive Restore – Under 1GB
- Google Drive Restore – Over 1GB
- NAS Restore (Any Size)
The NAS restore is the most straight forward, as the same procedure works for backups of all sizes. If you only have a Google Drive backup, then you have to determine if your backup archive is under or over 1GB. The procedure is different depending on the size. This is critical. The under 1GB procedure will NOT work with backups over 1GB.
If your Google Drive backup is under 1GB, you can simply download the latest backup to your local computer and restore it on the HA welcome screen. If it’s over 1GB, we need to do a bit more work to get the large backup loaded into HAOS.
Skip down to the appropriate section that fits your restore scenario (Google Drive under 1GB, Google Drive over 1GB, or NAS (any size)).
Google Drive Restore - Under 1GB
If your backup archive is under 1GB in size, you are in luck. The process should be pretty quick and easy. This assumes your last backup is in Google drive:
- Go to Google drive and download the latest backup to your local computer. Verify it is under 1GB in size.
- Re-install a fresh copy of Home Assistant OS. If you want to install HAOS on Proxmox, follow my Proxmox Quick Start Guide.
- Wait for the install to complete and STOP on the Welcome screen.
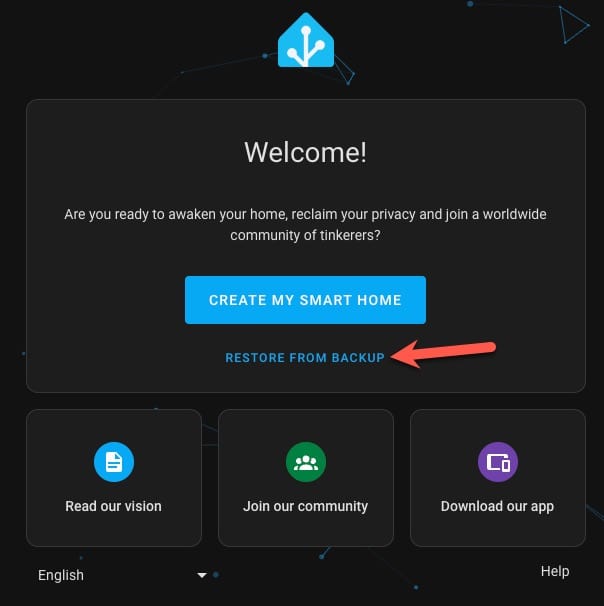
3. In the middle of the on-boarding screen click on restore from backup. Click on Upload Backup.

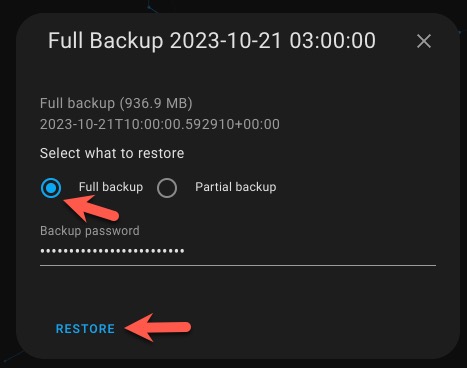
4. Select Full Backup and enter your backup password if you used one. Click on RESTORE. Acknowledge the warning and click RESTORE.
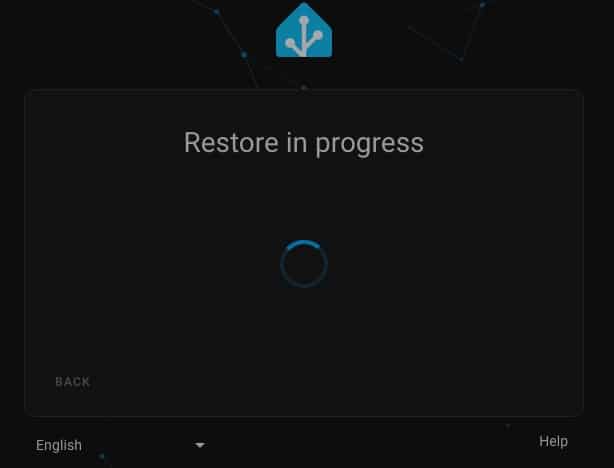
One the restore starts, immediately skip down to the section titled Waiting on the the Restore to Complete. You won’t see any progress on the screen, and that section tells you ways to determine if your restore is working or not. Don’t wait on any restore progress feedback. Skip down to Waiting on the Restore to Complete or you will die of old age. Even when the restore is complete the Restore in progress window spins like something is happening…so don’t wait.
Google Drive Restore - Over 1GB
If your backup archive is OVER 1GB in size, we have extra work to do. We will need to install an add-on, like Samba share, to upload the large backup file to HAOS, then do a restore. You don’t have to use Samba, but it is quick and easy. Other options include FTP. Let’s walk through the Samba process:
- Re-install a fresh copy of Home Assistant OS. If you want to install HAOS on Proxmox, follow my Proxmox Quick Start Guide.
- Wait for the install to complete and use your browser to navigate to the IP address of the new HAOS instance.
- Complete all the on-boarding screens using throw-away information. Our restore will over-write everything you input here.
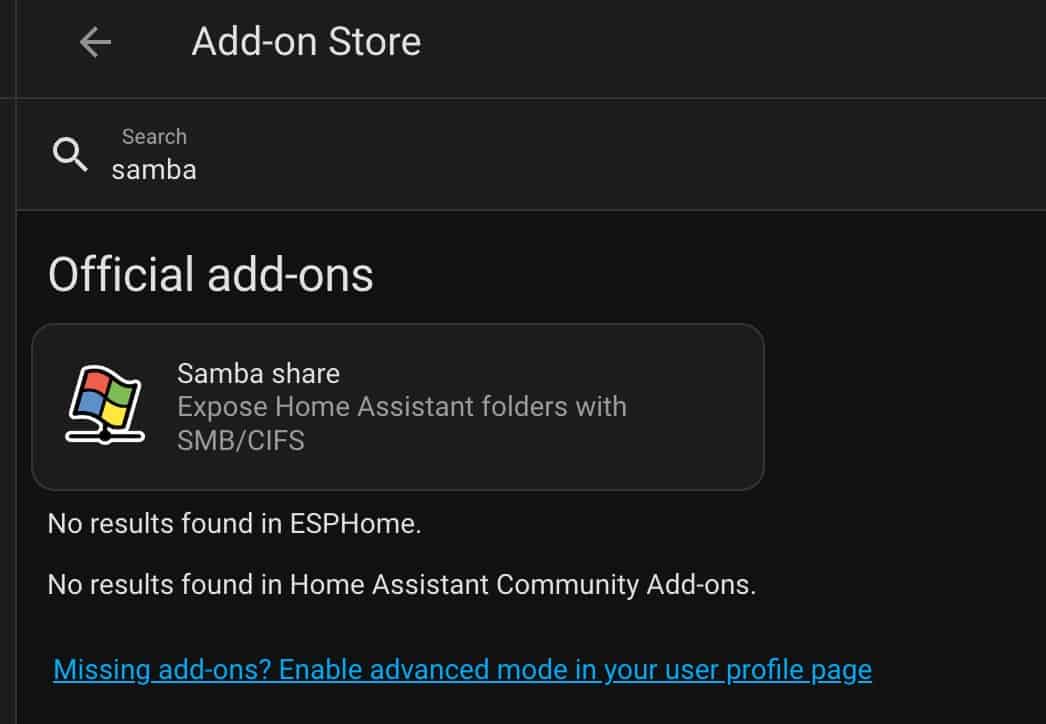
- When you get to the Home Assistant main landing page UI, click on Settings -> Add-ons -> ADD-ON STORE.
- Search for Samba and click on Samba share.
6. Click on INSTALL.
7. Before you click start, click on Configuration at the top.
8. Enter a password and click on save.
9.Click on the Info tab and click START.
10. Connect to the Samba share from your PC or Mac. On a Mac you can open Safari and in the URL type smb://IP and open it in Finder.
11. For the username use homeassistant and the password you configured.
12. Navigate to the backup volume.
13. Upload your backup file into the Samba folder.
14. Navigate to Settings -> System -> Backups.
15. You should see the back that you just uploaded.
16. Click on the backup, select full backup, and enter your backup password (if any). Click on RESTORE, acknowledge the warning, and click on RESTORE again.
One the restore starts, immediately skip down to the section titled Waiting on the the Restore to Complete. You won’t see any progress on the screen, and that section tells you ways to determine if your restore is working or not. Don’t wait on any restore progress feedback on your screen to skip down to that section or you will die of old age.
NAS Restore (Any Size)
If you are using HA 2023.6 or later, and have backups stored on your NAS, we can directly restore them from the NAS regardless of size. However, we need to first do a dummy setup of Home Assistant so we can login and mount the NAS storage. After the backup share is mounted, we can restore directly from the NAS.
- Re-install a fresh copy of Home Assistant OS. If you want to install HAOS on Proxmox, follow my Proxmox Quick Start Guide.
- Wait for the install to complete and use your browser to navigate to the IP address of the new HAOS instance.
- Complete all the on-boarding screens using throw-away information. Our restore will over-write everything you input here.
- Go to Settings -> System -> Storage.
- Re-add your network storage, mounting the same SMB/NFS share that hold your backups.
- Navigate to Settings -> System -> Backups.
- Click on the last full backup that you want to restore from. Select Full backup, and enter your backup password (if any). Click on RESTORE, acknowledge the warning, and click on RESTORE again.
One the restore starts, immediately skip down to the section titled Waiting on the the Restore to Complete. You won’t see any progress on the screen, and that section tells you ways to determine if your restore is working or not. Don’t wait on any restore progress feedback on your screen to skip down to that section or you will die of old age.
Waiting on the the Restore to Complete
At this point the Home Assistant UI fails us. There is ZERO feedback on if the restore is working, if it failed, or had errors. And you have no idea when it is done. The Restore in progress window remains, even after the restore is complete. Huge fail. For reference, I restored a 1GB HAOS backup and it was completed (per Proxmox stats) in about 10 minutes. But 40 minutes later the Restore in progress window was still there.
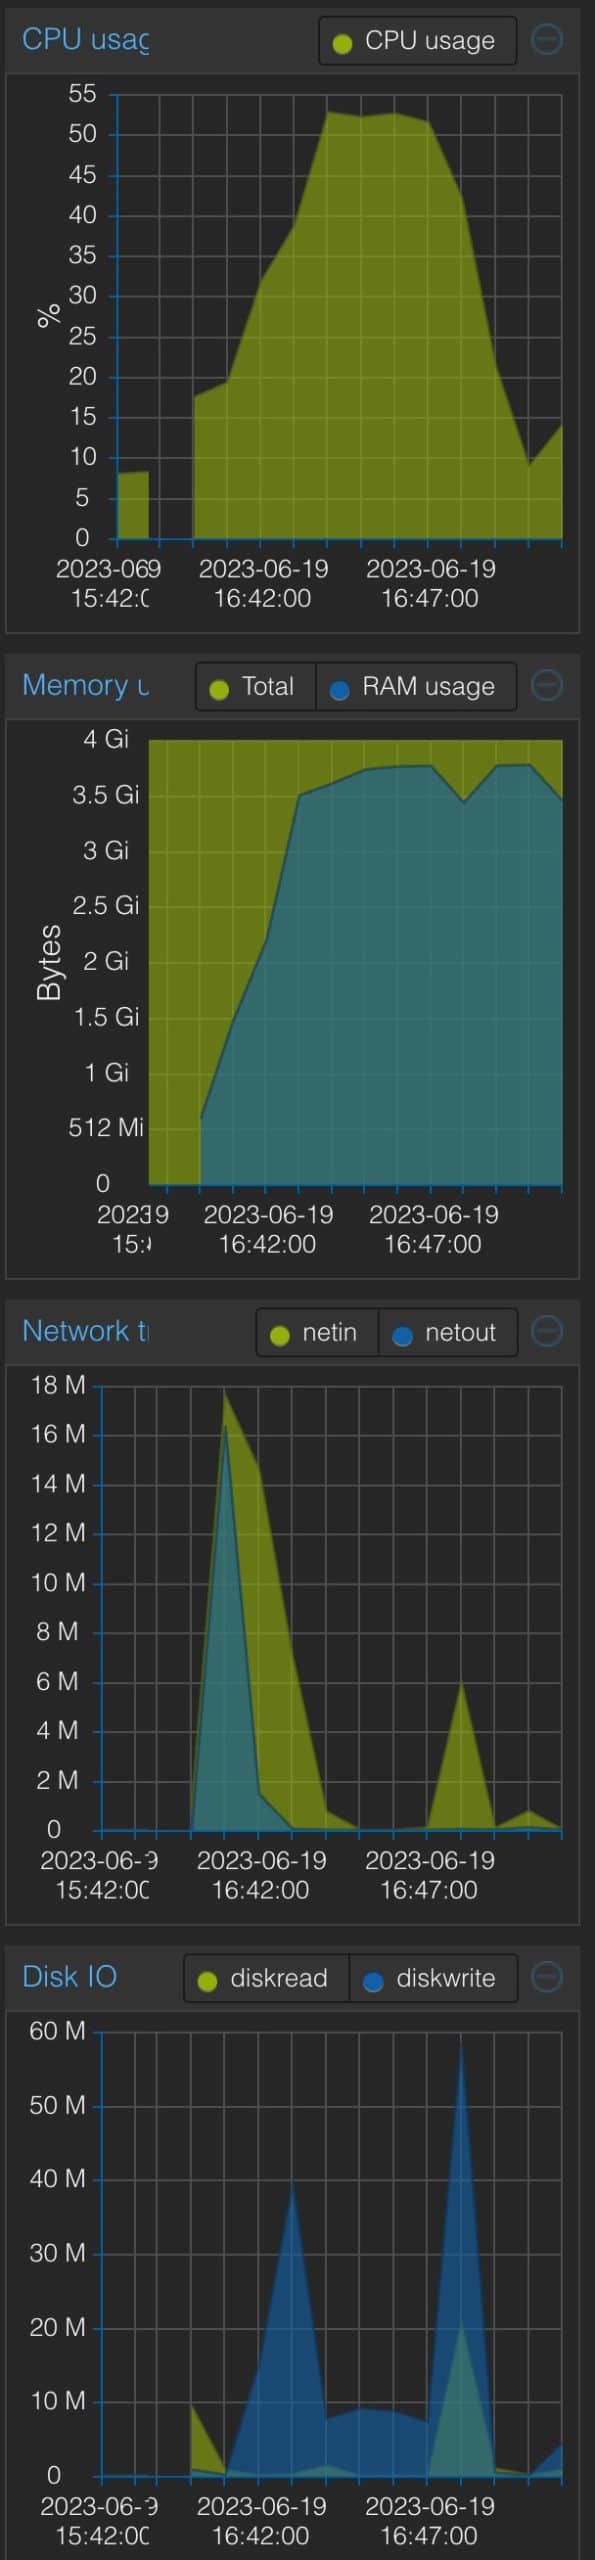
If you are restoring HAOS on Proxmox, once the restore starts, flip to the VM Summary screen and monitor CPU, network and disk activity. After things quiet down, proceed. See the screenshot below for what the performance stats of my HAOS VM looked like during the restore process.
After you think the restore has finished, refresh your web browser and see if you get a regular Home Assistant login box. If not, the restore is not yet complete or it failed. Wait a few minutes and try again. If your production HA server was using SSL certificates, then before you refresh your browser change the URL to use HTTPS. If you don’t do this you’ll be sitting there all day refreshing even if the restore is complete. You may need to open a new browser window to get the refreshed HA login page.
Important: Now that you are at the login screen, login, and do a full HAOS reboot (NOT restart). Wait for your system to reboot, then skip down to the Post Restore Checks section below.
If you are running HAOS in a VM and have any USB passthrough devices, then shutdown the HAOS VM for a second time and re-attach any USB devices.
Post Restore Checks
Unfortunately even if you get the login prompt and your old credentials work, there can be silent failures of some add-ons. So we need to review the logs to spot any issues.
- Login to HA. Make sure Advanced mode is turned on.
- Navigate to Settings -> System -> Logs and select Supervisor in the upper right corner.
- Review the logs for any errors or warnings.
- Change to the Home Assistant Core logs and review them as well.
- Navigate to Settings -> Devices & Services and check the health of all integrations.
- Perform check on various devices and automations to confirm everything appears to be working.
Note: If any of your add-ons appear broken, we can do a partial restore to see if we can recover them. See the next section.
Partial Restore Procedure
If any of your add-ons appear broken, Home Assistant has a built-in partial restore feature. This lets us selectively restore add-ons.
- Navigate to Settings -> System -> Backups.
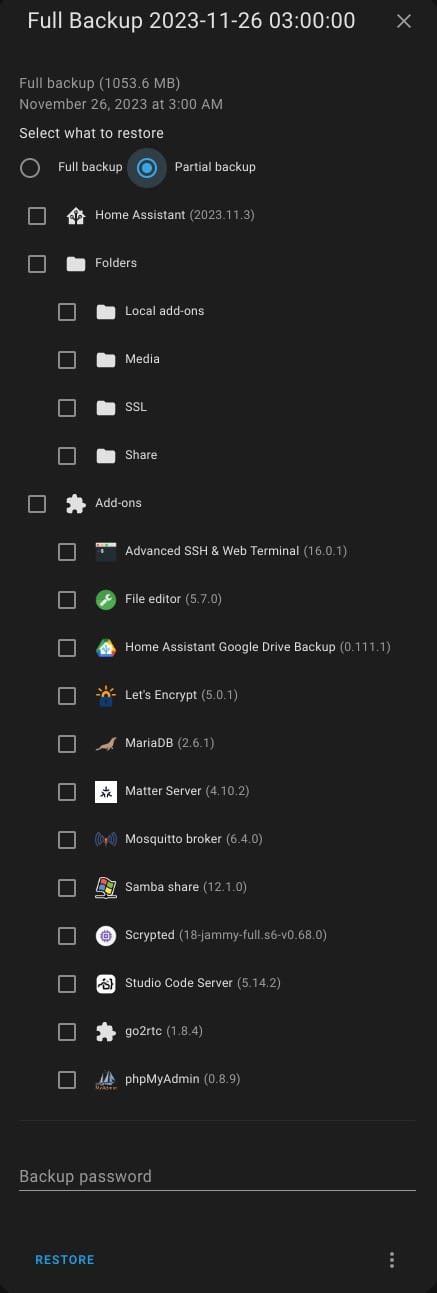
- Click on your backup.
- Select Partial backup.
- Tick the box next to any add-ons that are failing and that you want to restore.
- Enter your restore password (if any) and proceed with the restore.
- After the restore is done, do a full HAOS reboot (NOT restart).
Hopefully at this point your add-on is now in a working state. If not, review the logs and try to further troubleshoot.
Summary
Home Assistant could really use some love in the backup/restore department. Specifically, doing a restore is very mysterious with zero feedback in the UI on any progress. Plus, you can still have silent add-on failures that are only visible in logs. And if your backup is over 1GB, that has even more challenges. So ya, the Home Assistant restore process need a lot of work. But, it DOES usually work, even if it is a bit mysterious. I hope this post helps you have a smoother Home Assistant restore process.


Great write up! Thanks for putting in the time. It helped!
I just used a Google drive backup from my HA Rpi4 to Hassio running on a Dell Micro PC/Nuc.
The post restore checks step is appreciated. I found lots of errors so need to research each and correct them!
Glad it helped!
Any detail about backup and restore of the Zwave and/or Zigbee information ?
I don’t use either with Home Assistant, so I can’t comment. I do use Matter devices with thread, but I’m using my Apple Home hubs for the thread networks. So HA only talks to my Matter devices via IPv6 and the LAN, so there’s no thread radio config to backup or restore.
Hi, WIth the latest HA release (2023. Sept), there is no option on the Create user step to choose a restore from a backup.
Do you know how can it be restored then?
I’ll refresh that blog post after 2023.10 comes out.
Hi Derek
Thank you for the post.
The challenge of course is to keep a web service running to view the processes.
You can use the observer service to see the process:
Home Assistant observer
Or, when adding a monitor and keyboard, you can use the following command to see what is currently processing:
You will get a json output of the overall restore job running and the sub job what is currently beeing restored.
What is also important to note, the home assistant requires internet access to be able to download the missing addons as the backup contains data, not the addons themselve.
If you network was configured to use ha as DNS, you may not be able to download anything and restore fails.
Great info, thanks!
Thanks for this, >1Gb restore worked for me. I had tried before without using the samba copy and I don’t think it worked but I think I connected via http not https! The tip from Derek (jobs info) was useful to know progress, using proxmox console.
My disk usage on the original was ~60Gb but after restore it is only 20Gb – not sure why that is.
The extra data were the local backups, they are not restored but can be copied across.
I’m trying it migrate HA to a smaller machine (both HAOS on proxmox). Existing is 16GB RAM, 512GB SSD. I want to migrate to a SFF machine with 8GB RAM, 64GB SSD. I install HAOS, and it seems fine, but when I run “restore”, it never comes back, and I have to wipe the VM and start again. I deleted the database, to reduce my full backup to 300MB, but still no luck. My Any ideas?
Did you monitor the HAOS VM in Proxmox during the restore to see what was going on? Did you see CPU/disk spikes and then tail off?
Thanks for the great writeup! I’m curious if anyone has restored a backup from an older version of Home Assistant to a newer version. In my case I’m planning to migrate from a docker / supervisor setup to a Proxmox setup but my current version of HA (2023.11.3) can’t be upgraded first because of…reasons. Will I be ok to restore a backup from that older version to the latest 2024.04.23 or should I build my Proxmox instance with my older version?
So I’m running HAOS on Proxmox. I have 3 machines running in High Availability. Now it looks like a part of the disk on which HAOS is running is corrupted. Resulting in the fact that my HAOS is not High Available any more.
My idea was to load a new HAOS instance and restore the backup. (which is approx 2.2G). However, I didn’t see any progress even on the stats that you suggested – a flatline of 73KB with some peaks of 1.3MB. Based on the final result – meaning failure, it didn’t. How much time would it take. do you think ?
Can you run the restore for the BM machine at the same time as the old machine is running ?