Welcome to the unofficial Ruckus Unleashed Best Practices Guide for enterprise-grade home Wi-Fi. This post will guide you through the configuration of the free Ruckus Unleashed controller for a residential setting. Residential deployments can present unique challenges to maximizing Wi-Fi performance and stability. This guide provides detailed guidance on a variety of settings and presents sample Wi-Fi LAN configurations to help get you started.
Ruckus Unleashed is a high-performance local Wi-Fi controller which runs within your Ruckus access points. No external software or hardware controller is needed. Ruckus Unleashed is designed for residential and small business environments. You can check out their Ruckus Unleashed data sheet for all the details of supported models and feature set. As of late 2024 Ruckus added support to Unleashed for their Wi-Fi 7 APs, such as the R670 and R770. This is a welcomed addition to the Unleashed family.
Disclaimer: This post does not contain any affiliate links, and I did not receive any compensation from anyone for this post. Ruckus has previously provided an AP and ICX switch for testing.
Announcement: In May 2025 Ruckus released Unleashed 200.18. This is a major update to Unleashed with an ENTIRELY new UI/UX. The UI is modeled after their paid Ruckus One controller. This post covers prior (legacy) versions up through 200.17. Check out the Related Posts section below for links to the 2025 version of this guide that covers Unleashed 200.18 and later. This legacy guide will not be updated in the future.
Related Posts
Part 1: Ruckus Unleashed (200.18+) Best Practices Guide
Part 2: Ruckus Unleashed (200.18+) Best Practices Guide
Part 2: Ruckus Unleashed Best Practices Guide (200.17 and earlier)
Part 1: Ruckus One Home Wi-Fi Best Practices Guide
Part 2: Ruckus One Home Wi-Fi Best Practices Guide
Enterprise Grade Home Wi-Fi: Ruckus Unleashed vs. Ruckus One
Ruckus Unleashed to Ruckus One Migration Guide
Unleashing the Power of 6 GHz Wi-Fi: Re-Think Everything
Ruckus One: Provisioning ICX Switches
Best Practices Guide Versioning
This guide was written using the following version of firmware:
Recommended Unleashed Firmware: 200.17 GA (200.17.7.0.139)
Blog Post Change Log
March 28, 2024: Initial release
April 8, 2024: Ruckus released 200.15.6.112.52 (200.15 MR), which still has some potential iOS (and possibly other brands) issues. I still recommend staying on 200.14 GA refresh 2 until further notice.
October 20, 2024: Ruckus Unleashed 200.16.7.0.402 seems to be stable across all ecosystems from the reports I’ve seen. I personally now use Ruckus One, so can’t personally vouch. But forums seem quiet about problems with this release.
February 14, 2025: Major update for Wi-Fi 7 APs and various other minor changes. Updated most screenshots to reflect updated Unleashed options.
May 15, 2025: This 2024 series covering Unleashed 200.17 and earlier is being retired and will no longer receive updates. All future updates will be made to the 2025 Unleashed 200.18 series. See Related Posts above for the links to the 200.18 version of this guide.
What's Covered?
This series of posts will cover the entire setup of Ruckus APs with Ruckus Unleashed for a residential setting. It will also show you how to deploy various networks such as homeowner and guests. Major sections in this series includes:
- Ruckus Access Point Selection (Part 1)
- Cross-Flashing Unleashed (Part1)
- Unleashed Initial Configuration (Part 1)
- Unleashed Firmware Update (Part 1)
- System Time (Part 1)
- Country Code and Channel Mode (Part 1)
- Email Alerts (Part 1)
- Radio Control (Part 1)
- Client Load Balancing (Part 1)
- Radar Avoidance Pre-Scanning (Part 1)
- PoE Troubleshooting (Part 1)
- AP Name and Location (Part 1)
- Management Interface IP (Part 1)
- SSID Architecture (Part 2)
- Guest Traffic Isolation (Part 2)
- Wi-Fi 7 Multi-Link Operations (MLO) (Part 2)
- Dynamic Pre-Shared Keys (DPSK) (Part 2)
- Wi-Fi Band Use Cases (Part 2)
- Wi-Fi Calling (Part 2)
- Firewall IPsec Passthrough (Part 2)
- 2.4 GHz Radio Configuration (Part 2)
- 5 GHz Radio Configuration (Part 2)
- 6 GHz Radio Configuration (Part 2)
- WI-Fi Networks: WLAN Details (Part 2)
- Wi-Fi Networks: WLAN Priority (Part 2)
- Wi-Fi Networks: Access Controls (Part 2)
- Wi-Fi Networks: Radio Control (Part 2)
- Wi-Fi Networks: Others (Part 2)
- Adding more Access Points (Part 2)
- Setting Preferred Master AP (Part 2)
- Troubleshooting (Part 2)
Ruckus Access Point Selection
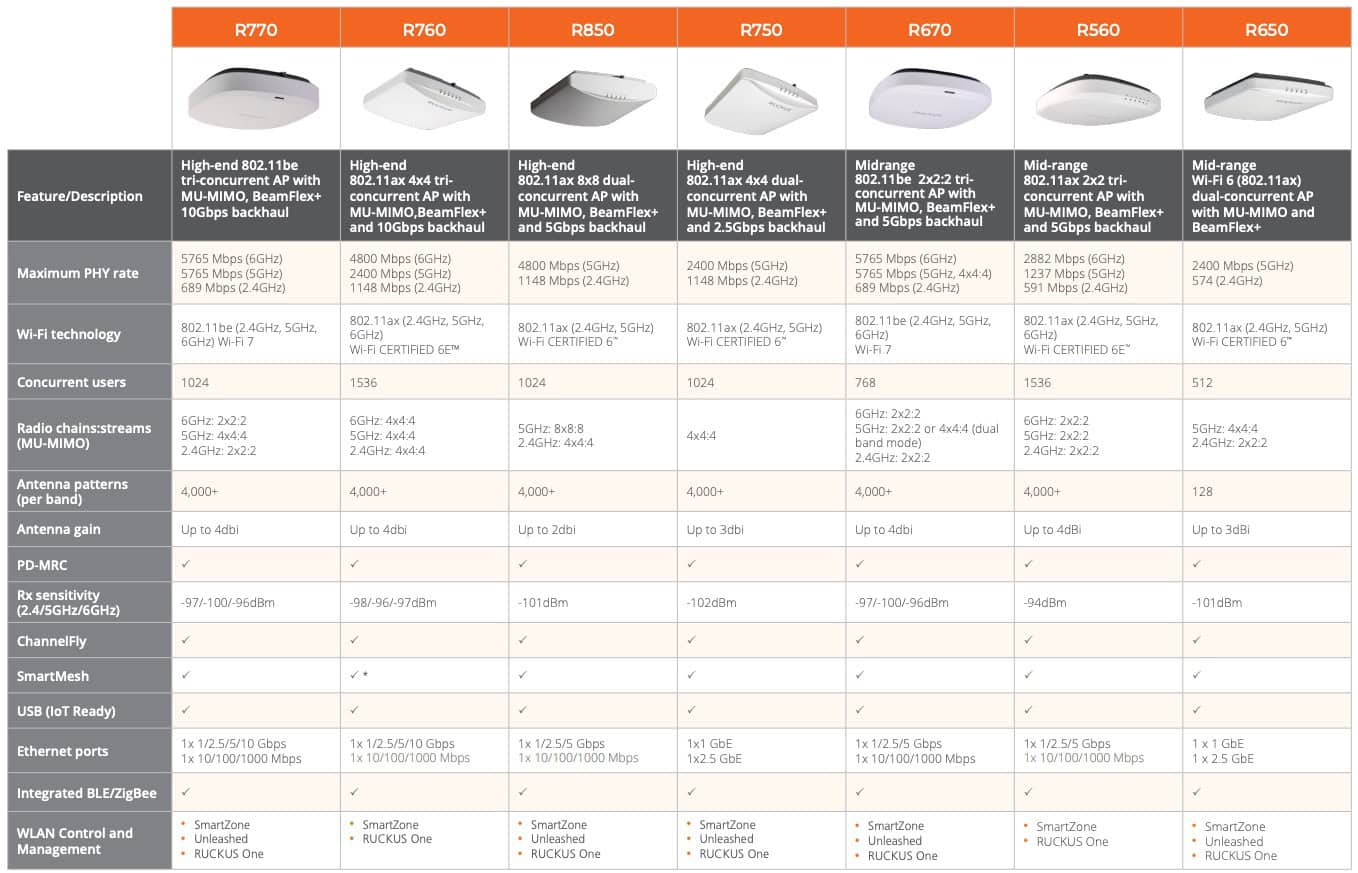
Ruckus makes a wide variety of indoor and outdoor Wi-Fi APs. You can peruse their full portfolio for the complete list of Wi-Fi APs. For residential Wi-Fi 6 the Ruckus R650 is an outstanding AP. It represents a killer value for the performance that you can get, and is a steal on the second hand market. Covered in their product guide, but not shown in the graphic below, are additional indoor APs such as the R350 and their “H” (hospitality) series. They also have a full line of outdoor (weather sealed) APs. As previously mentioned, not all AP models support Unleashed. If you want Wi-Fi 7 APs, then you can choose between the R670 and R770, both of which support Unleashed.
Cross-Flashing Unleashed
Depending on how you acquired your access point it might be running firmware other than Unleashed. The easiest way to tell what your AP is running is by navigating to the IP address of the AP in your browser using HTTPS and looking at the login screen. If your login screen looks like the first screenshot below we will need to cross-flash your AP to the Unleashed firmware. If your browser is unable to connect to the AP’s IP via HTTPS, then we will need to enable the web interface via SSH and then cross-flash.
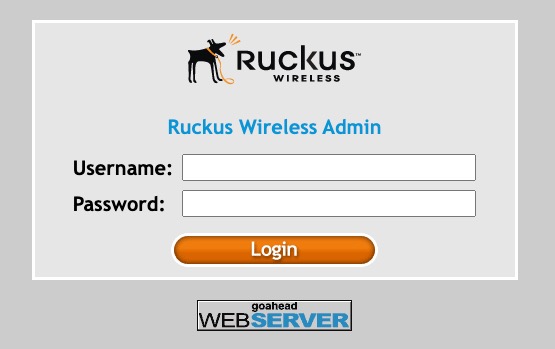
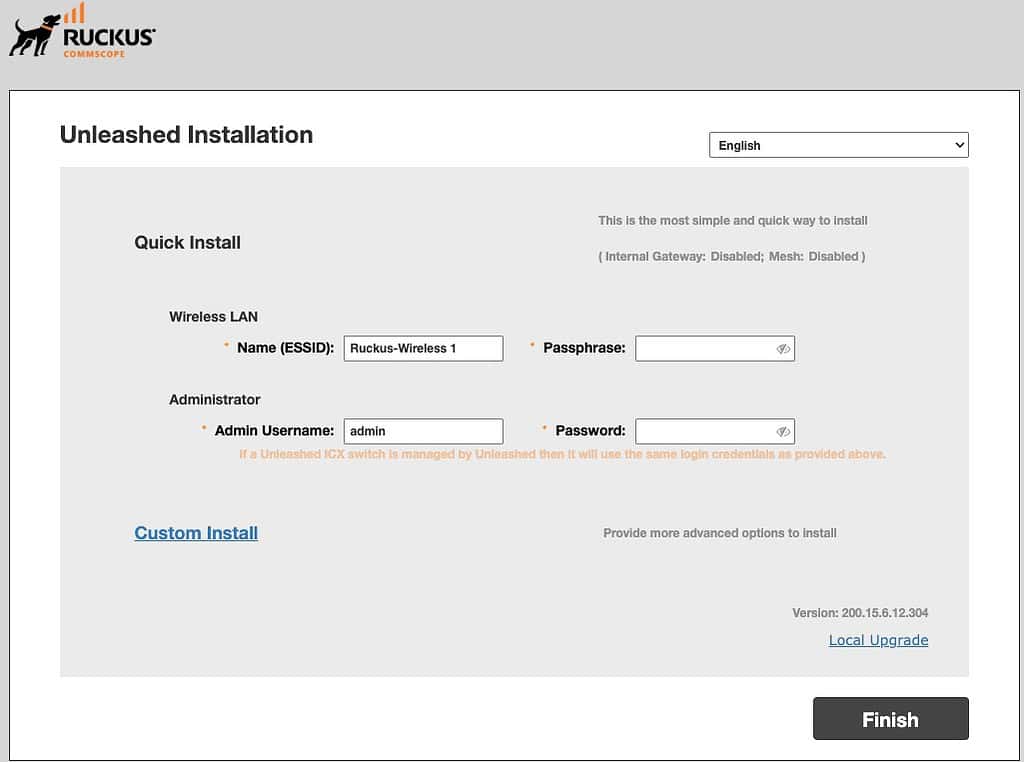
If you login screen looks like either of the ones below then you are already running Unleashed and do NOT need to cross-flash.
Enabling AP Web Interface
If your brand new Ruckus AP is not responding to HTTPS connections we need to enable the web interface. Follow these steps:
- SSH into the IP address of your AP. If AP is configured with default credentials, login with a username of super and a password of sp-admin.
- At the SSH prompt type set https enable.
- Reboot the AP by typing reboot.
- Wait a few minutes for the AP to reboot and the web interface to initialize.
- Verify you can now connect to the AP’s IP address via HTTPS.
Cross-Flashing APs to Unleashed
If you need to cross-flash your AP to Unleashed follow this procedure. If you are already on Unleashed, skip down to the next section. Please refer to the top of this post for the recommended firmware. On occasion the latest version is not the best option. If you are buying pre-owned older APs, such as off Ebay, the firmware flashing process should be done with Firefox. There can be issues with Chrome/Edge which cause firmware updates to fail unless you are using the very latest firmware.
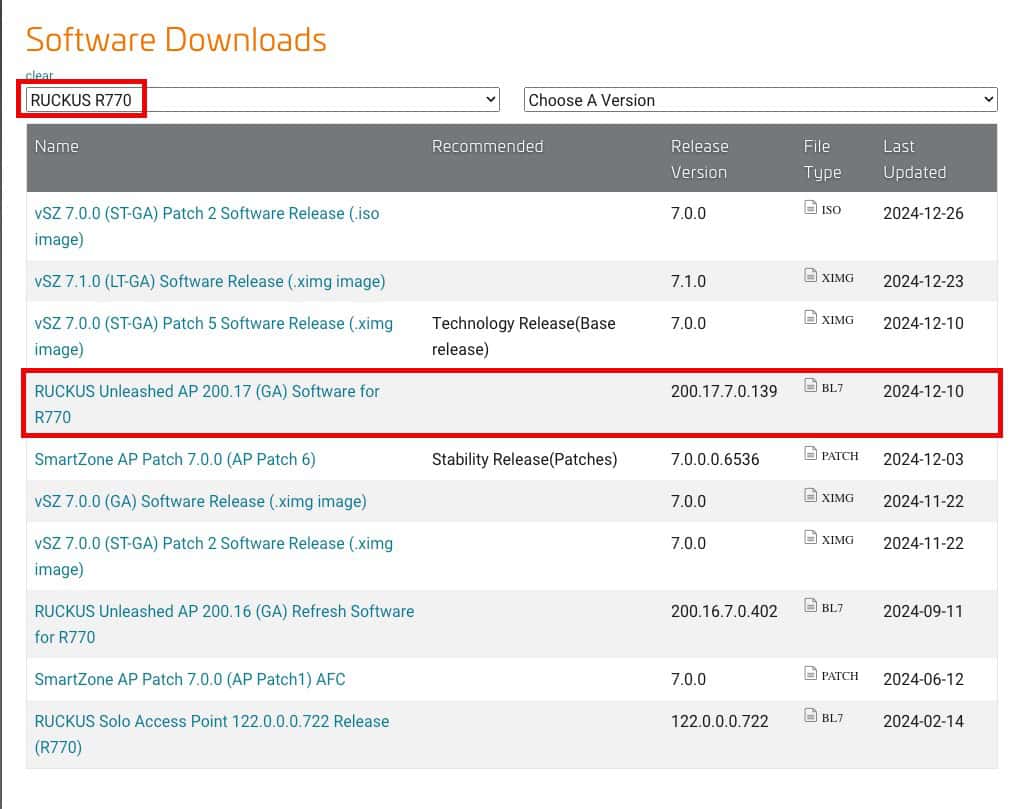
- Go to the Ruckus Support site, and select your AP model.
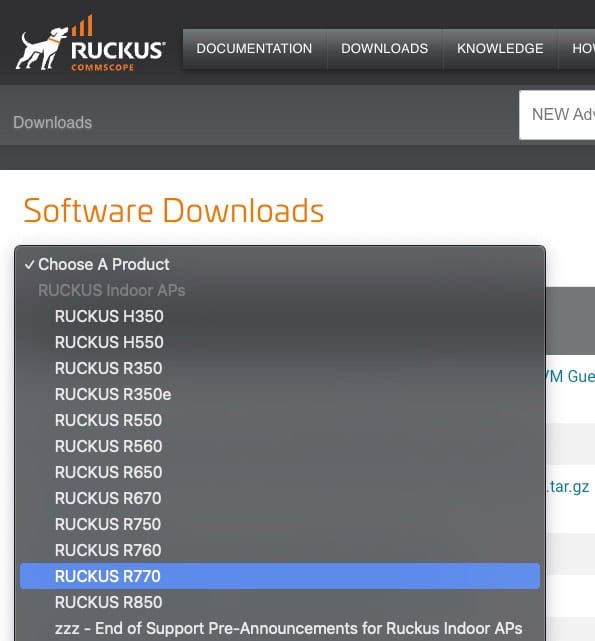
2. Locate the appropriate version of the Unleashed firmware for your AP model. It should have a file extension of BL7. Download the file.
3. Login to the access point using the default credentials of username super and password sp-admin. If those credentials do not work, you may need to do a factory reset. To do that, insert a paperclip into the reset hole and hold for 5-10 seconds, then release. Wait a few minutes for the reset to complete.
4. On the left side under Maintenance click on Upgrade. In right right pane click on Local. Browse to the BL7 file you downloaded from Ruckus.
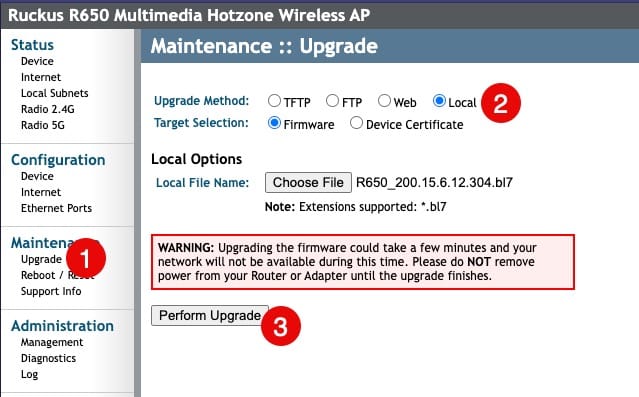
5. Click on Perform Upgrade and wait for the AP to reboot. This will take a few minutes.
Unleashed Initial Configuration
This section assumes your Ruckus access point is already flashed with Ruckus Unleashed. If you are deploying multiple APs in your environment, you should FULLY setup the first AP, including adding all of your Wi-Fi LANs (WLANs) which I cover in Part 2. Once the first AP is setup, also known as the Master, you can deploy additional APs and they will automatically inherit your configuration. This means completing both Parts 1 and 2 of this series on your first AP. Only after your first AP is fully setup should you power on your other APs.
- Make sure ALL of your APs are powered off.
- Plug in one AP to your network and provide power (PoE, or power brick). Lights should start blinking shortly after applying power. Give it a few minutes to fully boot. In my case on the R650 the power light is a solid green and the CLT light is blinking green.
- Open your favorite browser and connect via HTTPS to the IP of your access point. Consult your router’s DHCP table or use other means to find out the IP that it pulled. Ignore any SSL certificate warnings.
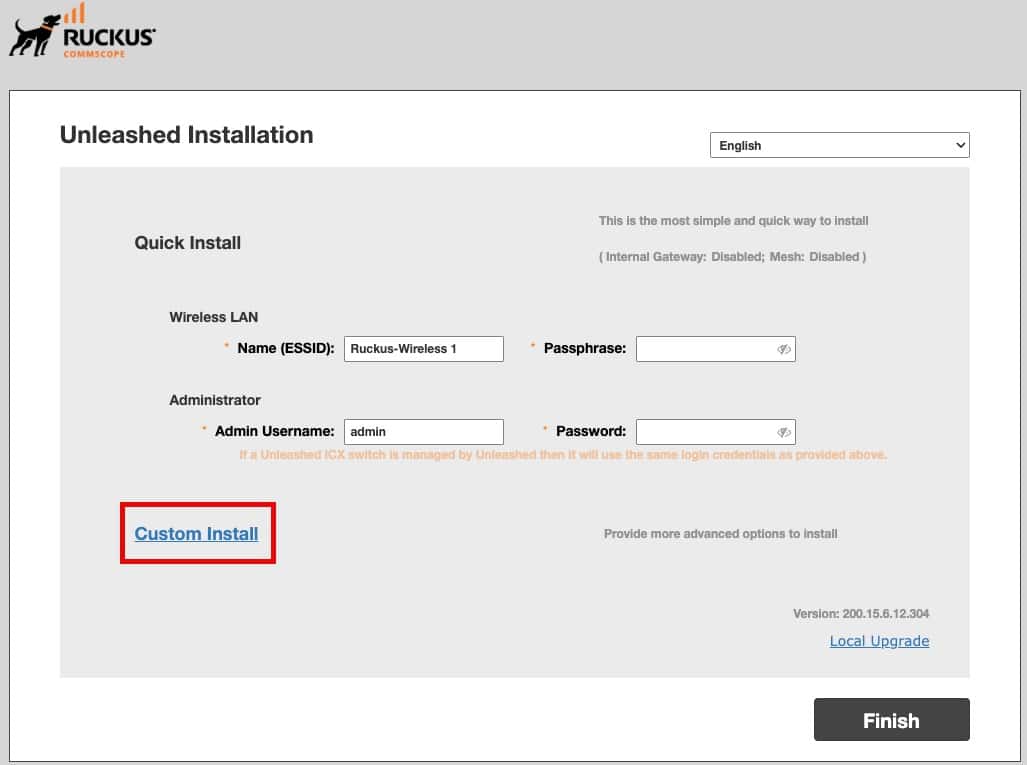
- Click Custom Install on the Unleashed landing page. If you see any other page, then either 1) The AP isn’t running Unleashed firmware (see cross-flashing section above) or 2) If you see the Unleashed username/password screen then you need to do a full AP reset. To do a reset put a paper clip in the reset hole on the AP and hold for 15 seconds. Release then wait a few minutes for the AP to reset.
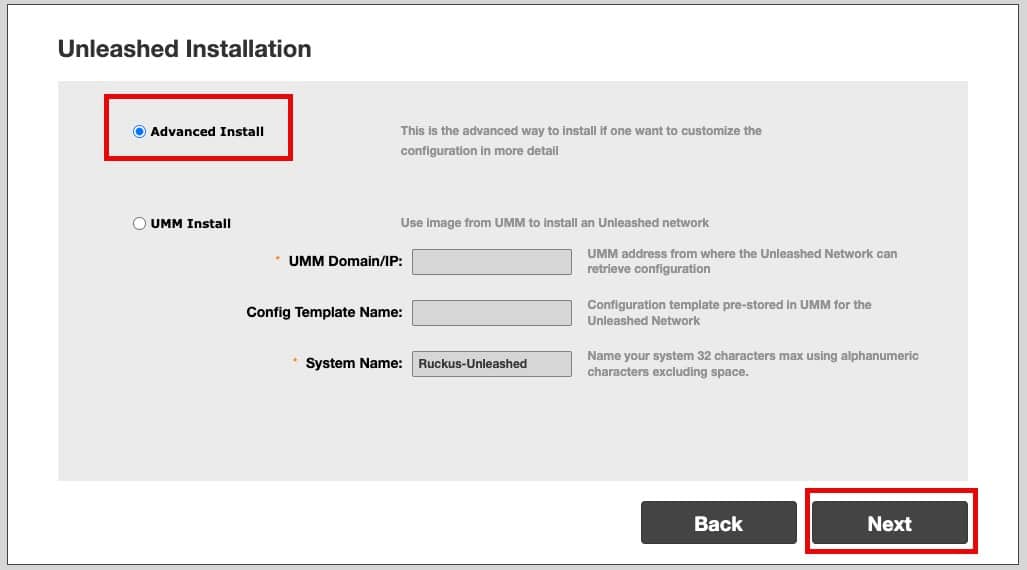
5. Make sure Advanced Install is selected and click Next.
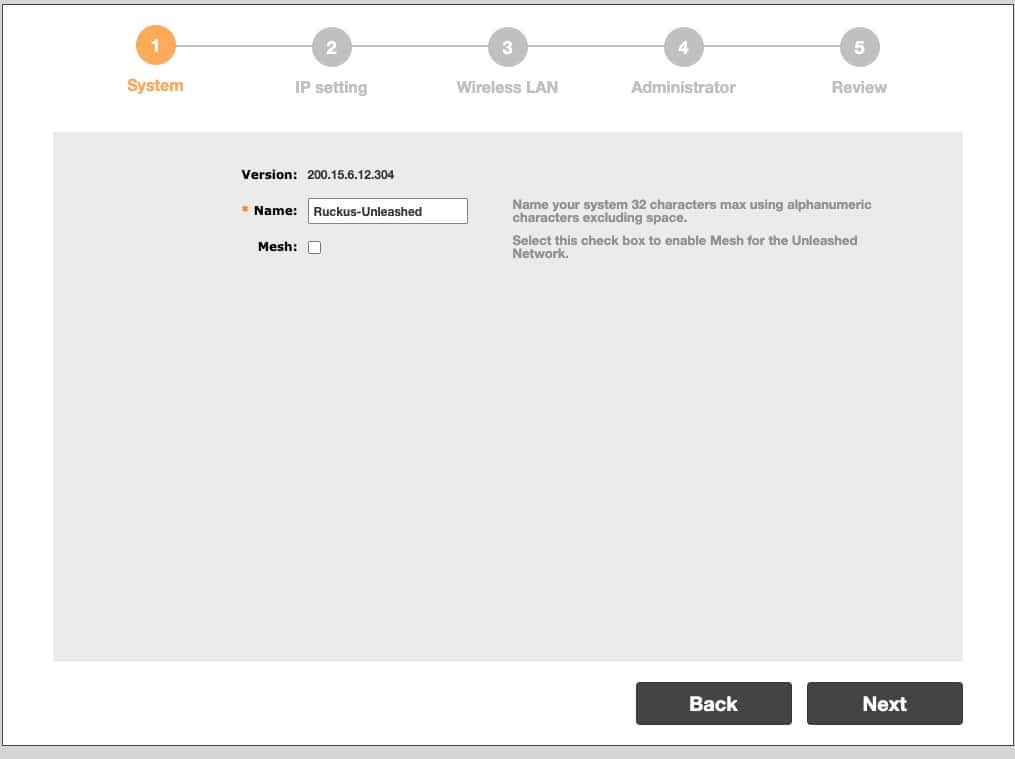
6. Select a name for your Ruckus Unleashed installation and click Next. Do NOT select the Mesh box, even if you are deploying multiple APs.
7. I suggest using DHCP for your APs, but recommending setting a DHCP reservation. This way you will always know the IP address of your APs. Click Next.

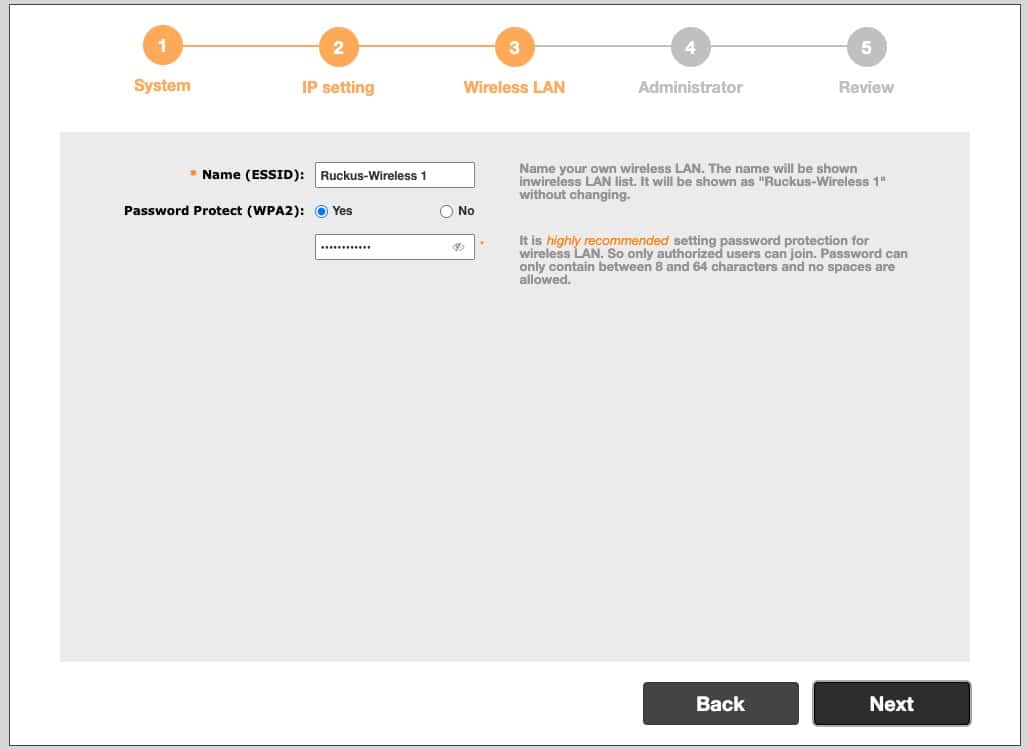
8. Here we are just creating a dummy SSID and password. Use disposable information here, as we will be creating various SSIDs later in this guide.
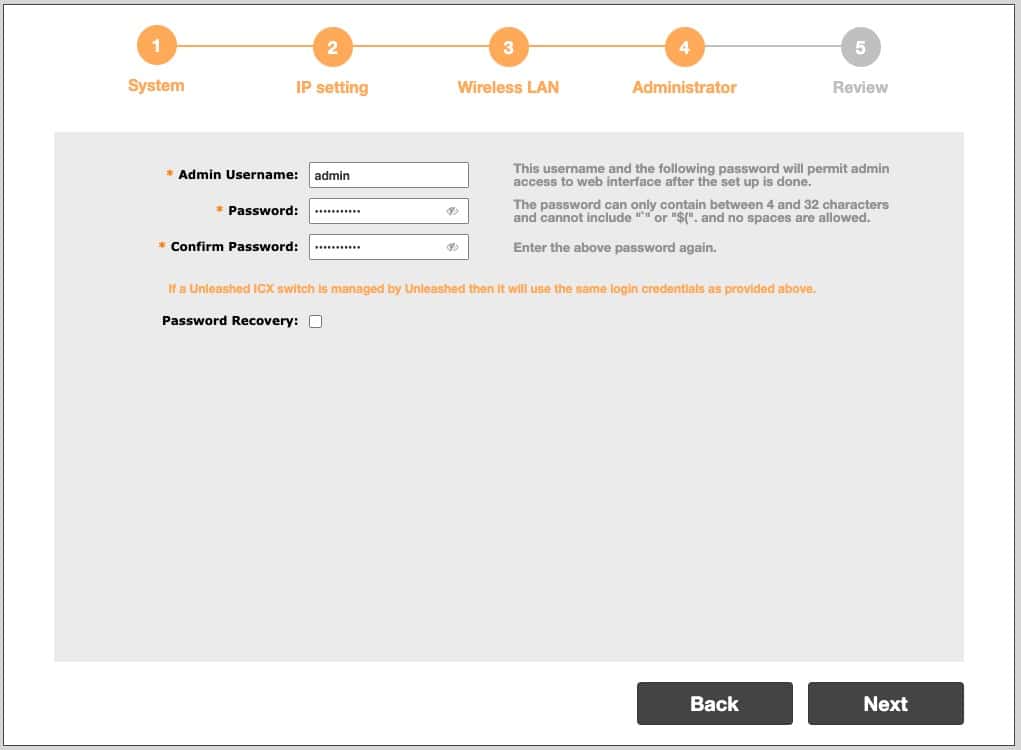
9. Enter a new password for the AP’s admin account. I would suggest a long complex password, and store it in your password manager of choice. Click Next.
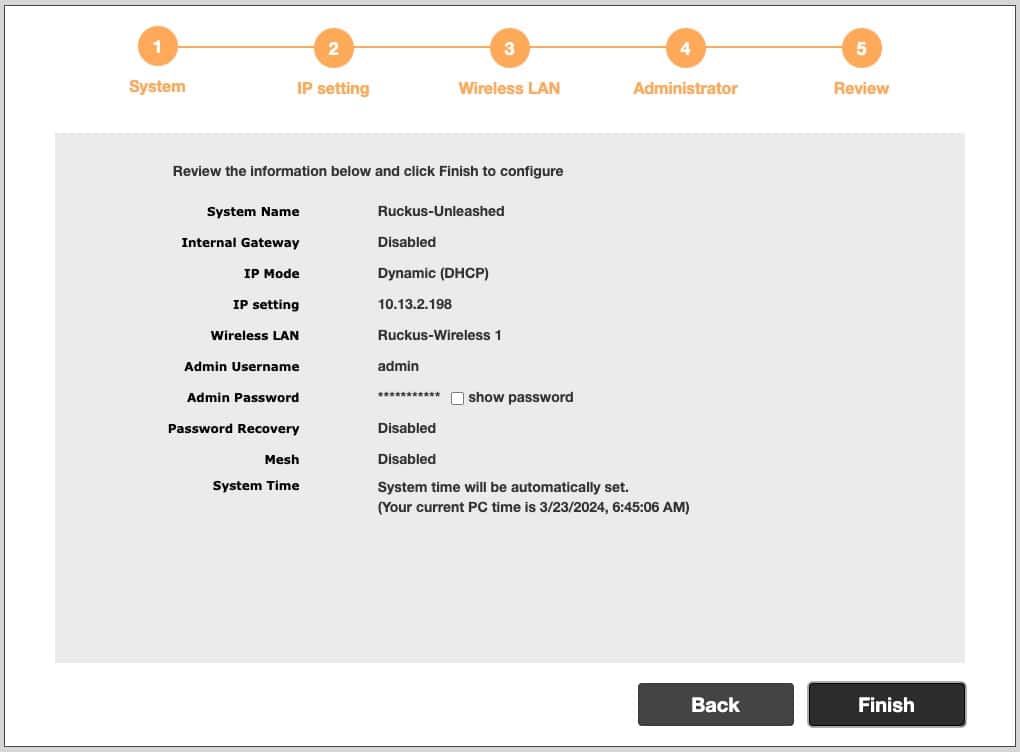
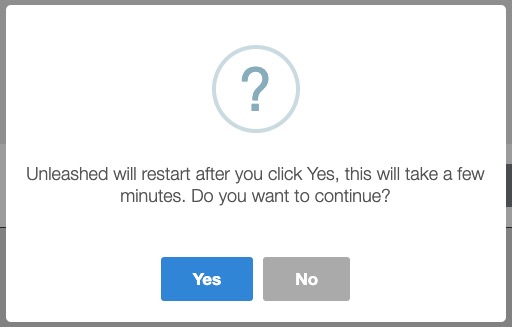
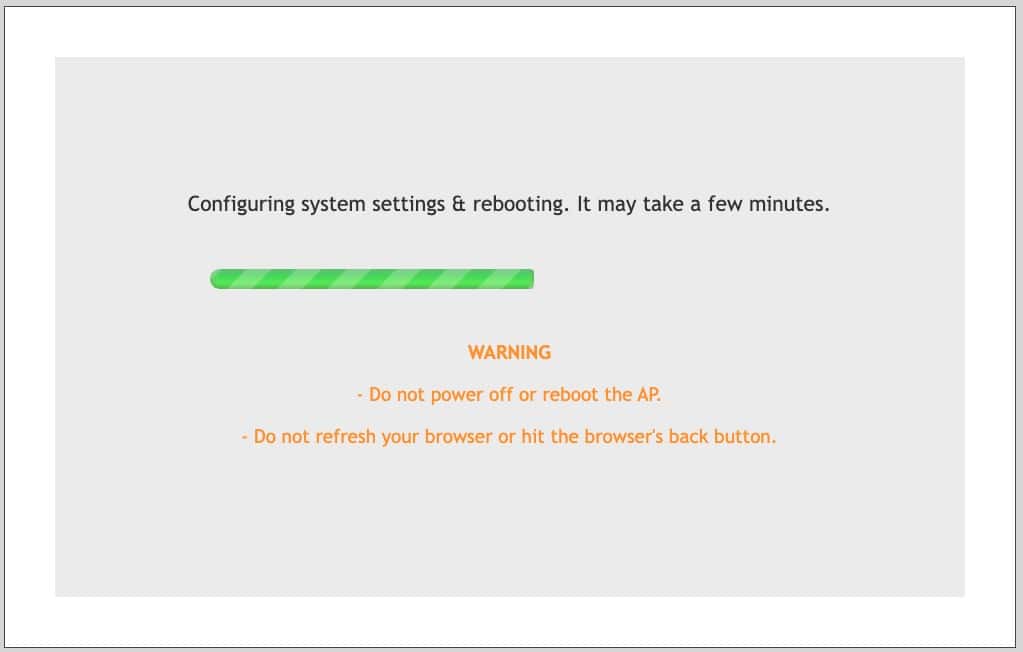
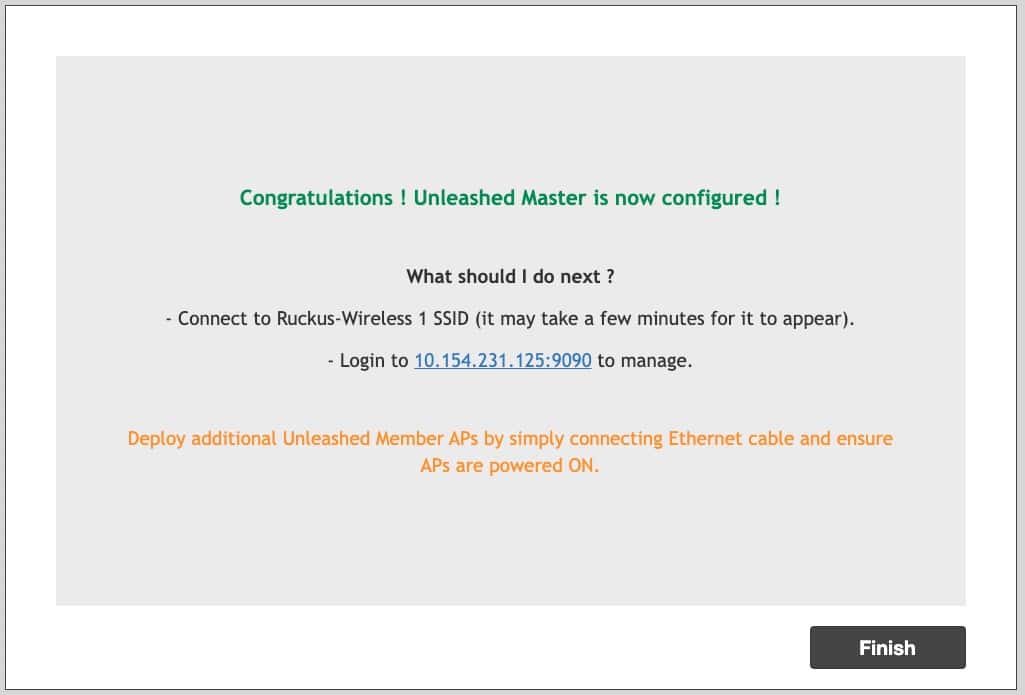
10. Review all of the information on the page and click Finish. Click Yes on the next popup, then wait several minutes while Unleash configures itself. Don’t do anything in the browser. Wait for the configuration process to complete. This will take a few minutes.
11. Wait for the Congratulations screen. Ignore the IP address and port number shown on the screen. Now that Unleashed is running, go to the next section for additional configuration.
Unleashed Firmware Update
Please refer to the top of this post for the recommended firmware. On occasion the latest version is not the best option. If you are buying pre-owned older APs, such as off Ebay, the firmware flashing process should be done with Firefox. There can be issues with Chrome/Edge which cause firmware updates to fail unless you are using the very latest firmware.
- In your browser connect via HTTPS to the IP of your access point. No port number is needed. Ignore any SSL certificate trust issues. Login with the credentials you previously saved (e.g. admin, password).
2. Let’s make sure your Unleashed firmware is on the latest recommended version. Click on Admin & Services -> Administration -> Upgrade. Make note of the firmware version you are running.
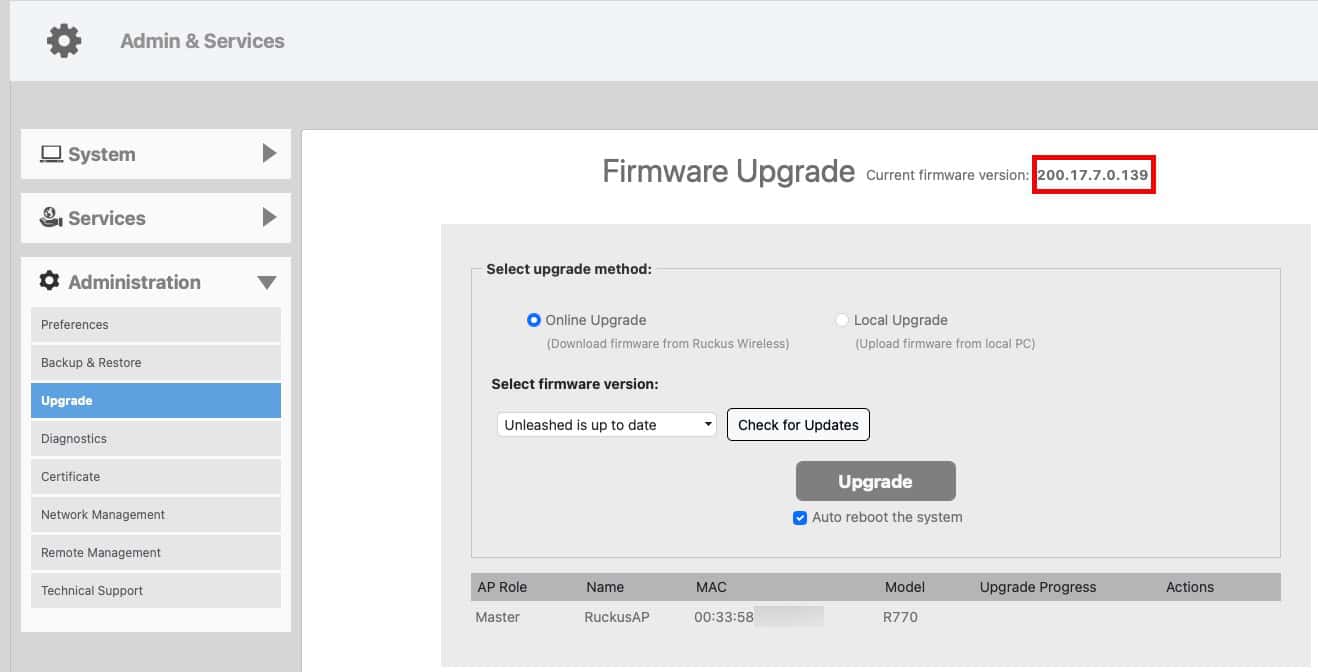
3. Click on Check for Updates. If there is an update, install it and wait for the AP to reboot.
Ruckus Unleashed System Settings
The following settings are at the system level and prepare Unleashed so that we can then start provisioning Wi-Fi LANs (WLANs) in Part 2.
System Time
Assuming the APs are connected to the internet they will, by default, use ntp.ruckuswireless.com as their NTP server. Unless you have a specific reason to change the NTP server, leave it as the default vale. We also need to change the timezone and daylight savings.
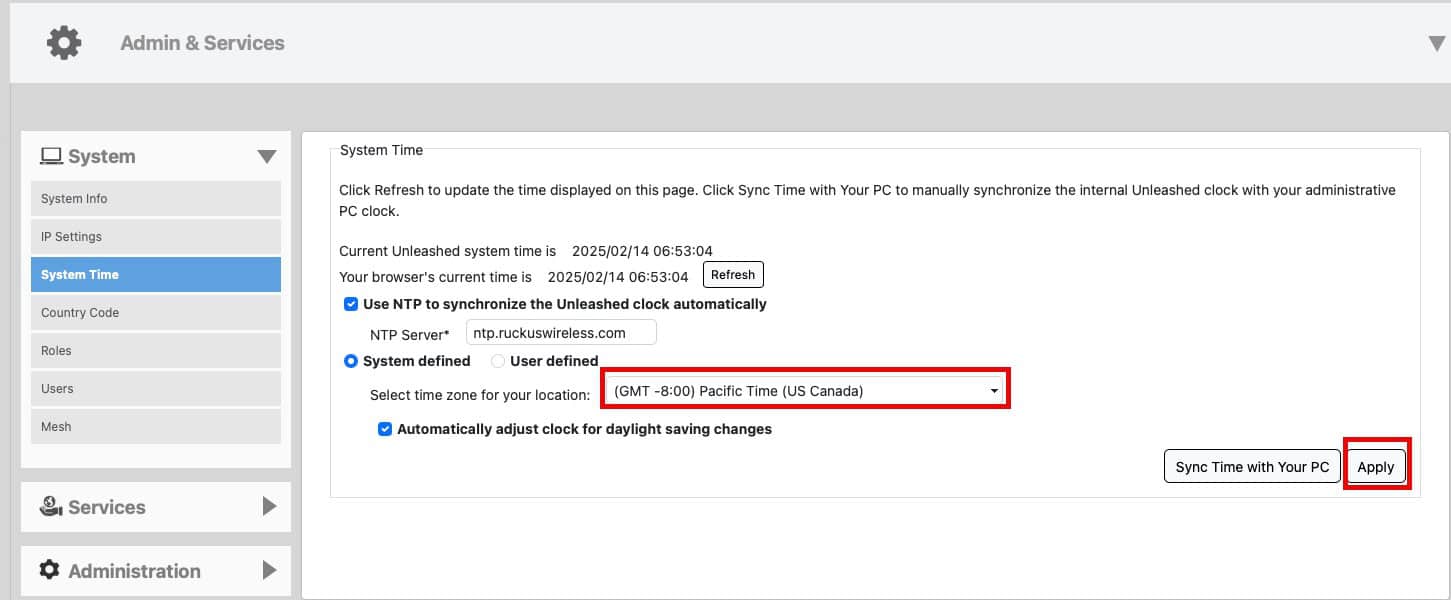
- Navigate to Admin & Services -> System -> System Time.
- Select your timezone. If your location observes daylight savings times check the box. Click Apply.
Country Code and Channel Mode
1. On the left click on Country Code.
2. Verify your country is selected and click on Optimize for Performance. Click Apply.
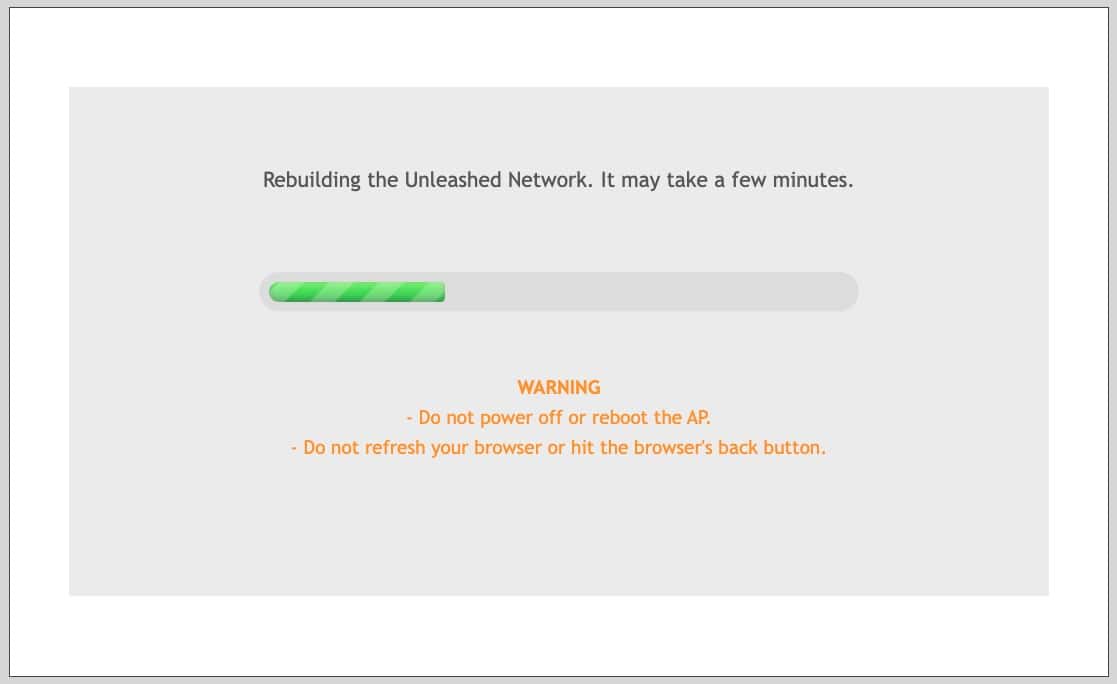
3. Acknowledge the popup window and wait for Unleashed to finish rebuilding (if you changed the setting).
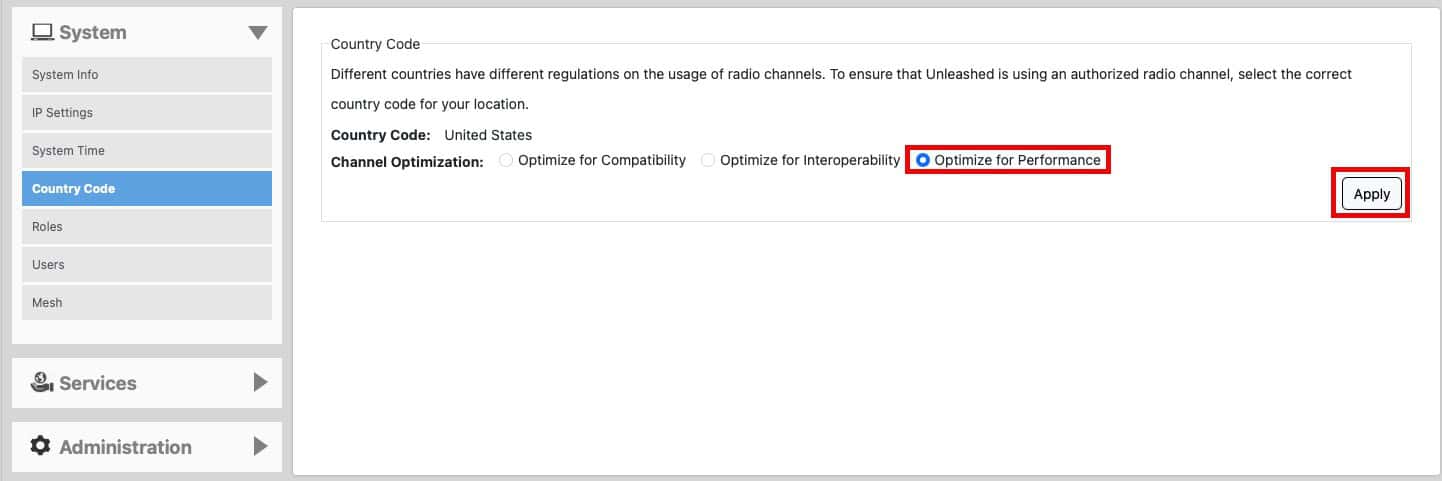
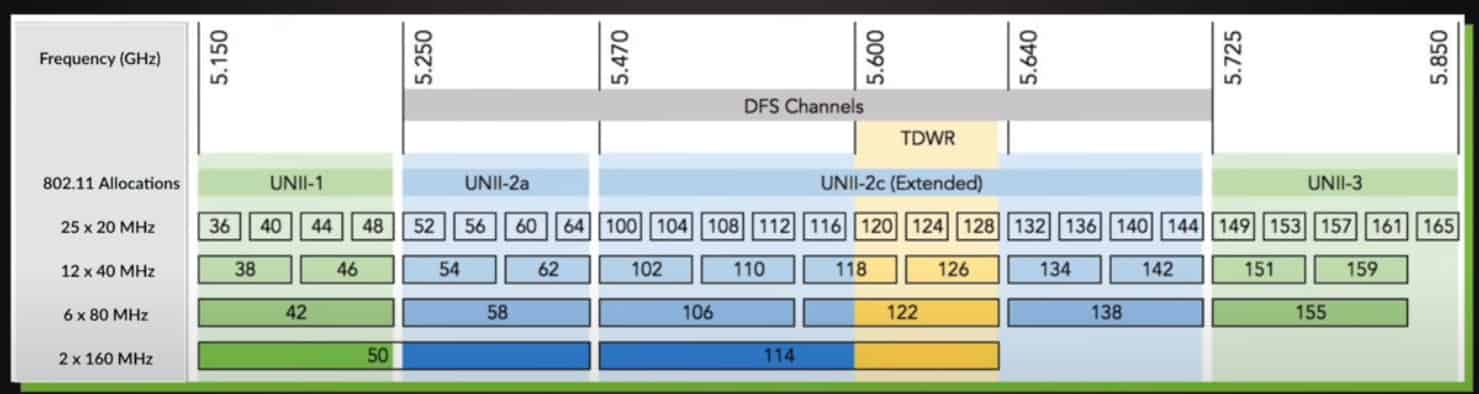
Optimize for performance enables what are called DFS channels. These channels can overlap with radar in your area, such as those used at airports. However, the APs can detect radar events and change channels as needed. Unless you run into issues with frequent radar events that create issues for your 5 GHz devices, I would use the DFS channels. Most consumer and ISP APs don’t use DFS channels, so this can be a great opportunity to use channels that have little to no interference.
Optimize for compatibility uses UNII-1 and UNII-3 channels (36-48, 149-165). Optimize for performance adds UNII-2a and UNII-2c, depending on your region. These are channels 52-144. See the graphic below for more details.
Tip: Some badly designed devices may not deal with DFS channels. For example, old Amazon Fire TV devices did not support channels 52-144. If you have old devices that don’t like DFS channels you can 1) Upgrade the device 2) Disable the DFS channels (52-144). For the purposes of this series I’ll assume your clients are DFS compatible. However, in Part 2 you can modify which channels are used on the 5 GHz band, if needed to work around broken clients.
Email Alerts (Optional)
1. After Unleashed reboots, login again.
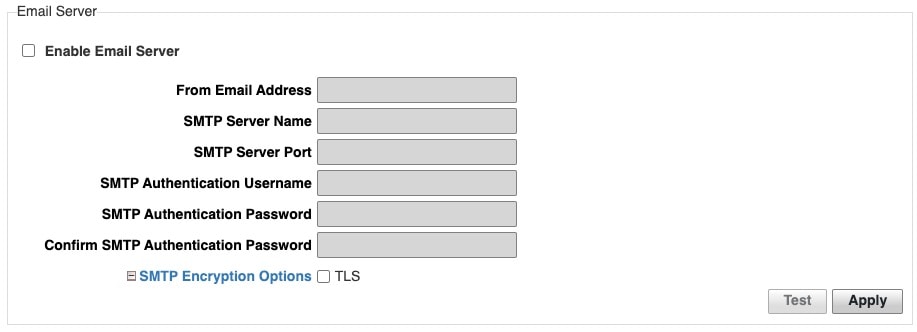
2. Navigate to Admin & Services -> System -> System Info.
3. Scroll down to Email server. If you have email relay server that you want to use for Unleashed alerts, enter that information here. I personally use my Synology as a relay for my primary hosted domain.
Radio Control
- Navigate to Admin & Services -> Services -> Radio Control.
- On the Self Healing tab select ChannelFly for all bands.
- Change the Channel Change Frequency to 66%.
- Modify the Optimization Period to include all hours (click on the left most square). Click Apply.
Note: ChannelFly uses background scans to collect information on the presence of neighboring APs and to assess how busy the channel is. The algorithm focuses on placing neighboring APs on different channels and avoiding busy channels.
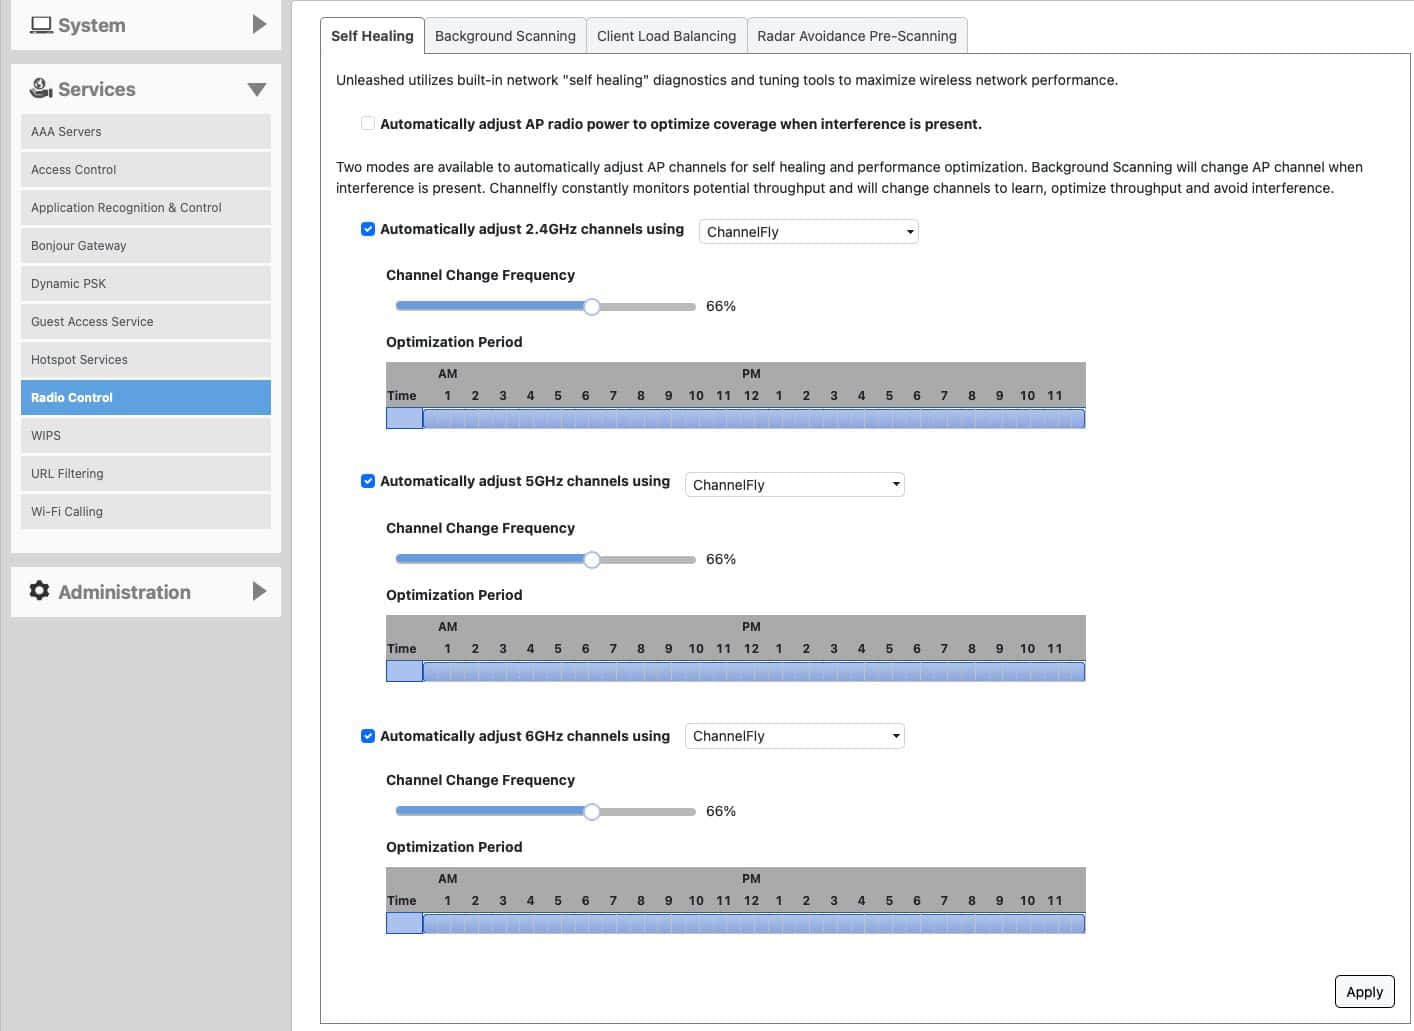
3. Click on the Background Scanning tab.
4. Change all bands to 20 seconds. Click Apply.
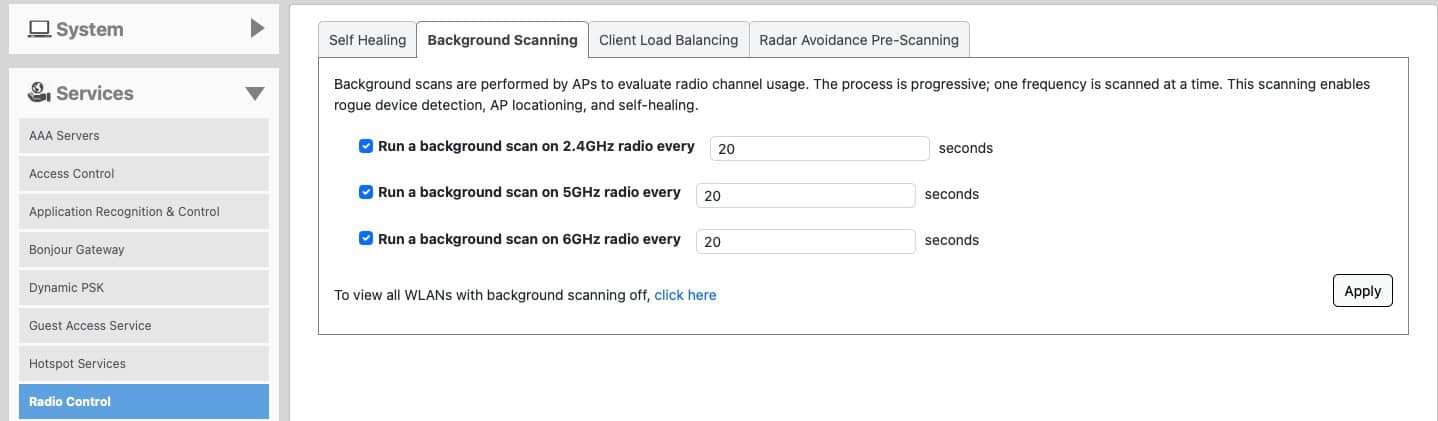
Tip #1: Background scanning plays a role in rogue AP detection and discovering RF neighbors. A good value to start with is 20 seconds. If you are in a sparse RF environment (think rural), you could even increase this up to 60 seconds.
Tip #2: Sometimes in high interference locations Channelfly will ‘flip flop’ frequently between channels. If notice frequent channel changes which cause client connection issues, you can decrease the scanning frequency. If you find yourself in this situation, consider increasing this to 600 seconds, then monitor.
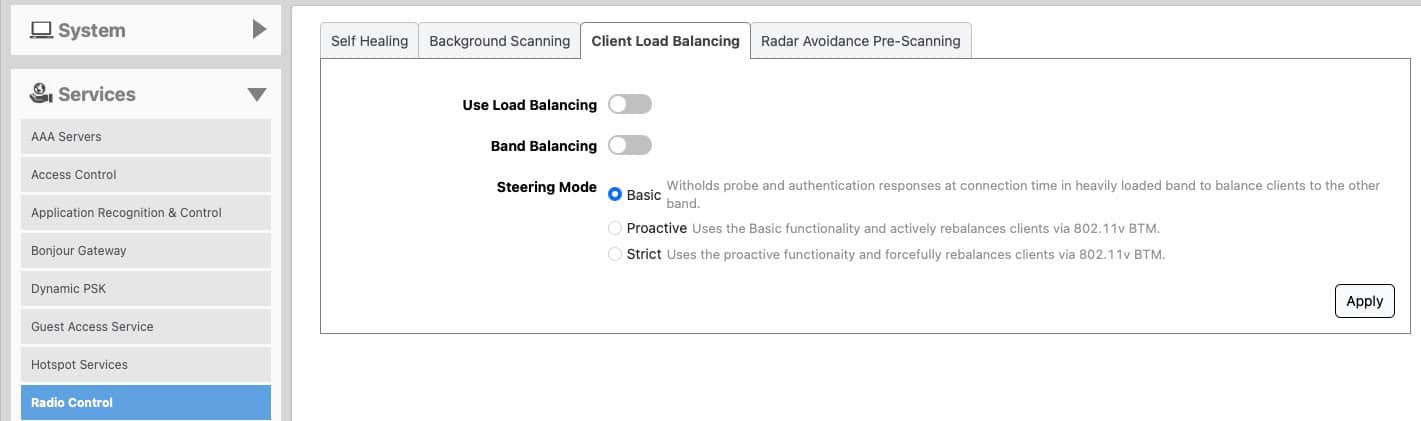
Client Load Balancing
In a residential settings it is NOT recommended to use any form of client load balancing. In addition, steering mode should be left at basic.
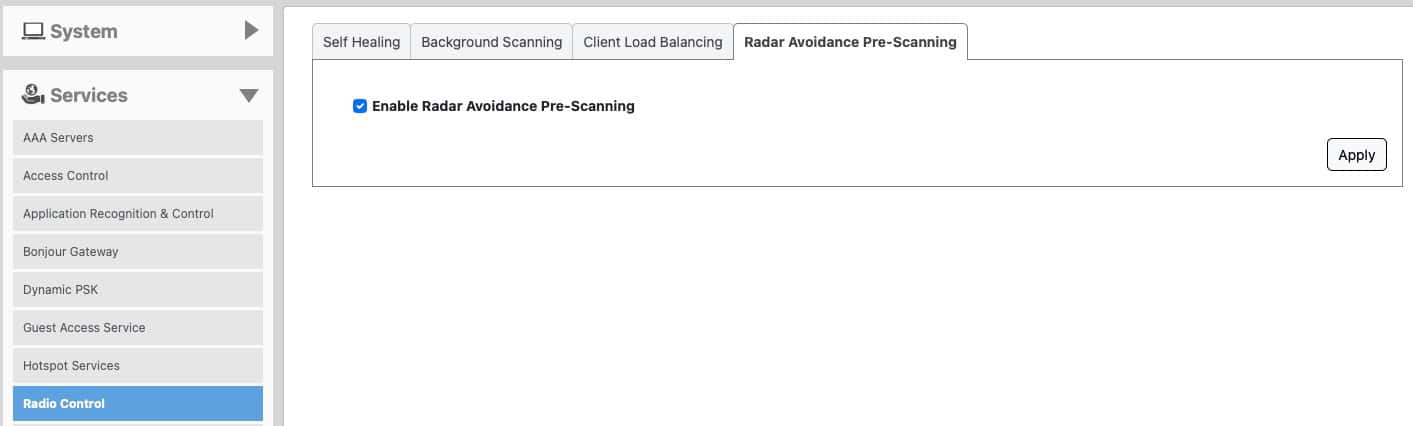
Radar Avoidance Pre-Scanning
When using DFS channels it is imperative that you enable the Radar Avoidance Pre-Scanning feature. This will scan the airwaves for any nearby radar signals and adjust Wi-Fi channel allocation as needed.
PoE Troubleshooting
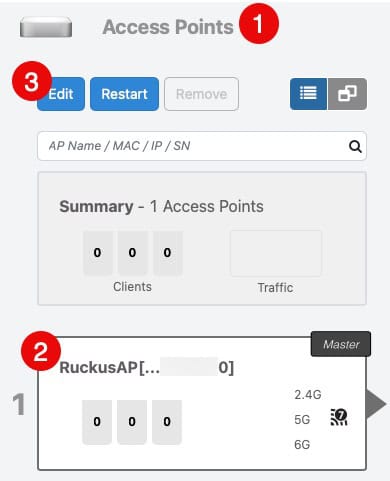
Ruckus APs use LLDP to negotiate their PoE request to the upstream switch. Depending on the compatibility with your upstream switch, the AP may complain about insufficient power. You can see this warning by going to Access Points -> Click on your AP. If there is a power issue you will see an orange warning symbol, as shown below.
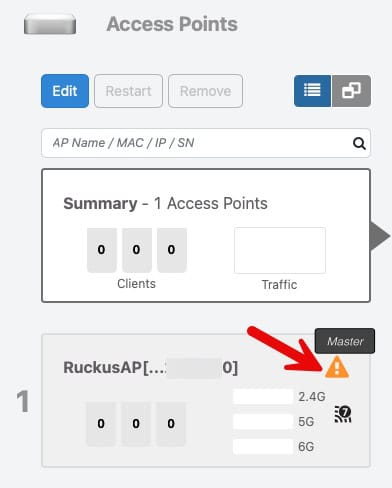
If you see this error, first validate that your switch can support the proper power mode, which is probably 802.3at (AP model dependent). This is commonly referred to as PoE+ and can support up to 25.5w to the end device (AP). Once you’ve verified your switch can provide the proper power, we can override the LLDP negotiation.
- Click on the AP (#1 in this case), then click on the blue Edit button.
- Click on the Other tab, check the Override Group config and select 802.3at PoE (or the highest PoE level for your AP).
- Click OK.
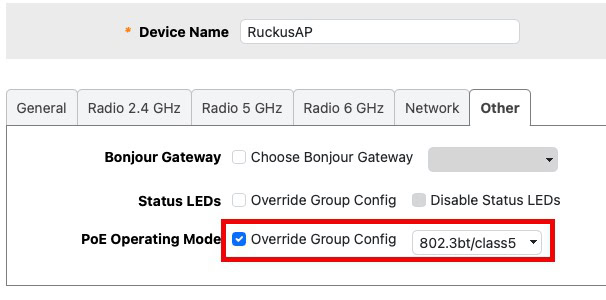
Note: If your switch does not support PoE+ (802.3at) or higher, you can use a mid-span power injector or the AC power brick to power your AP. Ruckus has a 10G 60w PoE injector that works perfectly with all of their APs. Also, higher power Wi-Fi access points such as the R770 require additional power, using 802.3bt5 (40w). In my real world usage of multiple R770s supporting 10-15 clients each, the actual PoE power draw is around 14w.
Access Point Name and Location
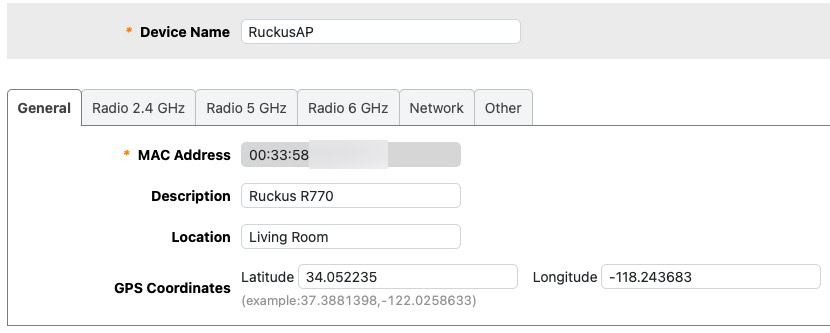
Naming your access points and providing GPS coordinates is always a good idea. To get the GPS coordinates of your house you can use the latlong.net converter. The AP name will use used elsewhere in the UI, so pick something meaningful. Use the same value for Name and Description.
- Navigate to Access Points -> Click on your AP -> Edit.
2. On the General tab enter your AP Device Name, Description, and GPS coordinates. Click OK.
Management Interface IP
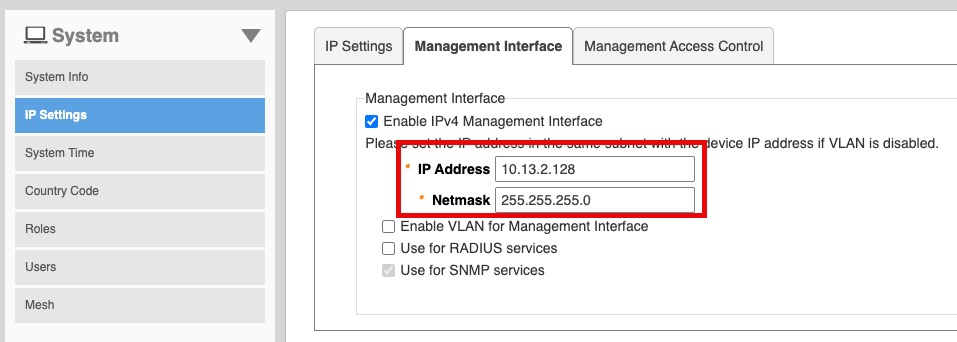
The Master AP role can move between APs. If you want to assign a static IP to the master management interface, you can do that. I would recommend doing this so you can always connect to the management interface.
- Go to Admin & Services -> System -> IP Settings.
- Click on the Management Interface tab.
Summary
This is part one of two of my Ruckus Unleashed for Residential Wi-Fi best practices guide. Ruckus Unleashed is a free Wi-Fi controller which is local and resides inside your APs. It’s entirely free and there’s no cloud component. It’s a great way to get started with Ruckus Wi-Fi APs.
In this first part we covered a number of topics including Ruckus AP model selection, cross-flashing Unleashed, updating the firmware, and a number of system settings. In Part 2 we cover a wide range of areas including SSID architecture, guest traffic isolation, dynamic pre-shared keys, Wi-Fi calling, and much more. You can check it out here: Part 2: Ruckus Unleashed Best Practices Guide.


Do you still recommending sticking to firmware 200.14.6.1.203?
yes, Ruckus pulled 200.16 due to bugs. Rumor has it there should be a fixed re-release later this week or next.
Hi, it’s about two months later, what do you think of 200.16.7.0.402?
I”m now using Ruckus One, so I can’t personally vouch for .402. However, it seems on Reddit that this might be a good stable release across all ecosystems. I updated my post.
i tried 200.15 but have had some issues with persistent disconects for apple products,so revert back to 200.14 and everything is fine now
didn”t tried 200.16 thou