Welcome to the unofficial Ruckus One Best Practices Guide for enterprise-grade home Wi-Fi. This post will guide you through the configuration of the Ruckus One cloud controller for Ruckus Wi-Fi access points in a residential setting. Residential deployments can present unique challenges to maximizing Wi-Fi performance and stability. This guide provides detailed guidance on a variety of settings, including those for Wi-Fi 7, to get the most out of Ruckus Wi-Fi APs in your home.
What is Ruckus One? In contrast with Ruckus Unleashed, Ruckus One is a licensed (paid) AI-driven cloud-based controller platform that enables you to easily manage your private residential Wi-Fi networks. Since it is cloud based, you do not need any additional controller hardware or software running in your home.
Ruckus One is an evolution of their “Ruckus Cloud” offering, which has been around for a number of years and targeted at business. Ruckus One is their next generation cloud management platform which formally launched as GA in January 2024. Ruckus One supports the very latest Wi-Fi access point models, including the Wi-Fi 7 certified R770. Ruckus One has a lot of great features for an enterprise-grade residential Wi-Fi experience. To see a ton of Ruckus One screenshots and comparison to Unleashed, see the related posts below.
Disclaimer: This post does not contain any affiliate links, and I did not receive any compensation from anyone for this post. Ruckus has previously provided an AP and ICX switch for testing. They also graciously provided input for various settings covered in this series.
Best Practices Guide Versioning
This guide was written using the following versions of Ruckus AP firmware and Ruckus One. Users can control of the AP firmware they wish to use. Ruckus One releases, being a cloud based software- as-a-service (SaaS), are seamless and upgrades automagically happen behind the scenes without user intervention.
AP Firmware: 7.1.0.510.1041 (April, 2025)
Ruckus One Release: April, 2025
Blog Post Change Log
March 18, 2024: Version 1
March 21, 2024: Version 1.1 – Changed Client activity timeout to 4200 seconds, down from 7200.
March 23, 2024: Version 1.2 – Added 4 additional “Other” Wi-Fi calling ePDGs which Ruckus ships in Unleashed.
April 2, 2024: Ruckus released AP firmware 7.0.0.104.1404 which supports Wi-Fi 6/6E/7 APs, including the R650. A number of new features including embedded iPerf in the AP’s CLI. Feel free to peruse the April 2024 release notes.
April 7, 2024: I added a Troubleshooting section at the end of the second post. Covers some ideas to help diagnose problematic clients.
May 2, 2024: Added AI-Driven RRM Settings in Part 1, to address a new configuration option added in Ruckus One. Ruckus also released AP firmware 7.0.0.104.1432.
May 11, 2024: Ruckus has enabled AFC, Automated Frequency Control, and the support of SP (Standard Power) mode on the 6 GHz band with select APs, such as the R770. I have added AFC guidelines to this post.
October 26, 2024: Minor refresh to the guide for the latest R1 and firmware settings.
January 12, 2025: Minor refresh to the guide for the latest R1 and firmware settings. Added details around SP/AFC channel selection, added Thread/Zigbee channel overlap tips.
May 9, 2025: AP firmware 7.1.0.510.1041 corrected a minor issue I was seeing with my iPhone 16 Pro. The issue was causing lower 6 GHz MCS rates than expected.
What's Covered?
This series of posts will cover the entire setup of Ruckus APs with Ruckus One for a residential setting. It will also show you how to deploy various networks such as homeowner, guest, and also optimize your network for Wi-Fi 7. Major sections in this series includes:
- Ruckus AP Selection (This Post)
- Venue Settings (This Post)
- AI-Driven RRM Settings (This Post)
- SSID Architecture (Part 2)
- Wi-Fi Calling (Part 2)
- Access Point Settings (Part 2)
- 2.4 GHz IoT Homeowner Network (Part 2)
- 2.4 GHz Guest Network (Part 2)
- 5 GHz Guest Network (Part 2)
- 5/6 GHz Homeowner Network (Part 2)
- Troubleshooting (Part 2)
Ruckus AP Selection
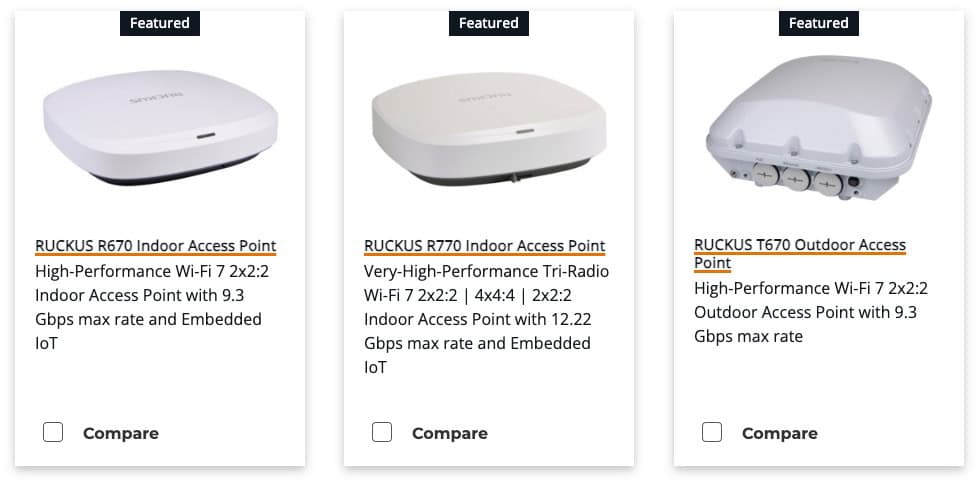
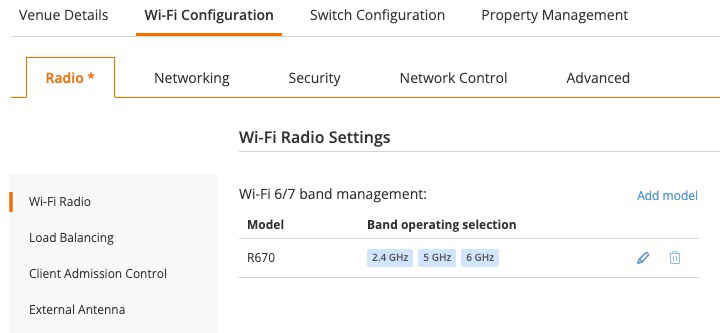
Ruckus makes a wide variety of indoor and outdoor Wi-Fi APs. You can peruse their full portfolio for the complete list of Wi-Fi APs. For residential Wi-Fi 6 the Ruckus R650 is an outstanding AP. It represents a killer value for the performance that you can get, and is a steal on the second hand market. If you want to make the jump to Wi-Fi 7, then your options are the R670, R770 and T670. Covered in their product guide, but not shown in the graphic below, are additional indoor APs such as the R350 and their “H” (hospitality) series. They also have a full line of outdoor (weather sealed) APs.
Venue Settings
A Venue is a Ruckus One construct which defines a physical location where APs and switches reside. In a Venue you define a number of high level settings which are then inherited by the devices at that physical location. For example, it defines the available Wi-Fi channels, channel bandwidth, radio transmit power, and more.
WLANs (SSIDs) are not defined at the venue level, but WLANs can be assigned to one or more Venues. This post will focus on all of the Venue related settings for Ruckus APs. The second post in this series covers the WLAN configuration (and more).
Let’s walk through setting up a residential venue for Ruckus Wi-Fi APs!
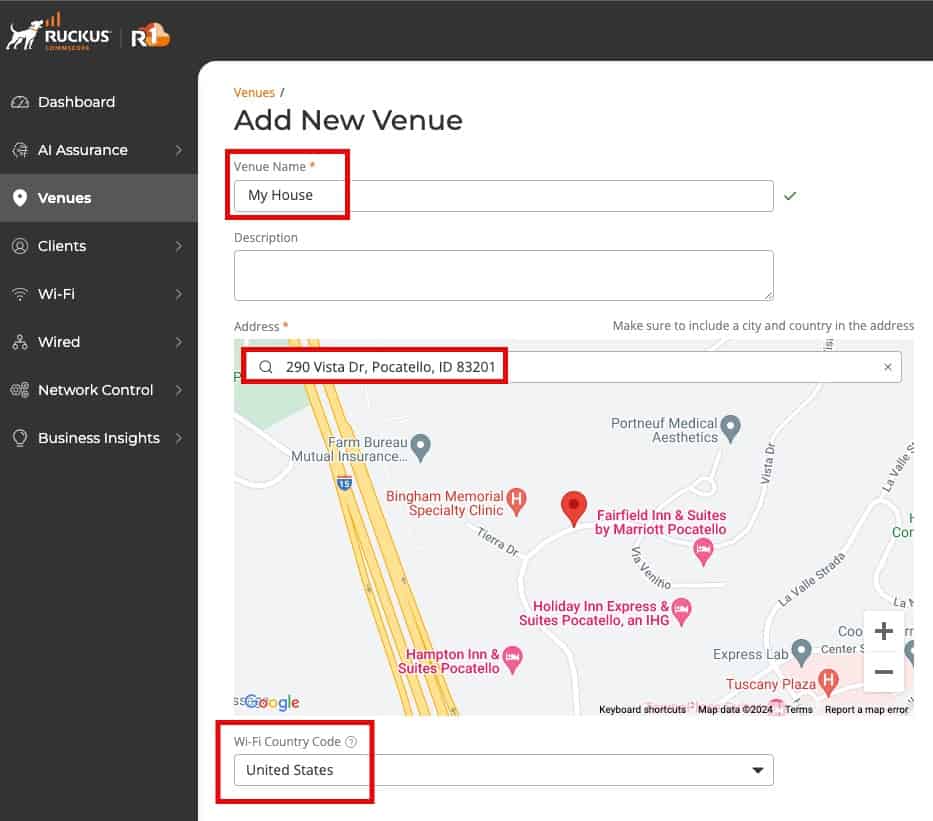
Venue - Details
- Login to Ruckus One.
- In the left tab click on Venues. In the upper right click on Add Venue.
- Enter your Venue Name, Address, and Wi-Fi Country Code.
- Click Add.
Venue - Wi-Fi Configuration - Radio
5. In the list of Venues click on your home.
6. In the upper right click on Configure.
7. Click on Wi-Fi Configuration. Modify the following settings:

Venue - Wi-Fi Configuration - Radio - 2.4 GHz
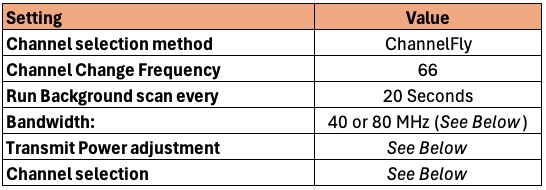
8. Click on the 2.4 GHz tab and modify the following settings:
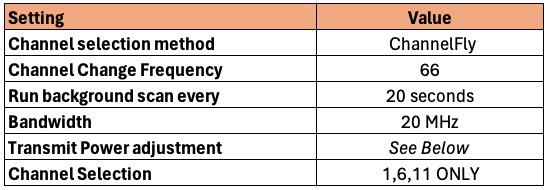
Channel selection method: Use ChannelFly. Residential RF environments are very dynamic, so setting static channels are not recommended unless you have clients that don’t deal with channel changes. ChannelFly uses background scans to collect information on the presence of neighboring APs and to assess how busy the channel is. The algorithm focuses on placing neighboring APs on different channels and avoiding busy channels.
Channel Change Frequency: The Channel Change Frequency (CCF) configuration allows the user to specify the responsiveness of ChannelFly to interference with consideration for the impact on associated clients. ChannelFly will avoid performing channel changes when a certain number of clients are associated to the AP on a per-radio basis. This threshold is defined by the CCF. With the default CCF of 33, channel changes may occur only when there are 3 or fewer associated clients. 33 is too aggressive for a residential environment, so I suggest a value of 66 or more. Note: AI-Driven cloud RRM will take over and will propose changes no more often than once a day.
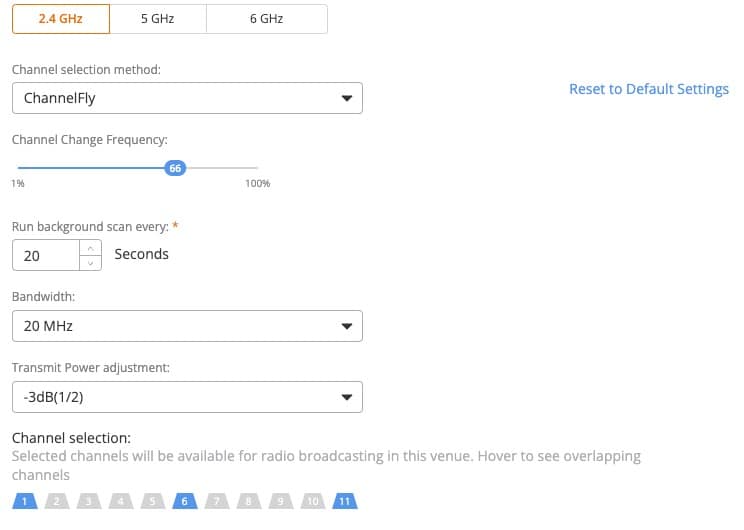
Tip: If you have a smart home and are using Thread or Zigbee, pay close attention to what channels they use. Both Thread and Zigbee use slivers of the 2.4 GHz spectrum and Wi-Fi APs can cause interference. For example, Apple TVs generally use Thread/Zigbee channel 25, which overlaps with Wi-Fi 2.4 GHz channel 11. In my home I only use Wi-Fi channels 1 and 6, to avoid Thread network interference.
Venue - Wi-Fi Configuration - Radio - 5 GHz
9. Click on the 5 GHz tab and modify the following settings:
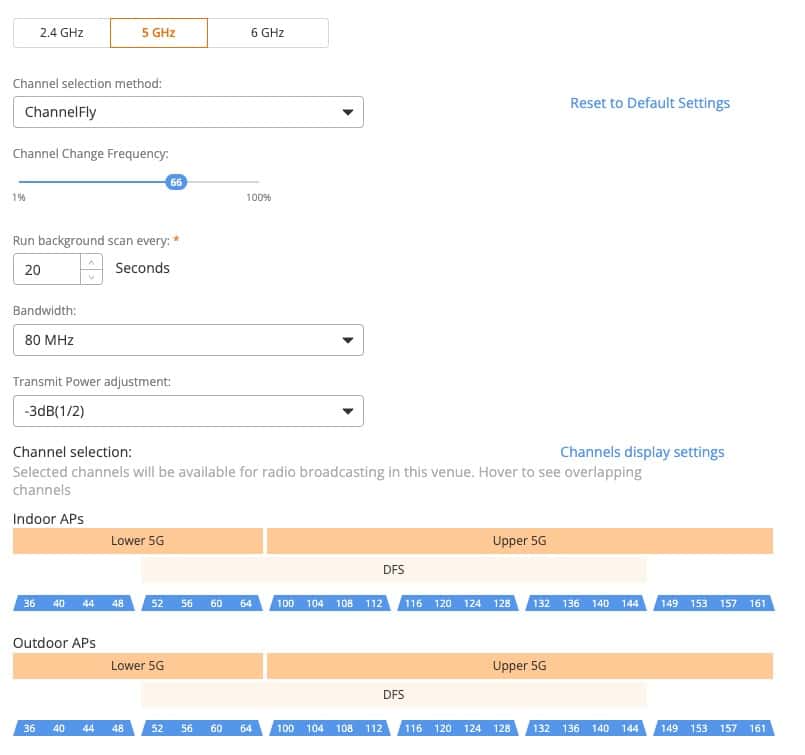
Channel selection method: Use ChannelFly. Residential RF environments are very dynamic, so setting static channels are not recommended unless you have clients that don’t deal with channel changes. ChannelFly uses background scans to collect information on the presence of neighboring APs and to assess how busy the channel is. The algorithm focuses on placing neighboring APs on different channels and avoiding busy channels.
Bandwidth: This value will depend on your environment and the region of the world you are in. Remember that the wider the channel the higher the noise on the channel, which can reduce performance near the edge of the range of the AP. However, wider bandwidth can improve Wi-Fi speeds. In the US 80 MHz is a good starting point, as many consumer grade Wi-Fi APs don’t even allow you to use DFS (UNII-2) channels (see graphic below). This gives enterprise grade APs, like Ruckus, four more 80 MHz channels to use, which likely have little neighbor interference. 160 MHz on the 5 GHz band is probably overkill, and may not even be supported by some clients. If you live in high density urban areas with limited channels, like much of Europe, 40 MHz is probably a safer choice.
Tip #1: If you have an exceptionally large number of APs in your house (like 6 or more), then you might get co-channel interference or co-channel contention. If this situation arrises, you may need to use 40 MHz channels. When two APs share the same channel they can ‘hear’ each other at signal strength -85 dBm or greater. Keep this in mind for large residential deployments.
Tip #2: You can use a program like Wi-Fi explorer on your laptop to look at the RF environment in your home. It will show you a lot of great information such as all the AP BSSIDs you can see, signal strength, channel utilization, and more. This could help give you a better idea of what bandwidth setting you can get away with. It has a free 3 day trial and they have an educational discount as well.
Transmit Power Adjustment: In a residential environment transmitting at full power on 5 GHz is not always ideal. However, without an accurate predictive Wi-Fi model of your house, it’s anyone’s guess on what transmit power is ideal. For a better roaming experience in your home it might be better to reduce the transmit power for 5 GHz if you have multiple APs.
Remember that 5 GHz has shorter range (more attenuation) than 2.4 GHz. So if you do adjust transmit power, you will not need to dial it down as much as 2.4 GHz for optimal roaming. Also, remember you want a stronger 5 GHz signal than 2.4 GHz, which is another reason why you should be more cautious in reducing 5 GHz transmit power in a residential setting. Remember though, always use the lowest power settings that you can while still maintaining good coverage and strong client performance.
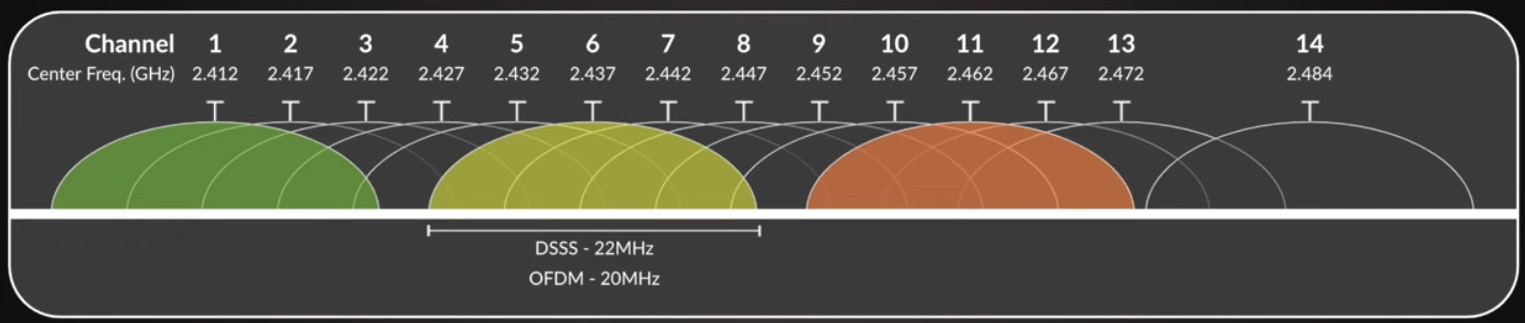
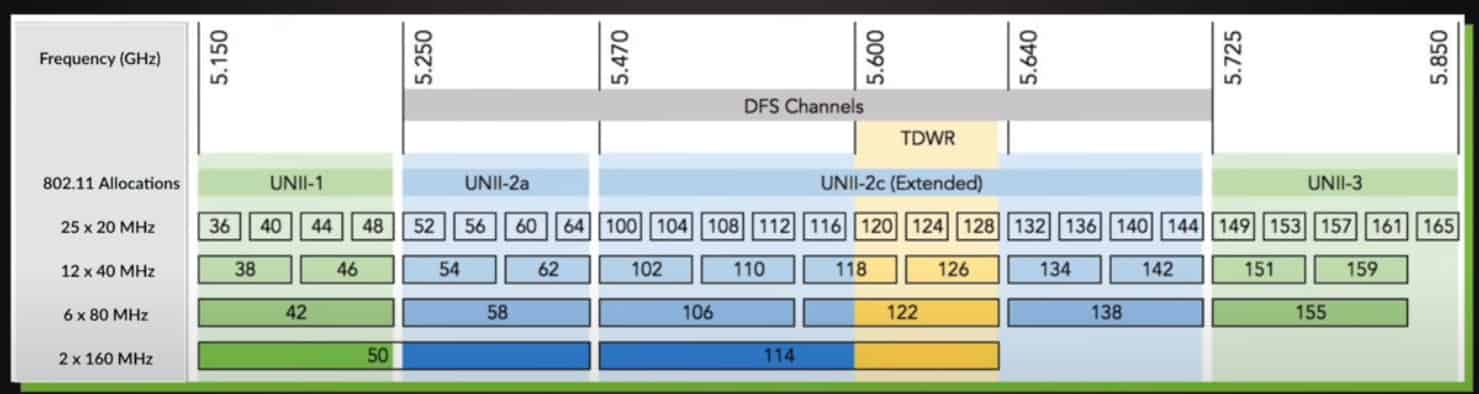
Channel Selection: The channels available to you will vary depending on the region of the world you live in. For example, in the US the graphic below shows what channels are available. Depending on your proximity to radar, the DFS channels may or may not be usable. And some client devices might not like certain DFS channels, like 144. My personal philosophy for 5 GHz (located in the US) is to use all channels. Modify as needed for your environment and clients. As previously mentioned, many consumer/ISP grade Wi-Fi APs in the US can’t use the DFS channels (52-144). So in your environment those channels may have little to no interference from neighbors.
Venue - Wi-Fi Configuration - Radio - 6 GHz
10. Click on the 6 GHz tab and modify the following settings:
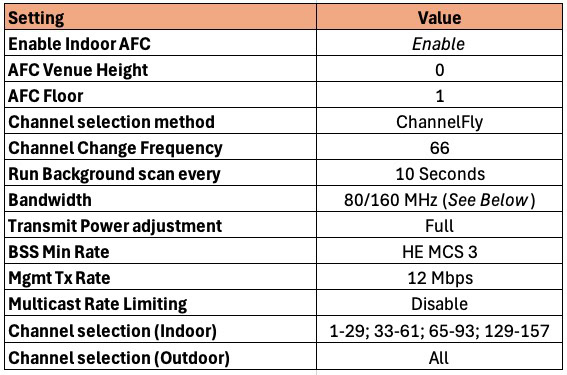
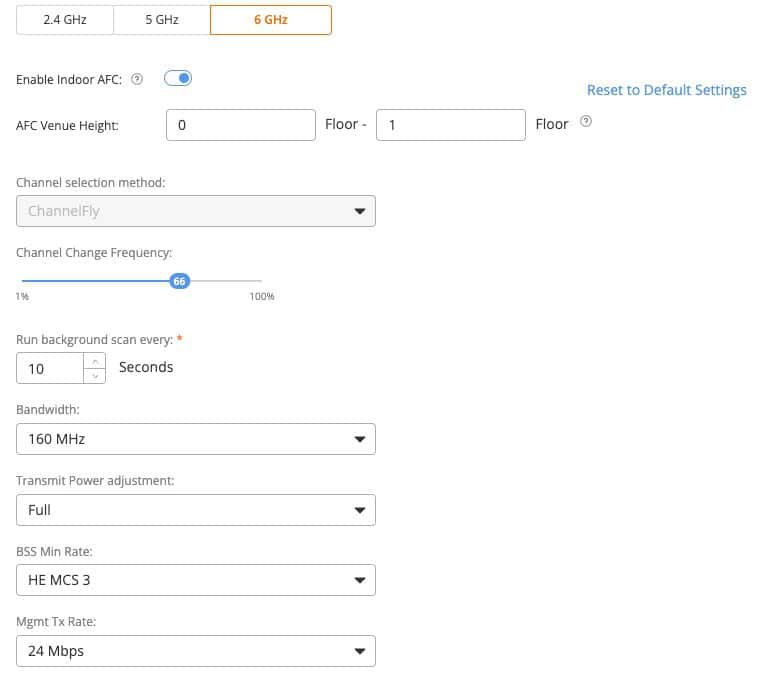
Enable Indoor AFC: Automated Frequency Control (AFC) enables a higher 6 GHz transmit power mode called Standard Power. If you have standard power compatible devices, enable this setting. If you have devices which cannot use standard power, set this to disabled. Tip: For Apple iPhones with Wi-Fi 6E or Wi-Fi 7, make sure you are on at least iOS 18.0 or later or it can’t use standard power mode.
AFC Venue Height: Set to 0 for simplicity.
AFC Floor: Leave this set to 1 for simplicity.
Channel selection method:With Ruckus One 6 GHz requires the use of ChannelFly.
Channel Change Frequency: The Channel Change Frequency (CCF) configuration allows the user to specify the responsive of ChannelFly to interference with consideration for the impact on associated clients. ChannelFly will avoid performing channel changes when a certain number of clients are associated to the AP on a per-radio basis. This threshold is defined by the CCF. With the default CCF of 33, channel changes may occur only when there are 3 or fewer associated clients. 33 is too aggressive for a residential environment, so I suggest a value of 66 or more. Note: AI-Driven cloud RRM will take over and will propose changes no more often than once a day
Run Background Scan every: Background scanning plays a role in rogue AP detection and discovering RF neighbors. A good value to start with is 20 seconds. If you are in a sparse RF environment (think rural), you could even increase this up to 60 seconds. I would NOT increase the scanning interval to more than 60 seconds.
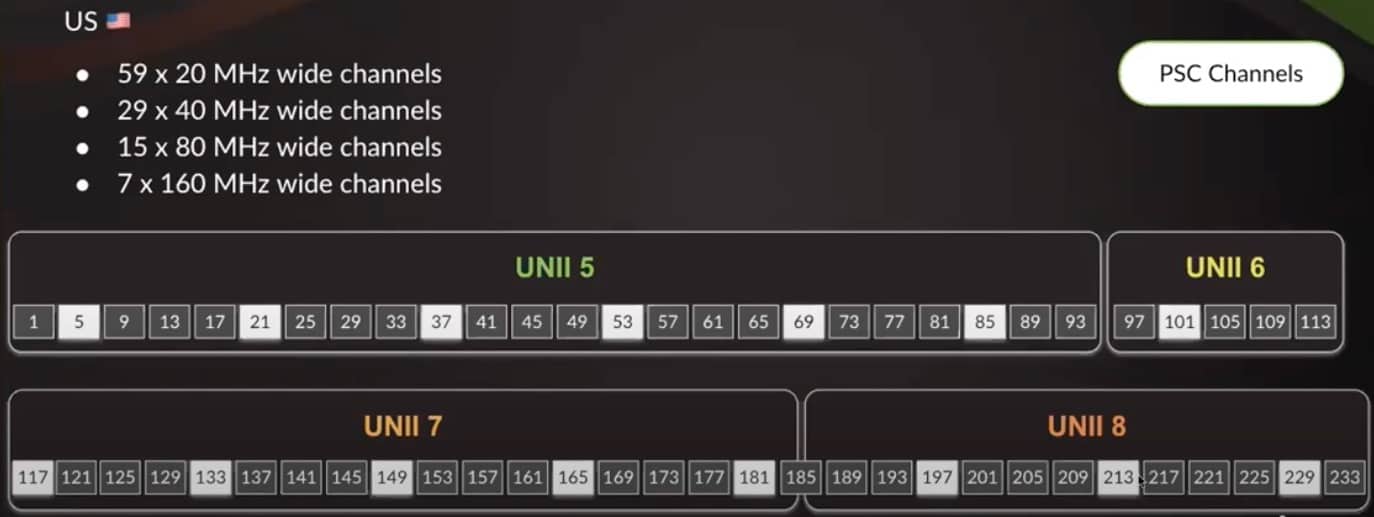
Bandwidth: This value will depend on your environment and the region of the world you are in. Remember that the wider the channel the higher the noise on the channel, which can reduce performance near the edge of the range of the AP. However, for 6 GHz channel width should never be below 80 MHz. Why? PCS (Preferred Scanning Channels). The Preferred Scanning Channels in 6 GHz WiFi are specific channels that devices scan preferentially for network discovery.
PCS needs 80 MHz channels to work properly. Even in Europe which has limited 6 GHz spectrum, you can still use six 80 MHz channels, which is great. In the US, you might even be able to get away with 160 MHz channels in your environment. But also check your client Wi-Fi specs to see how wide of a channel they can use. For example, the iPhone 15 Pro has a maximum channel bandwidth of 160 MHz at 6 GHz. 320 MHz channels, even in the US, is not advised unless you have a very niche use case. See the graphic below for more channel details.
Transmit Power Adjustment: With 6 GHz and LPI (low power indoor), just use full power and don’t bother to reduce the power level. 6 GHz also has higher attenuation than 5 GHz, so even at full power it has shorter range than 5 GHz. For more details about LPI, check out the Ruckus Wi-Fi 6E whitepaper.
BSS Min Rate: HE MCS 3 is a higher data rate within the modulation and coding scheme (MCS). MCS 3 in Wi-Fi 6 uses 256-QAM. You can use the higher MCS values if you have good 6 GHz signal strength throughout your house. If you have poor signal quality then a lower value is advised.
Mgt Tx Rate: Higher management transmission rates are more efficient, but can cause reliability issues with devices further away from the AP. Think carefully before increasing this value to more than 12 Mbps.
Multicast Rate Limiting: In a residential setting we don’t want to rate limit multicast, so leave this setting disabled.
Channel Selection: The channels available to you will vary depending on the region of the world you live in. For example, in the US the graphic below shows what channels are available. We enjoy 1.2 GHz of spectrum, which is amazing. In most areas in Europe there is a significantly smaller number of channels available, about 480 MHz worth. Unlike the 5 GHz spectrum, there are no “DFS” channels that can conflict with radar. Use all available channels in your region of the world.
Tip: If you live in the US and have enabled Indoor AFC (standard power mode), you will need to limit the available indoor channels to 1-29, 33-61, 65-93 and 129-157. If you enable any other indoor channels then the AP will automatically downshift to LPI (low power indoor) mode when those channels are in use. This can cause an inconsistent user experience.
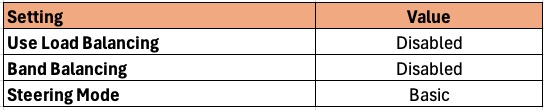
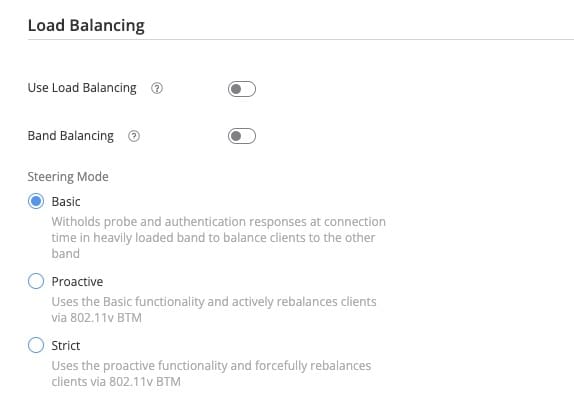
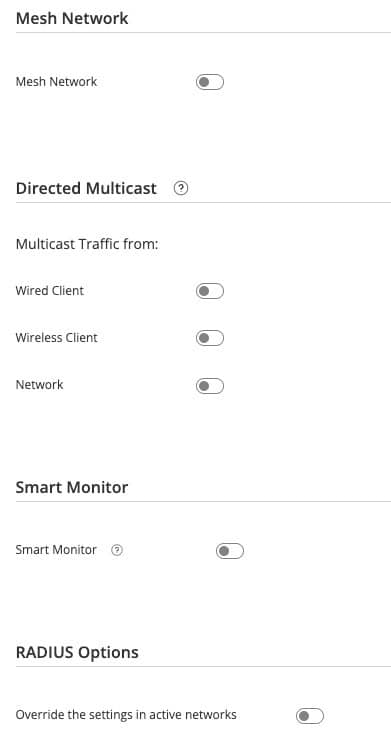
Venue - Wi-Fi Configuration - Radio - Load Balancing
11. Scroll down to the bottom of the Radio settings and make the following changes:
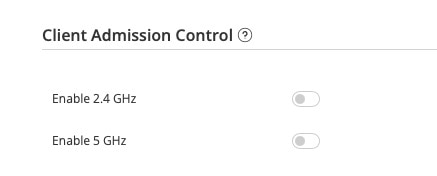
Venue - Wi-Fi Configuration - Radio - Client Admission Control
12. Scroll down further in the Radio settings and make the following changes:

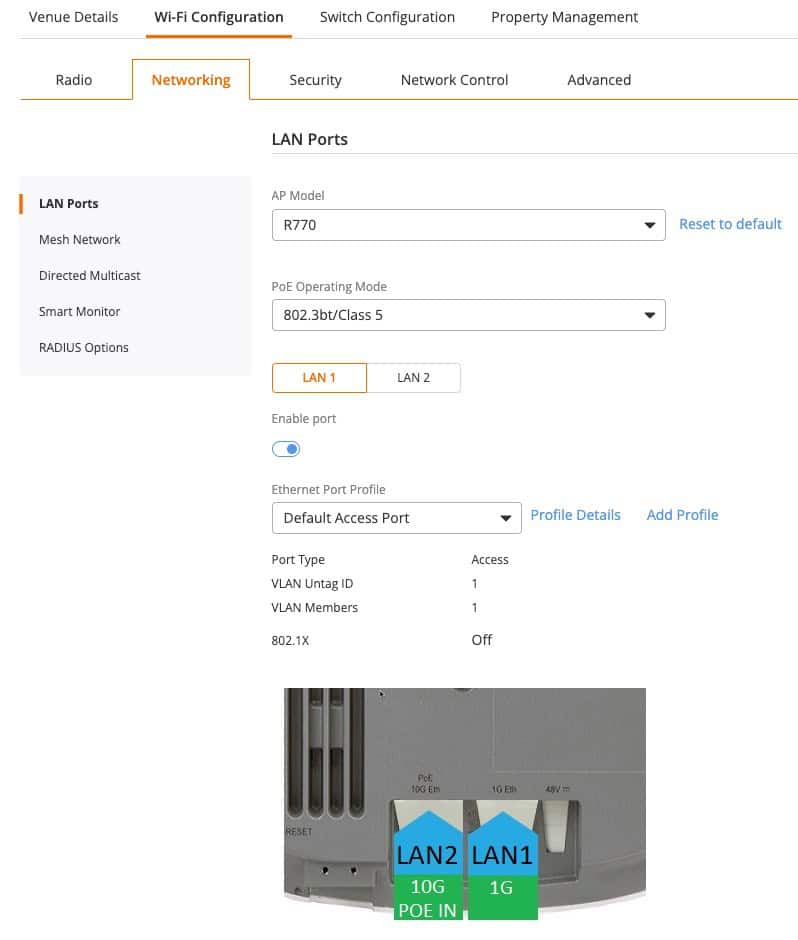
Venue - Wi-Fi Configuration - Networking - LAN Ports
13. Click on the Networking tab and select your AP model(s). For each model modify the settings as shown:
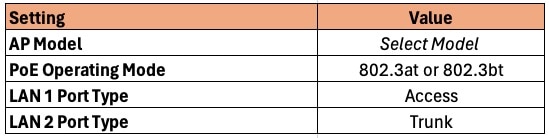
PoE Operating Mode: Depending on your AP and PoE power source, you may need to tweak this setting. The AP uses LLDP to “ask” the switch for the right amount of power. However, some non-Ruckus switches might not properly set the port’s PoE class. For maximum AP performance use the highest PoE level the AP and your power source supports. 802.3at is generally for Wi-Fi 6 APs (up to 25.5w), while 802.3bt (up to 71.3w) is for more power hungry APs such as the R770.
LAN 1 Port Type: By setting this to ACCESS, the port can be used by ‘dumb’ devices that you plug into the AP and will be assigned to the VLAN of your choice (default is VLAN 1).
LAN 2 Port Type: This is the LAN port which provides PoE and manages your Wi-Fi client traffic. Leave this as TRUNK so you can use one or more VLANs for your Wi-Fi traffic. Your upstream switch will also need trunk mode configured for this port.
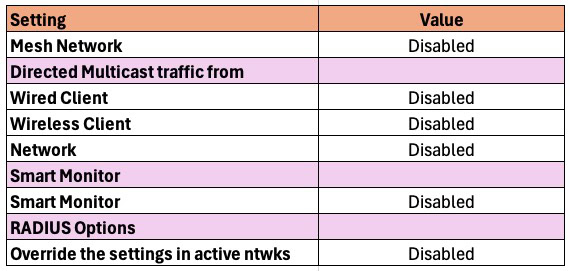
Venue - Wi-Fi Configuration - Networking - Other
14. Scroll down to the bottom of the Networking section and make the following changes:
Venue - Wi-Fi Configuration - Security
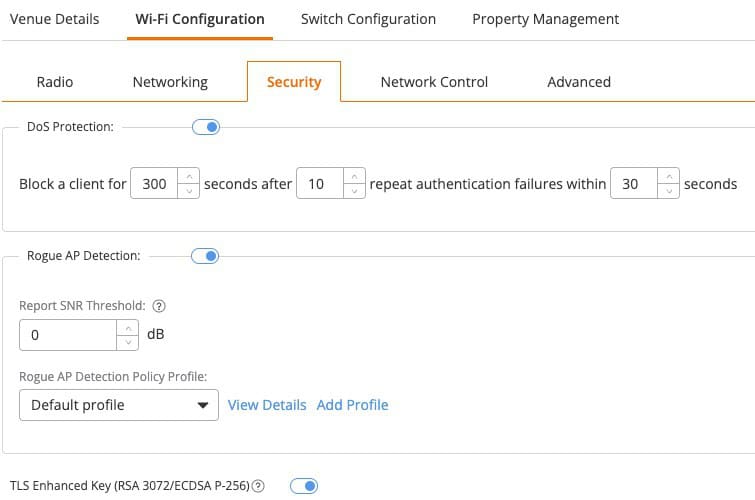
15. Click on the Security tab and make the following changes:
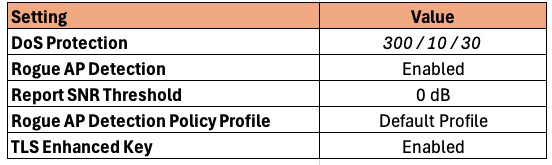
DoS Protection: If this capability is activated, excessive 802.11 probe request frames and management frames launched by malicious attackers will be discarded for the specified period. Adjust thresholds as needed to fit your threat model. I suggest blocking for 300 seconds (5 minutes), after 10 authentication failures in 30 seconds.
Rogue AP Detection: This setting should be enabled. When this setting is enabled, it allows the AI enhanced RRM algorithms to detect nearby APs and feed that information into its algorithms. You can leave all the default values here.
Report SNR Threshold: Leave the default 0 dB.
Rogue AP Detection Policy Profile: No need to customize this, so use the Default Profile.
TLS Enhanced Key: Enable this feature to increase the security between your APs and the Ruckus One cloud.
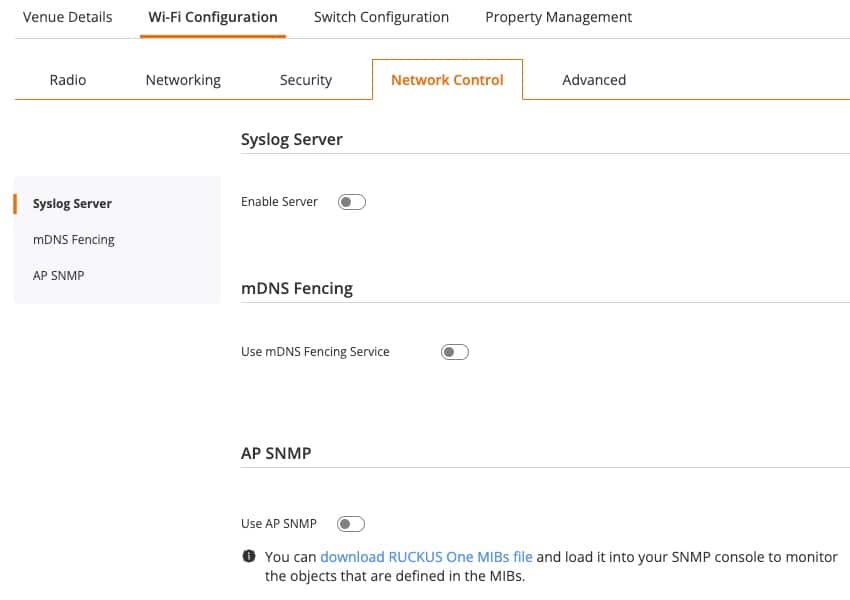
Venue - Wi-Fi Configuration - Network Control
16. Click on the Network Control tab and make the following changes:
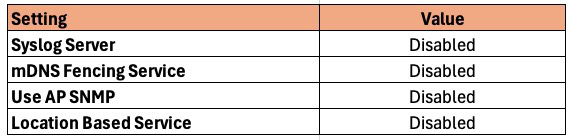
Syslog Server: Disable unless you have a syslog that needs your AP logs.
mDNS Fencing: Do NOT use mDNS fencing as that can wreak havoc on consumer grade services like Sonos, AirPlay, Matter, etc.
AP SNMP: Disable unless you have a SNMP server that needs to receive SNMP traps.
Location Based Service: An advanced setting that is not needed in a residential setting.
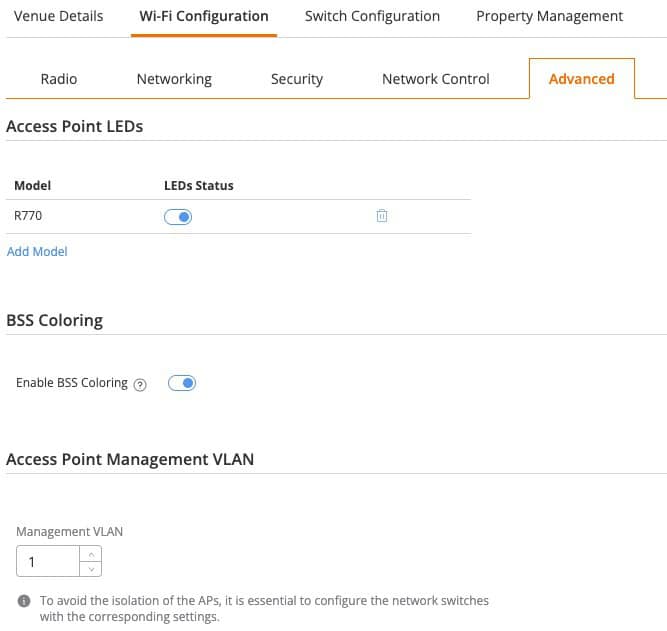
Venue - Wi-Fi Configuration - Advanced
17. Click on the Advanced tab and make the following changes:
Access Point LEDs: Enable, for better status and troubleshooting.
BSS Coloring: Enable BSS Coloring. BSS (Basic Service Set) coloring is a new feature introduced in Wi-Fi 6 (802.11ax) to help reduce co-channel interference from neighboring networks. Traditionally, Wi-Fi networks on the same channel interfere with each other, causing a decrease in network performance. With BSS coloring, a numerical identifier (from 0 to 63) called a color is assigned to each BSS. This color code helps wireless devices identify whether a Wi-Fi signal is from the same network or a different one.
Note: BSS coloring has limited utility in the real world, but turn it on anyway.
Access Point Management VLAN: Leave the default value of 1, unless you manage the APs on another VLAN.
Purchasing Ruckus One
Ruckus Wi-Fi APs and ICX switches utilize the same Ruckus One subscription SKUs. This means you can mix and match device types as you wish, and they use the same license in the Ruckus One portal. Ruckus One is licensed on a per-device per-year subscription basis, with longer subscription terms costing less per year.
Ruckus has an extensive partner network which sells their APs, ICX switches, and controller licenses. Prices can and do vary wildly between partners. Doing a Google search for a particular AP model or Ruckus One license SKU will probably return prices far higher than if you worked directly with a rep at an authorized Ruckus partner.
I purchased my Ruckus R650 APs through the authorized partner JRC Technologies. Joshua, the owner, is extremely responsive to inquiries at all hours of the day, and weekend. He happily works with both residential and business customers. He can hook you up with any Ruckus products, including APs, switches and Ruckus One subscriptions. Since he’s an authorized Ruckus partner, any purchases will be registered with Ruckus in your name for the limited lifetime hardware warranty. Be sure to tell him Derek sent you for the best possible deal.
Note: Only Ruckus authorized partners can register your purchase with Ruckus for the limited lifetime warranty. Purchases made through Amazon, Ebay (even if new), or other non-authorized partners means you get NO hardware warranty. If you want the limited lifetime warranty, always verify you are using an authorized partner. A lot of resellers are NOT. JRC Technologies is an authorized Ruckus partner.
Summary
Ruckus One provides an easy to use interface for managing your Ruckus Wi-Fi APs via the cloud. In this Ruckus One Best Practices Guide for home Wi-Fi we covered all of the Wi-Fi Venue settings. This included numerous settings for the 2.4, 5 and 6 GHz bands. We also dove into some security settings as well. The second and last post in this series will cover configuring multiple Wi-Fi LANs (SSIDs) for both the homeowner and guests. Check out Part 2: Ruckus One Home Wi-Fi Best Practices Guide to round out the complete guide.