This refreshed 2025 post covers using a Synology NAS NFS share as a datastore for Proxmox backups. Configuring a NFS share for the proper Proxmox Backup Server permissions can be quite challenging. The permissions requirements for PBS are different from just a basic NFS mount to a Proxmox VE host that you use for VE backups, ISOs, etc. Please take note that this procedure is very nuanced, and as such, each step must be exactly followed. One minor misstep can cause endless frustration.
I personally have now migrated to using an iSCSI LUN from my Synology for the PBS datastore and removed my NFS-backed datastore. With the iSCSI LUN scripts I wrote the mounting process is very easy, and this bypasses weird directory/file permissions that can cause PBS fits with a NFS datastore. Also, in a disaster recovery scenario I have much more faith in PBS being able to mount my iSCSI LUN than a finicky NFS share. In my home environment for backing up about 150GB of data, there is minimal performance difference between NFS and an iSCSI LUN. YMMV.
Recommendation: I would strongly suggest you consider using an iSCSI LUN vs. a NFS mount for your PBS datastore. However, if you wish to use NFS, follow this guide. You can check out the section below for a link to my Synology iSCSI LUN guide.
Related Synology Posts
As part of my Proxmox Backup Server 4.0 and Proxmox VE 9.0 series, check out these related posts:
Synology NFS Setup
1. Login to your Synology. Open the Control Panel then click on Shared Folder.
2. Click on Create and select Create Shared Folder.
3. Enter a share name (e.g. pbs). Disable the recycle bin. IMPORTANT!
4. Click Next. Skip folder encryption.
5. Enable checksum. Do NOT enable file compression. Don’t enable a quota unless you want to.
6. Click Next. Confirm settings.
7. Configure permissions. Give the ‘admin’ account read/write (yes, even if the actual admin account is disabled.). Click Apply.
8. In the Synology Control panel to go File Services in the left pane. Click on NFS.
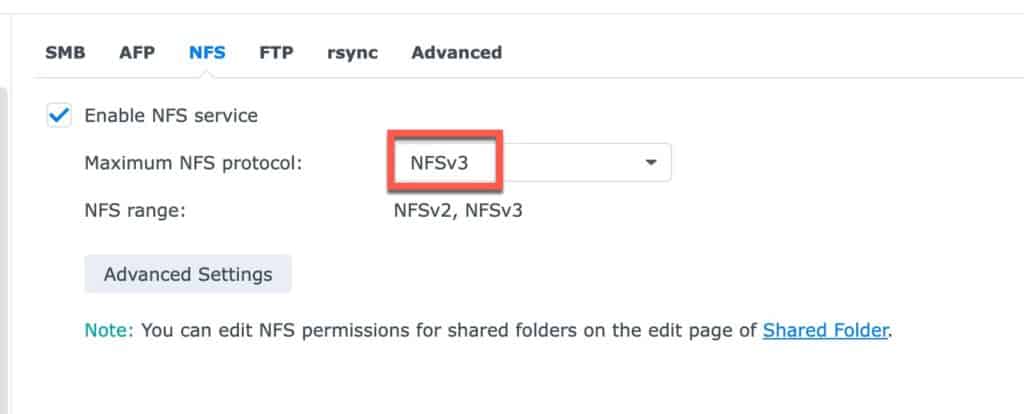
9. Enable NFS and make sure Maximum NFS protocol is NFSv3. Click Apply.
10. In Control Panel go to Shared Folder select the PBS share and click Edit.
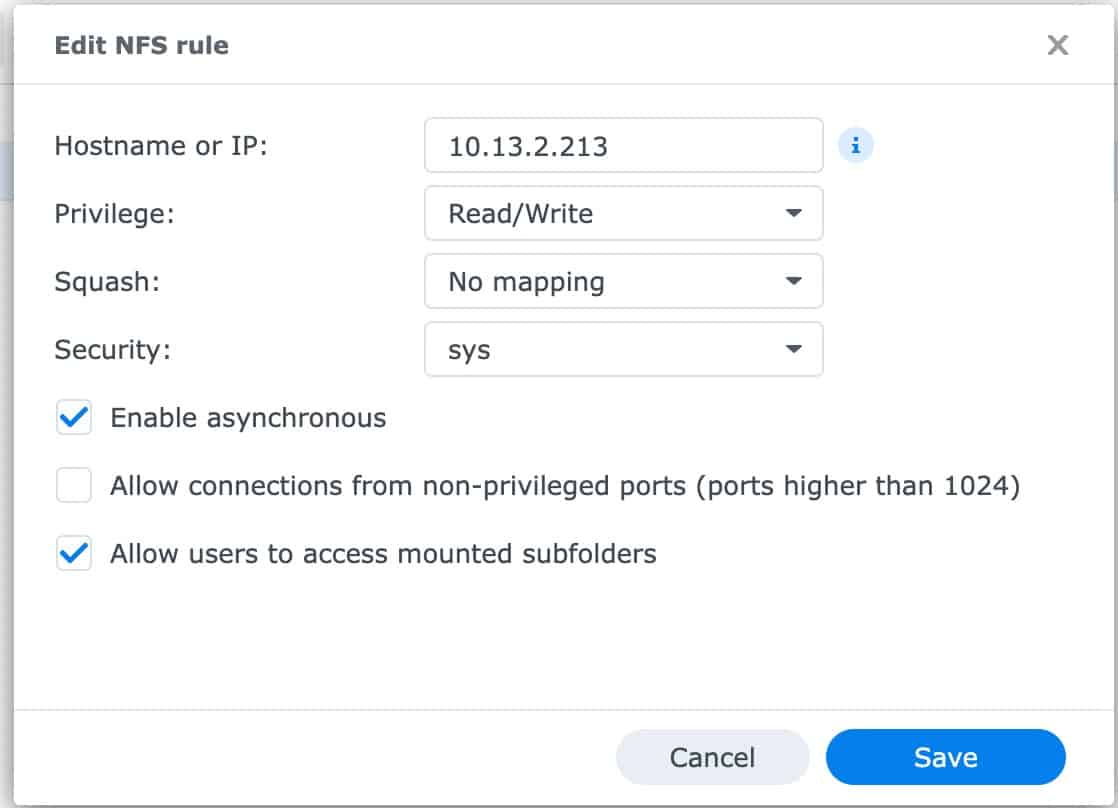
11. Click on the NFS Permissions tab. Click Create.
12. Add the IP address of your PBS server.
13. Make sure Squash is set to No mapping. Make sure Security is sys.
14. Click Save. Click Save again.
15. Optional: Open the Snapshot Replication app. Configure a snapshot schedule to suit your needs. I suggest keeping 7 days worth of snapshots.
16. SSH into your PBS server or open a shell from the GUI. Create a mount directory (pick any name or path you want), and then change the permissions (very important).
					apt update
apt install nfs-common
mkdir /mnt/synology
chown backup:backup /mnt/synology
chmod 775 /mnt/synology
17. Check the permissions on your mount point directory.

18. Modify the command below to change your IP (Synology NAS) and volume paths as needed. This will append a line to /etc/fstab. Make sure the NAS path starts with volumex, as appropriate for your share location. Most of you will probably use volume1, as that’s the Synology default.
echo "10.13.2.230:/volume1/pbs /mnt/synology nfs vers=3,nouser,atime,auto,retrans=2,rw,dev,exec 0 0" >> /etc/fstab
19. Test the mount. You should not get any permission denied or other messages. Silent completion means it worked. You may see a message about a symlink being created, which is normal.
Note: If you get a permission denied error with mount -a, re-run the chmod 775 /mnt/synology command and try again.
mount -a
20. I suggest you verify that creating a file on the mount point results in a file on the NAS share. So run the following command, then go to the Synology Filestation app, open the share, and verify the file exists. Important: Delete your test file.
touch /mnt/synology/testfile.txt
21. If all is well, run the following command to reload your fstab:
systemctl daemon-reload
22. Now that the NFS share is mounted, let’s reset the permissions again:
chmod 775 /mnt/synology
Proxmox Backup Server Configuration
1. Login to the PBS web interface.
2. In the left pane click on Add Datastore.
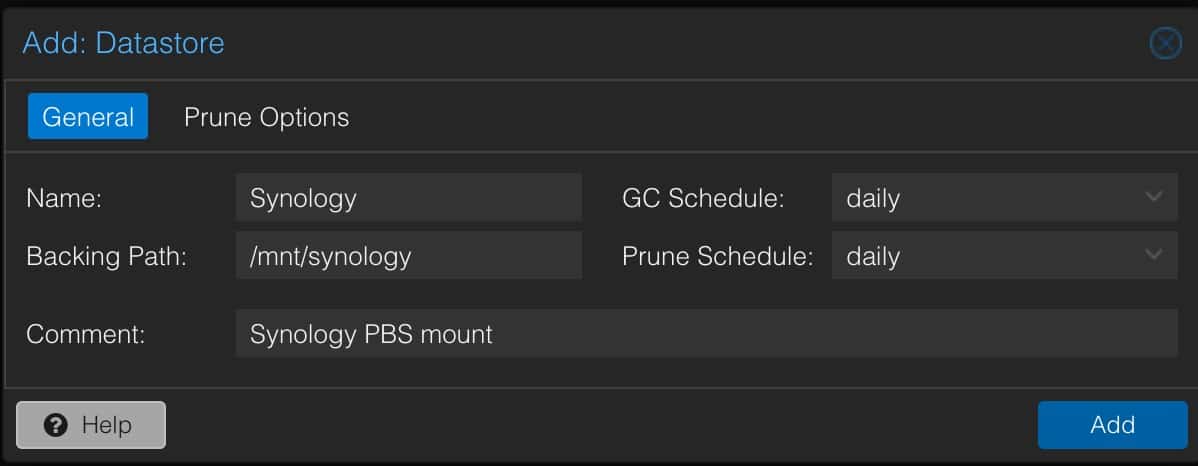
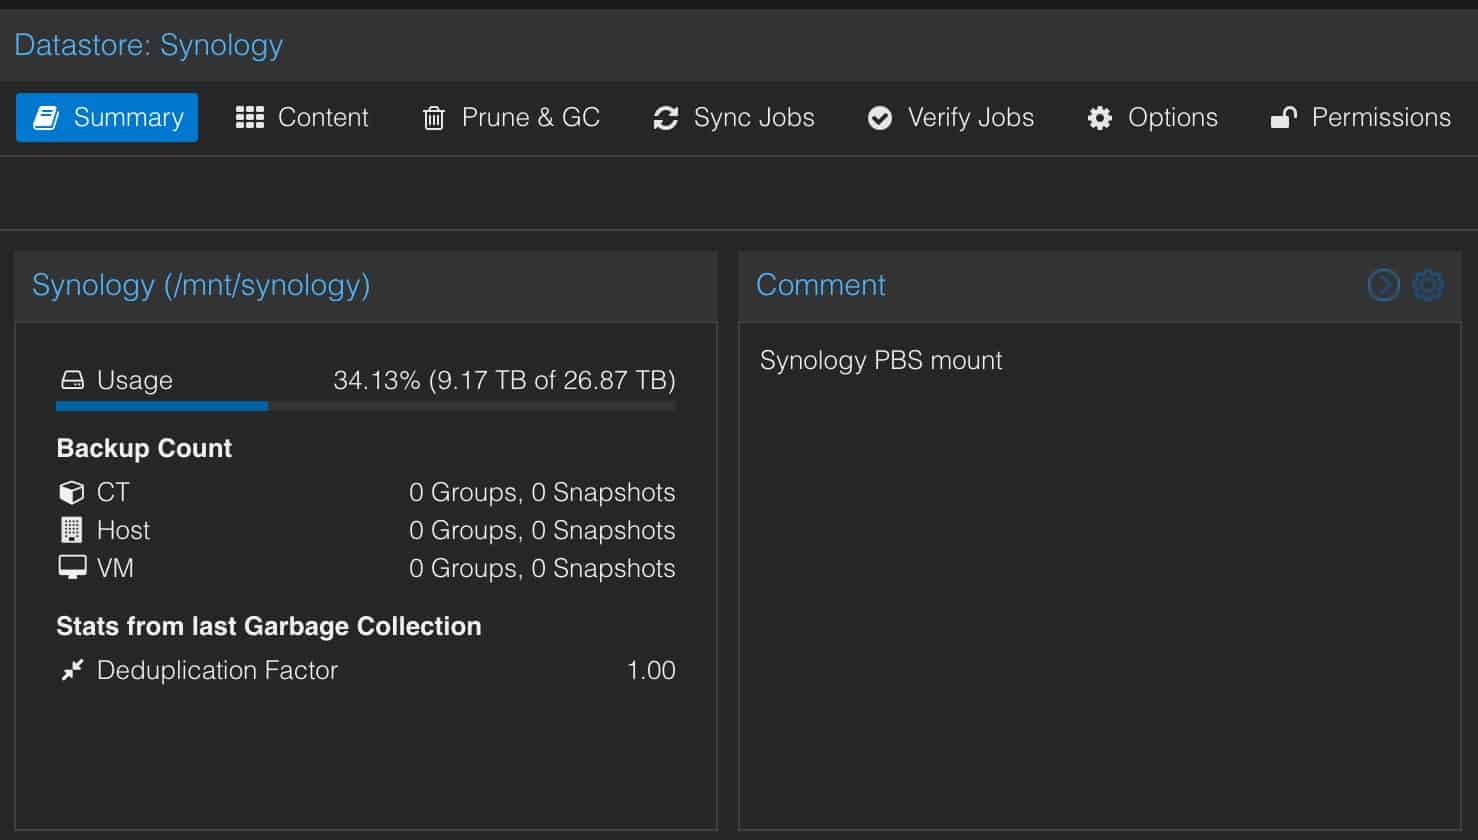
3. Configure the datastore with your parameters:
- Name: Synology
- Datastore Type: Local
- Backing Path: /mnt/synology
- GC Schedule: daily
- Prune Schedule: daily
- Comment: Synology PBS mount
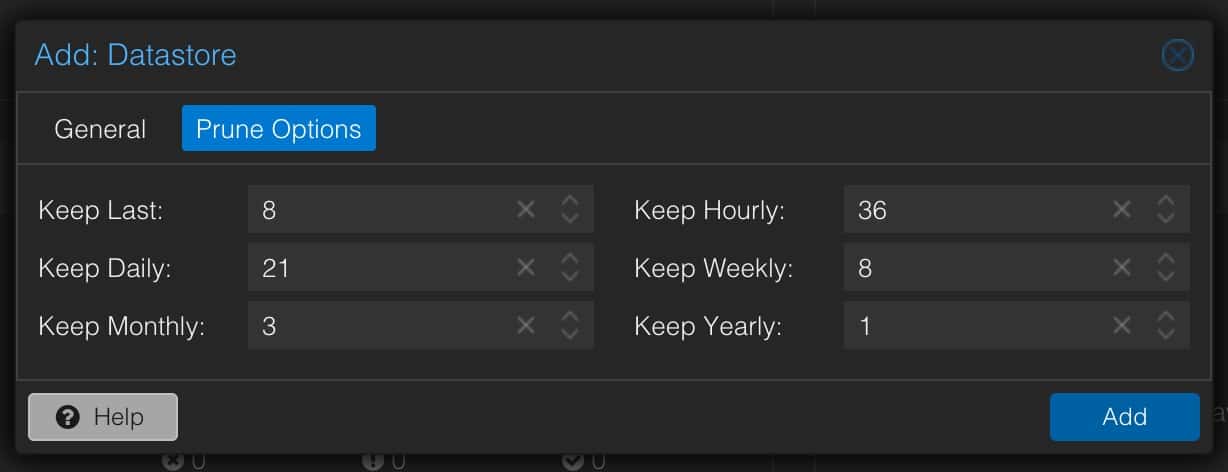
4. Click on Prune Options. Configure as you see fit. Each Prune period (e.g. daily) value corresponds to the number of days/months/hours/weeks. So entering “2” for Monthly keeps monthly backups for 2 months. A Daily value of 14 keeps Daily backups for 14 days. “Keep Last” refers to the number of snapshots to keep. Click Add. The creation process should take a few minutes.
5. After the datastore is created, click on the datastore, click on Content. You should not see any errors. Click on Summary to make sure storage stats populate. If you have any errors, go to the next section for some tips.
Troubleshooting
Getting the permissions and settings right on both the Synology NFS side and on the PBS mount point is not easy. If you have a permissions issue you will likely see errors similar to:
Bad Request (400)
unable to open chunk store ‘Synology’ at “/mnt/synology/chunks” – Permission denied (os error 13)
Or:
Error: EPERM: Operation Not permitted
Things to try:
1. Double check all Synology NFS settings and permissions.
2. Re-run chmod 775 /mnt/synololgy
3. Try running this chmod command:
chmod -R 777 /mnt/synology/.chunks
4. On the Synology side remove the PBS NFS IP, re-add it, then re-run the /mnt/synology mount ownership and permissions commands.
5. Double check the PBS /mnt/synology mount point permissions. The chown and chmod steps are vital.
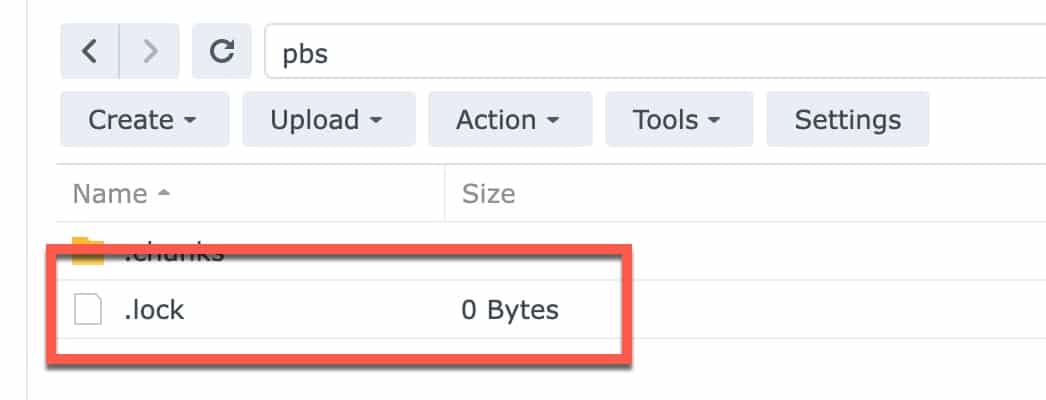
6. On the Synology browse to the PBS share and delete the .lock file.
7. Back in the PBS shell remount the share:
mount -a
8. In the PBS interface refresh the browser window, click on the Synology datastore, click on Summary, and verify you see storage usage and other stats. If not, reboot the PBS and see if that helps.
Note: I’ve observed that once you have datastores in a weird state that PBS may refuse to properly mount or still have chunks permission errors, even if the permissions are correct. You could try deleting the /etc/proxmox-backup/datastore.cfg file, reboot PBS, then reconfigure the datastore within PBS after permissions have been fixed.
Summary
Configuring the proper Synology NFS permissions for a Proxmox Backup Server datastore can be extremely frustrating. Precise steps must be followed to ensure everything will work. However, I’ve had very good luck with my procedure as long as all steps are precisely followed.


