New to Proxmox Backup Server (PBS) 4.0 is a ‘tech preview’ feature for using S3 buckets as a datastore. While many people associate S3 buckets with Amazon, it is more or less a standard that many cloud providers support. This opens up many possibilities for direct PBS to cloud backups, which is great news.
My preferred S3 compatible cloud storage is Backblaze B2. Unlike Wasabi, there’s no minimum billing retention period. And unlike other providers, there’s no egress fees (subject to plan limits).
Backblaze B2 is priced at $6/TB/month which is VERY reasonable. You are billed only for the amount of storage you use. Buckets can also be deleted and the billing for that storage amount immediately stops (unlike Wasabi).
If you are not using Backblaze B2, the Proxmox team has documented a few other S3 configurations, such as Cloudflare R2. Check out their post here.
Change Log
June 28, 2026: Added the step to create the S3 Endpoint.
March 27, 2026: I updated the verification section to suggest doing it no more than once a month to avoid excess B2 API costs. Also, the random backup job verification failures bug seems to have been fixed as well.
October 20, 2025: Added details about the fixed S3 verification bug, and added a whole new section about potential cloud storage costs and how to help mitigate huge bills.
Related Synology Posts
As part of my Proxmox Backup Server 4.0 and Proxmox VE 9.0 series, check out these related posts:
Cloud Storage Cost Warning
Before deciding on going all in on cloud storage for your Proxmox backups, you need to understand potential cost implications. Different cloud providers bill differently for ingres, egress, and API calls. Understanding how Proxmox Backup Server uses S3 storage is key to understanding the cost implications for your cloud provider.
I got a bit of a nasty surprise bill from BackBlaze B2, which increased my typical monthly bill of $5 to $25. When reviewing my billing details, it was apparent that the surprise costs were from egress fees and excessive API calls.
I inquired about this on the Proxmox forums, as it appear like the verification job I had running was potentially the problem child. Chris (a Proxmox Staff Member) responded and had this to say:
This is expected, I’ll try to explain what is going on here. The backup protocol is optimized to only upload the necessary data from the client to the server, and from the server to the S3 backend. The client (PVE) will use the fast incremental mode if possible to avoid re-reading and re-uploading unchanged data blocks (chunks). Only these which changed are uploaded and re-indexed, others re-indexed only. For security reasons, the client is only allowed to re-index and skip upload for chunks it has uploaded in the previous backup snapshot, it will re-upload others. The server then checks if that chunk is already known and present on its local datastore cache, avoiding re-upload when possible. This helps to reduce upload requests and bandwidth to the S3 API. Data consistency when uploading to the S3 backend is further assured by check-summing, so it can be assured the data the server has send is also persisted to the S3 object store.
If you now perform a verification of the backup snapshot, the index file referencing all the data chunks will be used to identify all objects which belong to this snapshot and fetch them from the object store, not just the newly uploaded. Once fetched, the chunk data is verified to assure that the data it stores is the data it must contain. This is analogous to what happens on regular datastores. So if you are verifying after each backup snapshot, you are effectively downloading all data chunks just as if you would do a full restore. There is room for improvements regarding the verification process performance and cost effectiveness with ideas floating around on how to do that, but not implemented yet.For the time being a verification will always fetch the chunk objects from S3, unconditionally. So I would recommend to strongly reduce the frequency at which you do verifications, and to do verifications in bigger patches, not just single snapshots. This is since the verification job has an optimization which avoids re-download and re-verification of already verifyied chunks for the same verification job.
So there you have it, S3 verification jobs can incur a large amount of downloaded data and API costs. Just like my local NAS datastores, I had a nightly S3 verification job that ran after all of my backups were complete. Based on Chris’s information, I would look at reducing the frequency to maybe once or twice a month, depending on your needs and quantity of data.
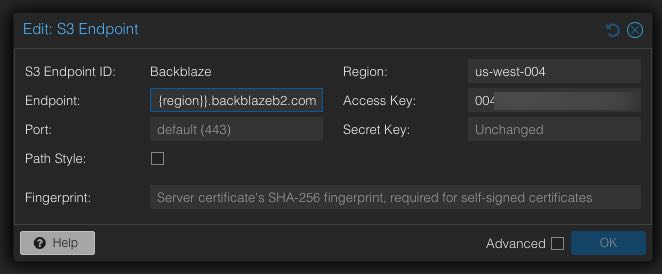
Creating S3 Endpoints
- Under the Configuration menu select S3 Endpoints.
- Click Add.
- Name the S3 Endpoint ID anything you want.
- For the Endpoint use the this format: {{bucket}}.s3.{{region}}.backblazeb2.com
- Leave the port to default (443).
- For the Region enter the region where your BB S3 bucket is located (e.g. us-west-004)
- Enter the Access Key ID and Secret Access Key from your Backblaze B2 account for the bucket you want to use.
- Click OK.
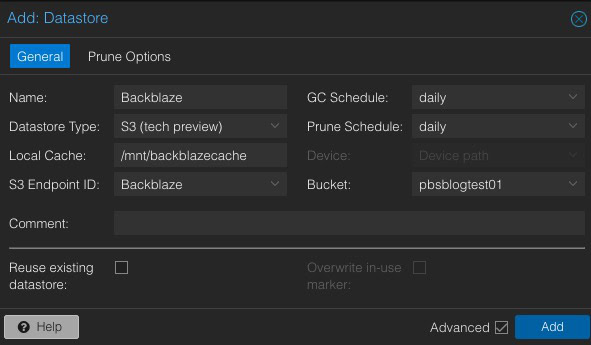
Add Proxmox Backup Server S3 Datastore
Note: PBS uses local disk space to cache some of the S3 chunks. Proxmox strongly suggests adding a dedicated partition to your PBS server that is 64-128GB for the cache. If your PBS server is a VM, simply add another virtual disk, partition, format, and mount it.
- In the left pane under Datastore click Add Datastore.
- Use the following parameters:
- Name: Any datastore name you wish
- Datastore Type: S3
- Local Cache: /mnt/backblazecache (your new partition)
- S3 Endpoint ID: Your configured endpoint name
- GC Schedule: daily
- Prune Schedule: daily
- Bucket: Your Backblaze B2 bucket
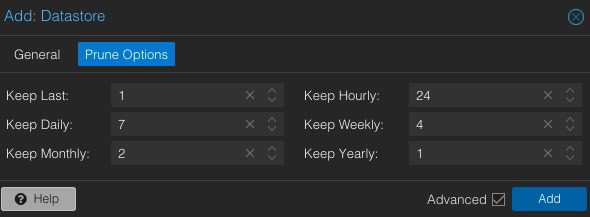
3. Click on Prune Options.
4. Configure reasonable retention periods for your Backblaze B2 bucket. Keep costs in mind when considering how long to keep your data.
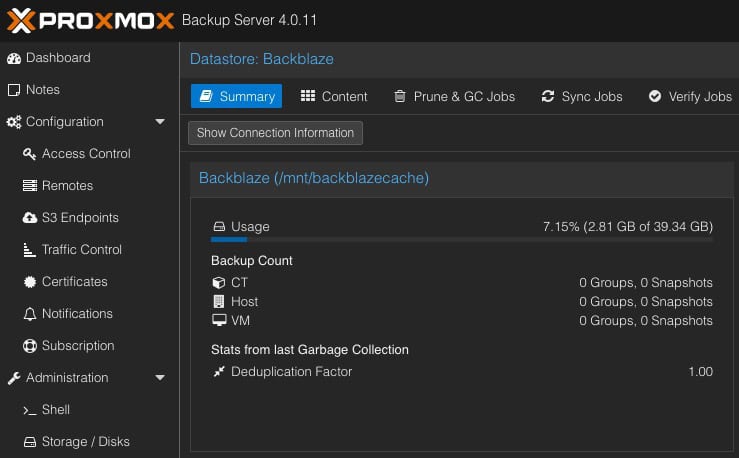
5. Click Add. Wait for the datastore to be successfully created.
6. If you have created a separate ‘backup’ user (used by Proxmox VE hosts to connect to your PBS server), we need to adjust the permissions on the datastore.
7. Locate your Backblaze datastore and click on it. In the right pane click on Permissions. Click Add -> User Permission.
8. Select the backup user account (e.g. backup@pbs), then give it the DatastoreAdmin role. Click Add.
Add PBS Datastore to Proxmox VE
Now that PBS has been configured with your Backblaze B2 datastore, we need to mount it on your Proxmox VE hosts.
- Login to the Proxmox VE host that will be running your backup jobs.
- Change to Server View (top left), then click on the Datacenter object.
- In the middle pane click on Storage.
- In the right pane click on Add, and from the drop down select Proxmox Backup Server.
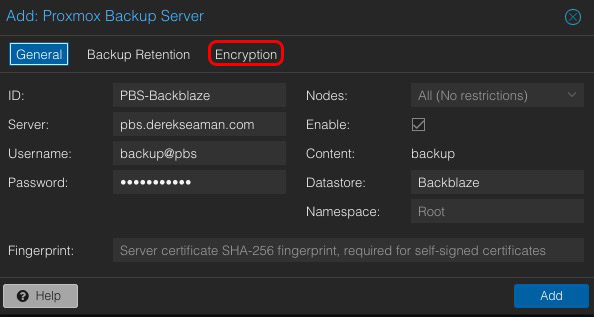
- Enter the following information:
- ID: Any name you wish (e.g. PBS-Backblaze)
- Server: IP or FQDN of your PBS server
- Username: Backup account username (don’t use root)
- Password: Backup account password
- Datastore: Name of the datastore on the PBS server
- Fingerprint: Only needed if using untrusted certificate
Note: If your PBS server has untrusted SSL certificates, you will need the fingerprint of your PBS server. Go back to your PBS server, click on Dashboard in the upper left, then click on Show Fingerprint on the right. Copy it to the clipboard.
6. If you want your backups encrypted in the cloud (STRONGLY recommended), click on the Encryption tab.
7. Select Auto-generate a client encryption key, download it, and store it in a safe place.
8. Click Add to add the datastore.
Add Verify Job (Optional)
I suggest creating a verify job to check the integrity of your S3 bucket. However, due to B2 API costs and ISP bandwidth usage, I would only run it once a month and not more frequently.
- Click on the Backblaze datastore in the left pane.
- Click on the Verify Jobs tab.
- Click Add.
- Choose your schedule. I suggest the baked-in ‘First Saturday of the Month at 02:00″ as a starting point.
- Click Add.
Final Configuration
Now that your PBS datastore is mounted to your Proxmox VE host, you can configure your VM and LXC backup jobs. For more details on these steps, check out the second half of my article: How To: Proxmox Backup Server 4 (VM) Installation.
Performance Observations
After I configured my B2 datastore, I did a fresh backup of my primary Proxmox VE server. My internet speed is 1 Gbps symmetrical, and the backup job averaged 94MB/s (yes, bytes). The 110GB backup job completed in 20 minutes, which is astounding.
However, I immediately ran a verification job of that same 110GB bucket, and it took 2 hours and 24 minutes. 7x slower to verify than to backup. I’m not sure if this performance difference is expected or not, but it’s what I observed.
Summary
Brand new to Proxmox Backup Server 4.0 is the ability to use S3 compatible storage buckets. In this blog post I walk you through how to configure a Backblaze B2 bucket for use with Proxmox Backup Server 4.0. We then mount it as a backup datastore to Proxmox VE, and schedule backup jobs against it.
Backup speeds were able to saturate my 1 Gbps symmetrical internet. However, a verification job took 7x longer to complete. I would also strongly suggest running the backup verification job no more than once a month to minimize B2 API costs.


Thanks for the article. I’m trying to set this up for my home lab.
To me, it seems you’ve skipped a step. To create an S3 datastore, there must already be an S3 endpoint to choose. It would be very helpful to see how you configured that. I’ve tried following the proxmox instuctions you linked to, but they are aws specific. I keep getting communication failed when setting up the datastore.
Apologies! Updated the post.