This post covers how to provision a factory fresh Ruckus ICX network switch with FastIron 10.01.x to their new Ruckus One cloud controller. Ruckus sells a number of network switches which can be easily integrated with their Wi-Fi APs. For this post we will be using a Ruckus ICX 8200-C08ZP, which is a multi-gig/10G/25G PoE++ switch designed to support Wi-Fi 7 APs, such as the Ruckus R770.
Disclaimer: Ruckus was kind enough to send me a ICX 8200-C08ZP PoE++ switch. However, there were no strings attached, no expectations, and Ruckus had no editorial input or review on this post. All of the content in this post is solely authored by me.
Update February 24, 2024: I updated some of the multicast settings per reader feedback, which are applicable to smart homes.
What's covered in this Post?
This post will cover the following areas:
- What is Ruckus One?
- Ruckus ICX 8200-C08ZP Switch Specs
- Building a ICX Configuration Profile
- Venue Configuration
- Provisioning an ICX 8200 in Ruckus One
- Additional Switch Configuration
- Enabling Dynamic Power Allocation
- Enabling IGMP/MLD Multicast Snooping
- Modify CLI Timeout
- Purchasing Ruckus One
What is Ruckus One?
Ruckus One is a licensed (paid) AI-driven network assurance and business intelligence platform that enables you to easily manage public and private Wi-Fi networks and ICX switches. Ruckus One is a cloud-only offering which can serve as your Wi-Fi access point controller and ICX manager in the sky. It is an evolution of their “Ruckus Cloud” offering, which has been around for a number of years. Ruckus One is their next generation cloud management platform which formally launched as GA in January 2024.
For more details on Ruckus One, check out my post Enterprise Grade Home Wi-Fi: Ruckus Unleashed vs. Ruckus One. That post has dozens of screenshots of Ruckus One, focusing on their Wi-Fi APs. I will also publish a follow up post covering all of the analytics Ruckus One offers ICX users with a plethora of screenshots.
Ruckus ICX 8200-C08ZP Switch Specs
The Ruckus ICX 8200 series of ethernet switches supports up to 8× 25 GbE ports for uplinks or stacking, PoE++ (802.3bt up to 90w), VXLAN, advanced L2/L3 features and stacking density with up to 12 switches per stack. You can also purchase an optional advanced Layer 3 license, which adds a number of dynamic routing protocols such as GRE, VRF, VRRP and OSPF with full IPv6 support.
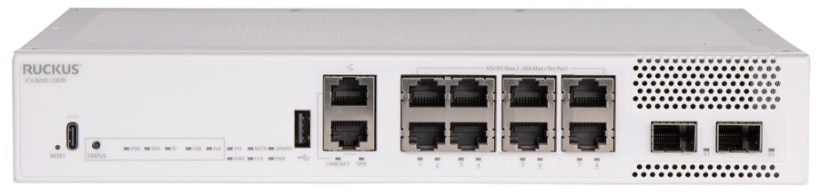
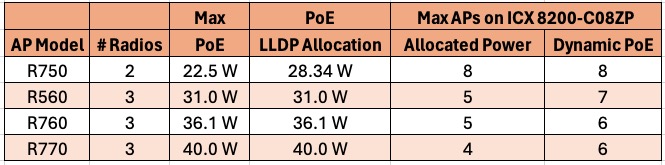
For this post I will be using the Ruckus ICX 8200-C08ZP. It is a very robust switch which is great for a small AP deployment in a premium residential setting, or SMB. It has the following specs:
- 4× 100/1000/2500 Mbps RJ-45 PoE++ 90W ports
- 4× 1/2.5/5/10 Gbps RJ-45 PoE++ 90W ports
- 2× 1/10/25 GbE uplink/stacking SFP28 ports
- 1x 1 Gbps management network interface
- 240W PoE budget
- Out of band management port
- USB-C serial port
- Fanless for nearly silent operation
- 200 Gbps switching capacity
- 3 year remote TAC support bundled in
Building a ICX Configuration Profile
A configuration profile is a Ruckus One construct that allows you to specify a number of switch settings. You can pre-configure the Configuration Profile so when you provision your new ICX switch, it will be automatically configured to your specifications. Let’s setup our sample configuration profile. In my sample configuration we will add a new VLAN, 10, as a tagged guest network. We will leave VLAN 1 as the primary homeowner network, which will be untagged. Note: Click on screenshots to enlarge.
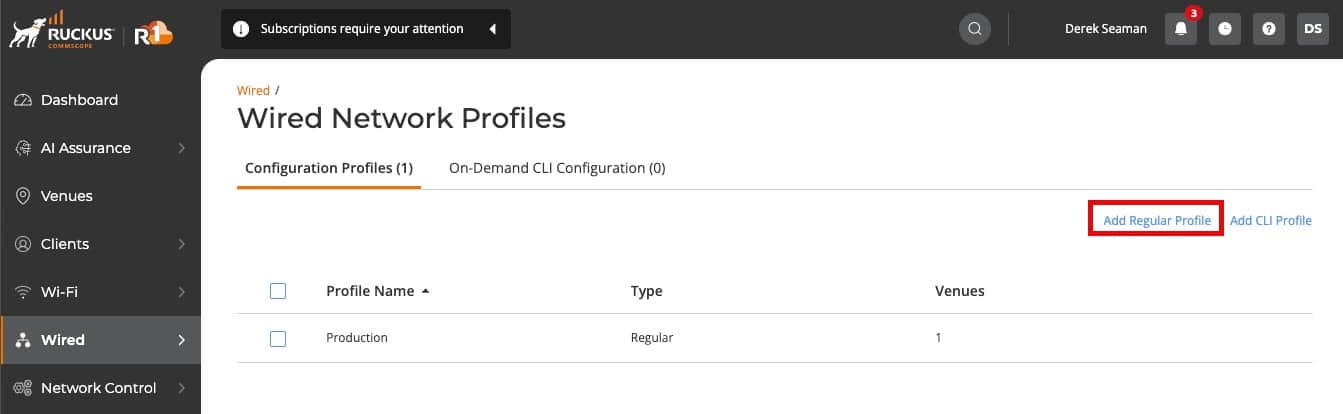
- Navigate to Wired -> Configuration Profiles in Ruckus One.
- Click on Add Regular Profile.
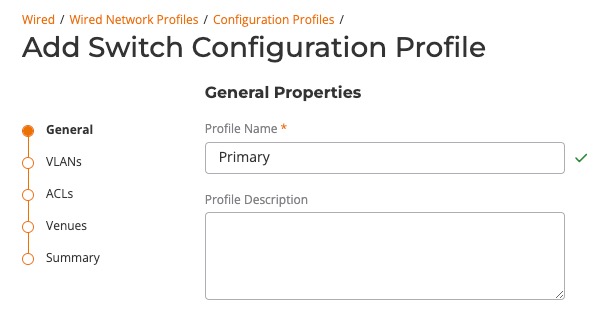
3. On the General tab give your profile a name.
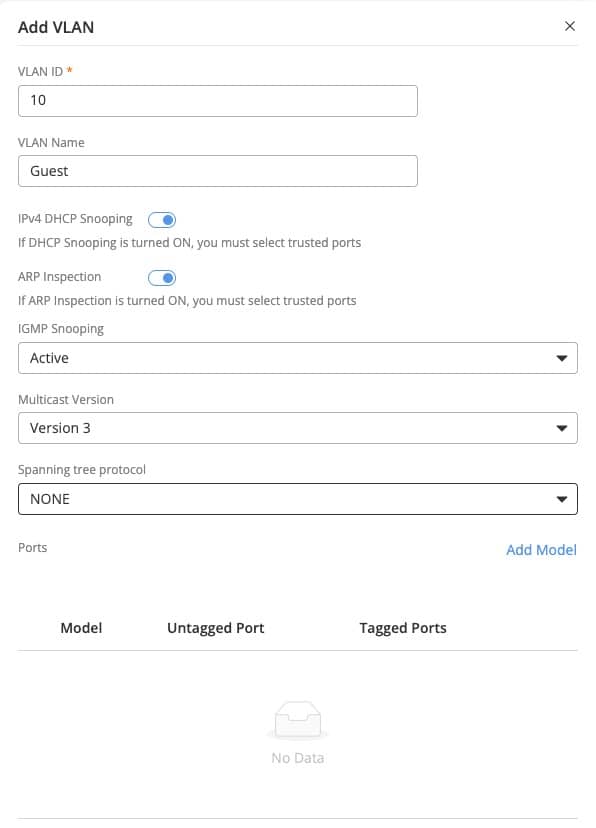
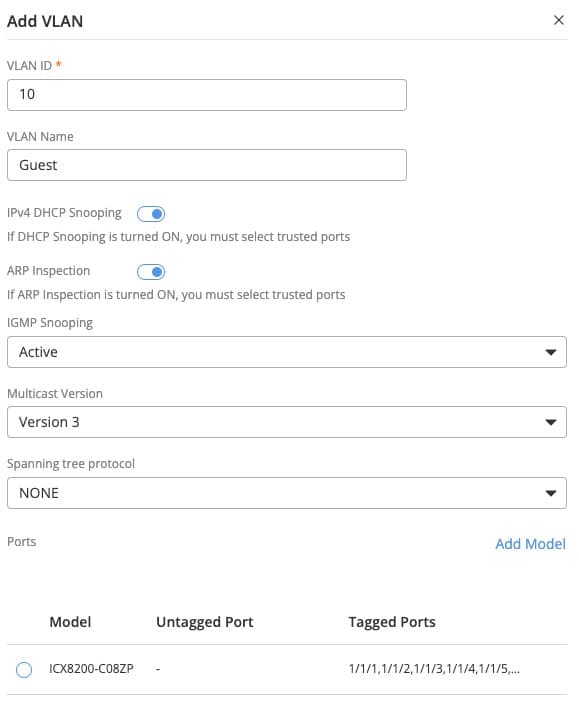
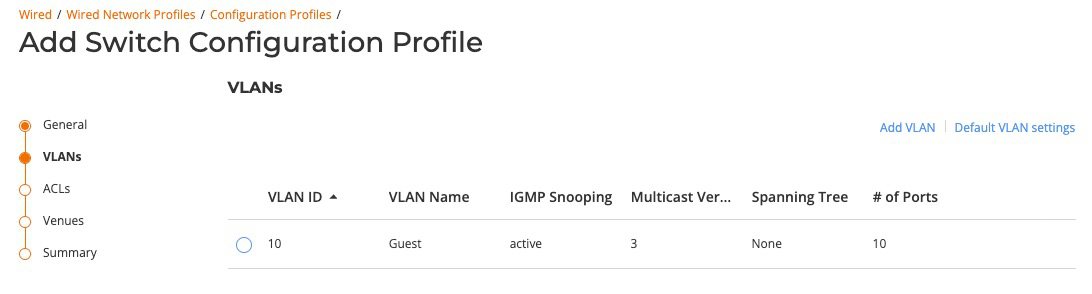
4. On the VLANs tab click Add VLAN. Fill in the details as appropriate for your network. In my case I’ll setup a guest network on VLAN 10. I also want DHCP/ARP inspection enabled. I use multicast at home as well, so I like to turn on IGMP v3 snooping in active mode. I have spanning tree protocol entirely disabled at home, so I set that to NONE.
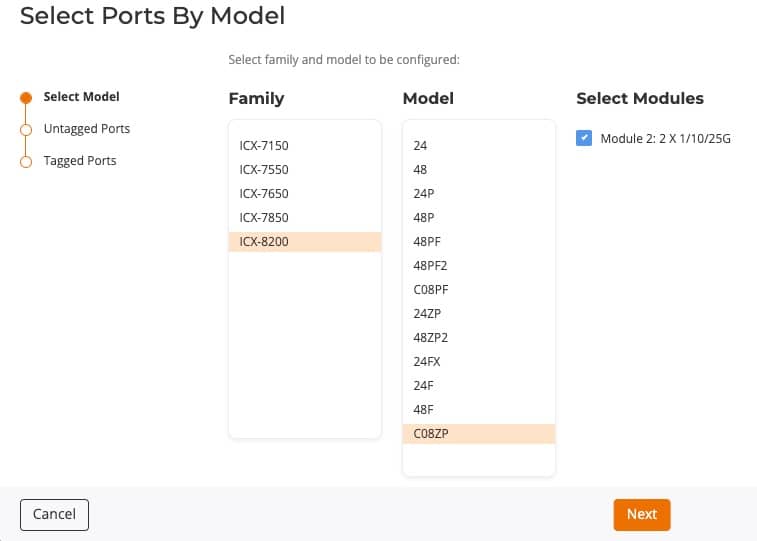
5. To configure the tagged ports, click on Add Model.
6. In my case I have a ICX-8200-C08ZP.
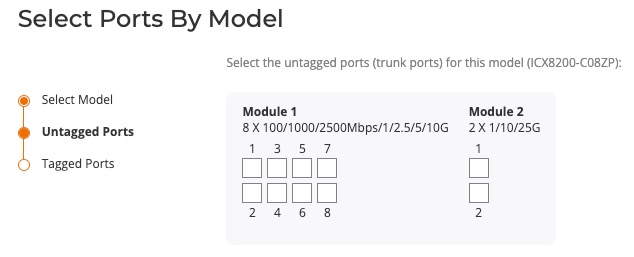
7. If you want all of the ports to be tagged with the Guest VLAN, skip the Untagged Ports page.
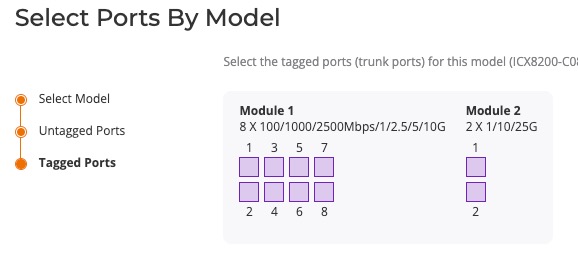
8. On the Tagged Ports select the ports which you want tagged with the VLAN. In my case I tagged all of the ports, which are now purple.
9. Click Add.
10. Your Add VLAN screen should now look similar to the screenshot below.
11. Click Add.
12. Now that the VLAN is defined, click on Next.
13. On the Voice VLAN page click Next.
14. On the ACLs page click Next.
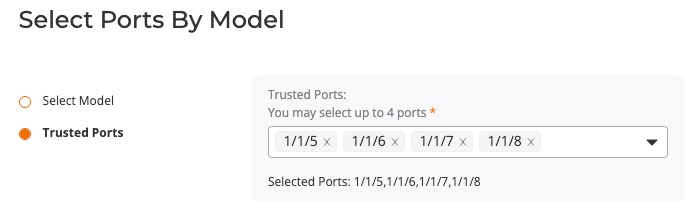
15. On the Trusted Ports screen click Please select.
16. For your switch model select up to four trusted ports. In my case I selected the four 10Gbps ports. Click Apply.
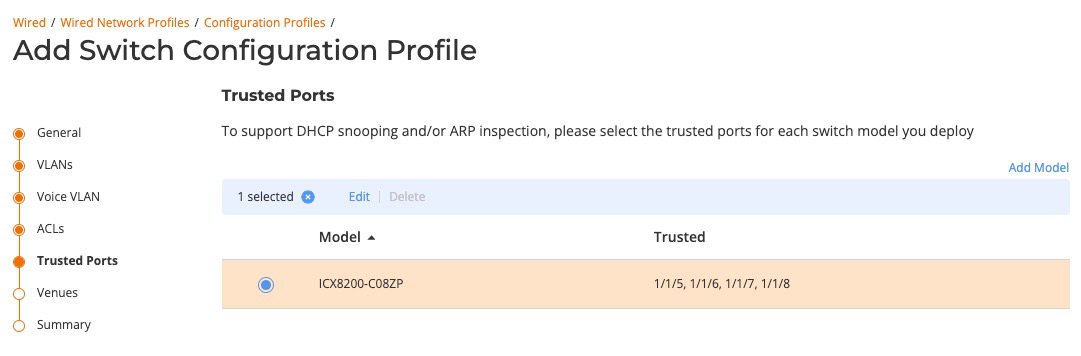
17. Click Next on the Trusted Ports screen.
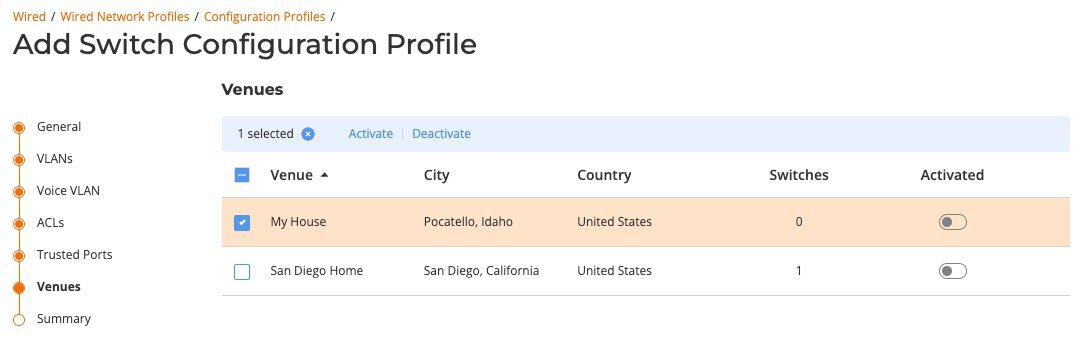
18. On the Venues screen select the appropriate venue. Click Next.
19. On the Summary click Add.
Venue Configuration
A Ruckus One venue is a physical location that dictates certain aspects of the site’s configuration for both Wi-Fi APs and ICX switches. For ICX switches we will associate the Configuration Profile that we just setup with the Venue. This means when we add the switch to Ruckus One and put it in the correct Venue, that the switch will automatically be configured per our configuration profile. Pretty slick!
1. Go go Venues, then click on your desired venue.
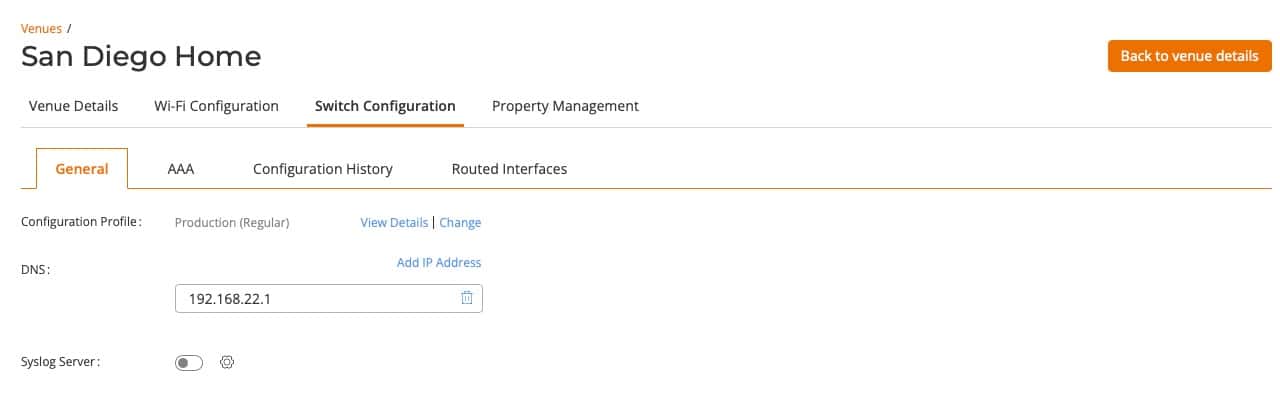
2. In the upper right corner click on Configure. Click on the Switch Configuration tab.
3. On the General tab enter the DNS server name. Configure syslog as well, if desired.
4. Click on AAA and configure any RADIUS/TACACS+ users as needed.
5. Click on Routed Interfaces and any layer 3 routing details, as needed. I did not need to add any.
6. Click on Save.
Provisioning an ICX 8200 in Ruckus One
Once you pre-configure the Ruckus ICX Switch with the configuration profile adding your switch to Ruckus one is a piece of cake. This assumes the switch meets the Ruckus One minimum requirements. You can check out the Ruckus One ICX Pre-Requisites doc for more details. In short, all 8200 series switches are Ruckus one ready. Other models need a minimum Fastiron version for Ruckus One support.
I connected ethernet cables to both the management port and another to one of the 10 Gbps ports. I have a separate OOB network (Out of Band) on the 192.168.22.xxx address space, which the management port was connected to. The cable connected to the 10 Gbps port is an uplink to my core Netgear dual M4300-16x stack, which uses the 10.13.2.xxx address space.
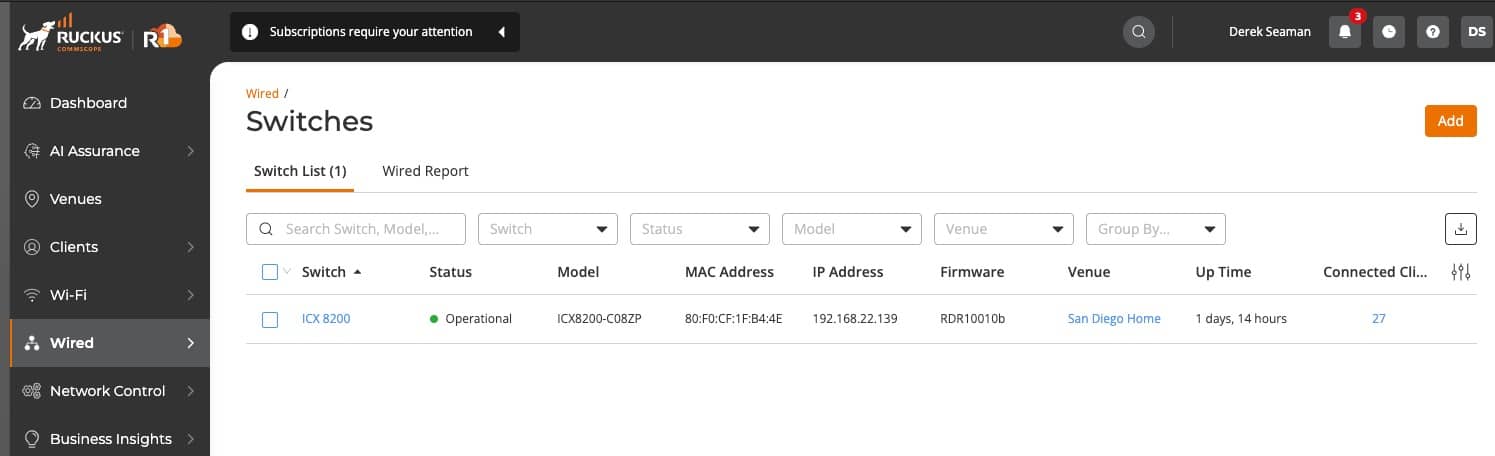
- To provision the ICX 8200 switch to Ruckus One go to Wired -> Switch List. Click Add.
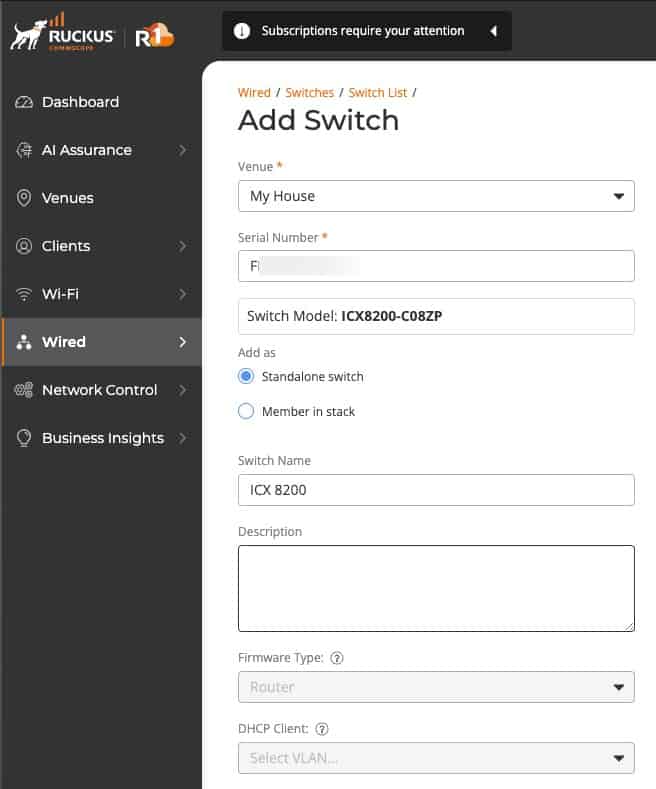
2. Select the Venue, enter the switch serial number, and give the switch a name. Click Add.
3. Power on the switch and then watch the Status. In a few minutes you should see various status updates with the final state being Operational. Depending on the firmware state of the switch, it might take 10-20 minutes for the switch to be Operational.
Additional Switch Configuration
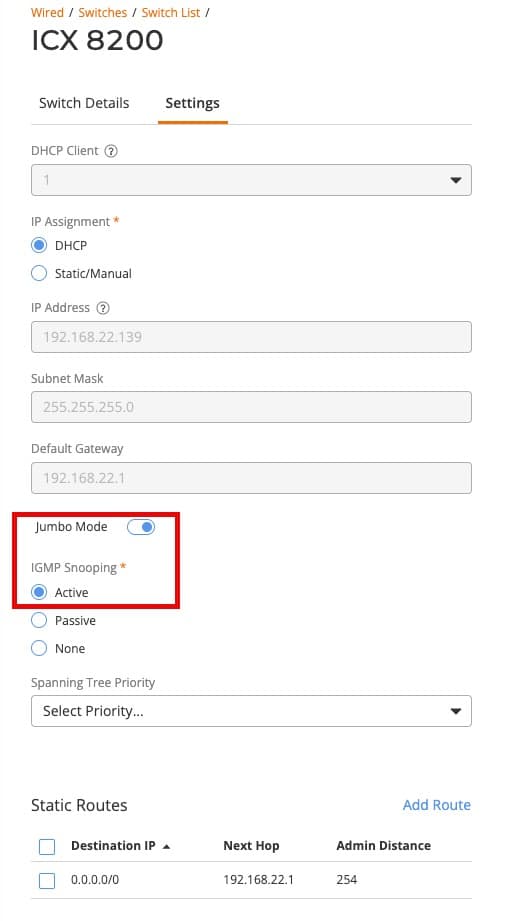
For my use cases I want to enable Jumbo frames and also make sure IGMP is fully enabled in active mode via the UI. This possibly duplicates the IGMP CLI settings, but can’t hurt. I have jumbo frames enabled on my core Netgear switches, so keeping the configuration consistent among switches is important. I do not us STP (spanning tree protocol) at my house, so I don’t change any configuration settings.
1. Go to Wired -> Switch List -> select switch -> Click Edit.
2. Click on Settings and change the settings as desired.
3. Click Apply.
Enabling Dynamic Power Allocation
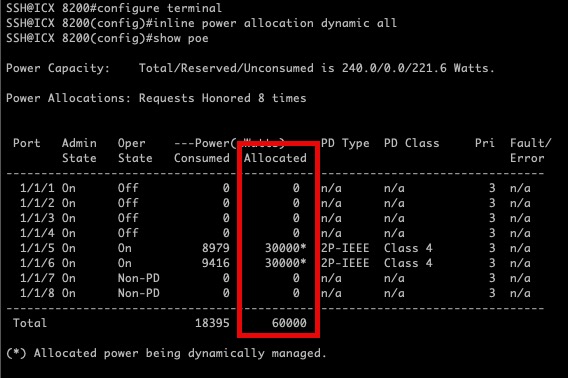
Dynamic Power management helps with the PoE power allocation on the ports based on the *actual* power consumed by the end device connected to the switch, not the full power allowance requested via LLDP. This can let you run more APs than you might be able to using a static power allocation based on maximum power usage. This is not enabled by default. To enable it, SSH into the switch and run the following commands.
					enable
configure terminal
show poe
inline power allocation dynamic all
show poe
write memory
Notice that the first time you run the show poe command that there’s no * by the Allocated power column. After you run the dynamic power you will see a * next to the Allocated power.

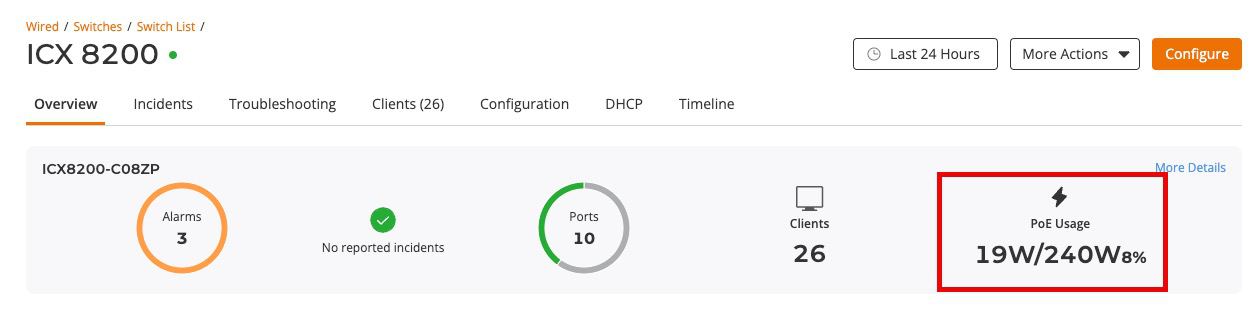
In Ruckus One you can see the dynamic power as well, by monitoring the PoE Usage state. Go to Wired -> Switch List and click on your switch. Without dynamic power you would see the cumulative maximum PoE allocation, but with Dynamic power you see the actual PoE consumption. In my case with two R650s, with dynamic power off, it would show 60w (30w x2) as PoE usage. With dynamic power it lists 19w, which is the actual real time power draw of the two APs.
Enabling IGMP/MLD Multicast Snooping
On my home network I use Matter and Thread devices, which relies on IPv6 multicast. I have IGMP and MLD snooping both enabled on my core Netgear switches, and also want it enabled my ICX 8200. To enable both IGMP (IPv4) and MLD (IPv6) multicast snooping, SSH into the switch and run the following commands. Use your VLAN numbers as appropriate.
					enable
configure terminal
ipv6 mld version 2
vlan 1
multicast fast-convergence
multicast version 3
multicast6 active
multicast6 fast-convergence
vlan 10
multicast fast-convergence
multicast version 3
multicast6 active
multicast6 fast-convergence
exit
write memory
Modify CLI Timeout
By default the SSH CLI times out after 2 short minutes. To increase the timeout period, run the following commands. The number is in terms of minutes, with the maximum being 240 minutes or 4 hours.
					enable
configure terminal
cli timeout 240
write memory
Purchasing Ruckus One
Ruckus ICX switches utilize the same Ruckus One subscription SKUs as their Wi-Fi APs. This means you can mix and match device types as you wish, and they use the same license in the Ruckus One portal. Ruckus One is licensed on a per-device per-year subscription basis, with longer subscription terms costing less per year.
Ruckus has an extensive partner network which sells their APs, ICX switches, and controller licenses. Prices can and do vary wildly between partners. Doing a Google search for a particular AP model or Ruckus One license SKU will probably return prices far higher than if you worked directly with a rep at a Ruckus partner.
I purchased my Ruckus APs through the authorized partner JRC Technologies. Joshua, the owner, is extremely responsive to inquiries at all hours of the day, and weekend. He happily works with both residential and business customers. He can hook you up with any Ruckus products, including APs, switches and Ruckus One subscriptions. Since he’s an authorized Ruckus partner, any purchases will be registered with Ruckus in your name for the limited lifetime hardware warranty. Be sure to tell him Derek sent you for the best possible deal.
Note: Only Ruckus authorized partners can register your purchase with Ruckus for the limited lifetime warranty. Purchases made through Amazon, Ebay (even if new), or other non-authorized partners means you get NO hardware warranty. If you want the limited lifetime warranty, always verify you are using an authorized partner. A lot of resellers are NOT. JRC Technologies is and authorized Ruckus partner.
Summary
Provisioning a Ruckus ICX switch in Ruckus One, their new cloud based controller, is straight forward and can be done in just a few clicks. Pairing Ruckus Wi-Fi APs with their ICX switches gives you a single pane of glass to manage your Wi-Fi and switching infrastructure. The Ruckus ICX 8200-C0ZP is a great switch for powering Wi-Fi 7 APs, as it supports 4x 10 Gbps ports, 4x multi-gig ports, has a 240 PoE budget, and supports up to PoE++ 90w. In a future post I will go over all of the fantastic metrics and data which Ruckus One surfaces for ICX switches.


I add in the below for each vlan:
I have found smart devices show up as active more quickly with this on. https://docs.commscope.com/bundle/fastiron-10010-commandref/page/GUID-CEC3E387-28D3-4F95-A0BE-DBD848E5B55C.html
I skip
for each vlan because in addition to tracking that command turns on:
and I have found some of my devices are more apt to intermittently show up as not responding with this on. I’ll turn the command on and then off as needed for any tracking. Wish the commands were separate. https://docs.commscope.com/bundle/fastiron-10010-commandref/page/GUID-9507AFF4-20FF-46CD-81E3-B4F9D0AFC522.html
Excellent info! All makes sense…I will update the post. Thanks.