This is Part 2 of 2 of the Ruckus One at Home Wi-Fi Best Practices Guide. In Part 1 we configured a number of settings at the Venue level, including channel plan, radio settings, channel bandwidth, and more. Part 2 will focus on SSID architecture and setting up a number of Wi-Fi networks (WLANs) for various use cases, such as homeowner IoT and guest networks. We will be deploying 3 or 4 WLANs, depending on your requirements. Let’s dig in!
Related Posts
Part 1: Ruckus Unleashed (200.18+) Best Practices Guide
Part 2: Ruckus Unleashed (200.18+) Best Practices Guide
Part 1: Ruckus One Home Wi-Fi Best Practices Guide
Enterprise Grade Home Wi-Fi: Ruckus Unleashed vs. Ruckus One
Ruckus Unleashed to Ruckus One Migration Guide
Unleashing the Power of 6 GHz Wi-Fi: Re-Think Everything
Ruckus One: Provisioning ICX Switches
What's Covered?
This series of posts will cover the entire setup of Ruckus APs with Ruckus One for a residential environment. It will also show you how to deploy various networks such as homeowner, guest, and also optimize your network for Wi-Fi 7. Major sections in this series include:
- Ruckus AP Selection (Part 1)
- Venue Settings (Part 1)
- SSID Architecture (This Post)
- Wi-Fi Calling (This Post)
- Access Point Settings (This Post)
- 2.4 GHz IoT Homeowner Network (This Post)
- 2.4 GHz Guest Network (This Post)
- 5 GHz Guest Network (This Post)
- 5/6 GHz Homeowner Network (This Post)
- Troubleshooting (This Post)
SSID Architecture
Best practices for enterprise APs, like Ruckus, is to broadcast no more than 4 SSIDs. For this residential best practices guide I recommend three or four SSIDs, depending on your requirements. For the homeowner we will have two SSIDs: One for 2.4 GHz IoT devices (smart speakers, doorbells, etc.) and another for the 5/6 GHz bands used for cell phones, laptops, tablets, etc. Some IoT devices don’t like SSIDs that are broadcasting on both 2.4 and 5 GHz, which is why I suggest a dedicated 2.4 GHz IoT SSID to head off potential issues.
For the guest networks I have two different use cases in mind. Pick which one best meets your requirements. The two use cases are:
1. A permanent ‘guest’ such as a cohabitating tenant or roommate: Dedicated 2.4 GHz SSID, and a 5 GHz (only) WPA2 SSID. This separates the tenant’s IoT devices (2.4 GHz) from their primary high bandwidth devices (phone, laptop, tablet, etc), which should use 5 GHz.
2. Friends or family that you have over on occasion for an event: Single guest SSID that combines both the 2.4 GHz and 5 GHz bands and uses WPA2. Ruckus has some fancy guest network captive portal options you can use, but I’m keeping it simple with a single pre-shared passphrase. Since we aren’t concerned about IoT devices in this use case, combing 2.4 GHz and 5 GHz should not be a problem.
In the table below I you can see the various use cases and suggested SSID naming convention. You can of course use any SSID names you wish, but for the purposes of this article I’ll be using the naming convention below.

In both guest scenarios I would keep 6 GHz for the exclusive use of the homeowner, unless there’s a strong case for giving guests access 6 GHz. Guests may also encounter some of the compatibility issues that can come with combining 5 GHz and 6 GHz, such as WPA3.
Guest Traffic Isolation
For your guest traffic consider if you want to isolate their traffic from your primary home network. If your scenario is more the casual party with trusted friends and family, then you might choose to not isolate their traffic to a dedicated (and firewalled) VLAN. This is by far the simplest solution, but is not as secure.
If, on the other hand, you have a tenant situation and have network gear that supports VLANs, you probably want to use a dedicated guest VLAN that is isolated from your primary homeowner network. An isolated guest network will require configuration on your switch/router/firewall.
For the remainder of this post I’ll cover the tenant use case with an isolated VLAN. But, you can easily modify the guest network to use a single SSID across the 2.4 and 5 GHz bands if you want to use the transient guests use case. This SSID would use VLAN 1, co-mingling their traffic with your primary home network.
Wi-Fi 7 Considerations
Wi-Fi 7 has a new feature called MLO, or Multi-Link Operation. This lets you combine up to two bands (2.4, 5 or 6 GHz) together for higher throughput and lower latency connections to select clients. Many Wi-Fi chipsets don’t support the Link Aggregation (LAG) mode of MLO, but DO support smart link selection between the two bands. Either way our primary Homeowner SSID will combine the 5/6 GHz bands to take advantage of MLO if/when a client supports it. We will not be using MLO for the guest networks.
For a lot more information on Wi-Fi 7 MLO, check out the Ruckus Wi-Fi 7 Multi-link Operations (MLO) blog post. For even more Wi-Fi 7 information, check out the Ruckus Whitepaper What to Know about Wi-Fi 7. And finally, watch this page for Ruckus blog posts on Wi-Fi 7.
Dynamic Pre-shared Keys (DPSK)
DPSK (Dynamic pre-shared keys), which is a Ruckus feature, is not recommended in a residential environment. DPSK lets you use a single SSID, but individual devices or groups of devices can use unique passphrases. You can then associate certain DPSKs to different VLANs, if you wish. However, due to the way consumer IoT devices sometimes needs your phone’s SSID passphrase to setup, DPSK can cause complications. You might also run into the rare device that is buggy and has issues with a DPSK SSID. Stick with standard pre-shared keys on your SSIDs for maximum compatibility is a residential setting.
Wi-Fi Band Use Cases
2.4 GHz: This band should only be used for IoT type of devices. This can include smart speakers, smart home sensors (e.g. garage door opener, presence sensors, thermostats, etc.) and cameras. Think relatively low bandwidth smart devices. You can also try streaming devices, such as Roku or Apple TV. But personally I put them on my 5/6 GHz network if they aren’t hard wired with Ethernet. The 2.4 GHz network will also be WPA2, so it is a good fallback for devices that don’t yet support WPA3 (which is required on the 5/6 GHz SSID).
5 GHz: This band is pretty widely supported among more advanced modern clients, such as phones, laptops, tablets, watches, and even some cutting edge cameras. This band should be used for your primary high bandwidth devices. 5 GHz supports a variety of security modes, including WPA2 and WPA3. Because guest device compatibility can be a crap shoot, I suggest using WPA2 for all guest networks.
6 GHz: The 6 GHz Wi-Fi band is pretty new, and many client devices do not yet support it. The very latest phones and laptops probably support 6 GHz (via Wi-Fi 6E or Wi-Fi 7). All certified 6 GHz devices require the use of WPA3 on the 6 GHz band. WPA2 and open networks are not allowed. Due to relatively limited client device support, and the great speeds you can get on 5 GHz, I would suggest limiting the 6 GHz band to only homeowner SSIDs. If you combined the 5/6 GHz bands on a single guest SSID, that would require all guest clients using that SSID to support WPA3, which may not always be the case.
Wi-Fi Calling
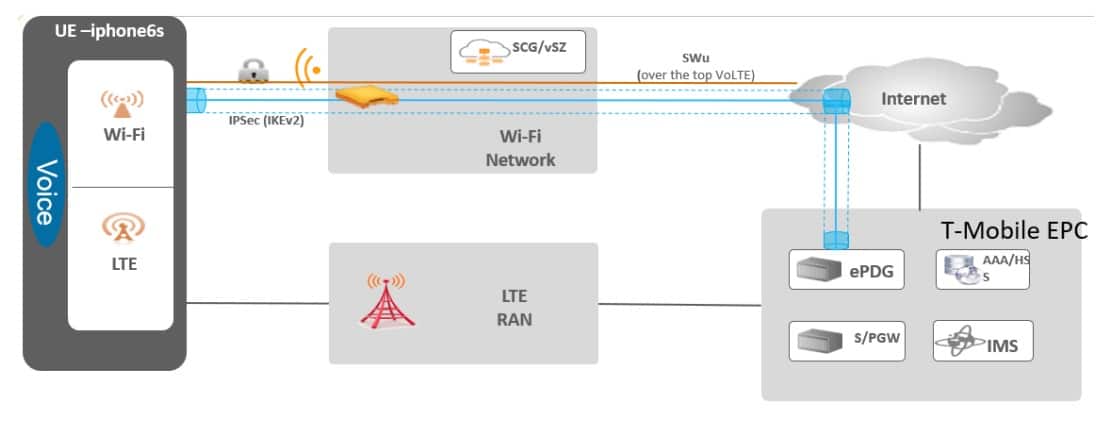
Wi-Fi calling is a service that allows you to make and receive calls over a Wi-Fi network instead of using your phone’s cellular network. This service relies on Voice over Internet Protocol (VoIP) technology to transmit voice calls as data over the internet. Wi-Fi calling uses ePDGs, which are manually defined in Ruckus One.
An Evolved Packet Data Gateway (ePDG) is a critical component in the network function of the 4G (and above) mobile core networks, known as the Evolved Packet Core (EPC). The ePDG helps mobile network operators control their user’s mobile experience, particularly in the context of WiFi calling and similar services. For US carriers setup the applicable ePDGs for ATT, T-Moble, and Verizon. I suggest setting up all three, even if you only subscribe to one carrier. If you reside outside of the US, lookup the ePDG FQDNs for the carriers in your country/region.
Enabling Wi-Fi calling incurs no additional overhead, so there’s no reason to not enable it for all SSIDs. This can help cover a scenario where someone is accidentally on the 2.4 GHz network with their cell phone and makes a call.
For more details on Wi-Fi calling check out the Ruckus Wi-Fi Calling Best Practices Guide. In short, the Wi-Fi calling process is as follows:
- A client associated to the WLAN with the Wi-fi calling profile enabled initiates a Wi-Fi call
- Ruckus One QoS features identify this as a Wi-FI call and can sense the carrier requested.
- An IPSec tunnel to the ePDG is established.
- Carrier grade voice connection is established just as an LTE call would be.
Configuration: Network Control -> Service Catalog -> Wi-Fi Calling -> Add. Copy/paste all of the FQDNs for each carrier (see below for US carriers).
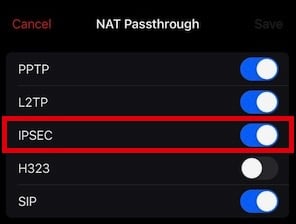
Firewall IPSec Passthrough
If your router/firewall has an IPsec pass-through option, I recommend turning it on for Wi-Fi calling. For Firewalla firewalls, go to Network -> NAT Settings -> NAT Passthrough -> IPSec (turn on).
US Carrier Wi-Fi Calling ePDGs
ATT
					vvm.mobile.att.net
sentitlement2.mobile.att.net
epdg.epc.att.net
cnc.epdg.att.erricson.net
vtc.epdg.att.ericsson.net
T-Mobile
					ss.epdg.epc.geo.mnc260.mcc310.pub.3gppnetwork.org
crl.t-mobile.com
epdg.epc.mnc260.mcc310.pub.3gppnetwork.org
primgw.vowifi2.spcsdns.net
Verizon
					233.sub-141-207-229.myvzw.com
wo.vzwwo.com
Other
					epdg.epc.mnc006.mcc454.pub.3gppnetwork.org
epdg.epc.mnc006.mcc454.pub.3gppnetwork.org
epdg.epc.mnc002.mcc505.pub.3gppnetwork.org
epdg.epc.mnc720.mcc302.pub.3gppnetwork.org
Access Point Settings
Nearly all of the settings for APs can be set at the Venue level and are inherited. So we won’t be changing any of those settings, since we set those up in Part 1 of this series. However, there is one network setting we should check, the IP addressing mode.
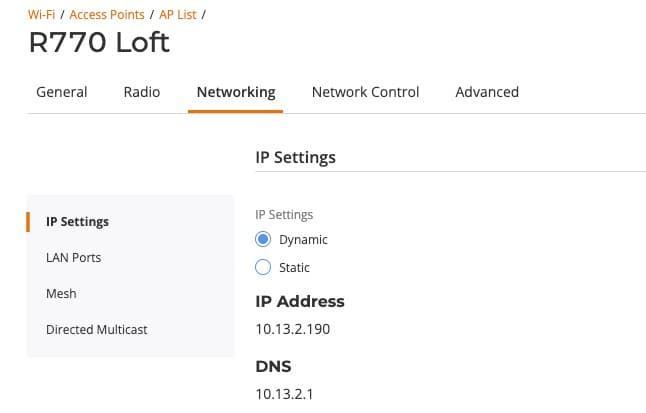
Access Point - Networking
I recommend that your APs use a Dynamic IP. And I also recommend setting a DHCP reservation on your router for each AP. This makes automatic addressing of the APs easier, yet you still know what IPs the APs will be using at all times. If Ruckus One allows AP CLI access in the future, you will be setup for knowing the static IPs of your APs.
1. Go to Wi-Fi -> AP List.
2. Click on your first AP, then click Configure.
3. Click on Networking. Verify IP Settings is set to Dynamic.
4. Repeat for all of your APs.
Wi-Fi Networks: Network Details
For the remainder of this guide I recommend going through all the settings for a single SSID, then come back and repeat for the remaining SSIDs. If you follow my SSID architecture you will end up with three (or four) SSIDs with different settings. You could also open multiple Ruckus One tabs and do each section for all SSIDs at once, but that may be confusing.
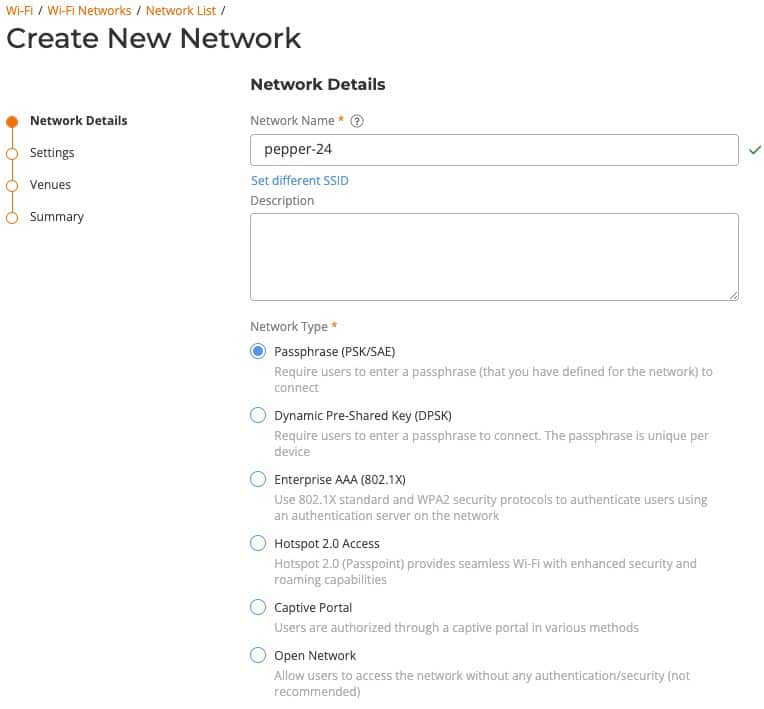
To add a new wireless network in Ruckus One:
- Go to Wi-Fi -> Wi-Fi Networks List -> Add Wi-Fi Network
- Walk through each section below to setup the various parameters for each SSID.
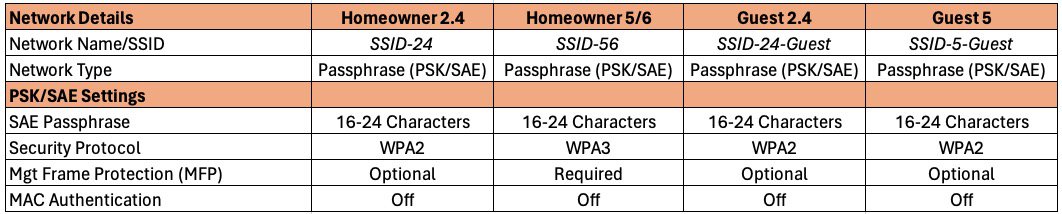
Network Name/SSID: Select your SSID name. I like to denote which frequency band and purpose of the SSID (e.g. Pepper-24, Pepper-56, Pepper-24-guest, Pepper-5-guest).
Network Type: All networks should use a passphrase (vs dynamic pre-shared key).
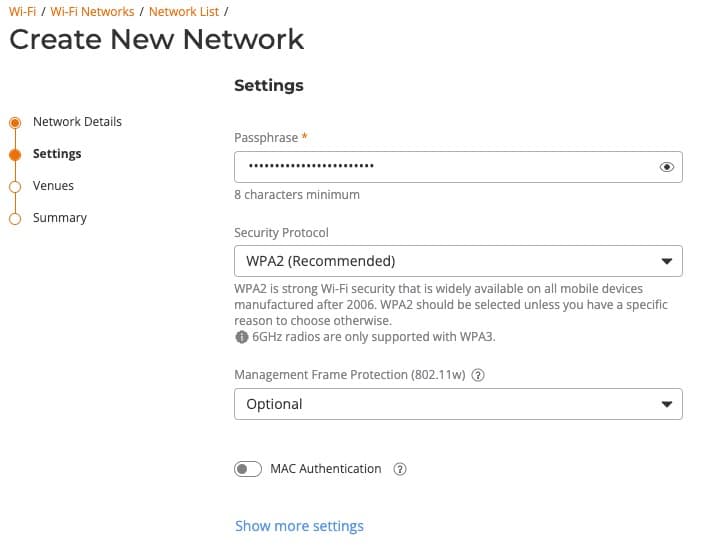
PSK/SAE Settings: Use the appropriate WPA setting as shown in the table. I would urge a minimum of 16 characters (Upper case, lower case, number, special character), with longer being more secure. Personally I always use 24 characters or more. I also use a passphrase, which is easier to type (e.g. MaryHadALittle@%lamb60606).
Security Protocol: Use WPA2 for everything except the Homeowner 5/6 GHz network, where WAP3 is required. If you know your guest clients will all support WPA3 (perhaps on the 5 GHz band), feel free to enable it for increased security.
Mgt Frame Protection (MFP): 802.11w (MFP) adds additional security to your SSIDs, but can cause compatibility issues. Set to Optional on everything except the Homeowner 5/6 GHz SSID, where it is mandatory due to WPA3. If you are very security conscious you could require MFP and see if any devices fail to connect. For example, some Google chromecast devices might have issues, so be careful.
MAC Authentication: We will not be restricting what MACs can authenticate to the network so leave this off.
Wi-Fi Networks: VLAN
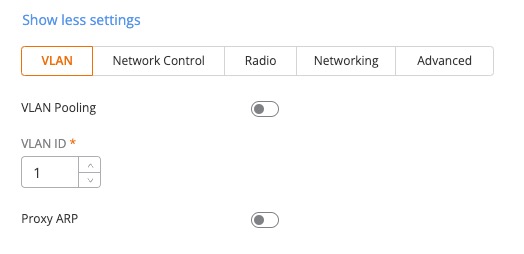
3. Click on Show more settings and go to the VLAN tab.

VLAN Pooling: Only needed in high density environments, not residential settings.
VLAN ID: Use VLAN 1 (native VLAN) for the homeowner network. If you have a VLAN configured on your switch/router/firewall for guests, use that VLAN ID for the guest SSID(s). I’m using 10 in this example. If you have trusted transient guests and do not wish to use a dedicated VLAN, just use VLAN 1.
Proxy ARP: Enterprise feature for allowing Layer 3 ARP requests cross layer 2 boundaries. Leave off.
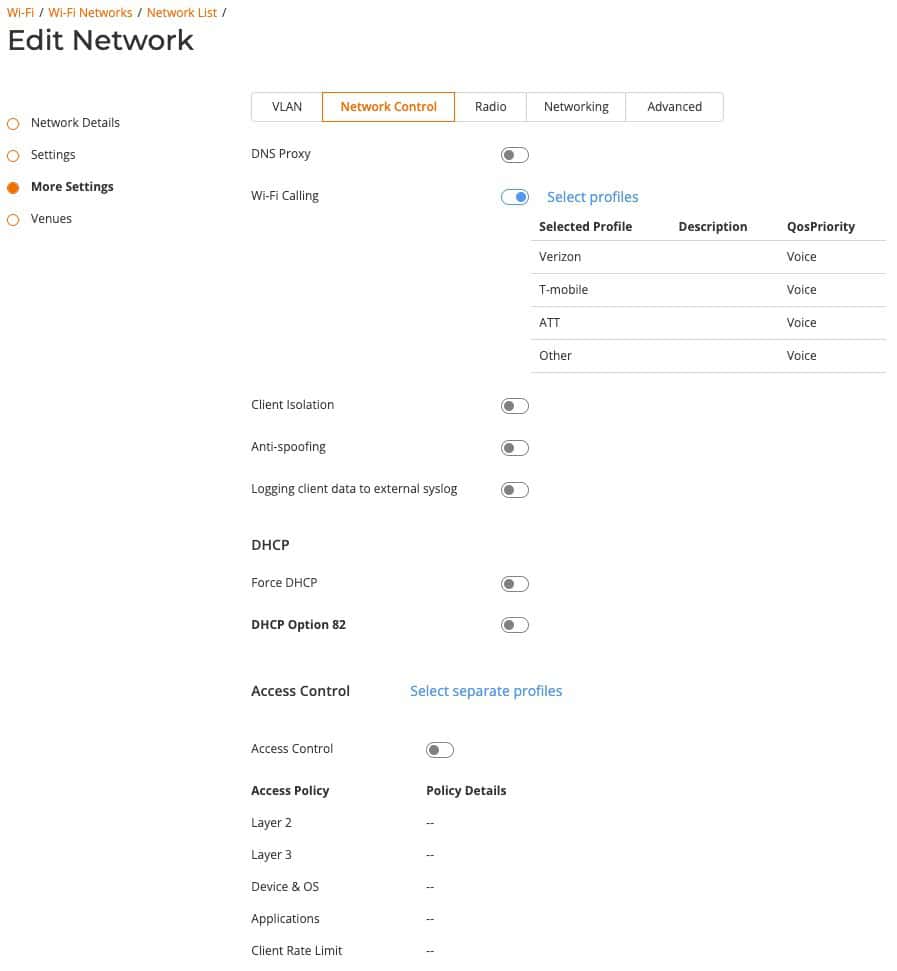
Wi-Fi Networks: Network Control
4. Click on the Network Control tab.
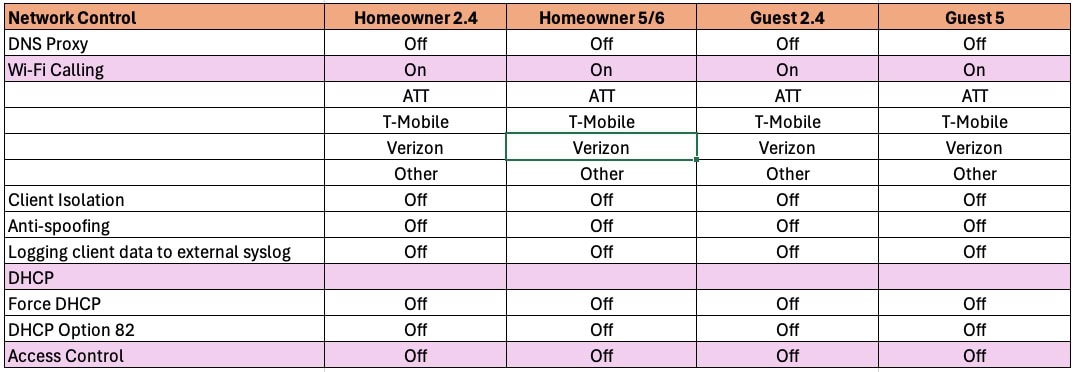
DNS Proxy: Not needed in a residential setting.
Wi-Fi Calling: Used on all networks. Select the carriers we previously setup.
Client Isolation: Not needed in a residential setting.
Anti-Spoofing: Residential security threat model doesn’t necessitate using this feature.
Syslog: Not needed unless you have a syslog server.
Force DHCP: Not needed in a residential setting.
DHCP Option 82: Not needed in a residential setting.
Access Control: Not needed in a residential setting.
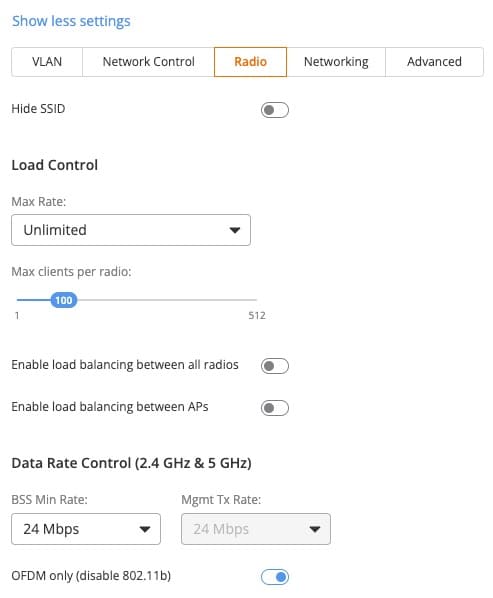
Wi-Fi Networks: Radio
5. Click on the Radio tab.
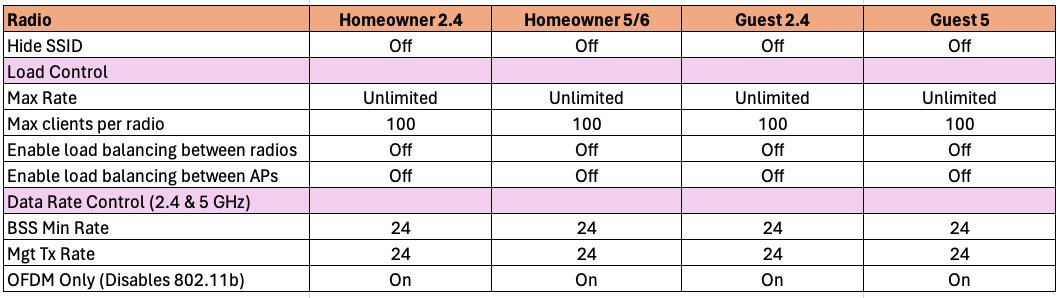
Hide SSID: Hiding your SSID is NOT a security feature, and is actually less secure. Leave your SSID visible.
Max Rate: No limit needed in a residential setting.
Max Clients per Radio: Leave the default of 100.
Load Balancing between radios: This can cause issues in a residential setting, so turn it off.
Load Balancing between APs: This is not a high density environment. Clients should roam freely, so turn it off.
BSS Min Rate: A minimum of 12 is strongly suggested, with 24 Mbps being even better. This encourages clients to roam when the signal is poor.
Mgt Tx Rate: Same value as BSS Min rate.
OFDM Only: You can safely enable this unless you know you have a client that only supports 802.11b (extremely ancient Wi-Fi standard). If you have 802.11b only devices, turn this off. OFDM has higher spectral efficiency and is more resistant to noise. Consider replacing any legacy 802.11b only devices so you can enable this setting.
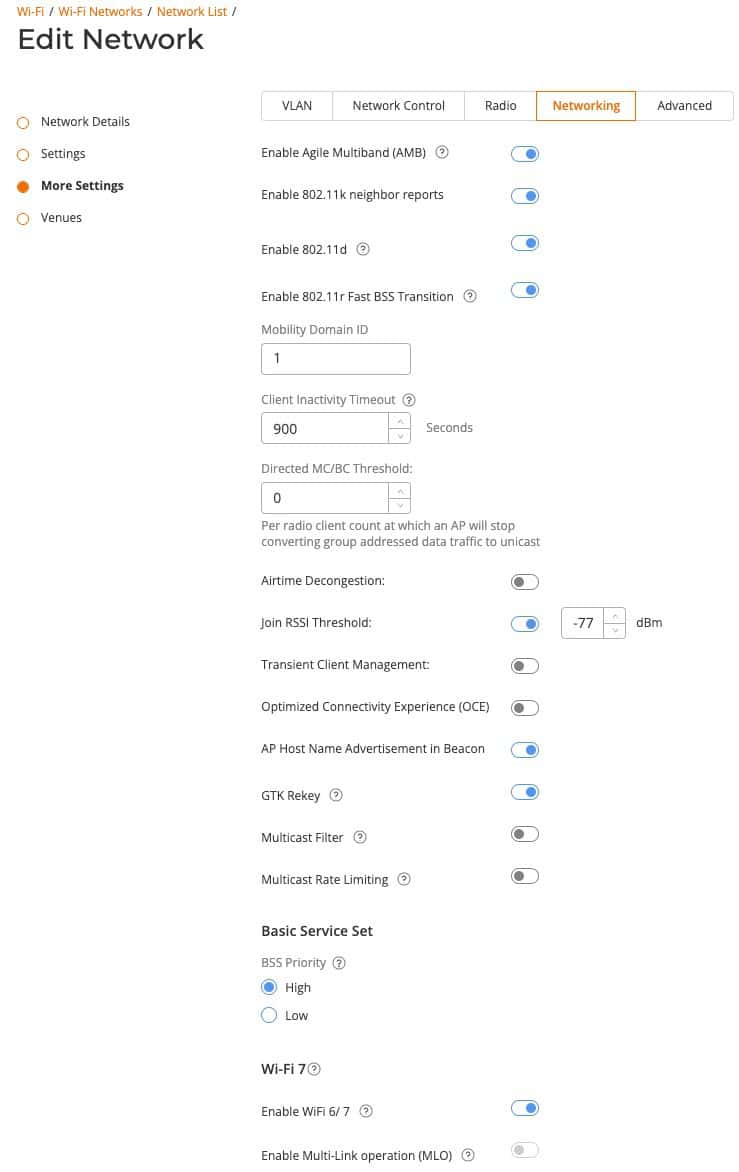
Wi-Fi Networks: Networking
6. Click on the Networking tab.
Enable Agile Multiband (AMB): Agile Multiband feature enhances network capacity and provides a better connectivity experience for end-users. Turn on.
Enable 802.11k neighbor reports: Very important to enable so that clients can easily find all bands the AP is broadcasting on. This accelerates some devices discovering which 6 GHz channels are in use. Turn on.
Enable 802.11d: Adds country information to elements, and allows a device to comply with country reguations. Turn on.
Enable 802.11r Fast BSS Transition: It is recommended to enable 802.11r. However, there can be compatibility issues. For example, some cameras and even an older iPad Pro I have didn’t like having 802.11r enabled. My iPad would connect but had roaming issues and my Ring camera was unable to join the network. Only if you run into compatibility issues should you disable 802.11r. Start with it enabled and disable only if you run into problems.
Mobility Domain ID: Leave the default value of 1.
Client activity timeout: Set to maximum 900 seconds (15 minutes). This helps keep the client list clean, and can also help if have a home automation system such as Home Assistant that relies on accurate client connection status.
Directed MC/BC: This must be set to 0, so that multicast services/devices like Sonos, Airplay, Matter, etc. work as expected. 0 disables directed multicast, which is what we want. Any value greater than zero is asking for problems in a residential setting.
Airtime Decongestion: Used in high density environments. Turn off for residential venues.
Join RSSI Threshold: This determines the minimum signal strength a device should have to even try and join or associate with a network (access point). If the device’s signal strength is below this threshold, it won’t attempt to join the network. Try starting with -80 and monitor client health and tweak as needed. This can cause issues, so if clients are having issues joining the network, try disabling or setting a lower threshold (larger number).
Tip: Be careful with adjusting this threshold. In particular, the homeowner SSID which combines 5 and 6 GHz might need tweaking. Setting this threshold to too low of a value (i.e. closer to zero) may prevent clients from associating with the 6 GHz band. If you have 6 GHz capable clients and they are having issues switching to the 6 GHz band, you may need to tweak this value. -80 seemed to be fine in my environment, but yours may be different.
Transient Client management: This feature, used only with a large number of transient devices, delays the association of transient clients with the network, reducing needless traffic and preventing unnecessary use of network resources, thereby improving overall network efficiency and stability. Turn off for home networks.
Optimized Connectivity Experience: For a home network, turn this setting off. It can cause compatibility issues with clients which may require in-depth Wi-Fi troubleshooting skills.
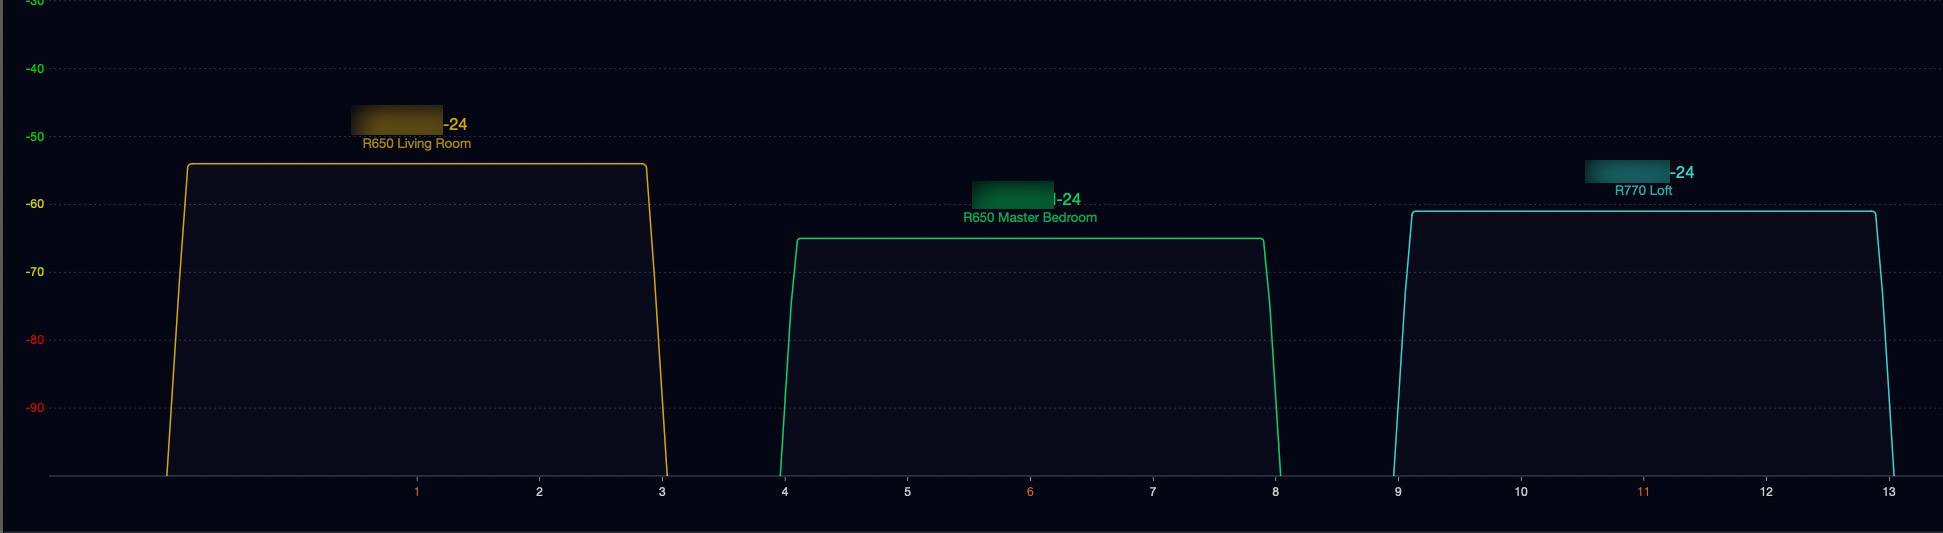
AP Host name advertisement: As the name states, this will broadcast the name of the AP. This can be helpful with software such as Wi-Fi Explorer which can show you the AP names. See screenshot below for an example.
GTK rekey: The Group Temporal Key (GTK) is used to encrypt and decrypt all broadcast and multicast traffic on a network. A GTK rekey happens when the wireless network decides to change this GTK. This process is an important aspect of network security because it helps to prevent unauthorized users from deciphering the key, which they could potentially use to decrypt broadcast and multicast traffic. Turn this on.
Multicast Filter: In a residential setting we don’t want to mess with multicast traffic, as that can break Sonos, Airplay, Matter, etc. Set to off.
Multicast Rate limiting: In a residential setting we don’t want to mess with multicast traffic, as that can break Sonos, Airplay, Matter, etc. Set to off.
BSS Priority: Leave set to HIgh.
Enable Wi-Fi 6/7: Set to Enable. We want the best client experience.
Enable multi-link operation (MLO): MLO may be incompatible with a variety of Wi-Fi 7 clients. For maximum compatibility I would disable this setting unless you perform thorough testing.
MLO Bands: N/A since we aren’t use MLO.
Wi-Fi Networks: Advanced
9. Click on the Advanced tab.

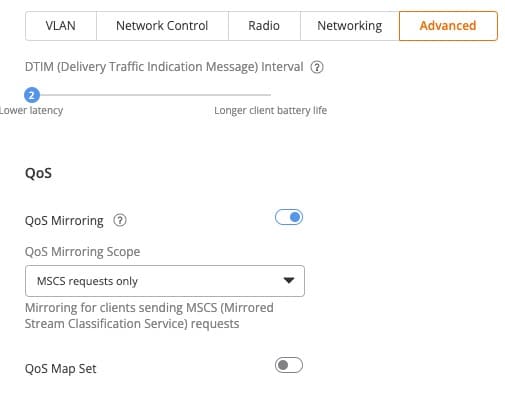
DTIM Interval: DTIM (Delivery Traffic Indication Message) Interval is a concept in Wi-Fi communication that relates to power saving. If the DTIM interval is 2, the AP will send out broadcast/multicast data every 2 beacon frames. Start with a value of 2, but sometimes 3 can work as well.
QoS Mirroring: Like Wi-Fi calling, enabling QoS mirroring is safe and does not add any additional overhead. In a residential setting it’s very unlikely there will be enough congestion to need QoS. But it’s ‘free’, so let’s turn it on.
QoS Mirroring Scope: Leave the default of MSCS requests only.
QoS Map Set: Enterprise oriented, so leave disabled.
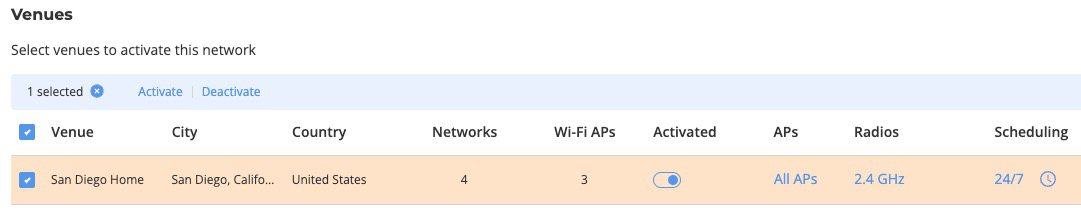
Wi-Fi Networks: Venues
10. At the bottom of the screen click on Next.
11. Select the Venue you previously setup (see Part 1).
12. Click the Activated toggle.
13. If needed, click on the Radios and modify the bands as needed for each SSID.

Venue: Your residence’s name.
APs: Select all APs
Radios: See table
Schedule: These SSIDs are on 24/7.
Troubleshooting
- If a client has trouble joining a SSID, disable 802.11r then re-attempt the client join.
- If clients have issues joining a SSID that potentially have weak signal (e.g. 6 GHz in particular), modify or disable the SSID’s “Join RSSI Threshold” option. On iOS it might say something like “Move closer to the access point.”
- If you are trying to join a device to the 5 GHz SSID and it’s not working, disable the DFS channels and try again.
- Some client devices are OK with most DFS channels but break on 144. If you run into client issues, check which 5 GHz channel(s) your APs are using. Try disabling 5 GHz channel 144 if that appears to be causing a problem.
- If a device can’t join the 5 GHz network, try it on the 2.4 GHz network.
- If you have particularly brain dead clients that don’t like channel changes, you may need to hard code the channels the APs use. You can use a program like Wi-Fi explorer to look at the RF neighborhood around you to see what channels are currently in use. But RF environments can be very dynamic, so be careful.
- If you are viewing the AP list and the Status for an AP is “Applying Configuration” for more than 20 minutes, unplug the AP, wait 10-15 minutes until it registers as disconnected in Ruckus One, then plug it back in.
- Review the “Wireless Clients Report” (Clients -> Wireless Clients Report) and review the Session count for your devices. If any of them have unusually high values, do some investigation. I’ve randomly had devices, even my Apple Watch Ultra 2, get stuck in some type of connection loop. Usually a client reset/reboot fixes it. I schedule this report for a daily email just to keep tabs on problematic devices.
Summary
This post is Part 2 of 2 of my Ruckus One Home Wi-Fi Best Practices Guide. We covered a lot of ground, including homeowner and guest WLANs. For the homeowner WLANs I proposed a dedicated 2.4 GHz network for IoT devices, and a combined 5/6 GHz SSID for high speed devices like phones and laptops.
For the guest networks I provided two suggested guest WLAN scenarios, depending on your use case. One use case is a tenant/roommate situation and the other is for friends and family who are only occasionally at your house.
The net result is either three or four WLANs (SSIDs), depending on your guest network needs. For each WLAN I covered every single Ruckus One setting available, along with a short description and the recommended setting for a residential environment. The combination of all these settings should set you for a successful enterprise-grade Wi-Fi experience within the comfort of your own home.
In case you missed out on Part 1 of this series, you can check it out here: Part 1: Ruckus One Home Wi-Fi Best Practices Guide