Now that we have vCenter installed, it’s time to update our User Solution certificates for the vCenter services. This is a fairly straight forward process, using the combination of the VMware Certificate Manager tool and my vCenter 6.0 Toolkit. The VMware Certificate manager tool will automatically create the private keys and CSRs for each user solution certificate. My toolkit will then take the CSRs and submit them to your enterprise CA and also create the chained PEM files the VMware toolkit needs to install the certificates. Then we flip back to the VMware tool to let it actually install the certificates. I decided against duplicating functionality between my Toolkit and the VMware tool, so there’s little flipping back and forth.
If you are using the VMCA, then that’s even easier, as we can fully rely on the VMware tool to update the required certificates. I’ll go over all of the scenarios here.
Also take note that you need at least version 0.85 of my vCenter toolkit for this article to work properly. So download it, or a newer version, from the permalink below.
Blog Series
vSphere 6.0 Install Pt. 1: Introduction
vSphere 6.0 Install Pt. 2: Platform Services Controller
vSphere 6.0 Install Pt. 3: Certificate Management
vSphere 6.0 Install Pt. 4: vCenter Upgrade Best Practices
vSphere 6.0 Install Pt. 5: ESXi Upgrade Best Practices
vSphere 6.0 Install Pt. 6: Install Windows PSC
vSphere 6.0 Install Pt. 7: Config SQL DBs
vSphere 6.0 Install Pt. 8: Toolkit Configuration
vSphere 6.0 Install Pt. 9: SSL Templates
vSphere 6.0 Install Pt. 10: Install VCSA PSC
vSphere 6.0 Install Pt. 11: VMCA as Subordinate
vSphere 6.0 Install Pt. 12: PSC Machine Certificate
vSphere 6.0 Install Pt. 13: Directory Services Certificate
vSphere 6.0 Install Pt. 14: Windows vCenter Install
vSphere 6.0 Install Pt. 15: VCSA vCenter Install
vSphere 6.0 Install Pt. 16: User Solution Certificates
Permalink to this series: vexpert.me/Derek60
Permalink to my Toolkit script: vexpert.me/toolkit60
User Solution Certificates with VMCA
1. Open a command prompt and run the ‘certificate-manager’ tool from C:\Program Files\VMware\vCenter Server\vmcad. If you are using the VCSA, open a bash shell and go to the /usr/lib/vmware-vmca/bin directory.
2. Select Option 6, Replace Solution user certificates with VMCA certificates.
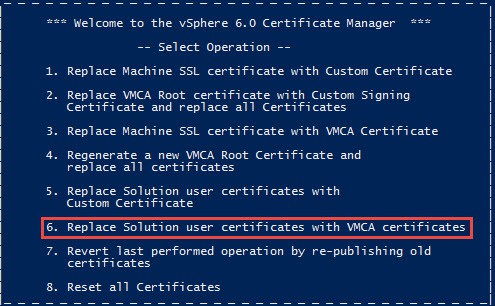
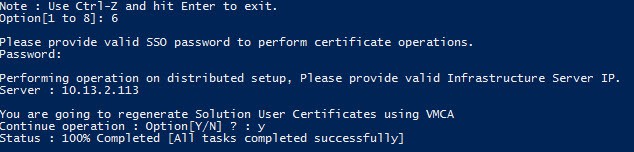
3. Enter your SSO password.
4. Enter the IP address of your external PSC. Confirm you want to replace the certificates using the VMCA. Wait a couple of minutes for the procedure to complete.
User Solution Certificates with Custom Certificates
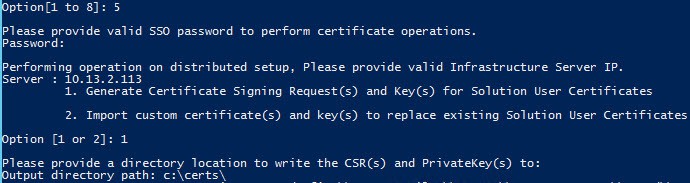
1. Open a command prompt and run the ‘certificate-manager’ tool from C:\Program Files\VMware\vCenter Server\vmcad. If you are using the VCSA, open a bash shell and go to the /usr/lib/vmware-vmca/bin directory.
2. From the main menu select Option 5. Enter your SSO password and PSC IP address.
3. Select Option 1 from the sub menu, to generate CSRs and keys. Enter a directory path of C:\Certs. If you are using the VCSA, enter an appropriate local directory.
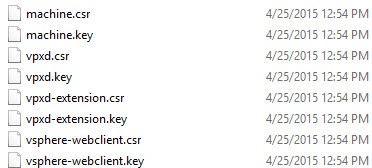
4. If you look in the C:\Certs directory you will see a bunch of files created. If you are using the VCSA, copy all of the created files down into C:\Certs.
5. Open a new PowerShell window and launch my vCenter 6.0 Toolkit. Select Option 5 from the main menu, “User Solution Certificate Menu”.
6. If you are using an Online Microsoft CA then select Option 1, Mint User Solution certificates with an online Microsoft CA. Wait a few seconds, and all of the CSRs will be submitted to your online CA and the certificates downloaded. If your CA requires certificate approval, go to your CA approve the certificates, then select Option 2 to resume the download.
7. If you look at the C:\Certs directory you will now see several subdirectories, one for each corresponding CSR. Skip to Step 10 if you are an online Microsoft CA user. 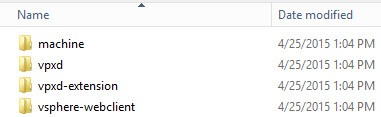 8. If you need to manually submit all of the CSRs to your CA (offline Microsoft CA, or third-party CA), then save each minted certificate as a base-64 encoded non-chained file with the following names in the C:\Certs directory:
machine.crt
vpxd.crt
vpxd-extension.crt
vSphere-webclient.crt
9. From my User Solution Certificate menu select option 3, which will create your PEM files and move your certificate files into their own directory. Only use this option if you manually downloaded your CRT files from your CA.
10. If you are using the VCSA, copy the new folders in C:\Certs up to the appliance. Also, upload the chain.cer file as well.
10. Back in the VMware Certificate Manager tool select Option 2, Import Custom certificates… Input all of the requested file names, using the “.cer” and “.key” filenames for the corresponding option. Note: Due to a bug, if you try and use the “chain.cer” file for the signing certificate, the operation may fail at 0% and rollback. So until they fix the bug, use the “root64.cer” file for the last response. 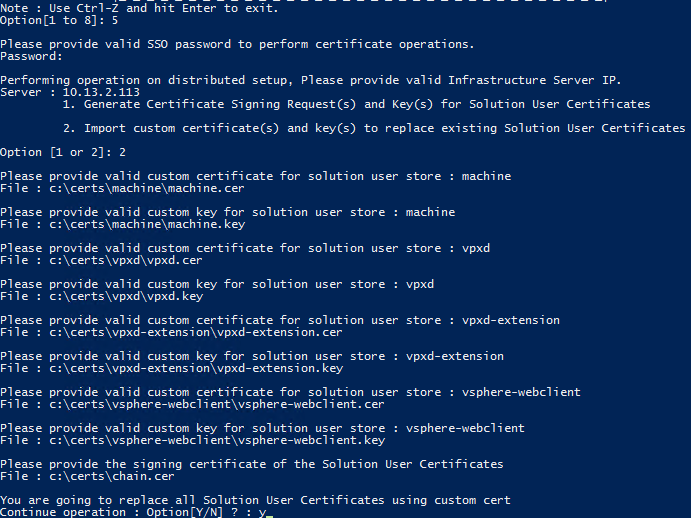
11. Type Y to continue with the replacement. Wait until the process is completed.
Summary
Replacing the user solution certificates is not a difficult process, if you combine my Toolkit script with the VMware certificate manager. Even with the multiple CA VMware bug, there’s an easy workaround .


