Now that we have the PSC installed, it’s time to configure the variables for the Toolkit script, and also make sure we can download our root certificates. Depending on your configuration, you may need to manually download your root public certificates. VMware needs certificates in a specific format, and they need the full certificate chain. So in this installment I show you all the variables in the Toolkit script that you will need to change to make it successful. In subsequent installments we will then use the Toolkit to setup the VMCA and other certificate options.
April 2, 2015 Update: Per VMware, VUM 6.0 can NOT use the vSphere 6.0 SSL template. So I’ve added a new variable called $VUMTemplate for the old 5.5 SSL template name. You can find instructions for creating the vSphere 5.5 template here.
Blog Series
vSphere 6.0 Install Pt. 1: Introduction
vSphere 6.0 Install Pt. 2: Platform Services Controller
vSphere 6.0 Install Pt. 3: Certificate Management
vSphere 6.0 Install Pt. 4: vCenter Upgrade Best Practices
vSphere 6.0 Install Pt. 5: ESXi Upgrade Best Practices
vSphere 6.0 Install Pt. 6: Install Windows PSC
vSphere 6.0 Install Pt. 7: Config SQL DBs
vSphere 6.0 Install Pt. 8: Toolkit Configuration
vSphere 6.0 Install Pt. 9: SSL Templates
vSphere 6.0 Install Pt. 10: Install VCSA PSC
vSphere 6.0 Install Pt. 11: VMCA as Subordinate
vSphere 6.0 Install Pt. 12: PSC Machine Certificate
vSphere 6.0 Install Pt. 13: Directory Services Certificate
vSphere 6.0 Install Pt. 14: Windows vCenter Install
Permalink to this series: vexpert.me/Derek60
Permalink to my Toolkit script: vexpert.me/toolkit60
Derek’s Toolkit Script
My Toolkit PowerShell script performs several tasks and is menu driven. It’s an all in one script, meaning it handles online/offline CAs, Windows CA and non-Windows CAs, and will also do other install tasks like create your ODBC and SQL database files connectors. New for vSphere 6.0 are automation steps for the VMCA and added support for three tier CA hierarchy (root and two subordinates).
My Toolkit script does NOT replace the VMware certificate replacement tools, it only augments them. So you would normally use the combination of my Toolkit script plus the VMware certificate management tools for full SSL certificate replacement. I did this specifically so that customers would be fully supported by VMware, even if they use my tool. I just make the process easier, I don’t do any behind the scenes hacking or unsupported commands.
I am still in the process of developing the script, so some of the vCenter SSL features are disabled in the initial versions until I work through the full process. But much of the script is functional in this initial version.
The script has the following features:
- Downloads and installs the proper version of OpenSSL if it’s not already installed
- Creates 2048 bit RSA private keys in the proper format
- Downloads both the root and up to two subordinate public certificates
- Submits the CSRs to the online CA and downloads the certificates
- Creates the needed service PEM files for the vCenter certificate tool
- Creates the required root/subordinate PEM files
- Does NOT require PowerCLI
- Automatically uses the hostname of the server you run the script on for all certificates
- Works with offline CAs
- Creates customized SQL vCenter and VUM database creation script
- Creates SQL ODBC DSNs for vCenter and VUM (SQL 2008 R2, 2012, 2014)
- Automatically downloads and installs SQL 2008 R2 client package
- Provides download URL for SQL 2012/2014 client
- Support Microsoft CAs that require manual certificate approval
- Requires PowerShell 3.0 or higher
Configure Toolkit Variables
1. Login to your external PSC and download my Toolkit script from here. You can run it from anywhere, but I think this is the optimal place for the first run.
2. My script will automatically download OpenSSL for you. Since OpenSSL versions change frequently, I put the download name up front for this version of the script. If you run the script and it errors out, it will display a friendly failure message. Just go to the URL shown, update the download filename and Voila! Unlike my vSphere 5.5 script, I won’t be releasing new versions every time OpenSSL is updated.

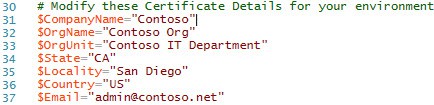
3. Open the script in your favorite PowerShell editor and find the certificate details section. Modify the company name, organization, etc. for your environment.
4. Modify the CA names as needed for your environment. My script now supports a root CA plus two subordinates. If you don’t have one or more subordinates, just add a # in front of the appropriate line.

5. If you are using a Microsoft CA with the certificate web enrollment service enabled, then select whether you will be accessing the CA web site via HTTP or HTTPS. HTTPS is recommended, but sometimes there are certificate errors that don’t allow that to work.

![]()
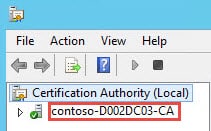
6. Next up you need to configure your Issuing CA information. This can be a little confusing, due to the way Microsoft labels the CA. The best way to find the proper name is login to your issuing CA, launch the Certificate Authority snap-in. This could be called anything, depending on how your CA was setup. Look for the name next to the green check mark. In the script prepend that name with the hostname of your CA.

![]()
7. For VUM 6.0 we need to use the vSphere 5.5 SSL template. So enter the name of your vSphere 5.5 SSL template here. If you followed my 5.5 guide, then it will be called VMware-SSL. Do NOT use your vSphere 6.0 template name here, as it will NOT work.

![]()
8. Now you need to configure your VMware SSL template name. These certificates will be used for vCenter services and ESXi host certificates. The steps for vSphere 6.0 are NOT the same, so refer to my blog article here in Part 9 for the template instructions. This template names assumes you will follow that article. You can NOT use your vSphere 5.5 template.

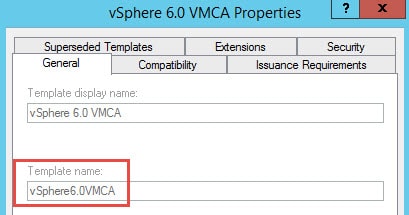
9. Next up, you need to define the Subordinate template name. VMware requires using a custom template and not the Microsoft default. If you follow my blog post here, then your template name will be called vSphere6.0VMCA. If you won’t be using the VMCA subordinate CA feature, just ignore this section.

![]()
If you have a custom template and need to know the “Template Name”, just open your CA MMC, go to “Certificate Templates”, right click and select “Manage”. Open the properties of the template in question and look for the “Template name” NOT the “Template display name”.
10. To download the proper certificate chain, my script must download the public certificates from each of the CAs that are in the chain. Depending on the age of your CA, you may need to increment up the “renewal” numbers to get the latest certificate. If you increment too high it will download garbage and my script will alert you to that fact. “0” is the default, but you may find you need 1 or more here.

Configure Windows CA
11. Next up we need to make sure your Windows CA can issue subordinate certificates if you will be using the VMCA as a subordinate CA. Ignore this section if you won’t be making the VMCA subordinate to your Windows CA. Go into your issuing CA, launch the Certificate Authority tool and look in the “Certificate Templates” folder. You should see a “vSphere 6.0 VMCA” template listed after you complete Part 9 of my guide. 
12. If you do not see this listed then you haven’t read Part 9 (sorry I didn’t blog about this before, but it was a last minute lesson learned) and created the template. Go to that part now, create the new vSphere 6.0 templates, then come back here.
Download Root Certs
If all of your CAs are serviced by an online Microsoft CA and you have correctly configured the Toolkit script variables, and you have web services enabled on the CA, then the script will automatically download the public certificates for you. However, if you have an offline CA or they aren’t web enrollment enabled, you will need to download them manually. Or if you are using a non-MS CA, then you need to get them manually as well. Sometimes the MS CA web services won’t cooperate so manual downloads are needed as well.
13. Open a blank MMC, then add the Certificates snap-in for the Computer account.
14. Navigate to the “Intermediate Certification Authorities” folder and open the Certificates folder. If you don’t see your CAs there, poke around in the other folders until you find them.
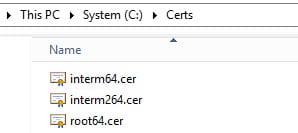
15. Find the certificate authorities for your environment. Right click on each one, and export as a base-64 encoded x.509 certificate. Save the root certificate as C:\Certs\root64.cer. Save the first subordinate certificate (if applicable) as C:\Certs\interm64.cer. If you have a second subordinate, save that certificate as C:\certs\interm264.cer.
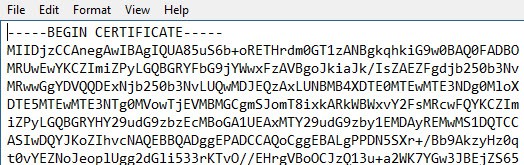
In case you are unsure of the base-64 certificate format, it will look like the following graphic if opened in a text editor.
Summary
If you are familiar with my Toolkit script for vSphere 5.5, then you will be right at home in the 6.0 version. I’ve cleaned up the configurable variables, added a few new ones, and added full VMCA support. We will use the Toolkit to configure the remaining SSL certificates, which include vCenter and ESXi. Next up is configuring the SSL template in Part 9.


Thanks for the update to handle vum in 6.0 however I am experiencing the following problem with the script; create vum certificate with an online Microsoft ca (option 1 on the vum menu) works fine but when I choose install custom vum certificate on this computer (option 5) the script exits with the prompt "please enter an option 1 to 6:". What am I doing wrong?
Nothing…I haven't blogged about the VUM certificate process yet and that menu is under development. Stay tuned in the coming weeks for an update.