If you are a VCSA (vCenter server appliance) convert, and wish to use the vCenter server appliance, this post is for you! It assumes you already have an external VCSA PSC setup, per Part 10. So this post will walk you through a similar deployment process, but this time install vCenter instead of a PSC. If you’ve deployed a Windows vCenter, then skip this post.
Blog Series
vSphere 6.0 Install Pt. 1: Introduction
vSphere 6.0 Install Pt. 2: Platform Services Controller
vSphere 6.0 Install Pt. 3: Certificate Management
vSphere 6.0 Install Pt. 4: vCenter Upgrade Best Practices
vSphere 6.0 Install Pt. 5: ESXi Upgrade Best Practices
vSphere 6.0 Install Pt. 6: Install Windows PSC
vSphere 6.0 Install Pt. 7: Config SQL DBs
vSphere 6.0 Install Pt. 8: Toolkit Configuration
vSphere 6.0 Install Pt. 9: SSL Templates
vSphere 6.0 Install Pt. 10: Install VCSA PSC
vSphere 6.0 Install Pt. 11: VMCA as Subordinate
vSphere 6.0 Install Pt. 12: PSC Machine Certificate
vSphere 6.0 Install Pt. 13: Directory Services Certificate
vSphere 6.0 Install Pt. 14: Windows vCenter Install
vSphere 6.0 Install Pt. 15: VCSA vCenter Install
vSphere 6.0 Install Pt. 16: User Solution Certificates
Permalink to this series: vexpert.me/Derek60
Permalink to my Toolkit script: vexpert.me/toolkit60
Deploy VCSA vCenter
1. Download the VCSA ISO (yes ISO, not OVA) and mount it on a Windows VM.
2. Open the root of the ISO and click on the vcsa-setup.html file.
3. Since I’m assuming a fresh install, click on Install. 4. Accept the license agreement and click Next.
5. Enter the FQDN or IP address of the ESXi server which you want the PSC deployed on. Enter the associated credentials. Click next and wait for the verification to complete. You may get a warning about an untrusted SSL certificate. Accept it.

6. On your DNS server configure A and PTR records for the vCenter’s address. This is critical!
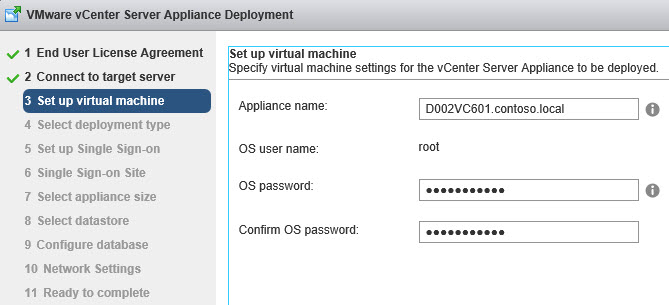
7. Enter the FQDN of your appliance, and a complex password. If your password is not complex enough it will warn you and provide the complexity requirements.
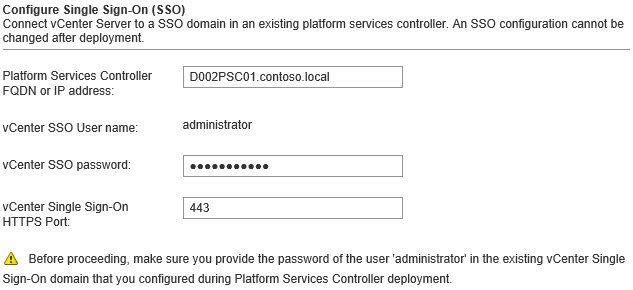
8. Select “Install vCenter Server” on the next screen, since we will be using our external PSC.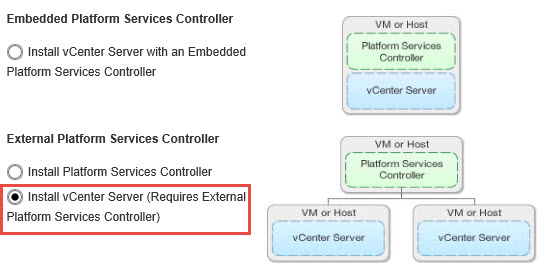 9. Now enter the FQDN of your PSC, and the SSO password.
 10. Up next is VCSA sizing. In my case I selected Tiny, since this is a small home lab.
11. Here you get to select your database. SQL is NOT an option, due to the lack of a supported ODBC binary for Linux. I’ll use the built-in Database.
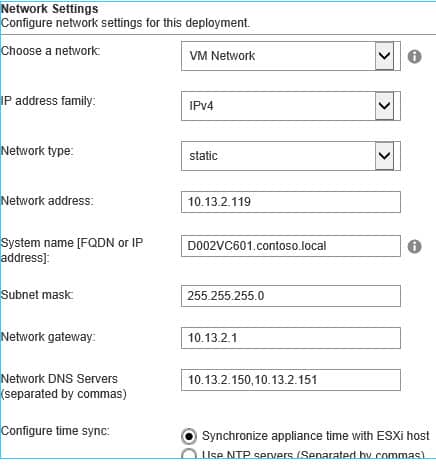
 12. Up next is configuring all the network settings. This is pretty self explanatory. Do take note of the time sync options. In a production environment I would suggest syncing to a trusted NTP source and not the ESXi host. Although you should have ESXi configured to sync with a trusted source as well. Not shown in the screenshot is the ability to enable SSH. Since I’m in a lab environment, I enabled SSH.
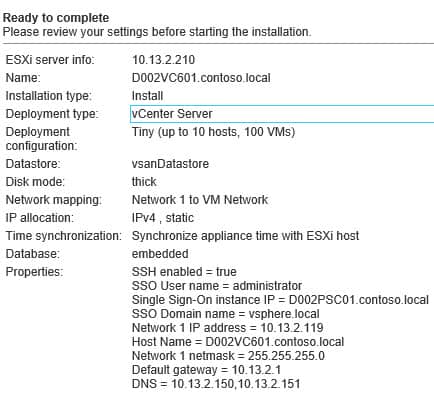
13. Review all of the settings to ensure they are 100% correct. Click Next, and sit back for the installation to complete.
Summary
Deploying vCenter in the form of a VCSA is easy peasy! I really like the VCSA for its ease of deployment, and self-contained nature. Clearly VMware has put a lot of development time into the VCSA, and it shows. Now that vCenter is installed, it’s time to replace more SSL certificates. That’s coming up next in Part 16.


