As mentioned in my vSphere 6.0 install part 3, VMware has introduced a new certificate option in this release. You can now make a built-in VMware certificate authority (VMCA) a subordinate to your enterprise CA. This is great news, as it will allow some automation of the certificate deployment process. However, there are certainly some regulated industries like the US Federal Government where they’d laugh you out of the office if you asked to stand up your own subordinate CA. So this model won’t be used by everyone.
So if you are one of those organizations that CAN use the built-in VMware VMCA, then follow along in this article to see how you make it a subordinate in your enterprise environment. Later in this series we will cover the manual replacement process so don’t worry…alternatives to the VMCA are covered.
As a reminder, I’ve written the vCenter Toolkit script which helps in the SSL deployment process. In this version of the script I’ve added some VMCA features. See the download link below. In this series I’m assuming a Windows Enterprise CA, but you can use a non-Windows CA with a little bit more work (manual submission and download).
Important: You MUST use Toolkit version 0.7 or later. Please download the latest Toolkit from the URL below.
Blog Series
vSphere 6.0 Install Pt. 1: Introduction
vSphere 6.0 Install Pt. 2: Platform Services Controller
vSphere 6.0 Install Pt. 3: Certificate Management
vSphere 6.0 Install Pt. 4: vCenter Upgrade Best Practices
vSphere 6.0 Install Pt. 5: ESXi Upgrade Best Practices
vSphere 6.0 Install Pt. 6: Install Windows PSC
vSphere 6.0 Install Pt. 7: Config SQL DBs
vSphere 6.0 Install Pt. 8: Toolkit Configuration
vSphere 6.0 Install Pt. 9: SSL Templates
vSphere 6.0 Install Pt. 10: Install VCSA PSC
vSphere 6.0 Install Pt. 11: VMCA as Subordinate
vSphere 6.0 Install Pt. 12: PSC Machine Certificate
vSphere 6.0 Install Pt. 13: Directory Services Certificate
vSphere 6.0 Install Pt. 14: Windows vCenter Install
Permalink to this series: vexpert.me/Derek60
Permalink to my Toolkit script: vexpert.me/toolkit60
Mint VMCA Certificate (Online)
You should run the Toolkit script on your Windows external PSC, so you have all the files needed locally and it will also automate the installation. If you are using the VCSA PSC, then run this script from a Windows server that has PowerShell 3.0. Use this online procedure if your Microsoft CA will issue the subordinate certificate either with or without approval. Before you run the Toolkit, always download the latest version as new versions can come out rapidly. You can get the latest from the permalink above.
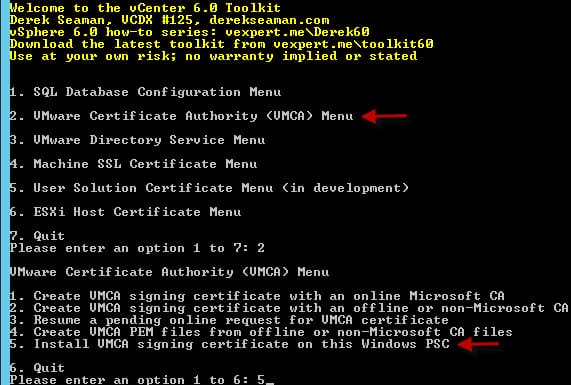
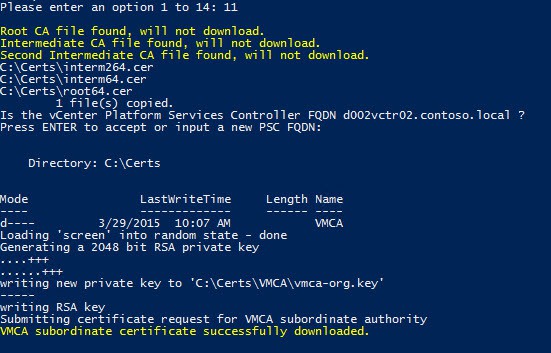
1. Run the Toolkit PowerShell script on your external PSC or a Windows server VM if using the VCSA PSC. Select the VMCA menu (option 2). Select the option to create a VMCA signing certificate with an online MS CA (option 1).
2. Press Enter to accept the PSC name, and the script will take care of the rest. After it quickly runs you have a C:\Certs\VMCA directory with all of the needed files.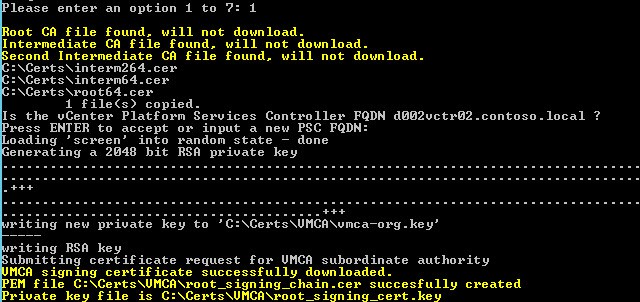
If your MS CA is configured to require CA manager approval before issuing a certificate, you will see the following:

Have the CA manager approve the request ID, then re-run my Toolkit script and select the “Resume a pending online request for VMCA certificate” (option 3).

![]()
After the request is complete, you will see the following files in the C:\Certs\VMCA directory. As you will notice, I’ve purposely used the same file names as the VMware documentation and tools.
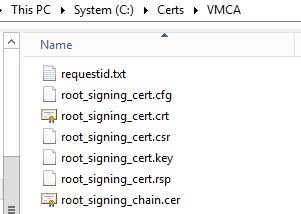
You have now minted your VMCA certificates, but they are not yet installed. Read on in the blog post to find out how to install them.
Mint VMCA Certificate (Offline)
Use this procedure if your issuing certificate authority is NOT a Microsoft online CA. It could be an offline Microsoft CA, or a non-MS CA as well. Don’t try this procedure with a public CA provider, as they won’t let you issue subordinate CA certificates. Only use this for internal enterprise CAs which you control and can issue subordinate certificate authority certificates with.
1. Run the Toolkit script and in the VMCA menu (option 2) select the option to create a VMCA signing certificate with an offline or non-MS CA (option 2). The script will verify that you have downloaded the root chain certificates.
2. Because I was running this on the external PSC, I just pressed enter for the PSC name.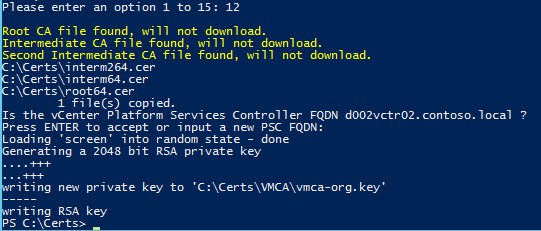 3. Navigate to C:\Certs\ and upload the root_signing_cert.csr file to your favorite CA and issue a certificate. Download the issued certificate in the base-64 format and save as root_signing_cert.crt in the same folder. You MUST use this file name and it MUST be base-64 encoded. It should only contain the certificate, not a full chain.
4. Re-run the toolkit and from the menu select the option “Create VMCA PEM files from offline or non-Microsoft CA” (option 4). No input is needed. This will properly create a PEM file with the full certificate chain. 
![]()
Now that we have our VMCA certificates, we need to install them. I will cover both the Windows and VCSA installation process. Windows is easier, since I’ve built that functionality into my Toolkit. For the VCSA we will leverage the VMware certificate tool.
Install VMCA Certificate (Windows PSC)
Note: For this procedure I am showing you how to use my Tookit script to install your VMCA signing certificate. VMware provides a Certificate Management tool that can perform the same steps. I show you how to use the VMware tool in the next section, when using the VCSA. The tool is the same on Windows and the VCSA. So if you feel more comfortable using the VMware tool to install the cert, skip down to that section. On Windows you can find the tool at C:\Program Files\VMware\vCenter Server\vmcad\Certificate-manager. My tool uses the manual method as documented in the vSphere 6.0 security guide, so the results are the same.
1. Re-run my Toolkit script and in the VMCA menu (option 2) select the option “Install VMCA signing certificate on Windows PSC” (option 5).
2. Sit back and wait while the script stops services, installs the new certificate, restarts the services, then lists the certificate properties. Keep an eye on the process, and verify a ‘success’ message half way through. I’ve added a pause and notification when you should see the ‘success’ message. The entire replacement process takes about two minutes.  3. Once the script completed, it will show the properties of the new VMCA. Validate that these match the issued certificate.
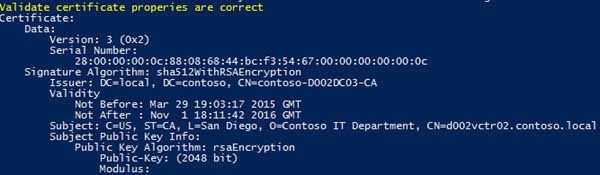
4. To follow in the footsteps of the VMware Certificate tool that also replaces the Machine SSL certificate by a VMCA issued certificate, re-run the Toolkit and select the Machine SSL certificate menu (option 4). Then select Option 3, Create Machine SSL certificate with VMCA. Press enter to accept the default hostnames (assuming you are running this on the PSC/VMCA).
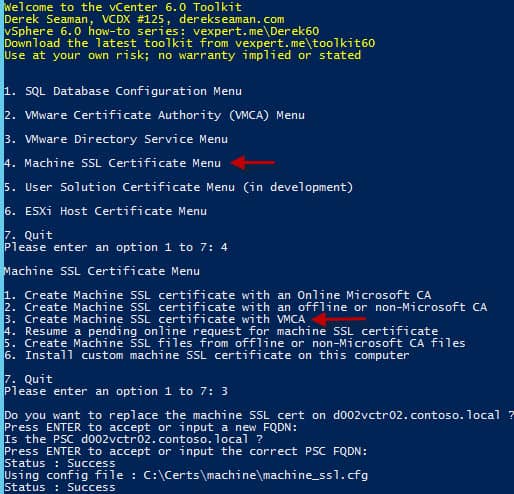 5. Re-Run the toolkit and select the Machine SSL certificate menu again. This time select option 6. It will stop the PSC services, install the certificate, and then re-start the services. You will also get prompted mid way through if you want to delete the existing machine certificate. Answer “Y” here to proceed.
Install VMCA Certificate (VCSA PSC)
Note: For this procedure I am showing you how to use the VMware Certificate Manager tool to install the VMCA signing certificate. This assumes you used my Toolkit to generate the certificate files.
1. If you haven’t already enabled BASH on your VCSA let’s do that now. Open a console into the VCSA. Press F2 to customize the system. Login. Arrow down to “Troubleshooting Mode Options” then enable BASH shell. Exit the VCSA console.
2. Open a SSH session to the VCSA and type the following:
shell.set –enabled true
shell
chsh -s “/bin/bash” root
Make sure you run the ‘chsh’ command from the ‘shell’ prompt and not the VMware restricted shell…it won’t recognize the chsh command. Thanks to William Lam’s blog post here for this step!
2. Download and install your favorite SCP client. I like WinSCP. Connect via SCP using the VCSA credentials.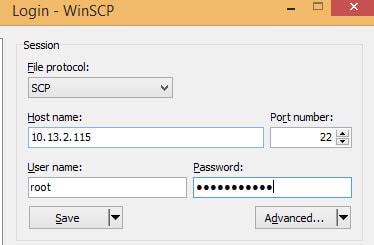 3. Create a folder to put your SSL certificates. I like the ‘/root/ssl’ directory.
4. In WinSCP navigate to the C:\Certs\VMCA folder. Upload the root_signing_chain.cer and root_signing_cert.key files to the SSL directory on the VCSA. The other files are not needed, so don’t upload them.
5. SSH into the VCSA and ensure you get a ‘shell’ prompt. This will be in red, and have the short name of the VCSA. Type the following command:
/usr/lib/vmware-vmca/bin/certificate-manager
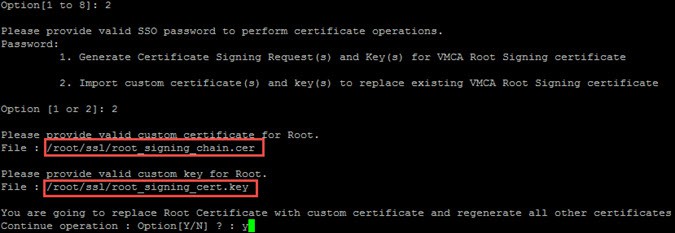
6. Choose Option 2 from the main menu. Enter the SSO password as requested.
7. From the new menu select Option 2, Import custom certificates. Input the root certificate file names when prompted. Use root_signing_chain.cer for the first prompt and root_signing_cert.key for the second.
 8. If you haven’t run the tool before, you will be prompted for a series of default values for the certool.cfg. Use the same values here as you did when setting up the Toolkit variables. When prompted, use the FQDN of the PSC for the ‘hostname’.
9. Wait a couple of minutes for the tool to run. After it has completed it has made the VMCA a subordinate to your enterprise CA, and also updated the machine SSL certificate to one issued by the new VMCA.
Inspecting the SubCA Cert
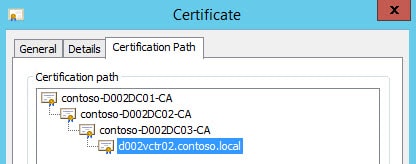
If you wish to look at the properties of the newly minted VMCA subordinate signing certificate which was installed, just double click on the C:\Certs\VMCA\root_signing_chain.cer file. Go to the Certification Path tab, and you can see the full certificate chain. If you do NOT see the full certificate chain, then follow my blog post here to enable your enterprise to trust the VMCA.
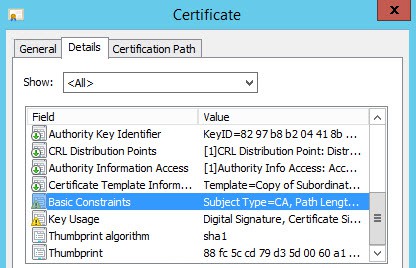
You can also check out the Details tab, and go down to the “Basic Constraints” and “Key Usage” fields. There you can see this certificate can be used as a subordinate CA.
Inspecting the Machine Certificate
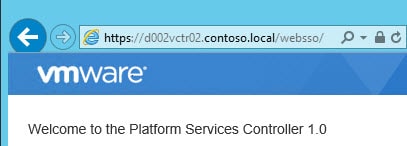
Now that we have installed a new machine SSL certificate, we want to make sure it was issued by the VMCA and is trusted. This can easily be done via any browser of your choosing.
1. Launch your favorite browser and go to https://PSC-FQDN/websso/. Open the certificate properties for the SSL site.
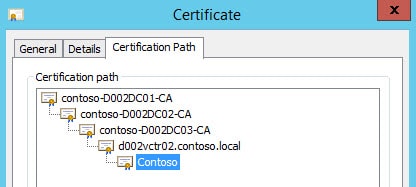
 2. Click on the Certification Path, and verify that all of your enterprise CAs are listed, as well as the FQDN of your PSC. There should be a certificate listed under the FQDN of your PSC. If you only see a single entry in this list, and not the full chain, that likely means your Windows computer does NOT trust the VMCA subordinate CA. If that’s the case, I would recommend publishing the VMCA public certificate via Active Directory so that your entire domain will trust the VMCA. As you can see in my screenshot below I have three enterprise CAs and the VMCA.
Solution Warning
A reader pointed out the SRM and other solutions may fail when replacing the machine certificate on vCenter or the PSC. If you find yourself in this situation, check out this VMware KB article for remediation.
Summary
Using my toolkit script, minting and updating the VMCA certificate is a breeze. My toolkit supports online Microsoft CAs, or any offline CA that you wish you use. Remember you can’t use a public CA for issuing your VMCA subordinate certificate. This must be an internal CA which you own, and which has been configured to issue certificates for the subordinate authority template.
Because we are using the VMCA for all of our certificates, we’ve also re-issued the PSC’s machine SSL certificate to one issued by the VMCA. This means any of the web services the PSC is providing are now using a VMCA issued certificate. In the next installment we will assume you can NOT use the VMCA for compliance reasons, and will replace the PSC’s machine SSL certificate with a trusted one. That is covered in Part 12. This will bring our two installations up to the same level. After that, we will replace the Directory Services certificate on the PSC.


Before your guide came out, I used the VCSA tool to do the signed subordinate CA replacement procedure. At first I thought everything worked okay. Later I found I could deploy but not register a vSphere Replication appliance. VMware support found the problem that the regenerated VCSA lookup service certificate doesn't have its SSL thumbprint updated correctly. Support indicated this could break other solutions as well as vRep. They fix was to follow the procedure here: http://kb.vmware.com/selfservice/microsites/searc…
Could it be – there is a bug in Toolscript line 1349 ff?
Bugs are always possible. I'm rapidly developing/updating the script.
I've found that once you update the certificates on vSphere 6 using a Windows CA to sign the VCSA you can't connect NSX manager to vCenter. I get the below error
"NSX Management Service operation failed.( Initialization of Admin Registration Service Provider failed. Root Cause: Error occurred while registration of lookup service, com.vmware.vim.vmomi.core.exception.CertificateValidationException: Server certificate chain not verified )"
Hi, Derek
Nice blog,
i have an issue when tryin Install VMCA Certificate (VCSA PSC) (Subordinate CA)
Process is fail at 85% (starting services)…