
Even if you don’t have an online Microsoft CA, I suggest reading through Part 8. It will familiarize you with my vCenter 5.5 Toolkit script and has the change log. If have an online Microsoft CA and ran the script in the previous post then you can skip this installment and go to Part 10 (coming soon).
Blog Series
SQL 2012 AlwaysOn Failover Cluster for vCenter
vSphere 5.5 Install Pt. 1: Introduction
vSphere 5.5 Install Pt. 2: SSO 5.5 Reborn
vSphere 5.5 Install Pt. 3: vCenter Upgrade Best Practices and Tips
vSphere 5.5 Install Pt. 4: ESXi 5.5 Upgrade Best Practices and Tips
vSphere 5.5 Install Pt. 5: SSL Deep Dive
vSphere 5.5 Install Pt. 6: SSL Certificate Template
vSphere 5.5 Install Pt. 7: Install SSO
vSphere 5.5 Install Pt. 8: Online SSL Minting
vSphere 5.5 Install Pt. 9: Offline SSL Minting
vSphere 5.5 Install Pt. 10: Replace SSO Certificates
vSphere 5.5 Install Pt. 11: Install Web Client
vSphere 5.5 Install Pt. 12: Configure SSO
vSphere 5.5 Install Pt. 13: Install Inventory Service
vSphere 5.5 Install Pt. 14: Create Databases
vSphere 5.5 Install Pt. 15: Install vCenter
vSphere 5.5 Install Pt. 16: vCenter SSL
vSphere 5.5 Install Pt. 17: Install VUM
vSphere 5.5 Install Pt. 18: VUM SSL
vSphere 5.5 Install Pt. 19: ESXi SSL Certificate
Permalink to this series: vexpert.me/Derek55
Permalink to the Toolkit script: vexpert.me/toolkit55
Offline SSL Method
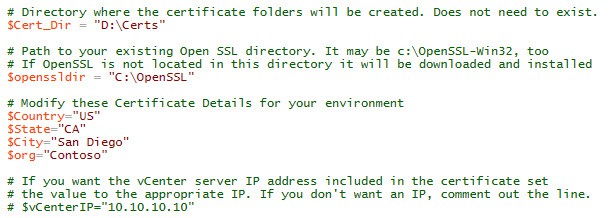
1. Download my vCenter 5.5 toolkit script from the link above. Open it in the PowerShell ISE (or favorite editor). The PowerShell script requires a few variable modifications before you run it. In the first block of variables you need to setup the directory where you want all of the certificates to go. If OpenSSL is already installed, change the path so the script knows where the root directory is. If that directory does not exist OpenSSL will be downloaded and installed for you. Next up are the certificate properties. Change those to suite your environment. If you want the server’s IP address in the SAN field, then uncomment the line and change the IP.
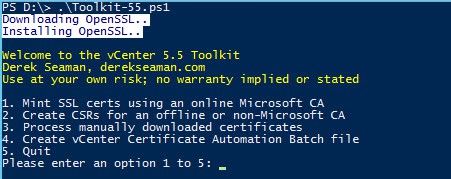
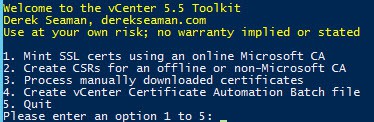
2. Execute the PowerShell Toolkit script. Unlike part 8 where we selected option 1 and everything was automated, here we need to select the option behind door number 2. This will create all of the required directories, private RSA keys and CSRs for you.
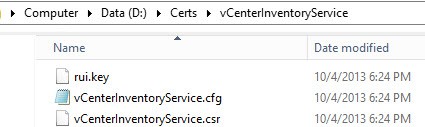
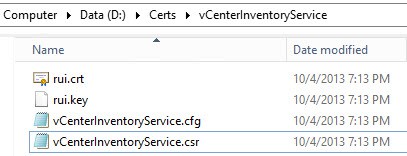
2. The first screenshot are the seven service directories which get automatically created. Inside each directory are three files. In the second screenshot the rui.key file is your private 2048 bit RSA key. The .cfg file is the OpenSSL configuration file that was used to generate the CSR. The .csr file is what you will submit to your CA.

3. Now you need to take each of the seven CSR files and submit it to your CA. In case you have an offline Microsoft CA or there are strong security measures in place so the vCenter can’t access your CA directly, I’ll cover the manual issuing and downloading process with a Microsoft Windows Server 2012 CA. If you have a non-Microsoft CA, then just skim over the Microsoft CA section, save your certificates as rui.crt in each directory, and pick back up at step 8.
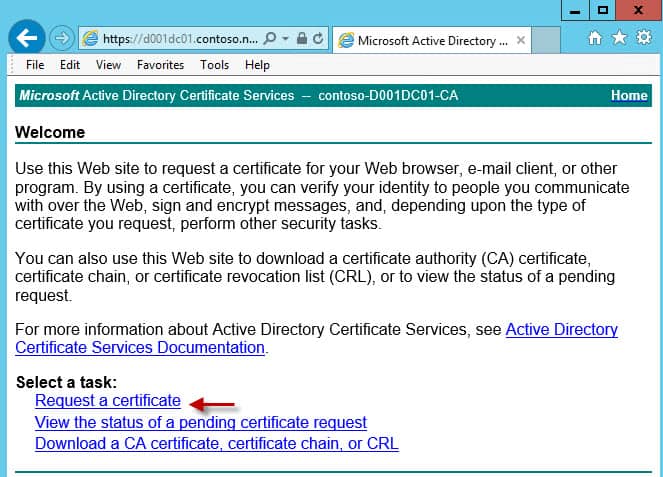
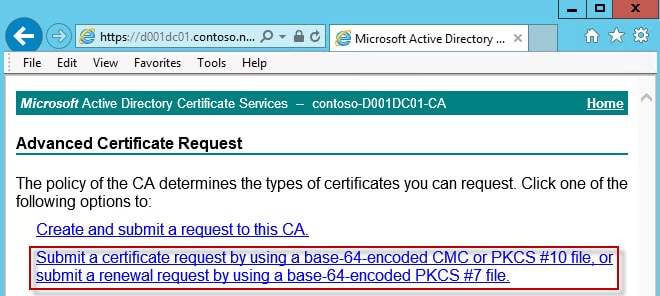
4. Go to the URL of your Microsoft CA. The default address is https://hostname/certsrv. Make sure you are accessing the CA page with credentials that can request VMware-SSL certificates. Click on Request a certificate.
5. Select the second option, Submit a certificate request by using a base-64-encoded….
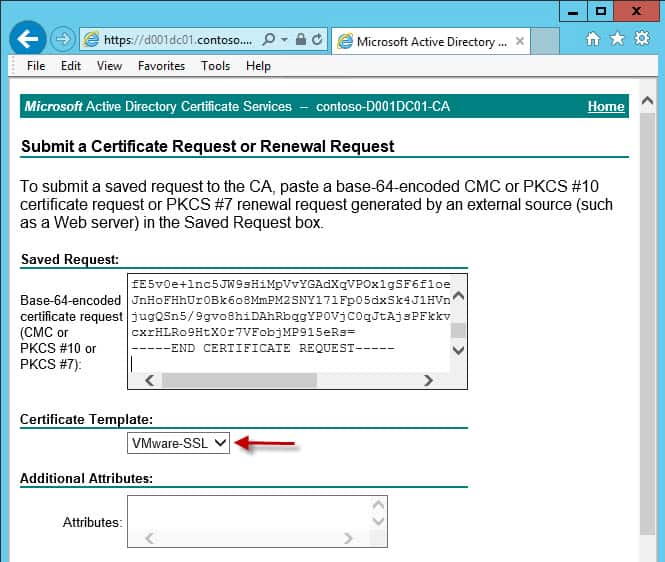
6. Copy and paste the CSR information from the first service into the top pane. Make sure the VMware-SSL template is selected. If that template is NOT listed then you probably goofed up one of three things 1) You accessing the CA web site with your non-admin account 2) You didn’t properly publish the VMware-SSL certificate template 3) You don’t have enroll permissions on the VMware-SSL template. Do not enter any additional attributes.
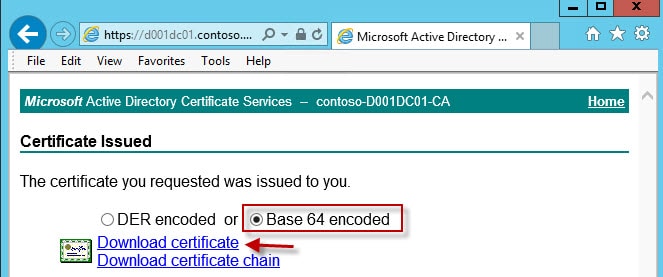
7. After you submit the certificate request you need to download the Base-64 encoded version WITHOUT the certificate chain. Name the file rui.crt and save it back into the same service directory that you submitted the CSR from. These certificates are NOT interchangeable, so don’t get the rui.crt files mixed up. The system will barf later on and you will lose some hair. Each certificate must match the service it was intended for.
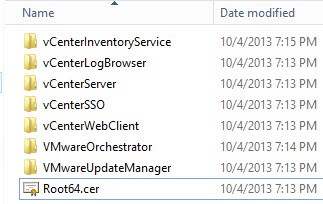
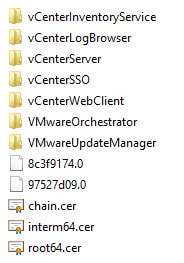
8. After you’ve done this for all seven certificates, each service directory should now look like the following, with a rui.crt file now present.
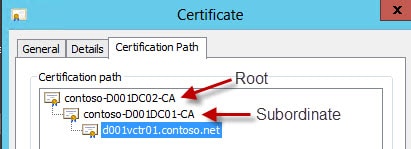
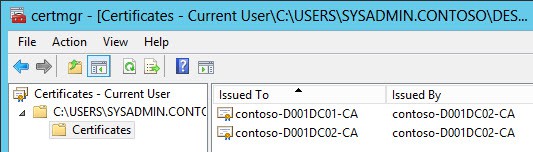
9. Next up we need to create one or two root CA files, depending on your CA architecture. Double click on one of your .crt files and go to the Certification Path tab. In my example below we have two CAs: A root and a subordinate. The CA at the top is the root and the next one down is the subordinate. vCenter needs the public certificate from both, so that it can properly chain.
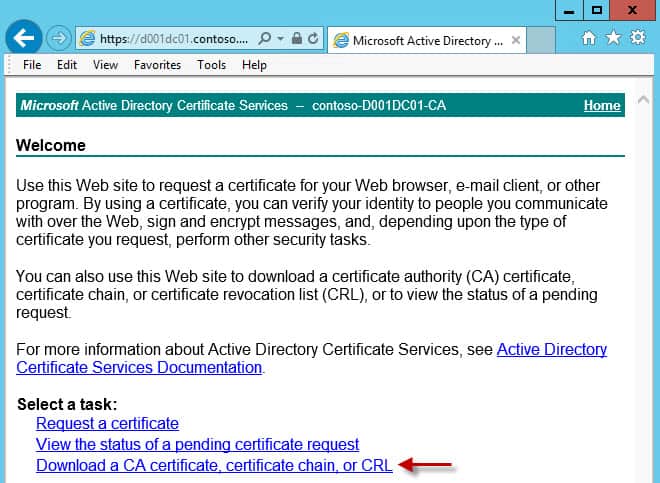
10. If you are using a Microsoft CA then go back to the Home page of the CA. But this time select the last option, Download a CA certificate…
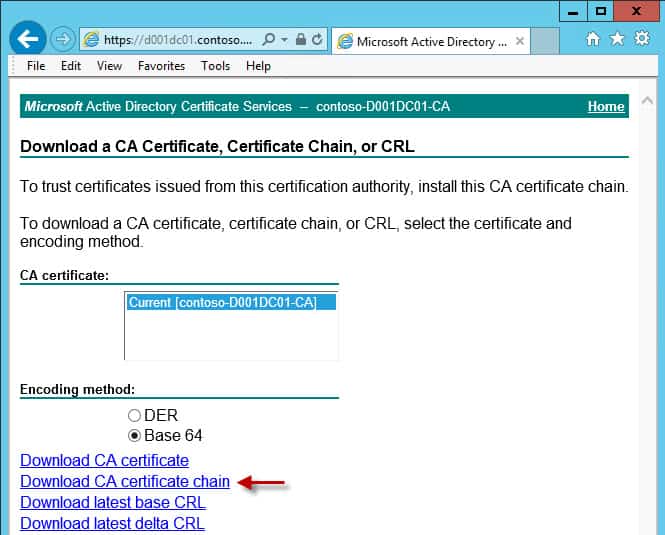
11. Click on Download CA certificate chain if you have a Root/subordinate CA architecture. If you have just a root CA click on Download CA Certificate. If you are downloading the chain, just save it to your desktop with any ole name and skip to step 12. If you have just a root CA, then save the file as Root64.cer in the root of your certificate directory (screenshot below).
Root only CA:
12. For those that downloaded their chain (and ball), double click the certificate and locate the two certificates. Right click on your ROOT (see step 9), select All Tasks, and Export. Save the certificate as a Base-64 encoded file and name it Root64.cer. Put it in the root of your certificate directory as show in step 11.
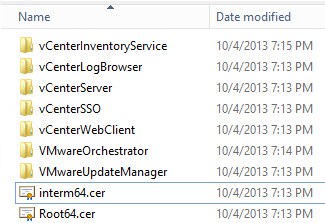
13. Repeat the process on the subordinate CA, but save the file as interm64.cer. You should now have a directory that looks like:
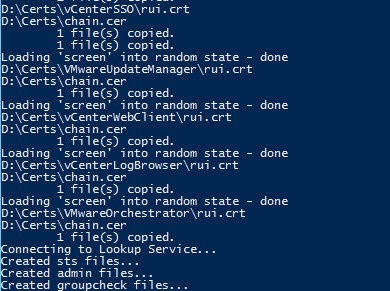
13. Re-run the Toolkit script but now we select Option 3. This will process all of the files and create the exact same output as the online option in Part 8. Review the screen events for any errors.
A sample of the screen output is below.
Output Validation
1. Assuming no errors occur, you should now see additional files in the root of your certificate directory. A chain.cer file should now appear if you have an intermediate CA. A hash file (which ends in 0) for each root certificate will also be listed. If you only have a root CA then you will have one hash file.
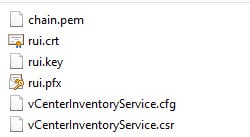
2. If you take a peek inside one of the folders you will see a series of files. Each service, except SSO, will have the same set of files (except the .csr and .cfg with are uniquely named). The
- chain.pem: Used for the VMware vCenter certificate automation tool
- rui.crt: Public half of your SSL certificate
- rui.key: Private half of your SSL certificate
- rui.pfx: Combined private and public SSL keys
- *.cfg: Certificate signing request file
- *.csr: Certificate signing request
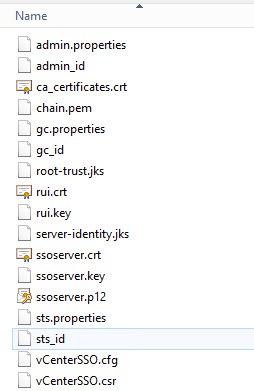
3. In the vCenterSSO you will see a plethora of files. Depending on how you replace your SSL certificates, you may only use some of these files. But to help you out as much as possible, all the SSO files that are tedious to create manually are created for you. If you are missing files, then something went wrong. Please match up all filenames to validate the toolkit script worked. Some files are copies of each other, but they are needed to avoid confusion and more easily follow the KBs.
- *.properties: Use for manual SSO SSL replacement
- *_id: Use for manual SSO SSL replacement
- ca_certificates.crt: Use for manual SSO SSL replacement
- root-trust.jks: Used for SSO/STS certificate validation
- server-identity.jks: Same file as above with a different name (per VMware KBs)
- ssoserver.p12: Same functionality as rui.pfx, but VMware changed the name and format for SSO 5.5
- ssoserver.crt: Copy of chain.pem
- ssoserver.key: Copy of rui.key
Certificate Validation
Now that your certificates are minted, let’s quickly validate all of the properties are present. Even if your CSR requests a property, that doesn’t mean your CA will honor it. The OU in each subject name should be unique and match the directory it’s in.
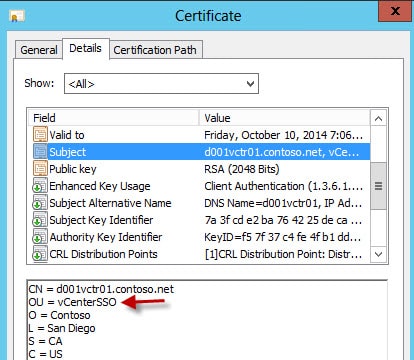
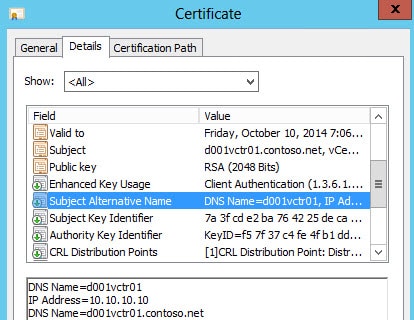
The Subject Alternative Name should contain the short name and FQDN. Optionally it can contain your IP address too.
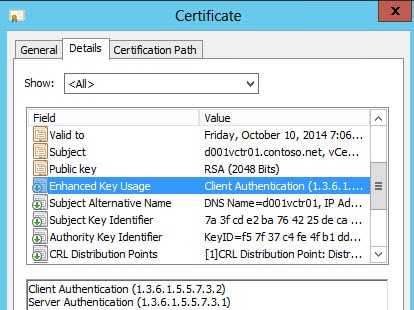
Enhanced key usage should show server and client authentication. Client authentication can be missing if the CA template is wrong.
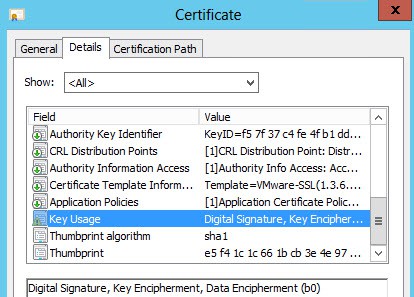
Key usage should contain digital signature, key encipherment and data encipherment.
Summary
After a bit more work than the automated method, you now have all of the required certificate files to either use the vCenter certificate automation tool, or try the complex manual replacement method. Next up in Part 10 we update the SSO service SSL certificates.


Hi Derek,
Again great how to and great investigations on the implementation on the vCenter implementation.
After some issues I was able to get the VMware-SSL to work and inside of the Certificates Templates and also in the Web.
After I Submit a certificate request by using a base-64-encoded, just don't do nothing. Just clean the screen and ready to apply another base-64-encoded certificate.
I never get the part to download the Base-64 encoded version.
Do you know what can be the issue??
For me was always a struggle to handle this VMware certificates.
Thank You
Hi Again,
After add the message just found the problem 🙂
Was the Internet Explorer Enhanced Security Configuration (IE ESC).
Even IE ESC was disable, still blocks, o I need to add the server to the security site in IE.
Hate this IE ESC
Thank You
After running the script over at point 1, I get some error messages. Can you see what this could be?
writing RSA key
Submitting certificate request for vCenterServer
Submitting certificate request for vCenterInventoryService
Submitting certificate request for vCenterSSO
Submitting certificate request for VMwareUpdateManager
Submitting certificate request for vCenterWebClient
Submitting certificate request for vCenterLogBrowser
Submitting certificate request for VMwareOrchestrator
Submitting certificate request for AutoDeploy
Submitting certificate request for DumpCollector
Submitting certificate request for SysLogCollector
Submitting certificate request for AuthenticationProxy
unable to load certificate
3908:error:0D0680A8:asn1 encoding routines:ASN1_CHECK_TLEN:wrong tag:.cryptoasn1tasn_dec.c:1315:
3908:error:0D07803A:asn1 encoding routines:ASN1_ITEM_EX_D2I:nested asn1 error:.cryptoasn1tasn_dec.c:379:Type=X509_CIN
F
3908:error:0D08303A:asn1 encoding routines:ASN1_TEMPLATE_NOEXP_D2I:nested asn1 error:.cryptoasn1tasn_dec.c:747:Field=
cert_info, Type=X509
3908:error:0906700D:PEM routines:PEM_ASN1_read_bio:ASN1 lib:.cryptopempem_oth.c:83:
1 file(s) copied.
unable to load certificate
3340:error:0D0680A8:asn1 encoding routines:ASN1_CHECK_TLEN:wrong tag:.cryptoasn1tasn_dec.c:1315:
3340:error:0D07803A:asn1 encoding routines:ASN1_ITEM_EX_D2I:nested asn1 error:.cryptoasn1tasn_dec.c:379:Type=X509_CIN
F
3340:error:0D08303A:asn1 encoding routines:ASN1_TEMPLATE_NOEXP_D2I:nested asn1 error:.cryptoasn1tasn_dec.c:747:Field=
cert_info, Type=X509
3340:error:0906700D:PEM routines:PEM_ASN1_read_bio:ASN1 lib:.cryptopempem_oth.c:83:
1 file(s) copied.
D:Certsinterm64.cer
D:CertsRoot64.cer
1 file(s) copied.
Did you ever find the solution to this problem? I am getting the same thing when trying to process the certificates.
Same issue here, got these errors and only one hash file