This is Part 3 of the SQL 2012 failover clustering series we will configure the required LUNs and iSCSI components, so that Windows Server 2012 can mount the shared LUNs. As I mentioned before, I’m choosing to do in-guest iSCSI for the shared LUNs vice RDMs. RDMs are acceptable as well, and there’s no one right or wrong answer here.
On larger SQL servers you will quickly run out of drive letters, so we will be using mount points for the majority of the volumes we create. This minimizes drive letter usage and allows seamless future expansion without worrying about what letter to use, or running out. CSVs (cluster shared volumes) also appear to be an option, but honestly I’ve never used them.
On a security note, iSCSI supports various kinds of CHAP authentication. Depending on your array vendor, if may or may not support CHAP. If you value security then I would encourage you to enable mutual chap, so both your target and initiator can authenticate each other. Some vendors also limit the CHAP password complexity, so if you have problems with CHAP authentication, try simpler passwords like limiting them to all upper case letters and numbers (yes, I’m speaking to you QNAP).
Blog Series
SQL 2012 Failover Cluster Pt. 1: Introduction
SQL 2012 Failover Cluster Pt. 2: VM Deployment
SQL 2012 Failover Cluster Pt. 3: iSCSI Configuration
SQL 2012 Failover Cluster Pt. 4: Cluster Creation
SQL 2012 Failover Cluster Pt. 5: Service Accounts
SQL 2012 Failover Cluster Pt. 6: Node A SQL Install
SQL 2012 Failover Cluster Pt. 7: Node B SQL Install
SQL 2012 Failover Cluster Pt. 8: Windows Firewall
SQL 2012 Failover Cluster Pt. 9: TempDB
SQL 2012 Failover Cluster Pt. 10: Email & RAM
SQL 2012 Failover Cluster Pt. 11: Jobs N More
SQL 2012 Failover Cluster Pt. 12: Kerberos n SSL
LUN Design Considerations
First let me say that SQL LUN design is HIGHLY depending on your workload, number of SQL instances, database size, number of databases, etc. You must understand the business and performance requirements, or you are setting yourself up for failure.
I don’t claim to be a DBA, so consult your nearest DBA for configuration details specific to your environment. However, what I have found that works well for smallish SQL servers that have a single instance are the following volumes/LUNs:
- Quorum – Needed for MS failover clustering
- Database – Database files
- Database Logs – Database log files
- TempDB – SQL temporary database (may see high I/O depending on apps)
- TempDFB Logs – Temporary database long files (may see high I/O depending on apps)
- Backup – Working space for SQL-native backup files
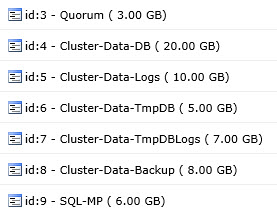
If you are building a true enterprise SQL server with multiple instances, you will very likely have a lot more volumes. For the purposes of my small lab and supporting vCenter 5.5, I kept the LUNs small. One trick that I’ve learned over the years to help keep your LUNs straight is making them all slightly different sizes. This is particularly true if you have multiple SQL instances on a server that use different LUNs. If you look in the Windows storage manager and see 10 LUNs of the same size, but they are backed by different storage QoS, it’s hard to match them all up. So I vary the sizes by 1-2 GB to keep them unique.
For my home lab I configured the following LUNs on my QNAP array. As you can I see I varied the size of all the LUNs so I can quickly match them up with their intended purpose inside Windows. Same logic would apply to RDMs. As with any block storage, you should configure array-side LUN masking so that only the authorized systems can access your LUNs.
I won’t go into depth about the RAID levels and number of IOPS you should design for. Modern storage arrays are complex beasts, IOPS requirements wildly vary, and you must know your application requirements. Generally RAID-1 for the SQL logs and RAID-5 for the databases is recommended. Again, consult your DBA and storage architect for the right answers.
New fangled storage technology like PernixData and VMware Virsto can do wonders for I/O performance (though they won’t help with in-guest iSCSI). That’s another reason why I’m a fan of SQL AlwaysOn replication, since you can fully virtualize all disks and use these exciting new storage technologies to increase performance. Dare I say software defined storage?
Windows Disk Configuration
1. Now that you’ve carved up your iSCSI LUNs we need to install a couple of Windows features to proceed. Run through the Add Roles and Features Wizard and add the following two Features: Failover Clustering and Multipath I/O. Do this on both of your SQL VMs.

2. Since iSCSI networks should be non-routed for security and performance reasons, I’m going to add a second NIC to each SQL VM. If you are using the VMware distributed virtual switch (with NIOC) or Cisco UCS where you can configure QoS for various pNICs or traffic types, then I would suggest putting some thought into what makes sense for your environment. Even if you aren’t using the DVS, configure an iSCSI port group on your vSwitch and configure it for your non-routed iSCSI VLAN. Don’t configure a vmkernel iSCSI port, since we are using in-guest iSCSI.
Once you add your second NIC to the VM, we need to make some configuration changes. First up, I would strongly recommend you rename the NICs so you don’t get them confused. I called mine Production (regular network traffic) and iSCSI. Do NOT put both NICs on the same IP subnet. Cluster services will only recognize one NIC per subnet. I faked it out by using pseudo IPs for my iSCSI network (and iSCSI actually routed through production).

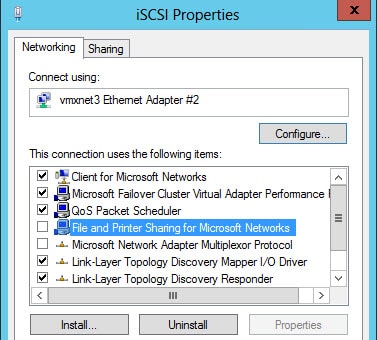
3. Open the iSCSI adapter properties and un-bind the File and Printer Sharing protocol.
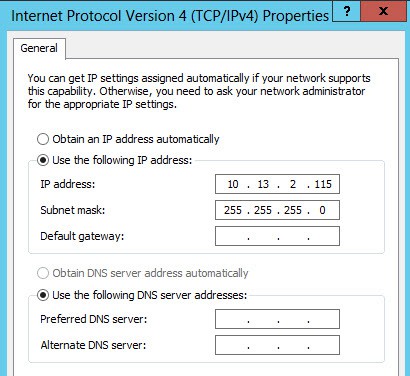
Configure the adapter with a static IP address and do not configure a gateway or DNS info.
Un-check the box to register the connection details in DNS. Why? You don’t want a private non-routable IP address in DNS, or clients will try to connect to the unreachable address. Clearly this would cause bizarre issues.
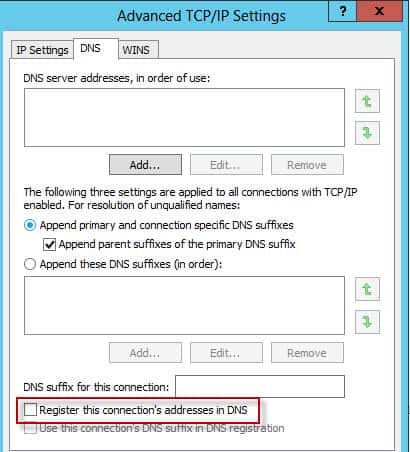
Do a DNS lookup of your SQL server hostname to ensure that only a single IP is returned.
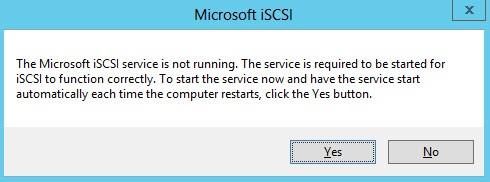
4. Press the Windows key then type iSCSI. You should get a warning message that the iSCSI service is not running. Click Yes to make sure it starts every time Windows does.
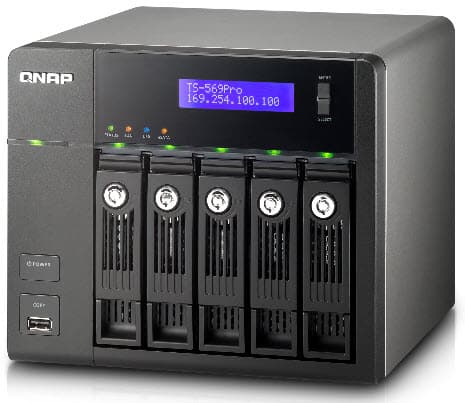
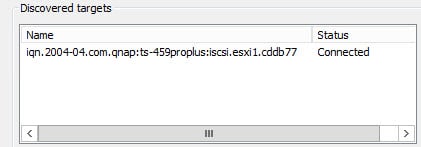
5. When the iSCSI Initiator Properties window appears, enter the IP address of your iSCSI target. In my case I entered the IP address of my baby QNAP. Click Quick Connect and your array should now be listed in the discovered targets.
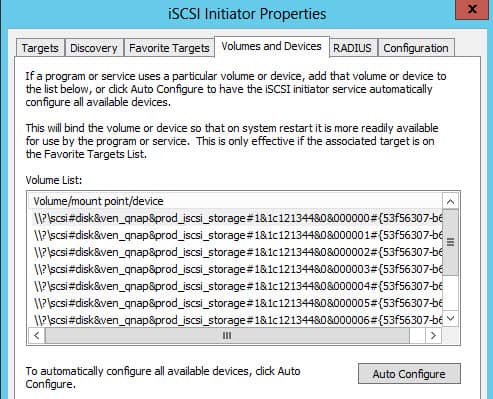
6. Click on the Volumes and Devices tab, and click Auto Configure. A list of LUNs should appear, that is equal to the number you exported from your array.
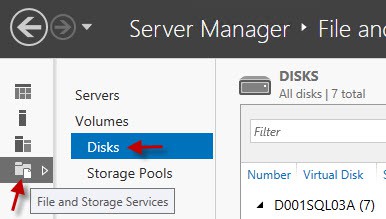
7. One common “mistake” that I see people new to Windows Server 2012 is using the legacy Disk Management MMC snap-in that’s been around for 15 years. Wrong answer these days for most storage tasks. Instead, from Server Manager click on File and Storage Services, then open Disks.
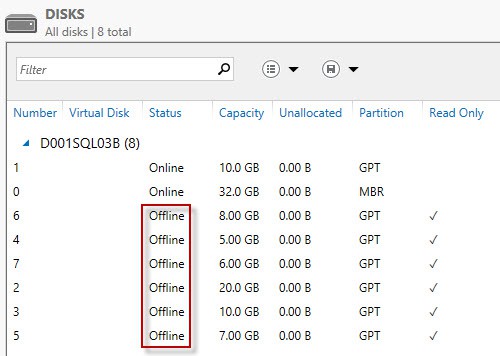
8. From here you should now see all of your LUNs, regardless of their state. Notice that the “number” does not correspond to the LUN IDs from your array (unless you get lucky), hence my propensity for unique LUN sizes.
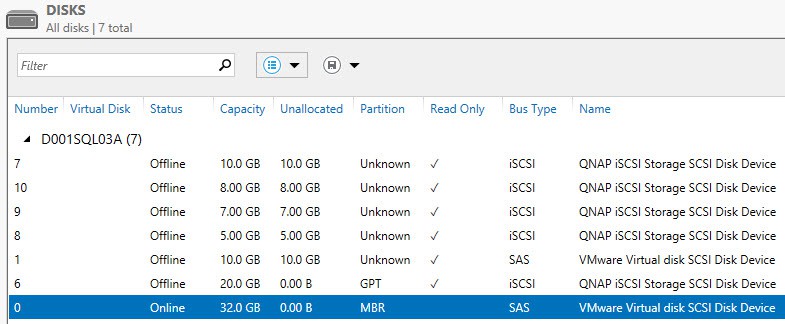
Don’t fall into the “click next” trap here and bring all of the disks online with their default values. No no! Another performance optimization is choosing the proper NTFS allocation size based on the LUN’s intended usage. For our D drive, where the SQL binaries are installed, we will select the default size.
However, for all other LUNs (database, logs, and tempdb) we will use 64K allocation size. This better matches the SQL server I/O size, and is generally more efficient. The new 2012 disk wizard also initializes all disks as GPT, which is required to go beyond 2TB. Even for smaller LUNs I now always use GPT, instead of the legacy MBR format. The only LUN configured as MBR is the boot volume. Short name generation is also disabled in the 2012 wizard, and I leave that off as well for a slight performance tweak.
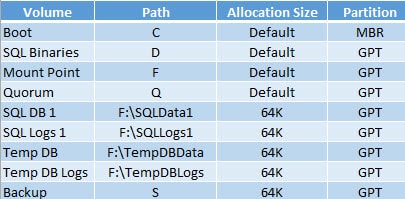
A summary of my proposed disk configuration is in the table below. F is a tiny partition that only serves as a mount point holder for the bigger database and log volumes. While I’m still using up a fair number of letters here, as you add more DB and log volumes those would get mounted under F.
Now go ahead and on ONE node (ONLY!!!) bring all of the volumes online, format, and mount as shown in the table above.
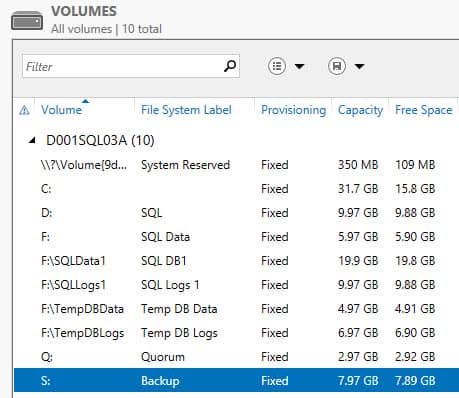
9. Assuming that you followed my example, if you look at the Volumes tab you should see something similar to the screenshot below.
10. Go over to your second SQL node and format your D volume (ONLY!). Do a disk rescan and validate that all of the shared volumes are OFFLINE. Do NOT bring them online. If you did bring them online on the second node, you may have corrupted the NTFS file system. So to be safe I’d unmount the volume(s) from both nodes, reset the disk config, and reformat on one node.
Multi-Pathing
Built into Windows 2012 is a multi-pathing plug-in that works with a variety of storage vendors. Most commonly this would be for Fibre Channel SANs, or physical Windows servers that have multiple NICs and storage arrays with multiple iSCSI IPs. Depending on your iSCSI infrastructure you may in fact have two paths to your LUNs. If you do, then I’ll show you how to enable MPIO and make sure it has claimed your iSCSI LUNs.
In my home lab MPIO won’t do anything for me since I have a single NIC in my VM and my QNAP has a single iSCSI target IP. I don’t like to configure unnecessary services, so if you can’t take advantage of true multi-pathing, then I would not suggest activating iSCSI MPIO.
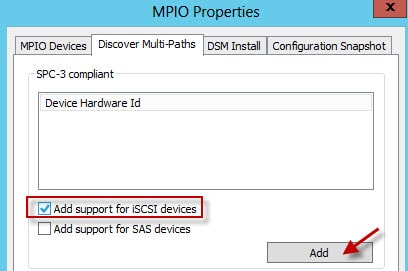
1. In the Server Manager dashboard select the MPIO tool. Open the Discover Multi-Paths tab, check the iSCSI box, then click Add. You will then need to reboot.
2. Your reboot make take longer, so don’t worry if things seem to hang for a couple of minutes. Open Computer Management then find one of your iSCSI devices and you should see a MPIO tab. In there you can find some geeky stats and settings (which I would NOT tweak).

Summary
Ok, so that was a lot of disk configuration and it was somewhat tedious. I can certainly see why some people would just throw up their arms, install SQL on the C drive, put everything else on the D drive and call it a day. And they then wonder why SQL is slow as a snail in winter and blame it on VMware overhead. Blame yourself, not VMware. 🙂
Next up in Part 4 is configuring Microsoft failover cluster services.


I definitely see the case for using the mount points to help keep the drive letters down, so in a case where we would have multiple instances we would be using F: for each instance? A new mount point, lets say G:, would be created for instance 2 and H: for instance 3 and so on.
The mount point F can't be shared for more than one instance correct?