In this article I will walk you through how to install Proxmox Backup Server (PBS) 4.0 inside of a VM running on Proxmox 9.0. You might be wondering why you might want to install PBS as a VM instead of a LXC. Good question! If you want to use iSCSI LUNs as a PBS datastore, then going down the LXC path is very convoluted and complicated due to shared permissions between the host and PBS LXC.
By using a Proxmox Backup VM, this bypasses all of the LXC complexities and lets you directly mount the iSCSI LUN in your VM. I personally find that iSCSI LUNs from my Synology are more reliable and less finicky than a NFS mount. A PBS VM fully supports NFS/SMB mounts as well, so using a VM opens up more options down the road even if you start off with a NFS/SMB share.
As of the writing of this article, the Proxmox VE Helper-Scripts repo (RIP tteck) only has a PBS LXC support. So installing PBS as a VM will take a little more work as there’s no automated script for us to use.
Related Synology Posts
As part of my Proxmox Backup Server 4.0 and Proxmox VE 9.0 series, check out these related posts:
Proxmox Backup Server 4 VM Creation
1. Download the latest Proxmox Backup Server ISO (4.0 in my case).
2. Login to the Promox host that will be running your backup VM. Upload the ISO to a datastore.
3. In the upper right corner of the Proxmox console click on Create VM.
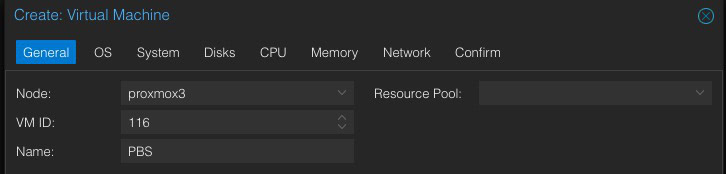
4. Make the following selections:
- Node: Pick the proper node (if you have a cluster)
- VM ID: Default
- Name: PBS (or whatever name you wish)
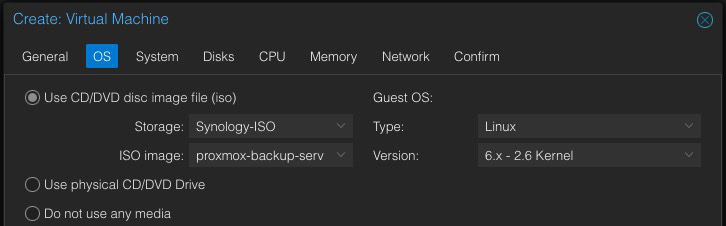
- ISO: Use the ISO file you downloaded
- Type: Linux
- Version: 6.2 – 2.6 Kernel
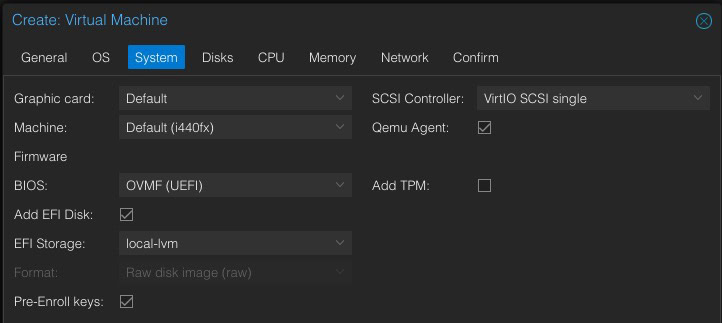
- Graphic Card: Default
- Machine: Default
- BIOS: OFMV (UEFI)
- Add EFI Disk: Checked
- EFI Storage: Pick local storage
- SCSI Controller: VirtIO SCSI single
- Qemu Agent: Check
- Add TPM: Un-checked
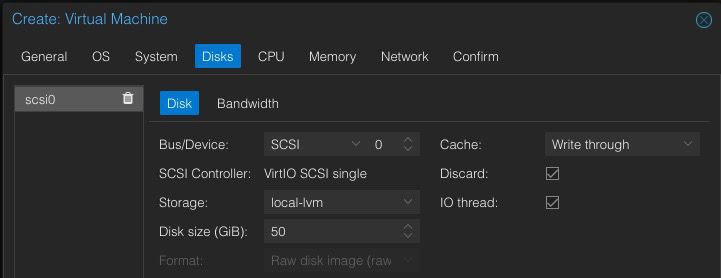
- Bus/Device: SCSI
- Storage: <Local storage>
- Disk size (GB): 50
- Cache: Write Through
- Discard: Checked
- I/O thread: Checked
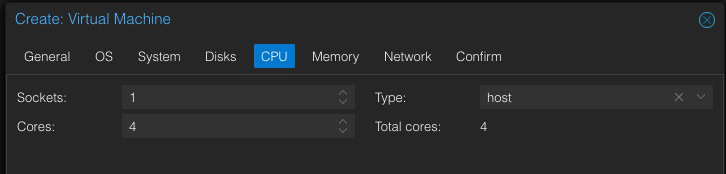
- Sockets: 1
- Cores: 2 – 4
- Type: host
- Memory (MB): 4096
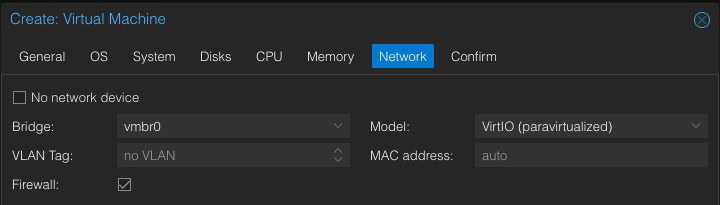
- Network: Defaults
Disk Size Note: If you ever want to use S3 storage as a datastore, PBS needs a certain amount of local disk cache space. It’s not quite clear how much disk space it needs. My Backblaze S3 bucket is 140GB, and the local S3 cache is 9GB. Size the disk of the PBS VM accordingly to allow for future upgrades and S3 cache.
CPU Note: I would assign a minimum of 2 vCPUs to PBS, and would consider going up to 4. Do a full host backup and monitor the CPU usage of the PBS VM. If it becomes CPU constrained, increase the number of vCPUs. When doing a full backup of my Proxmox host it uses upwards of 70% of 4 vCPUs.
Memory Note: I recommend 4GB as the bare minimum, and more may be needed. Monitor a running backup job and see how much VM memory is used.

5. On the confirmation screen verify all of the selections are correct.
6. Check the box to start VM on creation. Click Finish.
Proxmox Backup Server 4 Graphical Install
- Open the VM’s console and you should be presented with the PBS welcome screen.
- Press ENTER to use the Graphical install. Wait a few minutes for the EULA screen to appear. Click I agree.
- On the Target Hardisk screen click Next.
- Set the Location and Time Zone as needed. Click Next.
- Enter a password and an email address. Click Next.
- Enter a FQDN, IP, gateway and DNS server. Click Next.
- Review the Summary and click Install.
- Wait for the installer to complete.
Proxmox Backup Server 4 Configuration
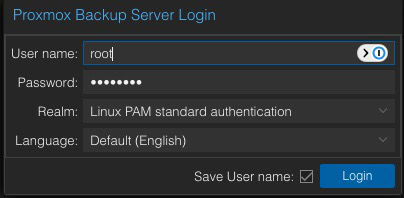
- Login to your new PBS instance (https://<IP>:8007). Acknowledge the certificate warnings.
- Login (User name: root, Password: <your password>, Realm: Linux PAM). Acknowledge the subscription warning.
3. On the left click on Shell.
4. Run the following commands to install the QEMU tools:
					apt update
apt install qemu-guest-agent
5. Update the repos to the free version:
					cat > /etc/apt/sources.list.d/proxmox.sources << EOF
Types: deb
URIs: http://download.proxmox.com/debian/pbs
Suites: trixie
Components: pbs-no-subscription
Signed-By: /usr/share/keyrings/proxmox-archive-keyring.gpg
EOF
					rm /etc/apt/sources.list.d/pbs-enterprise.sources
apt update
apt upgrade -y
6. Reboot after the updates are applied.
SSH Keys (Optional)
If you are using SSH keys, let’s add that to the PBS VM. If you aren’t using SSH keys, skip this section.
- Open a Shell within the web UI. Run the following commands to configure your public key:
					echo "your-public-key-content" >> ~/.ssh/authorized_keys
chmod 600 ~/.ssh/authorized_keys
2. Use your favorite SSH client and verify your ssh key works.
3. If you wish to disable password logins and only allow ssh keys:
					sed -i '$a PasswordAuthentication no' /etc/ssh/sshd_config
systemctl restart ssh
Proxmox Backup Server Let's Encrypt SSL Cert
This section is optional, but recommended if you meet the requirements for a trusted Let’s Encrypt SSL certificate. PBS will work just fine with self-signed certificates.
In order for Let’s Encrypt to issue you a trusted SSL certificate for the FQDN of your Proxmox backup server you need a couple of things:
- You need to own a public domain via a registrar (any registrar)
- You need to be using a DNS provider supported by the Proxmox ACME client
For this post we will be using the Cloudflare DNS provider. But you can substitute any supported provider. Proxmox backup server has a massive list of supported DNS providers so chances are yours is listed.
DNS Redirection Rule
Since we are configuring the Proxmox backup server for a trusted SSL certificate you will want to access your Proxmox server via FQDN from inside your home network. This will prevent any browser warnings. However, since this is an internal server, I would NOT register the hostname on a public DNS server for your domain.
In this case I will assume you are using split DNS. Split DNS is where internal resources are registered with a “private” DNS server, not your public DNS server. This can be accomplished by a firewall, Pi-hole, AdGuard server or with your upstream DNS service like ControlD (or NextDNS).
I’ll use ControlD in this example, as that’s my primary DNS service. If you want to know more about ControlD, check out my article: Goodbye NextDNS, Hello Control D : My New DNS Service.
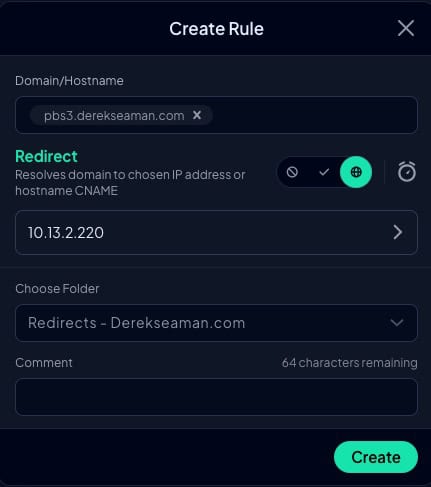
What is a DNS redirect rule? Basically when your home computer does a DNS query for pbs.mydomain.com we want the private internal IP address of your Proxmox backup server returned. By creating a redirection record the FQDN is redirected to the local private IP address on your home network.
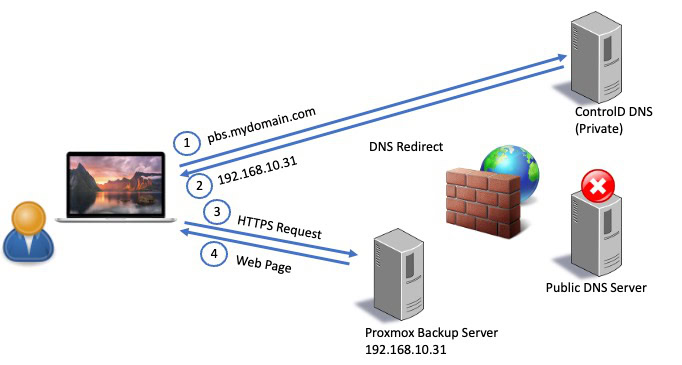
Before proceeding create a DNS direct rule that points the FQDN of your Proxmox backup server to the private (internal) IP address of your Proxmox backup server.
Cloudflare API Tokens & ID
If you don’t already have the API token (NOT a global token) for your DNS zone and your Cloudflare Account ID, go through this post and save the information in a safe place: Getting your Cloudflare DNS Zone API Key and Account ID
Creating Let's Encrypt Proxmox Accounts
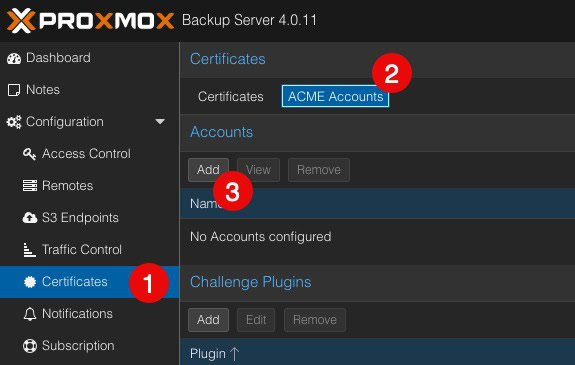
1. In the left pane click on Certificates, then ACME Accounts, then Add.
2. Enter the following information:
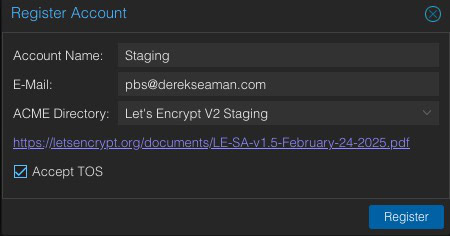
Account Name: Staging
E-mail: [email protected]
ACME Directory: Let’s Encrypt v2 Staging
Accept TOS: Tick box
3. Click Register.
4. Create another account for production:
Account Name: Production
E-mail: [email protected]
ACME Directory: Let’s Encrypt v2
Accept TOS: Tick box
5. Click Register.

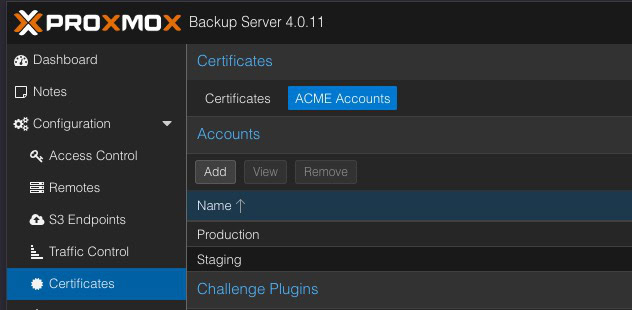
6. You should now see two ACME accounts:
Add Cloudflare DNS ACME Plugin
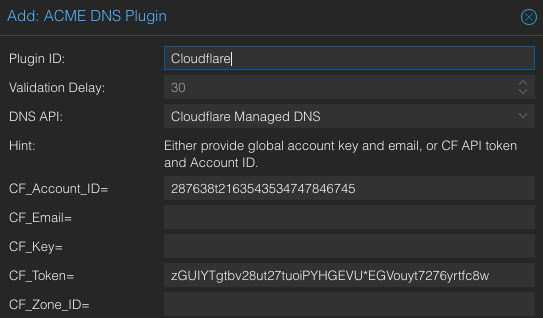
The ACME DNS Plugin is what contains the necessary code to talk to the Cloudflare API and create the TXT record needed to prove to Let’s Encrypt you own the domain you want the certificate issued to. Proxmox backup server has a number of built–in DNS providers, so if you aren’t using Cloudflare DNS review the list for a plugin to see if your provider is listed.
1. Under you two accounts you will see the Challenge Plugins section. Click Add. Fill in the following information:
Plugin ID: Cloudflare
DNS API: Cloudflare Managed DNS
CF_Account_ID= Your Cloudflare Account ID
CF_Token= Your Cloudflare DNS API Token (Not Global token)
2. Click Add.
Configure Domain ACME Challenge
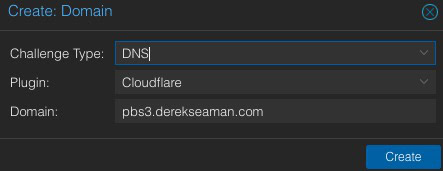
This step configures the domain name that we want the certificate issued to.
1. Click on the Certificates tab at the top (next to ACME Accounts).
2. Under ACME click on Add. Configure the following. Make sure you use the FQDN of your Proxmox backup server host (e.g. pbs.mydomain.com) for the domain. Do NOT just enter your registered domain name.
- Challenge Type: DNS
- Plugin: Cloudflare
- Domain: FQDN of your PBS VM
3. Click on Create.
Minting your Let's Encrypt SSL Certificate
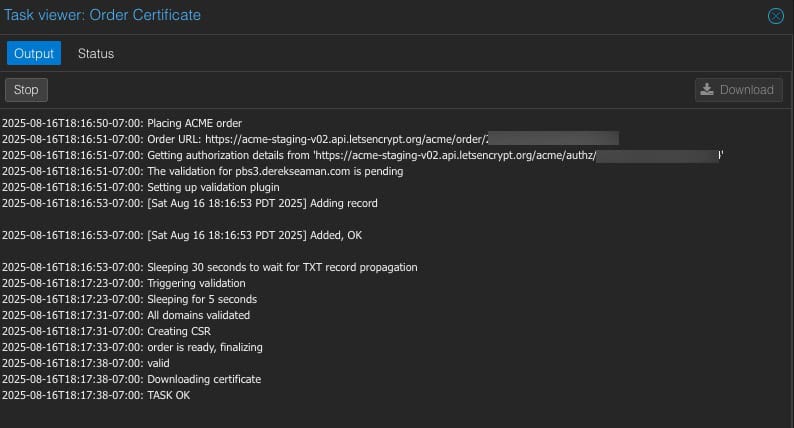
This section will mint your staging and production certificates. If your staging certificate request is a success, then proceed to doing the Production request. Let’s Encrypt rate limits production requests so ensure everything works in Staging before doing a Production request.
1. Under ACME and next to Using Account: click on Edit. Select Staging, then click the check mark.
2. Click on the domain you added. Click on Order Certificates Now.
3. Monitor the Task viewer for any errors. If everything is successful PBS will restart its web server and you can refresh your browser. Your browser will still show an invalid SSL certificate, but if you look at the properties you will see it’s issued by Let’s Encrypt staging.
4. Next to Using Account click Edit and change to Production.
5. Click on Order Certificates Now.
6. Monitor the Task viewer for any errors. If all goes well the Proxmox UI will restart, then refresh your browser and make sure you are connecting via your domain’s FQDN and port 8007. You should not see any SSL certificate errors in your browser.
Note: Some browsers may need you to close the old Proxmox webpage and open a new tab/window with the FQDN to get rid of the certificate warning.
Adding Datastores
Now we need to add the storage where your backups will reside. This configuration entirely depends on your situation. Check out these articles for various type of Proxmox Backup Server datastores:
- How To: Synology NFS for Proxmox Backup Server Datastore (2025)
- How To: Synology iSCSI LUN for Proxmox Backup Server Datastore
- How To: Backblaze B2 as a Proxmox Backup Server 4 S3 Datastore
If you have another datastore type in mind, go ahead and mount it now. If you are rebuilding your PBS server and have an existing datastore, skip down to the end of this post for the importing instructions.
PBS Backup Account Configuration
Here we are going to create a dedicated account for the Proxmox VE server to do backups. It would not be wise to use the ‘root’ account.
1. In the PBS UI in the left pane click on Access Control.
2. Click Add under User Management.
3. Enter a username (e.g. backup) and password. Save this in a safe place. Click Add.
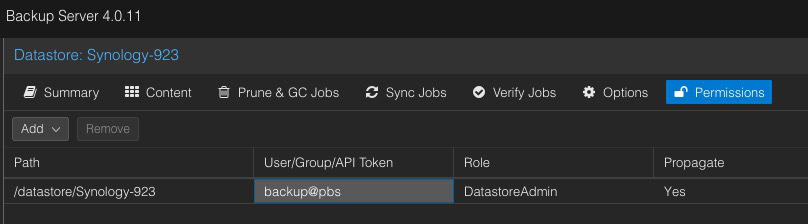
4. Click on your Datastore name in the left pane.
5. Click on Permissions. Click on Add -> User Permission.
6. Select the backup user you created and assign the DatastoreAdmin role.
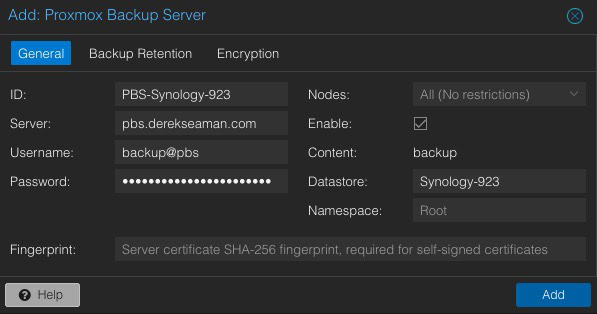
Add PBS Datastore to Proxmox VE
Note: If you didn’t provision a trusted SSL certificate, we need the thumbprint of the self-signed certificate. In the left pane click on Dashboard, then click on Show Fingerprint on the right. Copy the Thumbprint to the clipboard.
1. Login to your Proxmox VE host (where your LXCs and VMs are running). In the left pane click on Datacenter, then in the middle pane click on Storage.
2. Click on Add in the right pane and select Proxmox Backup Server.
3. Enter the following information:
- ID: Any name you wish. I like to prefix backup datastores with “PBS”.
- Server: The FQDN of your PBS server if using Let’s Encrypt cert, or IP if self-signed cert.
- Username: The name of the backup account you created and add the @Realm from the previous screenshot.
- Datastore: The name of the PBS datastore that you added in the backup server.
- Fingerprint: Only needed if using self-signed certs. Do NOT enter for Let’s Encrypt certs.
Proxmox Backup Server Job Configuration
This section will setup nightly backups for your VMs and LXC containers. This is just an example, so feel free to configure as you see fit.
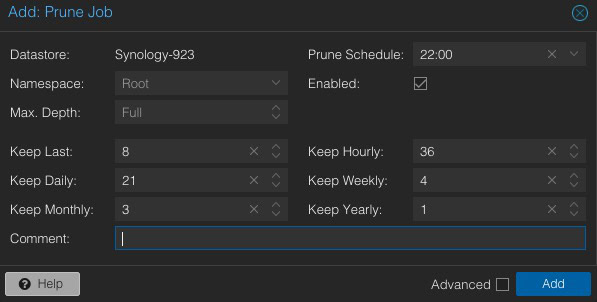
Prune – Daily 22:00
Backup Job – Daily 23:00
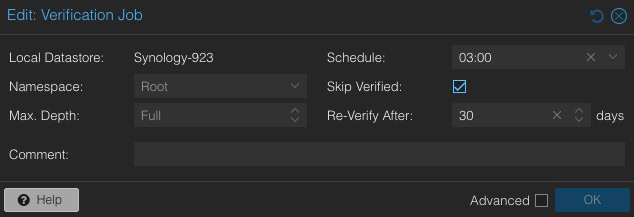
Verification Job – Daily 03:00
Garbage Collection – Daily 06:00
1. In the PBS UI click on your Datastore. In the right pane click on Prune & GC.
2. If there’s a Garbage Collection Job, open it up and verify it has your desired parameters. If there’s no job, click on Edit. Enter the time you want it to run (.e.g 06:00).
3. Under Prune Jobs click Add.
4. Modify the various retention periods as you see fit. Remember to change the prune schedule in the upper right corner (e.g. 22:00). Click Add.
5. In the middle pane click on Verify Jobs.
6. Add a Verification Job by clicking on Add. From the Schedule dropdown I selected Every day 21:00 and change the time to 03:00. I suggest Re-Verify After 30 days. Click Add.
Create Proxmox VE Backup Jobs
1. Login to your Proxmox VE host that has VMs or LXCs you want to back up.
2. In the left pane click on Datacenter (Server View). In the middle pane click on Backup.
3. Click on Add in the right pane. Configure the job as you see fit. Make sure to select your new PBS datastore as the storage location.
4. Configure backup start time, and include/exclude VMs as needed. I would exclude the PBS VM from any jobs, so that it doesn’t try to back itself up.
5. I would not configure retention settings here, as I like to rely on the retention policies set on the PBS datastore.
6. Click OK to save.

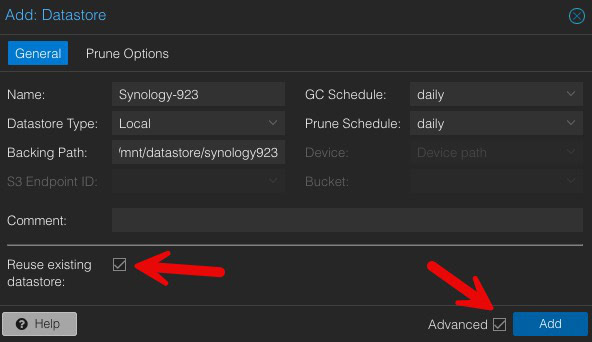
Importing Existing PBS Datastore (Optional)
If you are rebuilding your PBS and have an existing datastore which you want to mount, then follow whatever procedure is needed to get the datastore mounted at the OS level. After the datastore is mounted at the OS level, go through the normal datastore add process, but tick the Advanced box, then tick Reuse existing datastore.
If you are using a NFS datastore and you are unsuccessful mounting it via the GUI (maybe a permissions error), then you can try directly adding the datastore to the configuration file:
nano /etc/proxmox-backup/datastore.cfg
Modify the mount options to fit your environment. If you have multiple datastores separate each one by a blank line. If there’s a residual .lock file at the root level of your datastore (hidden file), delete it now.
					datastore: Synology-923
        gc-schedule 06:00
        path /mnt/datastore/synology923
I would suggest rebooting your PBS server and validate that the datastore is online AND that you can view the contents in the GUI.
Notifications (Optional)
If you want to get email notifications when jobs finish or errors occur, you can easily setup email alerts. In my case I have a Synology NAS with an open SMTP relay (local LAN only), which forwards to my commercial email provider. PBS could directly forward to your commercial email provider, if you wish.
- In the left pane of PBS click on Access Control.
- Click on the root user and enter a valid email address.
- Click on Notifications under Configuration in the left panel.
- Under Notification Targets click Add -> SMTP.
- Enter your SMTP server details. Make sure you enter a valid From Address, and change the recipients to root@pam.
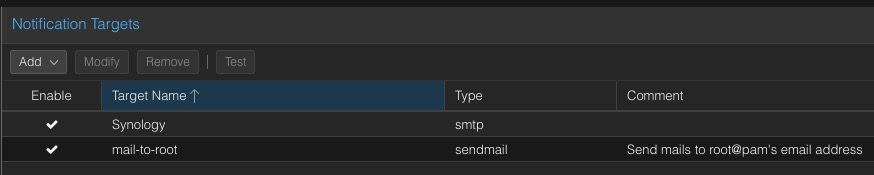
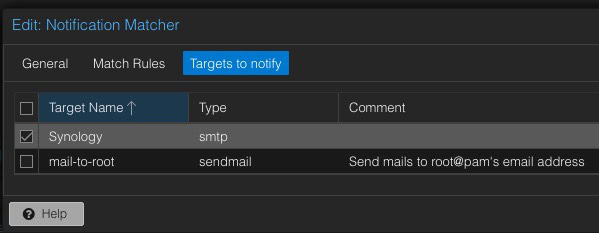
6. In the bottom pane under Notification Matchers click on the default-matcher rule and click Modify.
7. Select the Targets to notify tab. Check the box next to your SMTP provider and UN-check the box next to mail-to-root.
8. Run a quick job, such as prune or garbage collection and verify you receive an email after the job finishes.
Note: You can modify the Match Rules to only receive alerts for the specific event types that you want.

Summary
And there you have it! A tutorial on how to install Proxmox Backup Server (PBS) 4.0 on Proxmox 9.0. This is a bit of a manual process, as there’s no Proxmox community scripts for installing PBS as a VM. Using the VM deployment method opens up more datastore options, such as using an iSCSI LUN. It is still fully compatible with NFS/SMB datastores as well.


