Interested in sharing your Intel Alder Lake GPU between multiple Proxmox 8.x or 9.x VMs? This post covers configuring Intel vGPU virtual functions on Proxmox 9.0 using an Intel 12th Generation CPU (Alder Lake) with Windows 11 Pro 25H2. I will walk you through the Proxmox 9.0 kernel configuration, modifying GRUB, Installing Windows 11 Pro, and then setting up the Intel graphics inside Windows.
I’ve completely updated the content from my Proxmox 8.0 vGPU post which appeared on my blog back in June 2024. While the process is generally the same as before, I’ve added new sections and refreshed all the prior content. I’ve redirected the old blog post URL to this post. In case you need the old post you can view it here: Proxmox VE 8: Windows 11 vGPU (VT-d) Passthrough with Intel Alder Lake. It has a lot of user comments, which you might find helpful. However, use this post for the installation process on Proxmox 9.0.
Update October 4, 2025: Validated that Windows 11 25H2 works as expected. Totally revamped the local account procedure for RDP. Added a new section to prevent Windows update from installing old Intel drivers, breaking vGPU. Various other screenshot updates.
Update September 30, 2025: I’ve done Proxmox 9.0 testing, and found that no changes to my procedure are needed. I used Intel drivers 32.0.101.7076 with Kernel 6.14.11-3-pve. Updated text to reflect Proxmox 9.0, and updated Community scripts URL.
Update January 1, 2025: Significant updates to the post for Windows 11 24H2, Proxmox kernel 6.8.12-5 and Proxmox 8.3. Minor tweak to kernel configuration steps. Updated Proxmox community script link for kernel cleanup. Several updated screenshots.
Update July 28, 2024: Significant update to the steps, as Linux kernels 6.1-6.9 are now supported by the DKMS module. I used PVE Kernel 6.8.8-4 without issue. As always, you can find the latest official repo here: i915-sriov-dkms.
Also, to clear out some ‘junk’ from my previous 8.0/8.1 install with DKMS modules I had to perform a clean install of Proxmox PVE 8.2. Once I did the clean install the steps in this post worked like charm. Restoring my VMs and LXCs from Proxmox Backup Server (PBS) was a piece of cake and very quick.
Finally, on this updated stack and latest Intel driver for Windows, the Parsec app is working for me.
Update May 5, 2024: Kernel 6.5.13-5 was giving me problems, as well as readers, on some systems with secure boot. A reader suggested 6.5.13-3, which DID work on the one system that 6.5.13-5 had issues on. So I updated the steps to use 6.5.13-3, as that seems more widely compatible for users with secure boot.
Update May 4, 2024: I’ve updated the instructions for Proxmox 8.2. This requires pinning kernel 6.5.13-5 in order for vGPU/DKMS to work. You can NOT use the 6.8.x kernel branch with vGPU.
Update April 29, 2024: Added installing sysfsutils in the first Proxmox CLI section. I also updated the tested Proxmox kernel and Arc driver versions.
Update April 25, 2024: Proxmox 8.2 is now out, but ships with Kernel 6.8x. DKMS is broken on this kernel. DO NOT use this procedure on a vanilla Proxmox 8.2 install with Kernel 6.8. Either wait to upgrade to Proxmox 8.2, or pin the kernel to a prior 6.5 kernel that still works with DKMS and then upgrade.
Update Dec 7, 2023: Proxmox has released a minor kernel upgrade. Kernel 6.5.11-7-pve. If you update from the Proxmox UI, it looks like DKMS rebuilds the kernel and you should be good to go. However, in my experience your 7 VFs will vanish if you do nothing. As my article states, just re-run the all the GRUB steps which rebuild DKMS from scratch, then reboot. Now my 7 VFs are back. This is why it is wise to pin your kernel version and only upgrade as needed. I also added a bit to the troubleshooting section.
Update December 2, 2023: Added a screenshot for the secure boot MOK setup.
Update November 27, 2023: Added an additional step for Proxmox 8.1 or later installs that use secure boot. Updated Plex information, as their stance has now changed. They will work on SR-IOV (vGPU) support for a future release.
Update November 26, 2023: I’ve modified both the DKMS and GRUB sections so they are now responsive to the kernel version your Proxmox host is running. It also performs more system cleanup, and is pretty much just a copy/paste endeavor now. The changes were inspired by a Github comment, which I modified for even more automation.
Update November 25, 2023: The DKMS repo has been updated to address the minor tweak needed for Kernel 6.5. So I removed the step to modify one of the DKMS files. I also added a LXC vGPU VF section to address other services like Plex and their vGPU support.
Proof is in the Pudding
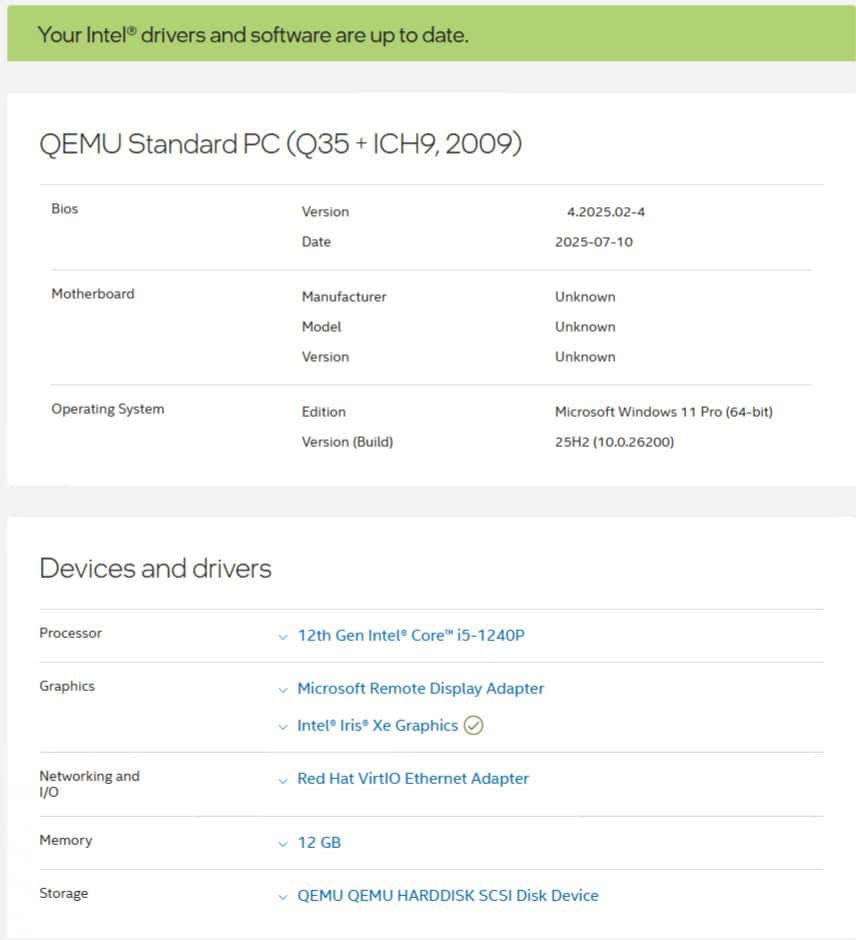
By the time you finish following my guide, you should see something similar to the screenshot below for your Windows 11 Pro 25H2 Proxmox VM. This is using the latest Proxmox 9.0 6.14 kernel, Intel drivers, and Windows updates as of September 30, 2025.
GPU Passthrough vs Virtualization
Typical GPU passthrough passes the entire PCIe graphics device to the VM. This means only one VM can use the GPU resources. This has an advantage of being able to output the video display via the computer’s HDMI or DisplayPort ports to an external monitor. But, you are limited to one VM using the GPU. This can be useful if you want Proxmox on your desktop computer, but also want to fully use the GPU resources for your primary desktop OS with an external monitor.
However there is a way to share the GPU among VMs. This technology called Intel VT-d (Intel Virtualization Technology for Directed I/O) which enables the virtualization of the GPU resources and a present VF (virtual function) to up to 7 VMs. This enables (up to) 7 VMs to concurrently use the GPU, but you lose the ability to use a physically connected monitor. Thus you are limited to Remote Desktop access only for these VMs.
Full GPU passthrough and vGPU setups both have their place. It totally depends on what you want your setup to do. This post will focus on vGPU configuration and sharing your GPU with up to 7 Proxmox VMs. I’ve only tested this with Windows 11 VMs. Linux VMs, in the past, have had Intel driver issues that caused some issues with vGPUs. So test thoroughly if you want to try vGPU with Linux VMs.
What GPU does Windows 11 see?
When using a vGPU VF the OS does not know you have virtualized the GPU. The screenshots below are from my Beelink i5-1240P Proxmox VE 8.1 host. The “root” GPU is at PCIe 02.0, and you can see 7 GPU VFs (virtual functions).
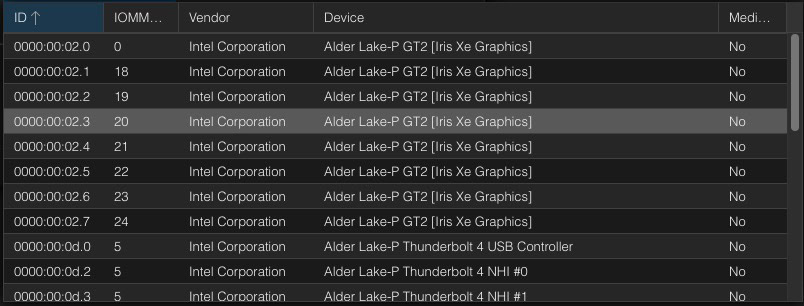
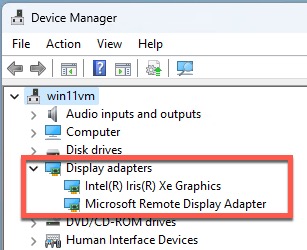
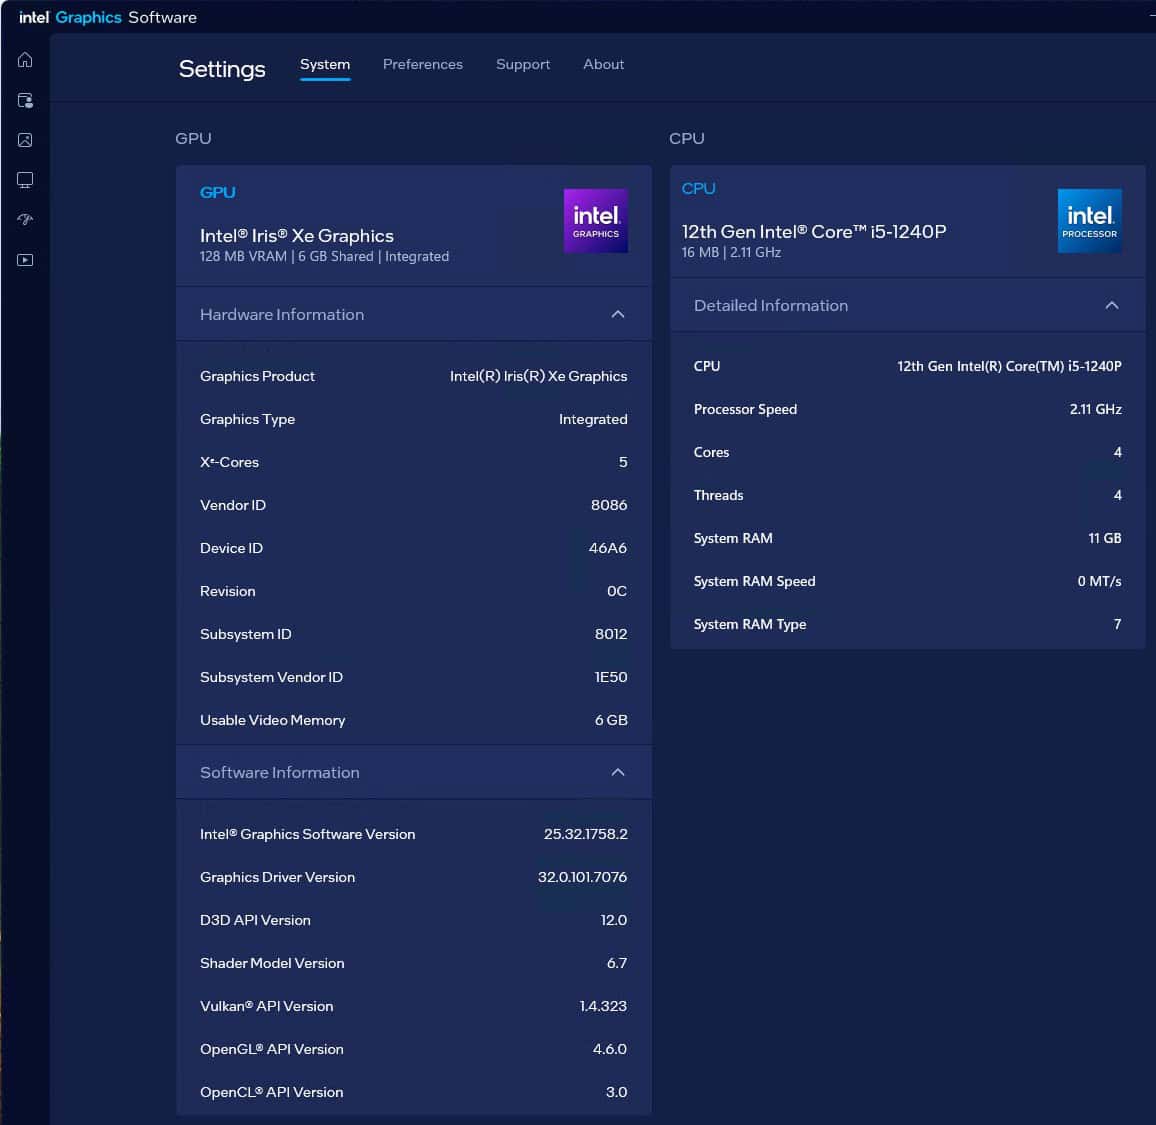
I’ve assigned one GPU VF to a Windows 11 Pro VM (00:02.1). From the Windows perspective the stock WHQL Intel driver works as normal. The GPU even shows up as an Intel Iris Xe. You can also look at the Intel Arc control application and view the various hardware details of the GPU.
My Working Configuration
Not all Intel CPUs support VT-d with their GPU. Intel only supports it on 11th Generation and later CPUs. It considers prior generations “legacy”. I’ve seen forum posts that users have issues with Intel 11th Gen, so that may or may not work for you. My latest configuration is as follows:
- Beelink SEi12 Pro (Intel 12th Gen Core i5-1240P)
- Proxmox VE 9.0 (with Linux 6.14.11-3-pve)
- Windows 11 Pro (25H2)
- Intel GPU Driver 32.0.101.7076 (09/12/2025)
Note: Your Proxmox host must have Intel VT-d (or whatever they call it) enabled in your BIOS, and your motherboard must properly implement it. Not all motherboards have working VT-d for GPUs. If this is disabled you will see “NO IOMMU detected” when you try and add the VF PCI device to the Windows VM. You BIOS may also have a feature called something like SR-IOV that needs to be enabled as well.
Note: Several readers left comments on my 8.0 post about the Parsec app not working. However, with as of 10/04/2025 using the above configuration the Parsec app launches just fine.
What about LXC vGPU VF Compatibility?
If you are nerdy enough to run a Windows 11 VM with a vGPU, you might also have some Linux LXCs that can use GPU resources as well (such as Plex). Linux LXC compatibility with vGPU VFs might be problematic.
As of the publication date of this post, a Plex LXC with Ubuntu 22.04 has problems with HDR tone mapping. Basically the Linux Intel Media Driver (IMD) doesn’t like using a vGPU VF. If you enable HDR tone mapping on the Plex server and you are viewing HDR content on a device that needs server side HDR tone mapping, the video stream will likely be corrupted.
However, Plex hardware transcoding will still work. Hardware transcoding uses the XE graphics module in the CPU (not GPU), whereas HDR tone mapping uses the GPU itself. Meaning, these two hardware offloads use different APIs and the GPU offload for HDR tone mapping is broken when using a vGPU VF.
Chuck from Plex posted on the forums on that he consulted with his engineers, and they will work on making Plex compatible SR-IOV. However, the needed kernel mods or GRUB updates will be up to the user to make. Intel has mainline SR-IOV for the Linux 6.4 kernel, and is working on 6.5. You can follow the progress in SR-IOV Mainling.
Bottom line, if you have LXCs on a Proxmox host that need GPU resources, they may not work with a vGPU VF. When Intel releases their official 6.5 package, it should offer wider compatibility. Configuring a LXC to use a vGPU VF requires modifying the LXC config file. Since this post is about Windows 11 vGPU, that procedure is out of scope for this post. I’ll cover the required LXC config changes in a separate post.
Proxmox Kernel Configuration
Note: If you have previously pinned your Proxmox kernel, unpin the kernel then reboot the Proxmox host into the new kernel that you want to modify for vGPU support. Pinning and unpinning instructions are at the end of this post.
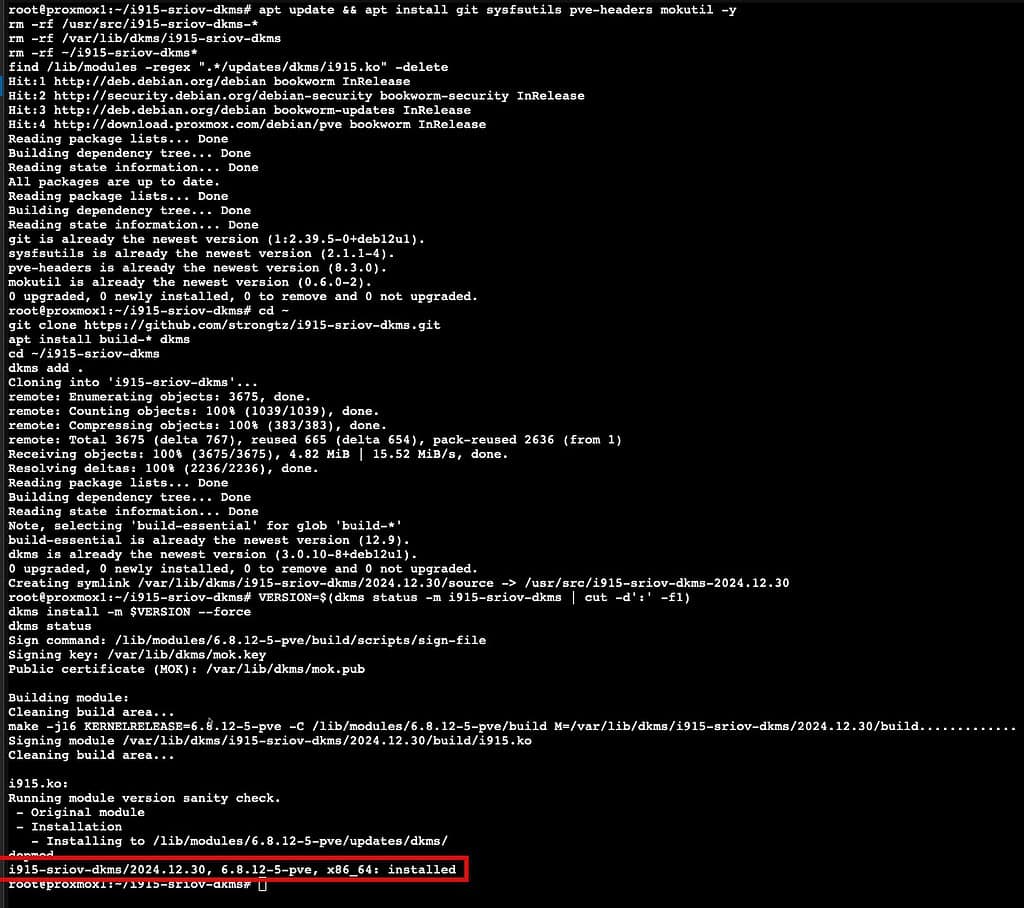
- On your Proxmox host open a shell and run the following commands. First we need to install Git, kernel headers and do a bit of cleanup.
					apt update && apt install git sysfsutils pve-headers mokutil -y
rm -rf /usr/src/i915-sriov-dkms-*
rm -rf /var/lib/dkms/i915-sriov-dkms
rm -rf ~/i915-sriov-dkms*
find /lib/modules -regex ".*/updates/dkms/i915.ko" -delete
2. Now we need to clone the DKMS repo and do a little build work.
					cd ~
git clone https://github.com/strongtz/i915-sriov-dkms.git
apt install build-* dkms
cd ~/i915-sriov-dkms
dkms add .
3. Let’s now build the new kernel and check the status. Validate that it shows installed.
					VERSION=$(dkms status -m i915-sriov-dkms | cut -d':' -f1)
dkms install -m $VERSION --force
dkms status
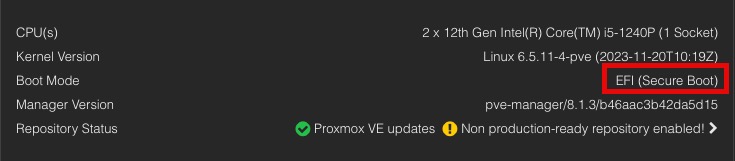
5. For fresh Proxmox 8.1 and later installs, secure boot may be enabled. Just in case it is, we need to load the DKMS key so the kernel will load the module. Run the following command, then enter a password. This password is only for MOK setup, and will be used again when you reboot the host. After that, the password is not needed. It does NOT need to be the same password as you used for the root account.
mokutil --import /var/lib/dkms/mok.pub

Proxmox GRUB Configuration
Note: Default installations of Proxmox use the GRUB boot loader. If that’s your situation, follow the steps in this section. If you are using ZFS or another config that uses systemd bootloader, skip down to the systemd section below.
1. Back in the Proxmox shell run the following commands if you DO NOT have a Google Coral PCIe TPU in your Proxmox host. You would know if you did, so if you aren’t sure, run the first block of commands. If your Google Coral is USB, use the first block of commands as well. Run the second block of commands if your Google Coral is a PCIe module.
					cp -a /etc/default/grub{,.bak}
sudo sed -i '/^GRUB_CMDLINE_LINUX_DEFAULT/c\GRUB_CMDLINE_LINUX_DEFAULT="quiet intel_iommu=on iommu=pt i915.enable_guc=3 i915.max_vfs=7"' /etc/default/grub
update-grub
update-initramfs -u -k all
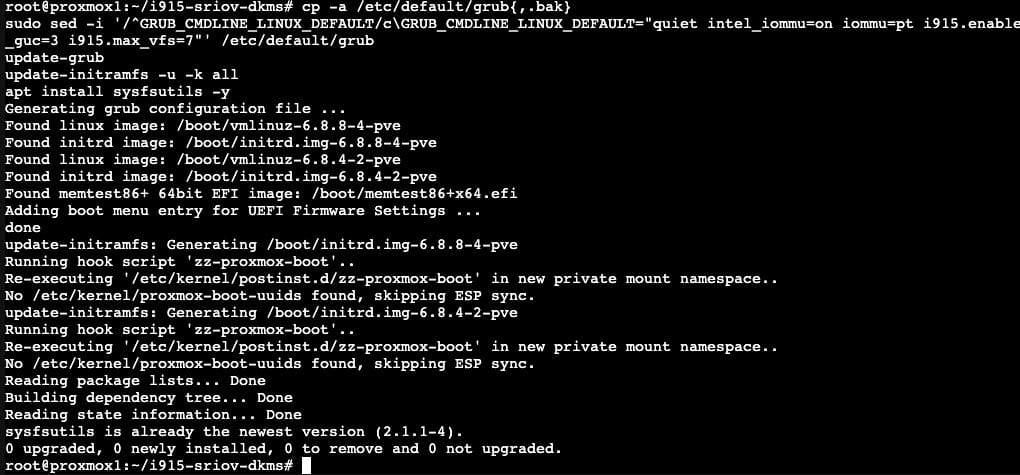
If your Proxmox host DOES have a Google Coral PCIe TPU and you are using PCIe passthrough to a LXC or VM, use this command instead. This will blacklist the Coral device at the Proxmox host level so that your LXC/VM can get exclusive access.
					cp -a /etc/default/grub{,.bak}
sudo sed -i '/^GRUB_CMDLINE_LINUX_DEFAULT/c\GRUB_CMDLINE_LINUX_DEFAULT="quiet intel_iommu=on iommu=pt i915.enable_guc=3 i915.max_vfs=7 initcall_blacklist=sysfb_init pcie_aspm=off"' /etc/default/grub
update-grub
update-initramfs -u -k all
apt install sysfsutils -y
Proxmox SystemD Bootloader
Note: If your Proxmox host doesn’t use GRUB to boot (default), but rather uses systemd, then follow these steps. This is likely the case if you are using ZFS. Skip this section if you are using GRUB.
- Let’s modify the kernel loader command line:
nano /etc/kernel/cmdline
2. Add the following text to the END of the current line. Do NOT add a second line.
intel_iommu=on iommu=pt i915.enable_guc=3 i915.max_vfs=7
3. Run the following command to update the boot loader.
proxmox-boot-tool refresh
Finish PCI Configuration
1. Now we need to find which PCIe bus the VGA card is on. It’s typically 00:02.0.

2. Run the following command and modify the PCIe bus number if needed. In this case I’m using 00:02.0. To verify the file was modified, cat the file and ensure it was modified.
echo "devices/pci0000:00/0000:00:02.0/sriov_numvfs = 7" > /etc/sysfs.conf
cat /etc/sysfs.conf

3. Reboot the Proxmox host. If using Proxmox 8.1 or later with secure boot you MUST setup MOK. As the Proxmox host reboots, monitor the boot process and wait for the Perform MOK management window (screenshot below). If you miss the first reboot you will need to re-run the mokutil command and reboot again. The DKMS module will NOT load until you step through this setup.
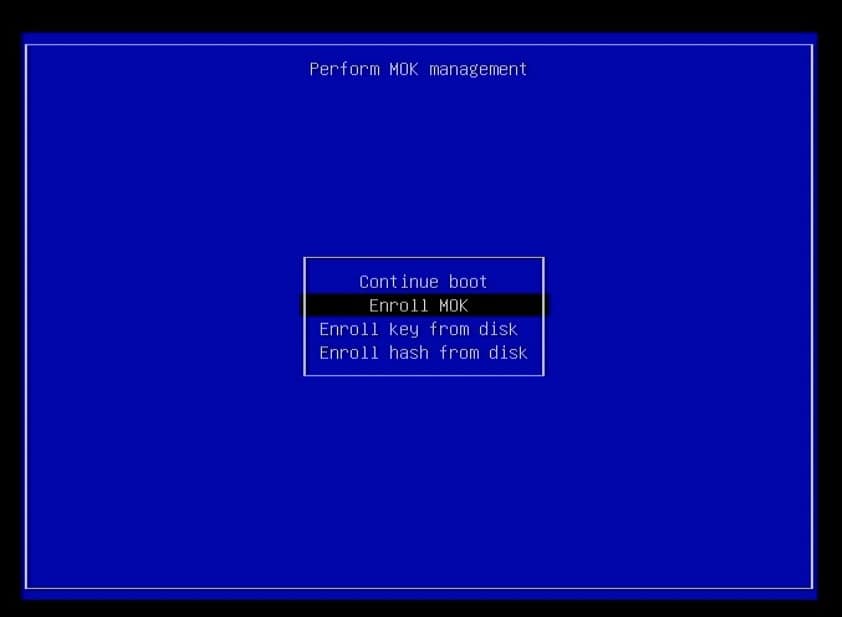
4. Select Enroll MOK, Continue, Yes, <password>, Reboot.
5. Login to the Proxmox host, open a Shell, then run the commands below. The first should return eight lines of PCIe devices. The second command should return a lot of log data. If everything was successful, at the end you should see minor PCIe IDs 1-7 and finally Enabled 7 VFs. If you are using secure boot and do NOT see the 7 VFs, then the DKMS module is probably not loaded. Troubleshoot as needed.
					lspci | grep VGA
dmesg | grep i915

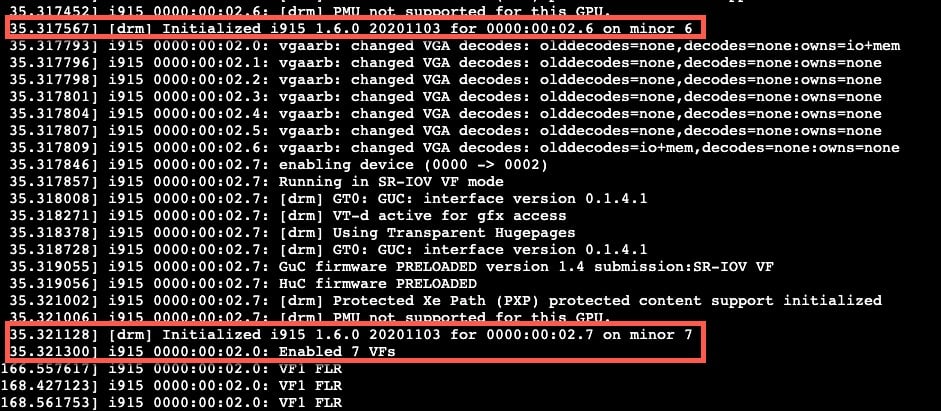
6. Now that the Proxmox host is ready, we can install and configure Windows 11. If you do NOT see 7 VFs enabled, stop. Troubleshoot as needed. Do not pass go, do not collect $100 without 7 VFs. If you are using secure boot and you aren’t seeing the 7 VFs, double check the MOK configuration.
Windows 11 Installation
- Download the latest Fedora Windows VirtIO driver ISO from here.
- Download the Windows 11 ISO from here. Use the Download Windows 11 Disk Image (ISO) for x64 devices option.
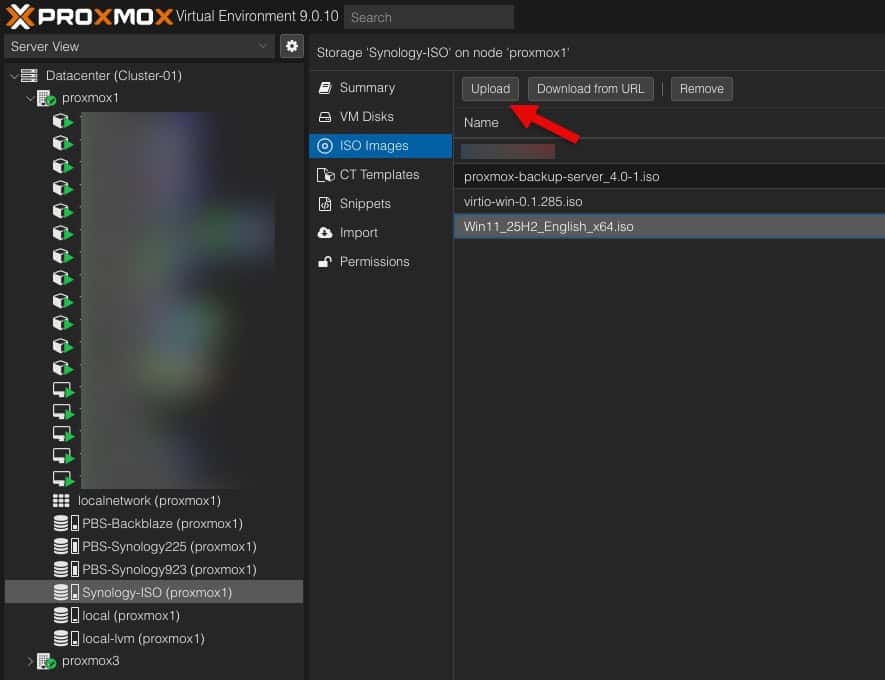
- Upload both the VirtIO and Windows 11 ISOs to the Proxmox server. You can use any Proxmox storage container that you wish. I uploaded them to my Synology. If you don’t have any NAS storage mapped, you probably have “local“, which works.
4. Start the VM creation process. On the General tab enter the name of your VM. Click Next.
5. On the OS tab select the Windows 11 ISO. Change the Guest OS to Microsoft Windows, 11/2022/2025. Tick the box for the VirtIO drivers, then select your Windows VirtIO ISO. Click Next. Note: The VirtIO drivers option is new to Proxmox 8.1.

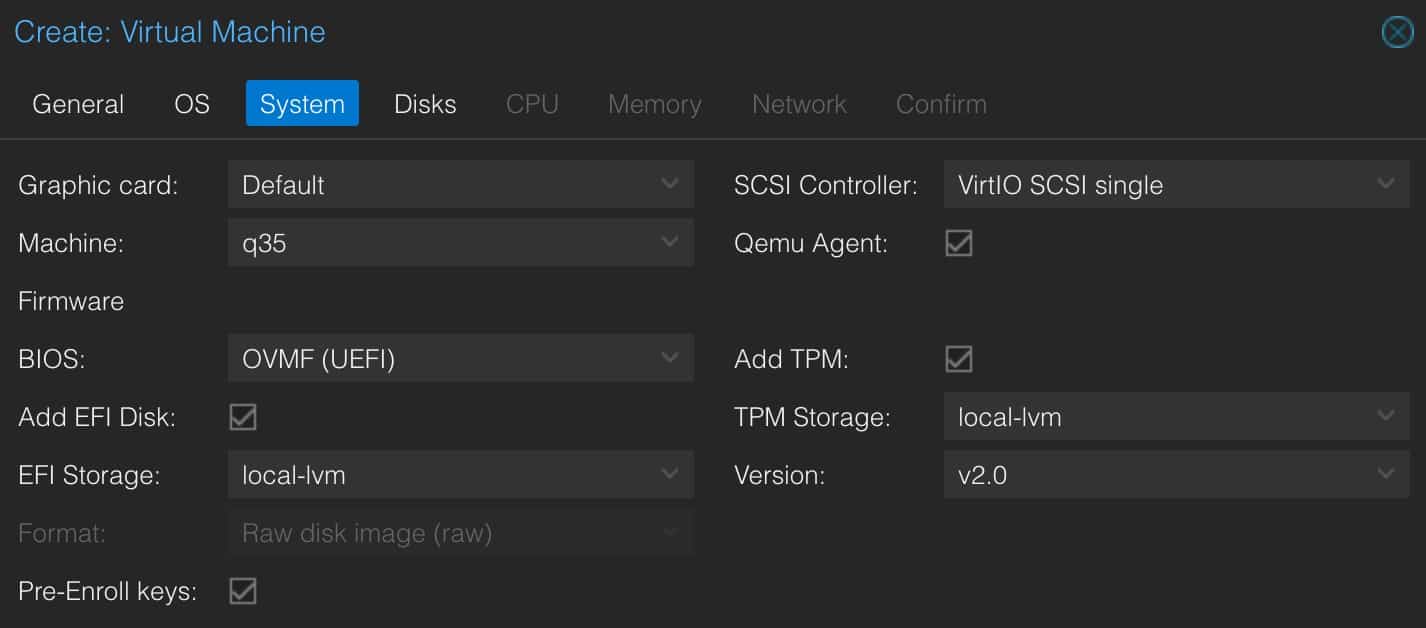
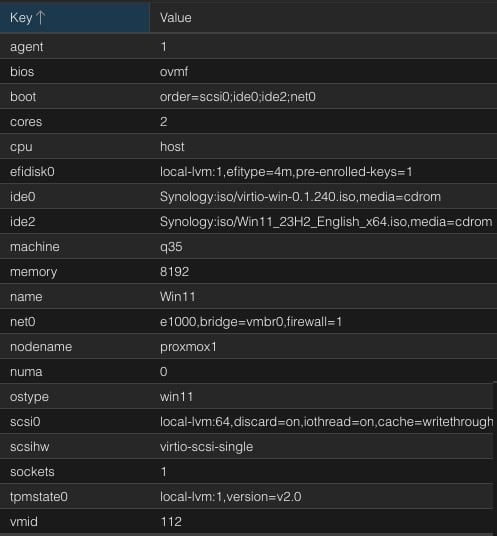
6. On the System page modify the settings to match EXACTLY as those shown below. If your local VM storage is named differently (e.g. NOT local-lvm, use that instead).
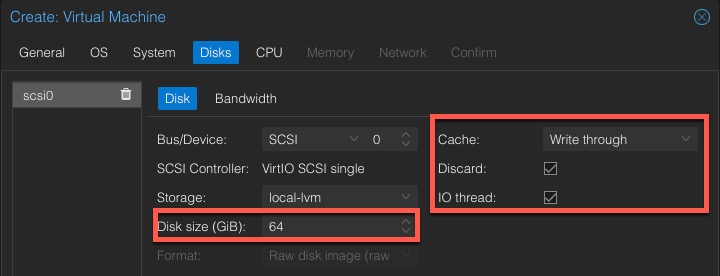
7. On the Disks tab, modify the size as needed. I suggest a minimum of 64GB (probably closer to 100GB for future Windows updates). Modify the Cache and Discard settings as shown. Only enable Discard if using SSD/NVMe storage (not a spinning disk).
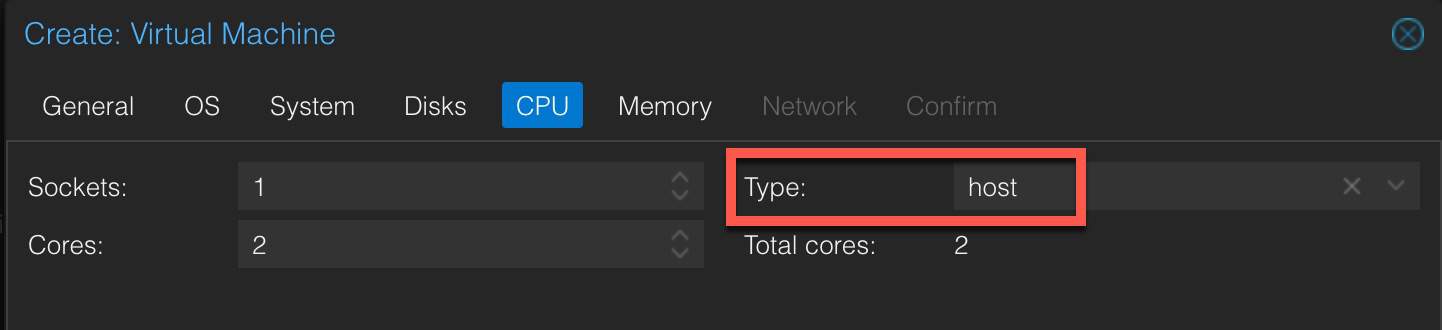
8. On the CPU tab, change the Type to host. Allocate however many cores you want. I chose 2.
9. On the Memory tab allocated as much memory as you want. I suggest 8GB or more.
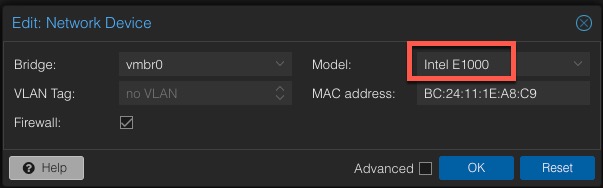
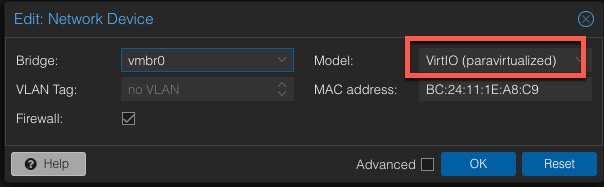
10. On the Network tab change the model to Intel E1000. Note: We will change this to VirtIO later, after Windows is configured.
11. Review your VM configuration. Click Finish. Do not start the VM.
Windows 11 Installation
- In Proxmox click on the Windows 11 VM, then open a console. Start the VM, then press Enter to boot from the CD. If you miss the prompt, just “reset” the VM and watch the console closely.
- Select your language, time, currency format. Click Next. Select keyboard. Click Next. Click Install Windows 11. Check the box to delete everything. Click Next.
- Click I don’t have a product key.
- Select Windows 11 Pro. Click Next.
- Tick the box to accept the license agreement. Click Next.
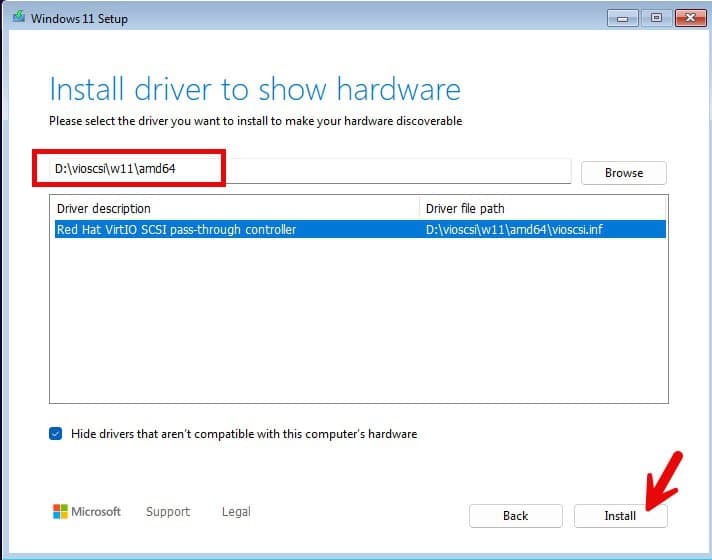
- Click Load driver.
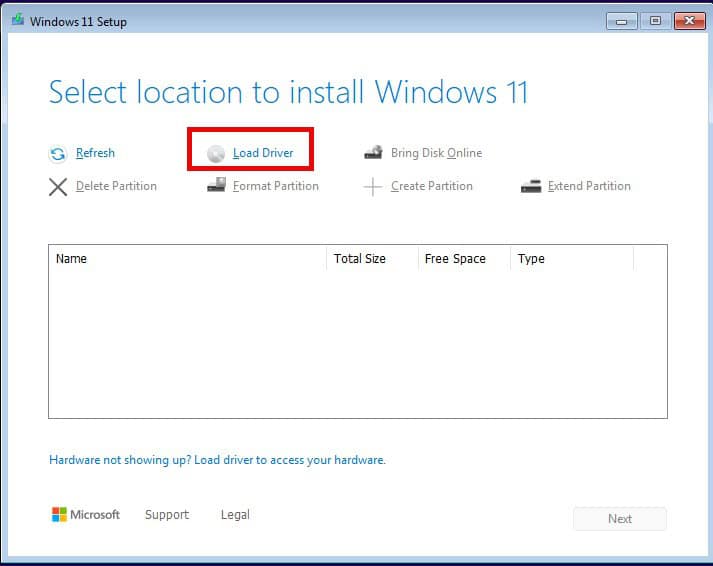
8. Browse to the D: drive, navigate to vioscsi\w11\amd64 and click OK.
9. Select the w11 driver. Click Next.
10. On Select location to install Windows 11 click Next.
11. On Ready to install click Next. Sit back and wait for Windows 11 to install.
Windows 11 Initial Configuration
- Once Windows boots you should see a screen confirming your country or region. Make an appropriate selection and click Yes.
- Confirm the right keyboard layout. Click Yes. Add a second keyboard layout if needed.
- Wait for Windows to check for updates. Windows may reboot.
- Enter the name of your PC. Click Next. Wait for Windows to reboot.
- Click Set up for personal use. Click Next. Wait for any Windows updates to install.
- Click Sign in.
- Choose your privacy settings for your device and click Next. Click Accept.
- In File Explorer navigate to the D: drive. Run virtio-win-gt-x64 and virtio-win-guest-tools. Use all default options.
- Shutdown (NOT reboot) Windows.

13. In Proxmox modify the Windows 11 VM settings and change the NIC to VirtIO.
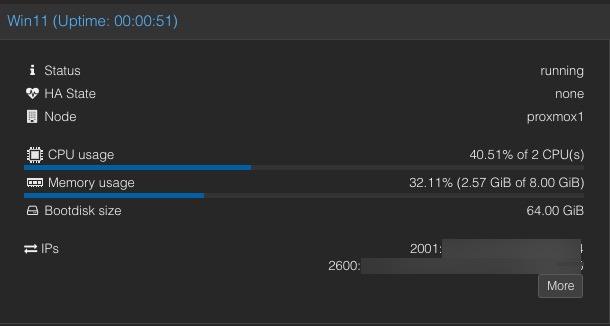
14. Start the Windows 11 VM. Verify at least one IP is showing in the Proxmox console.
15. You can now unmount the Windows 11 and VirtIO ISOs from the Proxmox console.
Enabling Remote Desktop
When we enable the vGPU feature, you will be unable to open the Proxmox console to the Windows VM. So we need to enable Remote Desktop (RDP) so you can access Windows over the network. We will also enable signing in with a local account so that RDP doesn’t have deal with your Microsoft online account.
1. In the Windows start search box type “your info“. Click on Your account info under Best match.
2. Under Account settings click on Sign in with a local account instead.
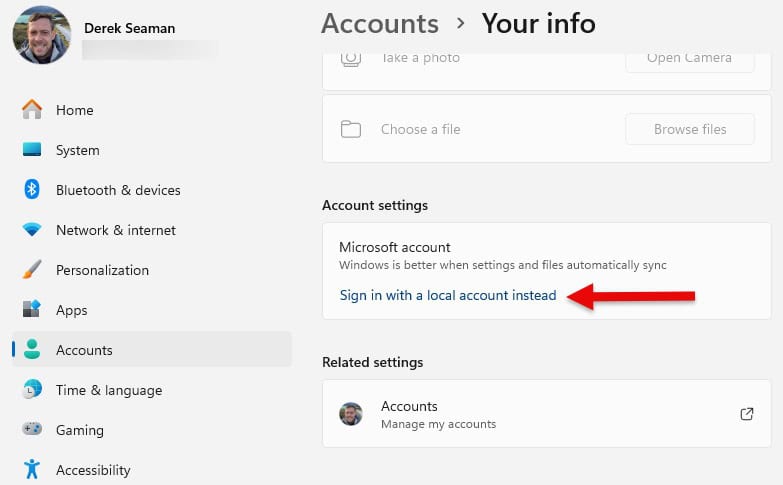
3. Walk through the wizard to create a local account with password. I would select a unique username to avoid confusion with whatever user name Microsoft used for your online account.
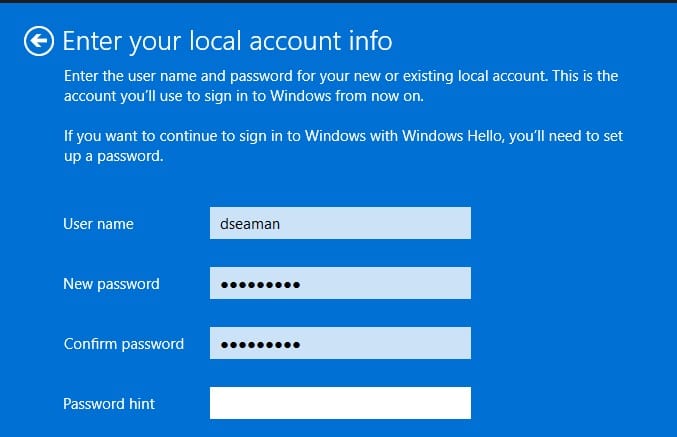
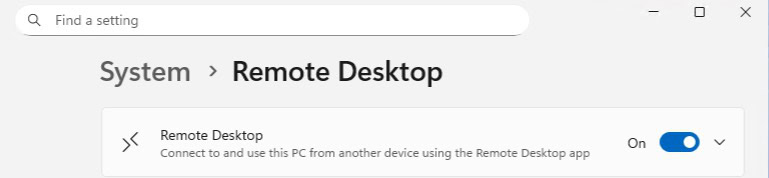
4. After your local account is created, in the Start search box type remote desktop then click on Remote desktop settings under Best match.
5. Enable Remote Desktop.
6. You will want to disable local account password expiration, as RDP will fail when your password expires with no easy way to reset. You’d need to re-enable the Proxmox console to reset your password (see later in this post for a how to). Open an elevated PowerShell command prompt and enter the following command using the local user name you specified in step 3.
Set-LocalUser -Name "username" -PasswordNeverExpires $true
Windows 11 vGPU Configuration
1. Open your favorite RDP client and login using the user name and credentials you setup. You should now see your Windows desktop and the Proxmox console window should show the lock screen.
2. Inside the Windows VM open your favorite browser and download the latest Intel “Recommended” graphics driver from here. In my case I’m grabbing “Intel® 11th – 14th Gen Processor Graphics – Windows” version 32.0.101.7076.
3. Shutdown the Windows VM. Wait for the VM to power off.
4. In the Proxmox console click on the Windows 11 VM in the left pane. Then click on Hardware. Click on the Display item in the right pane. Click Edit, then change it to none.

Note: If in the next couple of steps the 7 GPU VFs aren’t listed, try rebooting your Proxmox host and see if they come back. Then try adding one to your Windows VM again.
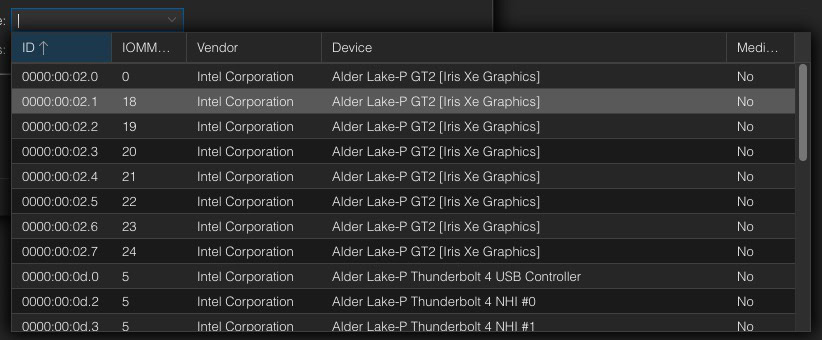
5. In the top of the right pane click on Add, then select PCI Device.
6. Select Raw Device. Then review all of the PCI devices available. Select one of the sub-function (.1, .2, etc..) graphics controllers (i.e. ANY entry except the 00:02.0). Do NOT use the root “0” device, for ANYTHING. I chose 02.1. Click Add. Do NOT tick the “All Functions” box. Tick the box next to Primary GPU. Click Add.
7. Start the Windows 11 VM and wait a couple of minutes for it to boot and RDP to become active. Note, the Proxmox Windows console will NOT connect since we removed the virtual VGA device. You will see a Failed to connect to server message. You can now ONLY access Windows via RDP.
8. RDP into the Windows 11 VM. Note: If the RDP session opens but the screen is black, try rebooting the VM and see if that helps.
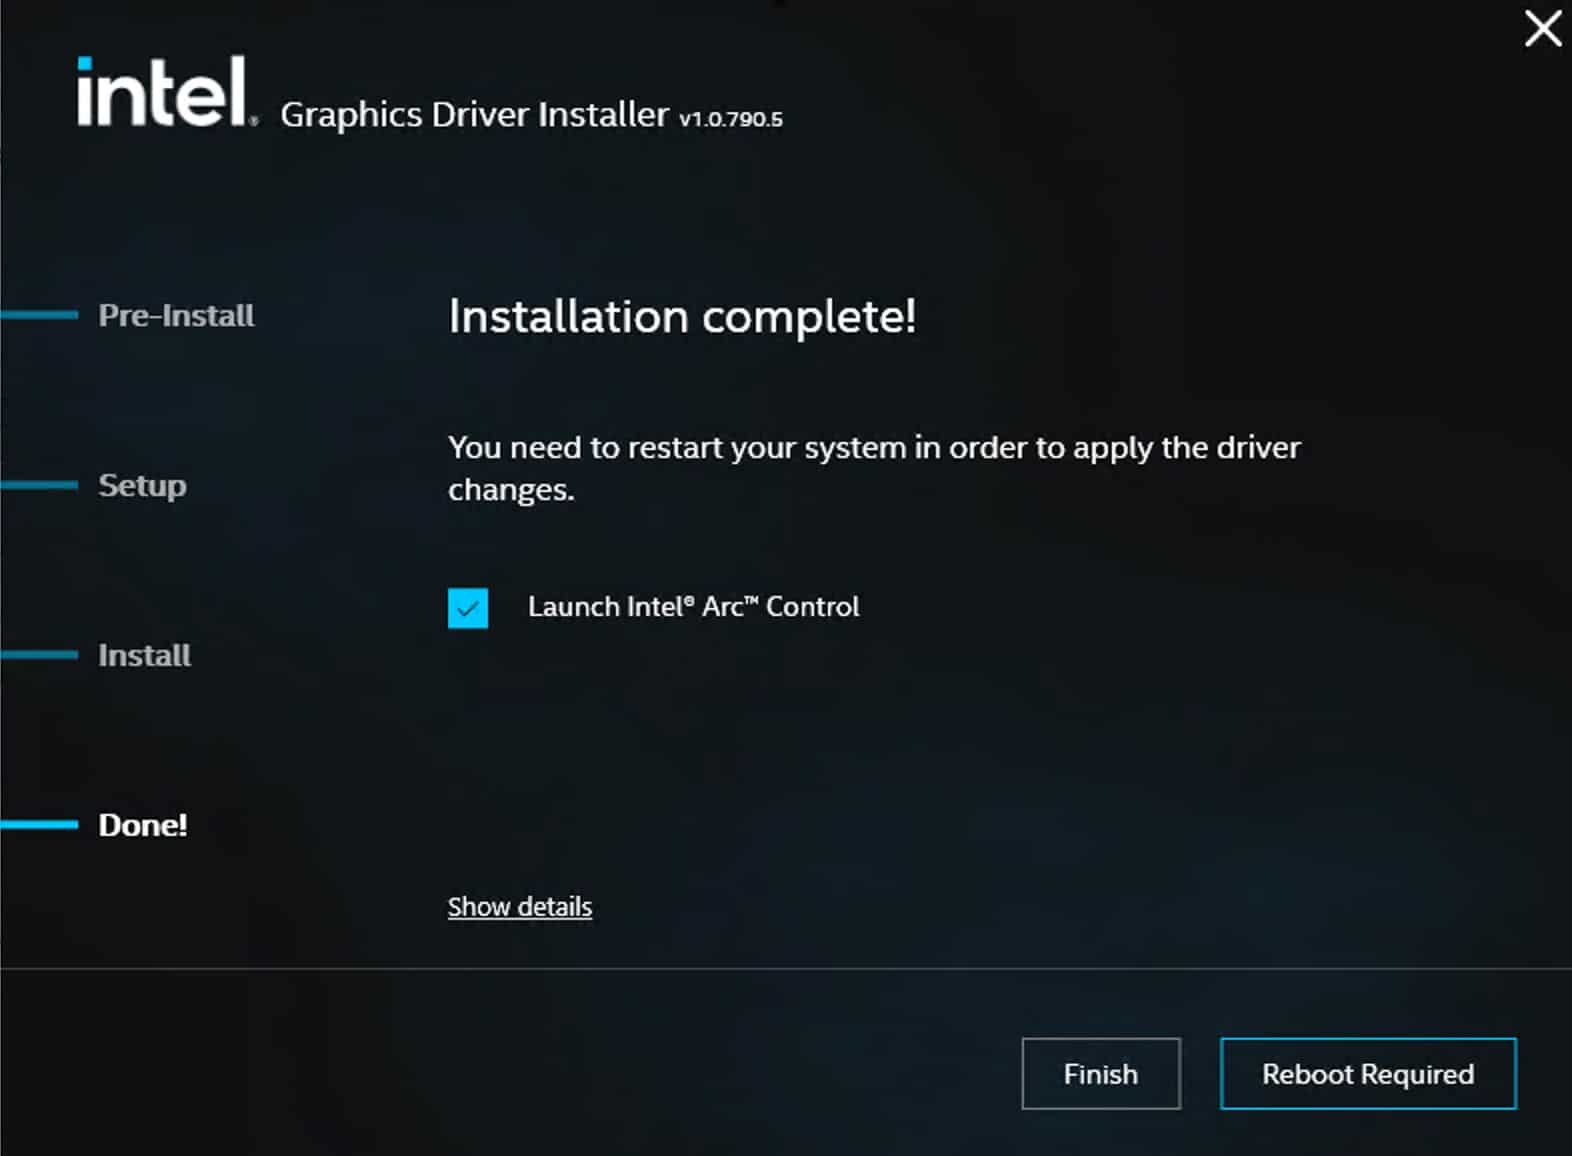
9. Locate the Intel Graphics driver installer and run it. Accept all defaults.
10. If all goes well, you will be presented with an Installation complete! screen. Note: For the gfx_win_101.7076 package, the installer never seems to complete, however the Intel drivers do install and appear to work fine. If the Intel installer appears to hang, give it 15-20 minutes, and check task manager for any activity. Once things quiet down, proceed with the next section. You can also open Device Manager and validate the Intel(R) Iris(R) Xe Graphics device is in a healthy state.
11. Do not yet reboot. Follow the steps in the next section before you reboot.
Preventing Automatic Driver Updates
Windows 11 seems to have the nasty habit of thinking the latest Intel GPU drivers need to be “updated” to a version from 2022. This breaks vGPU functionality. To prevent Windows update from automatically update drivers follow this procedure (Windows 11 Pro/Enterprise):
- Type Group in the Start search bar and click on Edit group policy.
- Navigate to Computer Configuration > Administrative Templates > Windows Components > Windows Update > Manage updates offered from Windows Update.
- Locate Do not include drivers with Windows Update and enable the setting.
- Reboot.
Windows 11 vGPU Validation
1. RDP into Windows and launch Device Manager.
2. Expand Display adapters and verify there’s an Intel adapter in a healthy state (e.g. no error 43). Note: If you DO see an error, immediately reboot the VM and check again. If there’s still an error, re-install the Intel drivers and reboot once or twice.
3. Launch Intel Graphics Software. Click on the gear icon (Settings), System, and expand GPU.
4. Launch Task Manager, then watch a YouTube video. Verify the GPU is being used.
Troubleshooting Intel Driver Installation
The first time I did this on my N100 Proxmox server the Intel drivers had issues installing. For some reason the RDP session would freeze mid way through the install, or would get disconnected and then fail to connect. I had to reboot the VM from the Proxmox UI and then re-start the Intel installer using their “clean” option. After a couple of re-installs, it ran just fine. It ran flawlessly the first time on my i5-1240P server. If after a VM reboot RDP can’t connect after a few minutes, reboot the VM and try again.
On rare occasions if you reboot the Proxmox host and the Windows 11 VM gets a GPU device error, try rebooting the Proxmox host again and see if it clears. Re-installing the Intel drivers might help too.
Also, if you see the following message in the dmesg logs, this likely means you have secure boot enabled and did not properly configure MOK or enter the MOK password after your first host reboot. If this is the case, re-run the mok utility command, connect a physical monitor/keyboard to your Proxmox host, reboot, and run through the MOK setup.
i915: module verification failed: signature and/or required key missing – tainting kernel
I’ve also observed that sometimes Windows tries to replace your installed Intel ARC driver with a version that is years older, and does NOT work. If you see driver errors, check the version that Windows is trying to use. Make sure it’s the latest version that you manually installed, not one from years ago.
How to Use Intel GPU VFs
You can configure up to 7 VMs to use vGPU resources on the Proxmox host. Each VM MUST be assigned a unique PCIe VF. In addition, no VMs can use the “root” PCIe GPU device. If a running VM is assigned the root GPU, the VFs will not function properly.
Some readers asked if they could connect a HDMI cable to their mini PC and access the Windows 11 desktop. As far as I know this is not possible, as the HDMI output is tied to the primary PCIe GPU device, which we are not using. You will be limited to using RDP to access your desktop(s). You would need to use full GPU PCIe passthrough for that.
Future Proxmox Kernel Upgrades
As Proxmox gets updated over time with newer Linux Kernel versions, you WILL need to reconfigure DKMS to patch the new kernel. Thankfully this is a pretty simple process. Just follow the section Proxmox Kernel Configuration. This will rebuild the new kernel with the latest DKMS module.
There are dependencies between the DKMS module and the Linux kernel. Sometimes the DKMS module breaks with newer kernels, or manual tweaks to the DKMS files are needed. DO NOT assume the very latest Proxmox kernel will be successfully patched by DKMS. You can check out the dkms GitHub Issues page and see if there are known issues, or report an issue if you are having problems. If you want to play it safe, after a new kernel comes out I would wait a few days or weeks to see if any issues pop up on the DKMS repo.
There is a neat solution to prevent Proxmox updates from installing a new kernel. You can use the pin command, as shown below, to allow Proxmox to update everything EXCEPT your kernel. Of course you eventually do need to update the kernel, but this way you can update it on your schedule and after you’ve reviewed forums to see if anyone ran into an issue with the latest Proxmox kernel.
To use the pin command, run the command below to pin your current kernel version.
proxmox-boot-tool kernel pin $(uname -r)
When you are ready to upgrade your kernel, run the unpin command. Update your Proxmox host then re-pin the new kernel.
proxmox-boot-tool kernel unpin
Unable to connect via RDP
If for some reason you can’t connect via RDP to your VM, there is a way to regain a local Proxmox console. This can happen if your password expires, for example. To enable the Proxmox console (and disable vGPU):
- Shutdown the Windows VM.
- Remove the PCIe VF device attached to your GPU.
- Modify the Display hardware property and change it to Default.
- Start the VM and wait for the Proxmox console to connect.
Do whatever you need to do to troubleshoot the issue. To re-enable vGPU:
- Shutdown the VM.
- Change Display to None.
- Re-assign the PCIe GPU VF device.
- Start the VM.
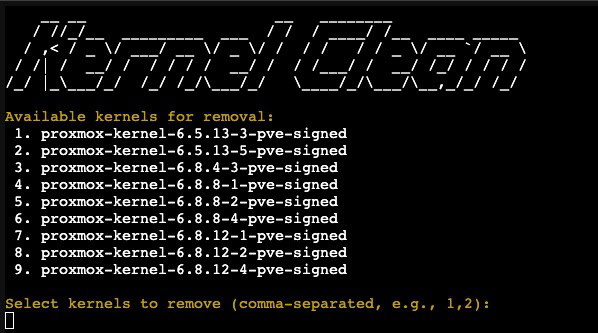
Kernel Cleanup (Optional)
Over time as you run Proxmox and do routine upgrades, your system can get littered with old kernels. This isn’t a problem per say, but does waste storage space. If you want to clean up unused kernels, you can use the awesome Community scripts to remove old versions. No need to reboot after the cleanup. This is entirely optional and is only mentioned for good housekeeping.
bash -c "$(curl -fsSL https://raw.githubusercontent.com/community-scripts/ProxmoxVE/main/tools/pve/kernel-clean.sh)"
Summary
The process for configuring Windows 11 for vGPU using VT-d on Proxmox VE 9.0 is a bit tedious, but it has worked very well for me. By using the virtual functions (VFs), you can share the Intel GPU with up to seven VMs at the same time. Remember that each VM on the Proxmox host that you want to use a vGPU must use a unique VF. Using GPU VFs means you can’t use a physically connected monitor to your Proxmox host and access your VM’s desktop. You have to use remote desktop to access your Windows 11’s desktop.
Configuring your Proxmox host for vGPU with VFs may have a negative impact on Linux based VMs or LXCs that need GPU resources, such as Plex. If you are using other VM/LXCs that need GPU resources, be sure to test them thoroughly including HDR tone mapping. Also remember that when you do Proxmox host updates that install a newer kernel, you will have to re-patch the kernel with dkms or your vGPU VFs won’t function. Using the kernel pin command you upgrade kernels on your schedule, while allowing other Proxmox updates to install.


Thanks for the update, it helped me update my cluster again.
Hello,
Nice rework of your previous post (june), that I had followed to get rid of the error 43 in intel GPU driver in my Win11 Pro install.
In reading this post, I understand why I couldn’t get my connected screen to show something. It’s just not possible when using vGPU. Ok.
But for my NUC, I didn’t manage to get the iGPU passthrough working nor having a display on the connected screen…
I own a NUC, Geekom Mini-IT13, with an Intel i9-13900H with an Iris XE for iGPU.
Do you have a working guide lie yours to follow for a full GPU PCIe passthrough?
Thank you very much for your work, and in advance for any answer you’ll give me.
That’s a 13th Generation chip, so I’d think it should work. Did you enable VT-d in the BIOS? I’d open an issue on the DKMS Github repo to report your issue and include logs. Full GPU passthrough has a vaguely similar process (but doesn’t use DKMS). If I have time in the coming weeks I’ll see if I can do a fresh post about that.
Hello,
sorry for the delay of my answer, was busy at work and at home with my toddler.
My NUC’s bios doesn’t really come with options… no cpu options…
but under windows (the one pre installed) HWInfo64 says that it’s ok for VT-D.
I’d be glad if you wrote a guide for full iGPU passthrough like this one.
I would be very glad to read about FUll GPU passthough.
Derek, I have Nipogi mini PC with an Intel N95 Alder Lake-N with an Intel UHD Graphics with Proxmox 8.1.4 with Home Assistant and Windows 11 Pro and a container that I will use for testing. I also would like to use a full passthrough to be able to use the HD screen connected to the PC through Windows 11 VM. It would be amazing if you could write a post about how to do it. Many thanks.
its not likely because you would need to integrate some patches from intel into the (and im probably wrong here) qemu which would require compiling that. but these patches would pass your display outputs to your vms. im just barely smart enough. if you want the support its supposedly available in stock ubuntu.
Derek,
Could you please recommend me where to look ? You mention “stock ubuntu” and I don’t have enough experience to find what you mean, could you please tell me more specific directions?
Many thanks!
For others having an issue with a clean install of Proxmox v8.1 and SR-IOV setup, you’ll need to sign the module built with DKMS. To do this, you’ll need to enrol the key with mokutil –import /var/lib/dkms/mok.pub before you build/install it. You’ll also need to enter the password on 1st reboot, or it will not accept the driver. Hope this helps.
Thank you! My 8.1 installs were upgrades. I’d do a fresh build and validate.
Amazing guide!
Can it be use for Amd or Nvidia cards?
Not this process, no. And from what I’ve read AMD does not support SR-IOV. Not as sure about NVidia….I’d check reddit forums.
Hello Derek,
Thank you for this updated write up and you others. I find them all easy to follow for what is a very technical concept.
Based on your review of the Beelink products I decided it was time I upgraded my whole setup.
My aim is to go low power. I usually use Windows for most work but am happy with Linux. I also run a Home Assistant node.
I went for the Beelink EQ12 Pro as it will more than cope with the load I need. Added Proxmox 8.0 and installed the 2 VM’s .
Initially I thought I could dedicate the HDMI ports to the graphics card on the Windows 11 VM but I couldn’t make that work. Next I tried adding Gnome to Proxmox so I can RDP into Windows 11. This works well but I can’t use the GPU’s because running the graphics on the Proxmox host will interfere them.
I’m just wondering if there is a way to make better use of the GPU’s in my setup ?
Keep up the great work.
Eric
If you use full GPU pass-through (versus vGPU), then a Windows 11 VM should be able to use the HDMI output of the Beelink. But then no other VM’s on that Beelink host can use the GPU. That might be perfectly fine for you. I don’t have a guide for full GPU pass-through, yet. There are other blog posts or forum procedures you can experiment with. But most of the ones I’ve seen aren’t as straight forward or clear as the procedures I strive to publish.
Can confirm this works on 14th gen chips (14600k). It’s a bit dodgy (as you mention in the article) where sometimes a VM won’t really come online or the drivers don’t install the first time. But other than that it’s great.
Hopefully Parsec gets patched (or the driver, whatever is broken) to work since that’s mostly what I want it for.
My fresh install of Proxmox 8.1 uses the systemd UEFI bootloader instead of GRUB. To update it run:
nano /etc/kernel/cmdline
Add “intel_iommu=on iommu=pt i915.enable_guc=3 i915.max_vfs=7” (without quotes) to the end of the first and only line.
Then run:
proxmox-boot-tool refresh
To update your EFI partitions and sync it to other drives if your boot pool is mirrored.
Thank you. I had the procedure in my first guide, but didn’t bring it forward. However, I just modified the post to split out GRUB and SystemD sections.
Thanks for the writeup! There’s some really interesting tech here. Would this work for intel arc gpu’s? If so, are there features that the (non-intel) cpu and motherboard would need to support in order for this to work?
Arc does not support SR-IOV. https://www.intel.com/content/www/us/en/support/articles/000093216/graphics/processor-graphics.html
Hello! I have tested on an Intel NUC 13 (i-1340P), Proxmox 8.1.3 (kernel 6.5.11-4), so thought I’d share for people struggling with this / googling:
ext4, secure boot on, GRUB loader – > I haven’t tested this one, but will take a guess it works too, and the issue is likely connected to systemd-boot, at least on this NUC configuration.
I would like to use ZFS with root filesystem encryption, and GRUB isn’t able to boot from that, so I’m left with systemd-boot, which alas doesn’t work. If any ideas how to get it working – drop me a line 🙂
Hi Sam, I struggled with this as well. But then I read this:
https://forum.proxmox.com/threads/newly-mirrored-zfs-drive-not-bootable-on-secured-boot.138731/#post-619376
and this:
https://pve.proxmox.com/wiki/Host_Bootloader
So it seems that ZFS + Secure Boot enabled in BIOS = GRUB Loader (NOT systemd-boot)
Came here to bump up this solution. thanx for this tip. It solved my issue. Had to reinstall proxmox with ext4 without secure boot to have my VF’s up and running.
If anyone wants to use parsec and sunshine, one option is to use an older version of Intel drive.
https://www.intel.com/content/www/us/en/download/741626/780560/intel-arc-pro-graphics-windows.html
This doesn’t work unfurtunately
Worked for me! Thank you!
Thanks! Works! Don’t forget to install virtual Display!
Wow, 31.0.101.4316 did a wonder for me. parsec finally works!!!!! on Intel iGPU as vGPU. (12600K)
Many thanks to Derek, and adm! You guys rock!
I am getting an error
Building module:
Cleaning build area…
make -j1 KERNELRELEASE=6.2.16-5-pve -C /lib/modules/6.2.16-5-pve/build M=/var/lib/dkms/i915-sriov-dkms/6.2.16-5/build KVER=6.2.16-5-pve……………………………(bad exit status: 2)
Error! Bad return status for module build on kernel: 6.2.16-5-pve (x86_64)
Consult /var/lib/dkms/i915-sriov-dkms/6.2.16-5/build/make.log for more information.
I was able to pass this point after i upgraded Proxmox to 8.1 with 6.5 kernel.
Now after I finish all the configuration I get this
root@proxmox:~# lspci | grep VGA
dmesg | grep i915
00:02.0 VGA compatible controller: Intel Corporation Raptor Lake-S GT1 [UHD Graphics 770] (rev 04)
0a:00.0 VGA compatible controller: ASPEED Technology, Inc. ASPEED Graphics Family (rev 52)
[ 0.000000] Command line: BOOT_IMAGE=/boot/vmlinuz-6.5.11-7-pve root=/dev/mapper/pve-root ro quiet intel_iommu=on iommu=pt i915.enable_guc=3 i915.max_vfs=7
[ 0.067792] Kernel command line: BOOT_IMAGE=/boot/vmlinuz-6.5.11-7-pve root=/dev/mapper/pve-root ro quiet intel_iommu=on iommu=pt i915.enable_guc=3 i915.max_vfs=7
[ 4.618943] i915: module verification failed: signature and/or required key missing – tainting kernel
[ 66.410260] snd_hda_codec_hdmi hdaudioC0D2: No i915 binding for Intel HDMI/DP codec
Yes, that looks like you are using secure boot and MOK hasn’t been properly configured. I’d re-run the mok utility step to import the key, reboot with a console attached to your proxmox host, then make sure you run the MOK authorization wizard. If you don’t step through the mok authorization prompts the kernel will not load the i915 module.
Thank you for your reply. The secure boot is not enabled on my proxmox. In the summary, under boot mode I have EFI. How can i change it to secure boot?
Don’t change it to secure boot. I’m not sure why you are getting that kernel message if secure boot is off. The easiest way to enable secure boot is a fresh Proxmox 8.1 install. Promox does have an article on how to convert a system to secure boot, but it’s a very long and involved process. Way easier to just wipe and reload the host.
me too
—————————–
xxx@tiao:~# mokutil –sb-state
SecureBoot disabled
Platform is in Setup Mode
—————————————-
[ 0.000000] Command line: BOOT_IMAGE=/boot/vmlinuz-6.5.13-1-pve root=/dev/mapper/pve-root ro quiet intel_iommu=on iommu=pt i915.enable_guc=3 i915.max_vfs=7
[ 0.061695] Kernel command line: BOOT_IMAGE=/boot/vmlinuz-6.5.13-1-pve root=/dev/mapper/pve-root ro quiet intel_iommu=on iommu=pt i915.enable_guc=3 i915.max_vfs=7
[ 9.124334] i915: module verification failed: signature and/or required key missing – tainting kernel
[ 9.711208] i915 0000:00:02.0: [drm] VT-d active for gfx access
I’m seeing this same behavior: Secure boot is disabled on my system, Proxmox is NOT booting in secure mode, and it’s still tainting the kernel because it can’t pass module verification.
Turning on Secure Boot, even with a fresh install, is not an option on my system. It’s an HP mini PC, and the BIOS makes correctly enabling secure boot an absolute nightmare.
I’m going to see if there’s a github issue on this, or open one if there’s not. I suspect the build script is hard coded to generate modules requiring signing (it always generates the MOK keys), and something is going sideways.
Having exactly the same problem. Theoretically my motherboard supports secure boot, but I don’t see any value in using it, so I didn’t enable it when I installed proxmox. But, following these instructions results in the same error:
[ 2.499472] i915: loading out-of-tree module taints kernel.
[ 2.499493] i915: module verification failed: signature and/or required key missing – tainting kernel
Not sure how to proceed to fix this
Same issue here, no secure boot but i915: module verification failed: signature and/or required key missing – tainting kernel, anything?
Go to the operation
dkms install -m i915-sriov-dkms -v $KERNEL -k $(uname -r) -force -j 1
dkms status
Hints
Error! Kernel headers for kernel 6.5.11-4-pve could not be found.
Please install the linux-headers-6.5.11-4-pve package,
or use the –kernelsourcedir option to tell DKMS where it is located.
I don’t know what to do about this error
yes you should run: apt update && apt install git pve-headers -y
You have to reboot pve after updating the kernel.
Out of curiosity; is there a specific reason why the number of virtual functions was chosen to be 7? Is there any specific detriment to setting it to the specific number of vm’s you wish to use or putting it into a gpu pool, and then just assigning the pool to multiple vms?
Yes. 7 is the maximum that you can do. You can configure less if you wish.
I think my question might actually be better posed to the i915 dkms driver creator, I can see in the sriov parameter, it just returns the value specified(possibly limiting to u16?). I think the direction where I wanted to head with the question is what/where in the hardware determines the optimal number of vfs. I recognize that since the driver creator ran it with 7, that the number is probably already optimized.
its probably poorly optimized, the bigger cards designed for this I believe are limited to 7 by the driver as well.
God bless you.
Thank you so much for this guide. Please keep it updated.
Thanks. Worked like a charm.
Can you please tell how to use this vGPU with ubuntu server VM ?
I’d like to know this as well. Thanks!
error 43
https://github.com/cmd2001/build-edk2-gvtd
Thank you. Following your method, I succeeded see 7 VFs enabled,but this VFs cannot be used on Synology NAS,Is there any solution?
No don’t do this on Synology. It’s only for standard Intel PCs.
Hello and thank you for the great instructions.
However, I have a strange error.
After setting up and restarting everything seems to work.
I can see the 7 cards, but after a while they are deactivated.
root@pve:~# dmesg | grep i915
[ 0.000000] Command line: BOOT_IMAGE=/vmlinuz-6.5.11-7-pve root=ZFS=/ROOT/pve-1 ro root=ZFS=rpool/ROOT/pve-1 boot=zfs quiet intel_iommu=on iommu=pt initcall_blacklist=sysfb_init pcie_aspm=off pcie_port_pm=off i915.enable_guc=3 i915.max_vfs=7
[ 0.186420] Kernel command line: BOOT_IMAGE=/vmlinuz-6.5.11-7-pve root=ZFS=/ROOT/pve-1 ro root=ZFS=rpool/ROOT/pve-1 boot=zfs quiet intel_iommu=on iommu=pt initcall_blacklist=sysfb_init pcie_aspm=off pcie_port_pm=off i915.enable_guc=3 i915.max_vfs=7
[ 15.622358] i915 0000:00:02.5: [drm] PMU not supported for this GPU.
[ 15.629766] i915 0000:00:02.0: Enabled 7 VFs
[ 31.432536] i915 0000:00:02.0: Disabled 7 VFs
Where you ever able to solve this? I’m also working with a 12th gen (and 11th, and 10th…) but I’m having this exact issue with Disabled 7 VFs and then nothing’s available anymore.
Thanks for the guide, just point that going through the systemd path, sysfsutils install command is missing. In my case, without it, lspci only displayed 1 VGA.
do we need to have secure boot on for this process? the guide implied IF secure boot was enabled this is what needs to be done. im on 8.1 without secure boot enabled – all process pass other than the reboot at the end. no MOK enrollment screen appears and after the reboot lspci | grep VGA reports just one listing of the gpu. im on i5-12400, vt enabled and secure boot disabled.
Would this guide work with passing a 12th gen chip into a linux VM? Ive followed this guide right up until adding the hardware to the linux VM however the device is not detected or shown within /dev/dri
Did you get this working?
Thx for the post!
It goes with out saying, VT-d and SR-IOV should be enabled in BIOS. I spent sometime troubleshooting before i realized SR-IOV was not enabled. After i made sure both were enabled, it all worked great!
What was the symptom of SR-IOV not being enabled?
If SR-IOV is not enabled in the BIOS then you won’t see any VFs.
Exactly. In my case, SR-IOV is not an available option in my old ThinkServer TS440. With VT-d enabled, I am able to passthrough GPU but VFs does not show up.
This is great article! I followed it for my Proxmox 8.1 kernel 6.5.11-7-pve with Windows 10 VM setup. At first I couldn’t get the VFs work but I realized that I started the procedure on fresh Proxmox install so as soon as I ran “apt update && apt upgrade” the kernel version changed after the next reboot which takes place at later point! I think such a warning/remark could be added to this intruction.
Eventually I reinstalled Proxmox, updated packages and kernel, REBOOTED the server and only then I started this whole procedure. Everything works fine for me!
PS Indeed Parsec doesn’t work in that setup.
The instructions were superb. The only deviation i made was having to install the iris drivers before removing the display from the vm hardware config. The vm would not boot otherwise. Now with the gpu, i get get a “Windows has stopped this device because of an error”. If i remove it in device mangler, windows finds it and shows it installs fine, but i get no gpu tab in task manager. After a reboot, same thing. Little x in device mangler.
I have shut down and restarted the vm several times, restarted the node. Clean device driver install. Uninstall and reinstall… Same deal
Hello, I followed your guide and rebuild my kernel. However, I was not able to get my driver to work. After a few days of troubleshooting, I realized that my CPU (Intel(R) Xeon(R) CPU E5-2697 v4 @ 2.30GHz) does not have the vGPU.
My quetion now is, how do I rollback these changes to get to my stock proxmox kernel?
> pveversion
pve-manager/8.1.4/ec5affc9e41f1d79 (running kernel: 6.5.11-7-pve)
I would post on the Github repo for the kernel mods, or Reddit. I’m not entirely sure.
Great tutorial, thank you! One issue I encountered is that the i915 driver crashes if you’re also using a discrete Intel GPU. It was necessary to add “softdep drm pre: vfio-pci” to /etc/modprobe.d/drm.conf and “options vfio-pci ids=8086:56a0” to /etc/modprobe.d/vfio-pci.conf for my Arc A770. Once the i915 didn’t have to deal with it, everything went as expected.
A couple questions:
Hi, do you find a solution for this issues?
Just after writing my host message, I realized that I had not set the CPU type to “host” as you described. I did that, and it works!
The comment about the discrete intel card still stands, probably worth calling out in your tutorial.
Thanks again for putting this together.
Hi,
I’ve proxmox 8.1 and I’m using this device from Nipogi AD08.
I’ve configured the passthrough, added the video card “Alder Lake-P GT1 [UHD Graphics]” as PCI (without the flag PCI otherwise Windows is returning error 43) but at the end HDMI is not working.
Any suggestion / path to follow (i executed the guide here reported and no issue detected)
Hi,
I follow all your steps, but it doesnt work.
my CPU is 12100, Intel VT-d is enabled, secure boot turned off , kernel:6.5.11-8
root@www:~# uname -r
6.5.11-8-pve
root@www:~# dmesg | grep i915
[ 18.836824] i915 0000:00:02.0: [drm] fb0: i915drmfb frame buffer device
[ 19.498743] i915 0000:00:02.0: not enough MMIO resources for SR-IOV
[ 19.580350] i915 0000:00:02.0: [drm] *ERROR* Failed to enable 7 VFs (-ENOMEM)
[ 19.663001] i915 0000:00:02.0: not enough MMIO resources for SR-IOV
[ 19.743905] i915 0000:00:02.0: [drm] *ERROR* Failed to enable 7 VFs (-ENOMEM)
Hi, I have got the same error and fixed it by enabling “Transparent Hugepages” in BIOS. Got a CWWK 13th gen i5 1335U and found it somewhere near in the CPU section in BIOS.
Hello, for AMI Bios you must enable *Above 4GB MMIO* under chipset settings.
When I run lspci | grep VGA
I get the expected output:
00:02.0 VGA compatible controller: Intel Corporation Raptor Lake-P [Iris Xe Graphics] (rev 04)
00:02.1 VGA compatible controller: Intel Corporation Raptor Lake-P [Iris Xe Graphics] (rev 04)
00:02.2 VGA compatible controller: Intel Corporation Raptor Lake-P [Iris Xe Graphics] (rev 04)
00:02.3 VGA compatible controller: Intel Corporation Raptor Lake-P [Iris Xe Graphics] (rev 04)
00:02.4 VGA compatible controller: Intel Corporation Raptor Lake-P [Iris Xe Graphics] (rev 04)
00:02.5 VGA compatible controller: Intel Corporation Raptor Lake-P [Iris Xe Graphics] (rev 04)
00:02.6 VGA compatible controller: Intel Corporation Raptor Lake-P [Iris Xe Graphics] (rev 04)
00:02.7 VGA compatible controller: Intel Corporation Raptor Lake-P [Iris Xe Graphics] (rev 04)
However, I get nothing from dmesg | grep i915
I combed the dmesg log and saw nothing at all about the igpu/i915.
Ignored it and set everything up in a Win 10 VM and it works great.
Ignore
Hygaard and Derek-
Many thanks for providing this tutorial. I am using this on a new Minisforum MS-01 with 13th Gen Raptor Lake iGPU. Like Hygaard, I have no output from “dmesg | grep i915”. Also like Hygaard, I can proceed and everything appears to work.
In my case however, I am seeing unstable reboots in both the VM and the node hosing it. I am a hobbyist user of Proxmox so my understanding of issues can be limited.
In the Syslog of the node I can see this 12x when starting the VM:
After boot the VM appears to function well. After some time Syslog for the node shows:
Feb 19 13:10:00 pve01 kernel: mce: [Hardware Error]: Machine check events logged
Shortly after this error either the VM or the node will reboot.
I know this is very new hardware and that maybe the problem.
How did you configure i915 on MS-01? I can’t get the VFs in lspci
You may need to do the MOK setup part again, or if you’ve updated the Kernel, you’ll have to redo the build steps again. When I had that happen it was because I had updated my kernel and just had to restart from the beginning of the guide.
For what it’s worth, I am also using an MS-01 with 13900H.
I have not run in to the same issues, so I can’t help much.
If it’s any help I am using Proxmox with Kernel Version:
Linux 6.5.11-8-pve (2024-01-30T12:27Z)
Hi All,
Thank you for the detailed and updated article.
I have a “8 x 12th Gen Intel(R) Core(TM) i3-1215U (1 Socket)”
Installed and configured according to the article and everything is working excellent, meaning that i have two Windows VMs (10 and 11) both configured with vFR and running concurrently.
My issue starts with the macOS VM i have which is configured (according to the article on installing mac on proxmox) with “Display: VMware compatible). when i start this VM, i see in the dmesg that proxmox “Disabled 7 VFs” , and from there on, there is no more virtual displays.
how can I resolve this and have all working together ?
Thanks in advance
Daniel
Kudos! Great guide thanks.
I was able to enable GPU passthrough in my brand new Dell Optiplex Micro 7010 (Released in 2023) w/ Intel 13th i5 processor and UHD integrated video card. Everything seems working fine but sometimes my RDP gets disconnected and I find this trace in syslogs:
No errors before enabling GPU passthrough.
Any clue?
Adding other logs as separate msg due to limits on length:
After days of intensive use I can confirm that setting Intel E1000 instead of VirtIO solves this issue.
Hi Derek,
(for some reason, my post was deleted),
I installed and configured everything correctly, and able to run two windows VM, but when i start a macOS VM, i see in dmesg “Disabled 7 VFs”. the macOS is configured as “Display: VMware compatible” . how can i configure the macOS VM correctly ?
I had the same issue. I found that I had a VM auto starting trying to use PCIe IDs 0.
As said above.. only use PCIe IDs 1-7
Using PCIe IDs 0 seems to disable the 7 VFs.
It seems that I can only use 0 and that 1-7 on my 13900k are unavailable…trying to figure that one out still.
Greetings, GPU passthrough in Optiplex 7010 (2023) i5 13th gen makes my VM unstable and unresponsive, shows often black screen or graphic glitches, so I need to kill/stop it.
When starting it up I see in Syslogs (not sure it’s linked to this issue):
The only way I’ve found to mitigate is to add Display as VMware compatible instead of none. Error 22 is still there, but at least it’s been stable for days now.
Will this work with a 10th gen intel processor? or if the only vm that needs the gpu is windows is it possible to just pass it to that?
No. Intel used GVT-g on 10th gen and earlier.
Bloody legend you are! Works great on 6.5.13-1-pve. I now have GPU passthrough for both Windows 11 and ttek Plex LXC
NUC 12 with a 12700H
So I’m getting stuck just before the Secure Boot MOK Configuration step. When I reboot the system hangs at:
i915 0000:00:02.0: 7 VFs could be associated with this PFi915 0000:03:00.0: [drm] VT-d active for gfx access
And I don’t even get the option to complete the MOK step. It’s happened to me on two kernels, 6.5.11-8-pve and 6.5.13-1-pve. I end up having to hold the power button to turn off, then when it boots gain it does so normally, but I don’t get video out past
EFI stub: Loaded initrd from LINUX_EFI_INITRD_MEDIA_GUID device pathEFI stub: Measured initrd data into PCR 9
but I can access the system via SSH again. I’m wondering if the video is just dying but the MOK screen is still waiting for input? I tried pressing enter twice then my root password to see if it would progress but nothing happened.
What are the exact key presses necessary from that part up to entering root password, and then what key presses are necessary to submit and complete the process?
Thanks for the great guide! Small note for others. The Display Adapter shows up as Intel(R) UHD Graphics instead of Intel(R) Iris(R) Xe Graphics if you’re not running a dual-memory channel configuration.
Hey Derek,
Have you seen this github
https://github.com/intel/Display-Virtualization-for-Windows-OS
With this following Driver from Intel.
https://www.intel.com/content/www/us/en/download/737311/iotg-display-virtualization-drivers.html
This white paper coauthored by intel, lead me down this path.
https://us.dfi.com/Uploads/DownloadCenter/5631e304-28b2-4256-975a-5689750b5636/Intel%20iGPU%20(Integrated%20Graphics)%20SR-IOV%20-%20The%20Catalyst%20for%20IoT%20Virtualization%20in%20Factory%20Automation.pdf?timestamp=1676441838.9072
The Rundown on the first link is how to pass a physical display port (no more than 4 virtually) upon vms. This can be useful for people wishing to have physical display access their vms. more importantly i believe this will fix the parsec issues other are reporting along with sunshine issues I am having, when deployed with a display dummy plug.
Thank You for your existing work. Its helped me soo much.
Hi, I am using Proxmox 8 with Grub, all is good, except after reboot I get:
Any help in trouble shooting? I actually only need 1 for a Windows, dont think I need the 7
Same here, proxmox 8.2.4 with kernel 6.8.8-4-pve.
Updated from previous kernel and updated latest i915 modules from git.
The module loads fine and i have a working transcode going in a lxc container but i’m not seeing 7VF’s
Found the problem: i was rebuilding the dkms on an older kernel, rebooted to a new kernel and it was not active.
so on the current booted kernel i started this command
and after a reboot, i got 7 VF’s
Just saying thanks broke my install with the new kernel and used your guide and it fixed it perfectly. Previously used the guide from last summer.
hi guys, I ran into a bad problem, after trying the guide without success (Intel n305) when I try to format proxmox with liveusb, or simply to install another distro I get a strange message that prevents me from booting another one system, any advice on how to fix it?
The message Is: mokmanager not found
Something has gone seriously wrong: import_mok_state() failed
salve ragazzi, mi sono imbattuto in un brutto problema, dopo aver provato la guida senza successo (Intel n305) quando provo a formattare proxmox con liveusb, o semplicemente ad installare un’altra distro mi appare uno strano messaggio che mi impedisce di avviare un altro sistema, qualsiasi consigli su come sistemarlo?
hi guys, I ran into a bad problem, after trying the guide without success (Intel n305) when I try to format proxmox with liveusb, or simply to install another distro I get a strange message that prevents me from booting another one system, any advice on how to fix it?
The message Is: mokmanager not found
Something has gone seriously wrong: import_mok_state() failed
Praticamente ho risolto eliminando alcune voci da efi Shell
Is there a documented procedure or best practice for reversing these steps?
Just like several others, I was unable to bifurcate into 7 VFs using zfs without secure boot enabled. However, after trying, my existing Jellyfin LXC was pegging CPU with multiple transcodes (usually doesn’t break a sweat). I tried to reverse out the key changes, but was unable to solve the new issue. Therefore, I went ahead and enabled secure boot in my bios and reinstalled proxmox. I’m tempted to give it a whirl with my new grub configuation, but before I do, I have a couple of questions: Derek mentioned that this could negatively impact LXC’s and may not work with Linux VMs. The only reason I still have some LXC’s is for transcoding/hardware acceleration. Has anyone used a VF for an Ubuntu VM with a docker based Jellyfin service? If so, how well does it work? Same question for Frigate (pass VF to Ubuntu VM that hosts docker/frigate). What about LXCs? Is anyone using VFs and also has a Jellyfin LXC? Is there anything additional I need to do? I’m currently just binding the render.
secure boot is not required, also it is possible to convert an existing install to secure boot if you need it (especially if you already use grub/efi)
If you are getting code 43 errors on the GPU after following this guide (or worse automatic repair loops) note that if you enable WSL or anything that configured windows hello (using a microsoft account at install time, using AAD join) then this will cause issues after a few reboots of the VM.
Make sure you use only a local account install and never AAD join / install WSL / bind to a microsoft account.
Thanks for the great article, I first had a lot of problems because of newer kernel but since I discovered I had to use older kernle everything went as expected.
I have one doubt, MY gpu is discovered by windows is working normal, but when I run dmesg | grep i915 I see this error in each virtual GPU:
Is this something I have to worry about or its normal ?
THanks in advance
Thank you so much for this guide.
Unfortunately, I didn’t make it past step 4. I Got the “bad return status” error trying to run the “install” command.
What do I need to do to make sure I’ve got the system back in the state where I started?
I’ve run the cleanup commands at the beginning of the article, but I’m not sure if I need to do anything else.
Thanks!
Excellent guide. I was able to get the VFs setup and use it on a windows VM. However, I want to connect local monitor to the HDMI output, and seems like there is no way to do that with a vGPU. How do I go back to using GPU passthrough? Is fresh proxmox install the only way?
Tried following this guide but it does not seem to work with kernel version 6.8.4-2. As mentioned above the dkms install command exits with the following error.
The mentioned log contains errors the following. I can paste it all here but here is a part of it. Anyone know how to proceed?
Yes, DKMS is broken on kernel 6.8. Need to stick with the prior Proxmox kernels.
Thanx for the heads up. Already switched back to kernel 6.5 and got everything set up. Thanx for this guide, much appreciated.
Hello Derek,
Do you think the new version 8.2 proxmox VE will be able to get this tutorial through ?
Not with kernel 6.8. The Proxmox 8.2 VE readme says DKMS is broken on kernel 6.8. Need to stick with the older 8.1 kernel for now.
Thanks for the answer.
That’s conforting me to not do vGPU for my Plex server as I read everywhere that vGPU broke the driver implementation in the Plex server, and broke the hardware transcoding including hdr tone mappling that I need !
So I think I’ll do a full iGPU pass through to one VM and use inside it the docker PMS and Nextcloud+Memories that both need access to /dev/dri.
I hope I’ll manage to to this.
You didn’t wrote something for full intel iGPU passthrough by chance ?
I read the article on the LXC but I want to share the iGPU with docker Nextcloud… so I’m not sure I should follow what you’ve wrote there.
Thanks for your work !
Miles
No I haven’t done a full GPU passthrough guide.
I’ve tested Proxmox 8.2 with kernel 6.5.13-5 with success, using the latest 4/20/2024 Intel Arc drivers. Do NOT use Kernel 6.8x.
Derek,
Proxmox 8.2 should work if you install and pin the 6.5.13-5-pve kernel. That way you’re on the actual, current supported Proxmox (8.2), with the latest version of the 6.5 kernel that the DKMS i915 driver likes.
I had to learn how to pin a kernel. Here’s what worked for me.
https://forum.proxmox.com/threads/how-to-pin-a-machine-to-proxmox-8-1-or-any-previous-version.145752/#post-658476
Yup, I’ve since updated the post for Proxmox 8.2 and the kernel pin procedure.
I’ve updated the guide for 8.2.
Hello again ,
I was thinking about to have the screen working for the proxmox host in case of something get wrong with the vGPU?
Is it possible to have a backup kernel version to boot too in such case?
I don’t know if it’s even possible…
but I hope there is a way to get the proxmox console to be accessible directly with a screen connected to the host.
Thanks for the help 😊
The easiest thing to do, if you have an available PCIe slot, is to install a serial port card and enable it for TTY access in the kernel command line. That way, you can use a serial cable to get in, and see the entire boot-up process.
With a USB Serial adapter, you won’t see any of the startup until the login prompt appears, so if it crashes before it gets to the login prompt, you won’t be able to see anything. LIkewise, SSH will only work if the system makes it far enough to activate the SSH server.
If you’d like to try this, let me know and I’ll send a link to instructions. 🙂
You can check your installed kernels and switch between them via the proxmox-boot-tool. What does the command: proxmox-boot-tool kernel list say now?
Hello,
The problem is that I don’t have any PCIe slot available: I have a NUC Geekom.
The command for kernel list gave me:
Hello I am trying to get this setup on my fresh install using Proxmox 8.1-2 Kernel 6.5.11-8. I am running into a
When I run the apt install commands I am seeing prints of
I pinned the kernel to 6.5 and it still appears to be having issues. After a reboot and attempting to install dkms again it prints
Im not really sure what else I can try unless its just the 8.2 issue.
Try kernel 6.5.13-5. I just upgraded, and used latest 4/20/2024 Arc drivers with no issues.
Good day. I decided to blow my node away and rebuild it. Unfortunately I’m running in to an error early on. In the Kernel Configuration section under #4, I run it and get the following:
root@pve2:~# dkms install -m i915-sriov-dkms -v $KERNEL -k $(uname -r) –force -j 1
dkms status
Sign command: /lib/modules/6.5.11-8-pve/build/scripts/sign-file
Binary /lib/modules/6.5.11-8-pve/build/scripts/sign-file not found, modules won’t be signed
Error! Your kernel headers for kernel 6.5.11-8-pve cannot be found at /lib/modules/6.5.11-8-pve/build or /lib/modules/6.5.11-8-pve/source.
Please install the linux-headers-6.5.11-8-pve package or use the –kernelsourcedir option to tell DKMS where it’s located.
i915-sriov-dkms/6.5.11-8: added
Did I miss something? I’m not sure what’s going on and I can’t get past it.
Yes, my instructions should pull down the right kernel headers. I just upgraded my system to 6.5.13-5 and the latest Intel Arc drivers with no issues.
Hello!
Thanks again for this tutorial. I’ve got it working with Windows 11 on an i5-12700T in an HP Elite Mini G9 600.
Could you modify the first step to include installing sysfsutils via apt? This isn’t a default Proxmox package, and without it, the system won’t be able to read the sysfs.conf file on boot and won’t start the VFs. I spent a good 2 hours of so misdiagnosing this problem (and getting distracted by things that weren’t actually errors) before realizing I was missing a package.
Now I’m messing around trying to figure out the best way to get 60 fps RDP on my local network. 🙂
I updated my guide to move up the installation of sysfsutils to earlier in the guide.
Hello, I am having an issue while running the dkms install command, like another user, but I am not able to overcome this. Any way you could help me with this? The error I get is:
Error! Bad return status for module build on kernel: 6.5.11-8-pve (x86_64)Consult /var/lib/dkms/i915-sriov-dkms/6.5.11-8/build/make.log for more information.
I would try with kernel 6.5.13-5. That build worked very well for me.
Hello. This version does not appear to be available while using apt install pve-kernel-6.5.13-5
Just wanted to thank you for the tutorial, ad for adding the instructions for using systemd as I am using a zfs mirrored install location. It is working, I have tested using igpu of an i5 12500T to decode and encode a video using handbrake under Windows server 2022, running on proxmox 8.1.4, with 6.5.13-5-pve kernel.
I’ve followed your excellent guide before with great success. This time though on a new MS-01 with a new and updated install of 8.2 I’m apparently getting a compile error while trying to build the kernel. It says:
Consult /var/lib/dkms/i915-sriov-dkms/6.5.13-5/build/make.log
CC [M] /var/lib/dkms/i915-sriov-dkms/6.5.13-5/build/drivers/gpu/drm/i915/display/intel_dp_mst.o
/var/lib/dkms/i915-sriov-dkms/6.5.13-5/build/drivers/gpu/drm/i915/display/intel_dp_mst.c: In function ‘intel_dp_mst_find_vcpi_slots_for_bpp’:
/var/lib/dkms/i915-sriov-dkms/6.5.13-5/build/drivers/gpu/drm/i915/display/intel_dp_mst.c:86:43: error: too many arguments to function ‘drm_dp_calc_pbn_mode’
86 | crtc_state->pbn = drm_dp_calc_pbn_mode(adjusted_mode->crtc_clock,
Did I somehow miss something?
I replicated that error on my N305 mini PC. I even did a wipe and reload without success. Not sure what’s wrong.
Ah, thanks! Always glad enough to just know it’s me this time, lol.
Looking at the i915-sriov-dkms git, it does look like these bits were modified 2 days ago. Perhaps it’s a work in progress? Thanks again! =)
Try kernel 6.5.13-3 instead of -5. A reader suggested that version, and viola, it WORKED for me on the system that 6.5.13-5 was giving me fits on. I’ve since updated my instructions for 6.5.13-3.
Just a final fyi note:
I noticed my other proxmox box was still running on 6.5.13-3-pve. So I rebuilt the MS-01 to test and use that kernel. It also works as expected. My windows11 guest test happy.
Anyways thanks again! =)
Yes, THANK YOU! I tried 6.5.13-3 on my stubborn system, and VIOLA, it worked! I’ve updated the steps.
Hi – I’ve run through all of the steps (MS-01, 13900K), and all is fine and matching the guide – up to checking for the 7 devices – still only 1 shows up (after the MOK config). When I attempt to re-run the mokutil command, I get “SKIP: /var/lib/dkms/mok.pub is already enrolled” . Running “mokutil –list-enrolled” shows that there is a key enrolled. Is there any other things that can be checked to get this enabled?
How did you fix it?
I assume you no longer need this a year later, but for anyone else: mokutil –revoke-import
it will revoke the one you started and let you start a new one.
Hey guys – I’ve worked through the guide on my MS-01 and have been able to activate SR-IOV for the iGPU in Proxmox and can see 7 devices. However, I’m struggling to enable the driver on an Ubuntu guest VM. I can see the passed-through iGPU on the guest
lspci -nnv | grep VGAproduces
00:10.0 VGA compatible controller [0300]: Intel Corporation Raptor Lake-P [Iris Xe Graphics] [8086:a7a0] (rev 04) (prog-if 00 [VGA controller])but I’m unsure how to install the driver and enable it – the guide on the strongtz/i915-sriov-dkms github page is very limited, and I think I’m missing some key details. Many of the guides online describe using a Windows guest, so I’m a bit stuck.
Thanks all!
No the kernel on the host and guest don’t need to match. However both of mine are on different minor versions of 6.5
My VMs are on 6.5.0-28-generic
Hey Doug, did you have to install the dkms on guest vm as well?
Hi Derek. Thanks for excellent guide. Intel documentation (page 3) says SR-IOV support display virtualization up to 4 physical displays so 2xThunderbolt + 2xHDMI output should be possible but maybe we have to wait for the new Xe driver in 6.9 kernel with SR-IOV support included.
https://www.intel.sg/content/dam/www/central-libraries/us/en/documents/2022-09/intel-whitepaper2022-dfi-v11.pdf
Thanks for this great guide!
Unfortunately, I’ve wasn’t able to make it work on Tiger Lake (i7-1165G7).
Got the 7 VFs, switches to secure boot and enrolled MOK, all looks good on Proxmox side.
But as soon as I install Intel drivers (31.0.101.5590) I’m getting black screen, and the RDP is disconnected.
On the device manager I’m getting:
“Windows has stopped this device because it has reported problems. (Code 43)”.
Any Ideas?
Having the exact same issue. Did you find a solution?
Unfortunately no. From what I read we need intel 12th gen cpu for this to succeed.
Did anyone try Frigate with LXC vGPU for hardware decoding and OpenVINO inferencing? Does it have the same problems as Plex?
I’m upgrading my Debian server to a NUC 14 Pro+ with Proxmox. It contains the Intel Arc Alchemist GPU. I’m new to Proxmox, but my idea was to use both VMs for desktops and LXC for docker. Both would need the GPU for hardware encoding and inferencing. I don’t use Plex but Jellyfin would run on LXC.
Very nice work. Wish the project supported kernel 6.8 but being able to pin 6.5.x does seem to work. Unfortunately, even with the boot environment pinned, whenever the Proxmox team releases new kernel updates you get build errors when updating using apt. You can just ignore these if you do your updates manually but it kinda reaks havoc on any automations (like using Ansible to manage your updates – the apt errror cause your playbook to quit processing on the affected host).
Also – I found that you can restore access to the Proxmox “console” if you set your display type to “Virtio-GPU” and then install the Virtio GPU driver in the guest. Windows 11 seems quite happy to have both the Virtio-GPU and Iris XE drivers installed at the same time.
without pinning kernel
GitHub – moetayuko/intel-gpu-i915-backports at redhat/main-epyc7002
new dkms support…
https://github.com/strongtz/i915-sriov-dkms
Linux i915 driver (dkms module) with SR-IOV support for linux 6.1 ~ linux 6.9
i using erying i9 12900hk but i cant locate SR-IOV in bios, theres another way to do it?
Just did a fresh Proxmox 8.2.4 install with 6.8.8-3 kernel and seems like passthrough is now fixed (albeit with a new naming scheme so my @PKGVER@ was 2024.07.19)
Hello is there a way to Revert all this?
Thank you
Update from kernel 6.8.8.4 to 6.8.12.1 failed because of dkms etc.
I want to run the latest kernel, so this is what i did.
After these steps the upgrade to 6.8.12.1 succeeded!
Not sure if it works in all situations:
1. dkms status (gives you modulename and version used for step 2)
2. dkms uninstall -m <module>/module-version> –all
3. grub bootloader: mv /etc/default/grub.bak /etc/default/grub
4. grub bootloader: update-initramfs -u -k all
5. systemd boot: remove changes to /etc/kernel/cmdline and update the initial ramdisk
6. systemd boot: proxmox-boot-tool refresh
7. dkms remove -m <module>/module-version> –all
8. reboot
After reboot dkms status should give nothing.
Has anyone tried full passthrough of the entire integrated GPU? I want to have a guest utilize the HDMI outputs but am struggling to get it to work. I ended up finding this custom ROM (un-translated link), which gets me to the point of getting some garbled HDMI output. Unfortunately I’m not sure how to debug further.
Here’s the argument that I’m passing to qemu to get that far:
Thanks in advance for any insight on debugging this!
Great guide. Any tips on passing the vGpu to a lxc container?
My conf looks something like this but plex isn’t using it for transcoding.
Found my issue. There is a typo on the first line. “cgroup” -> “cgroup2”.
This enabled hw transcoding in plex, but I still had to turn off HDR tone mapping, as mentioned in this article.
I also installed the ge9/IddSampleDriver on the Win11 vm so that Sunshine & SteamLink would stream properly.
fwiw I tried and cannot get this working. Maybe motherboard? Probably because of Rocket Lake
CPU i5-11500T, Motherboard MSI z490 Gaming Edge Wifi, In Bios: VT-d, IOMMU, SR-IOV all enabled
Proxmox 8.2.4 Kernel Pinned to 6.8.8-4
dkms is latest, i915-sriov-dkms built and installed.
/etc/kernel/cmdline:
dkms-status:
proxmox-boot-tool refresh and update-initramfs -u -k all for good measure and after reboot:
Does not return the vGPUs, only the root pci device
This makes me sad
HI, if anybody wondering this also works on Win 10 22H2 with driver 32.0.101.5972 WHQL Certified. Good luck all on your journey.
Thanks for the updated version, I have an odd error, after I reboot proxmox, I can go to the VM and select PCI device and see all 7 listed, I chose the 02.1 device from the list, the windows vm boots and the graphic card has no error. However after I shut windows down when I try to start it I get an error no pci device for 02.1 and when I go into the vm settings and check pci devices there is only one listed for Iris xe ?
Hi, I previously set this up from previous post with earlier kernel on a Lenovo ThinkCentre 12th gen 12400T, however every time I tried to start a second VM the first would shutdown and the other would start.
So I started again with the latest Proxmox, I am able to see the 7 VF but the same result as above, only 1 VM can run at a time.
I tried giving each VM their own slice and also tried a VGA pool both result in only 1 VM running at a time.
Any help on the above would be greatly appreciated, oh I also followed your letsencrypt setup with PBS on my synology, the proxmox host has ssl working but not the pbs.mydomain.net that still shows insecure 🙁
Here are some outputs, as I say only 1 VM can start at a time even though I assign them a different slice.
root@m70Q:~# cat /sys/kernel/debug/dri/0/i915_dmc_info
fw loaded: yes
path: i915/adls_dmc_ver2_01.bin
Pipe A fw needed: yes
Pipe A fw loaded: yes
Pipe B fw needed: no
Pipe B fw loaded: no
version: 2.1
DC3CO count: 0
DC3 -> DC5 count: 6
DC5 -> DC6 count: 0
program base: 0x0c004040
ssp base: 0x00086fc0
htp: 0x01a40188
root@m70Q:~# dmesg | grep i915
[ 0.000000] Command line: BOOT_IMAGE=/boot/vmlinuz-6.8.12-1-pve root=/dev/mapper/pve-root ro quiet intel_iommu=on iommu=pt i915.enable_guc=3 i915.max_vfs=7
[
I’ve set everything up on a new thinkcentre Gen 3 with a an intel i5-12400T. I setup a VGA-pool, I also tried to assign separate raw devices. When my win 11 VM is running (drivers installed etc, bit choppy on video playback but can see the UHD 730 in device mgr) and I try and start another VM (Linux/macos/win) it freezes the host for a while then starts the other VM whilst killing the running one. This also happened on the earlier kernel and the current. Has anyone got any ideas of what I can check as I’m out of ideas. BIOS updated also.
Dave, a few months ago when a new proxmox version came out I remember having to pin my kernel (I’m pinned to 6.5.13-5-pve) so that I could continue updating proxmox packages, but keep my SR-IOV intact. Is that no longer the case anymore? Can I unpin the kernel and update as normal and then just follow the whole process of rebuilding dkms? I know this post is focused on Windows 11, but I’m assuming I’d have to do the same thing I had to do previously for my debian VM (that is, update it, recompile the kernel with the proper flags and then rebuild dkms there too)?
Hi there, would it also possible to use the CoffeeLake-U GT3e [Iris Plus Graphics 655] with this method? I have vt-d enabled and it support IOMMU as far as I can see.
Only thing is that it does not create vgpu’s when I list it with lspci | grep VGA I only see the following.
00:02.0 VGA compatible controller: Intel Corporation CoffeeLake-U GT3e [Iris Plus Graphics 655] (rev 01)
But when I look into /sys/bus/pci/devices/0000\:00\:02.0/ I don’t see the sriov_numvfs there.
Is there a way around this how I can get it to work?
Looks like it worked for a bit for me, all 7 Vfs showed up but as soon as I reboot the VM, the 7 Vfs is gone and shell is showing me “Disabled 7 Vfs”.
What should I do at this point?
Using your instructions, I got it working on my new Beelink EQi12 (i3-1220p) with ProxMox 8.2.4 and linux kernel 6.8.12-1-pve. At first I had problems with Parsec which just gave me a blank white or blank black screen as soon as I started a game. After removing the installed Intel driver and rolling back to the driver (31.0.101.5537) that comes with Windows 11, parsec now works properly on this system. Thanks a lot for your time and effort maintaining these instructions!
Of course, Windows Update just had to update the Intel GPU driver, breaking my Parsec (black screen when starting a game). Luckily, by downloading intel GPU driver version 31.0.101.5537 as a CAB-file from http://www.catalog.update.microsoft.com and forcefully downgrading the driver using the “Have disk…” option, I got Parsec working again with this vGPU setup. I also disabled driver updating using gpedit – hopefully that allows me to keep this driver.
Excellent guide. I got it to work, where I can assign vGPUs to multiple VMs. Are there steps on how I can go back to regular full device?
Perhaps useful to add how you can specify the kernel version to build the dkms module for.
I installed a new kernel while the old was still pinned and the
command kept using my previous kernel version.
Changing it to:
helped.
Hello, I tried following the guide, but I can’t manage to get the 7 VFs. I’m using a Dell Vostro laptop with an Ice Lake i5-1035G1 CPU. Could it be an incompatibility with Ice Lake? According to Intel’s website, it supports GVT-d
The sweet spot for stability seems like Intel’s 12th generation.
Very thanks!
Thank you for this!
I have a NUC 11 running proxmox 8.2.2. Kernel 6.8.12-2-pve
Still giving code 43 with latest intel driver installed. I can confirm 7 VFs and using 00:02.1
Errors i see
xe 0000:00:02.7: Your graphics device 9a49 is not officially supported
by xe driver in this kernel version.
i915 0000:00:02.7: [drm] *ERROR* GT0: IOV: Unable to confirm version 1.0 (0000000000000000)
i915 0000:00:02.7: [drm] *ERROR* GT0: IOV: Found interface version 0.1.0.0
Updating grub
W: Possible missing firmware /lib/firmware/i915/mtl_gsc_102.0.0.1511.bin for module i915
W: Possible missing firmware /lib/firmware/i915/mtl_huc_8.4.3_gsc.bin for module i915
W: Possible missing firmware /lib/firmware/i915/mtl_guc_70.6.4.bin for module i915
Any ideas?
Awesome stuff, I just wanted to share that you can use your Microsoft account from the beginning but you have to use a workaround to RDP with it. Once you are in windows just run in a cmd this:
If I remember correctly is going to ask you credential once again but after that you can RDP with your credential no problem. Give it a try!
Worked perfectly today on Proxmox 9 running on a MinisForum MS-01 with a 12th gen CPU. If you want to run Debian 13 in a VM you’ll want to enable the non-free-firmware section and install the firmware-intel-graphics package. You may see the message
Cannot find any crtc or sizesin dmesg but that seems to be because there’s no display attached.