This post covers using an Intel 12th Gen (Alder Lake) CPU with Proxmox VE 8 to do VT-d vGPU passthrough to a Windows 11 Pro VM. This enables multiple VMs on the same Proxmox host share the GPU via virtual functions (VFs). What is VT-d vGPU and how is it different from ‘legacy’ GPU passthrough?
“Legacy” GPU passthrough requires that the entire GPU be dedicated to a single VM. Other VMs on the Proxmox host can NOT share the GPU. However, there is newer technology called Intel VT-d (Intel Virtualization Technology for Directed I/O) which is related to SR-IOV (Single Root I/O virtualization). This enables compatible devices to virtualize a device, like a GPU, into multiple VFs (virtual functions). This enables, for instance, multiple VMs on a single Proxmox host to share the same physical GPU and benefit from hardware acceleration as if they had their own physical GPU.
The screenshot below is from my Beelink i5-1240P Proxmox VE 8 host. The “root” GPU is at PCIe 02.0, while there are 7 VF GPUs. This means I can have up to 7 VMs using the same physical GPU. Pretty cool right?

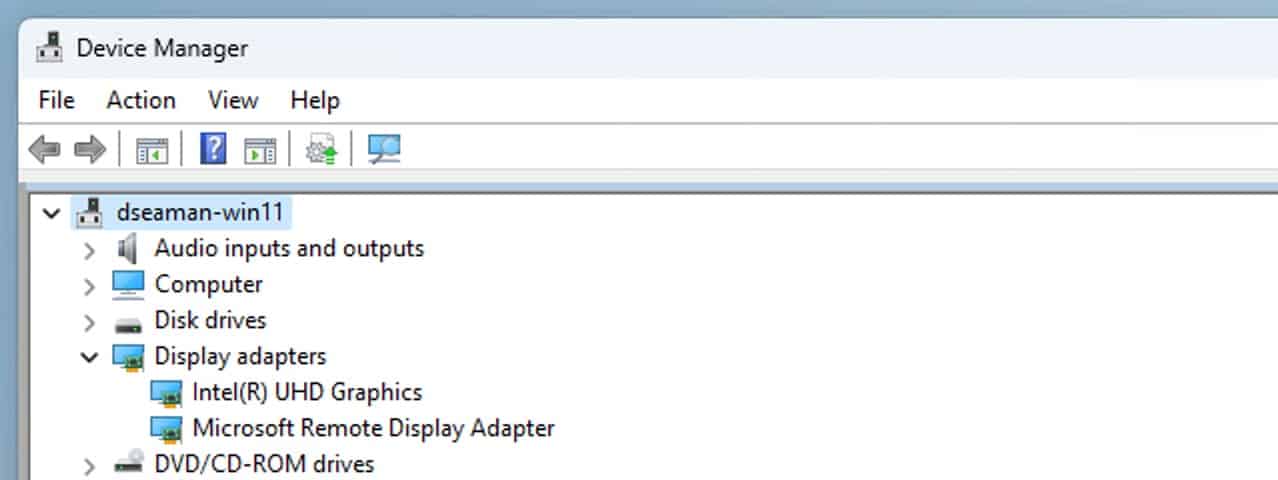
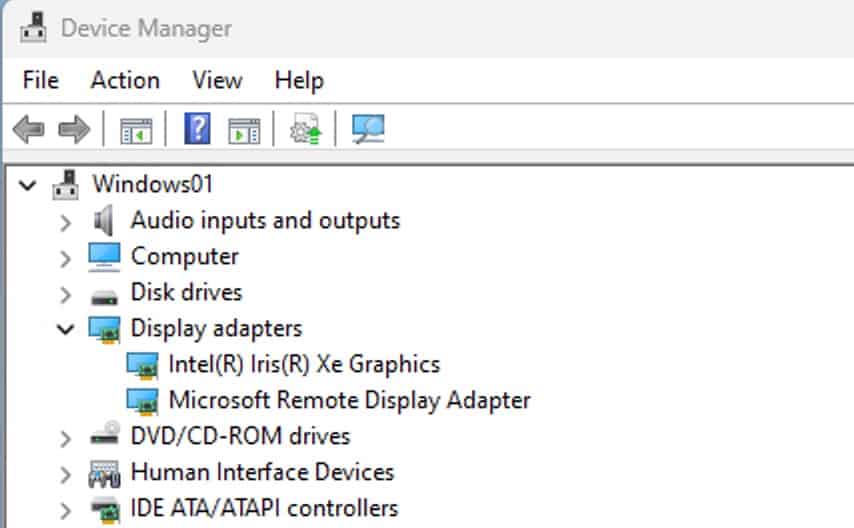
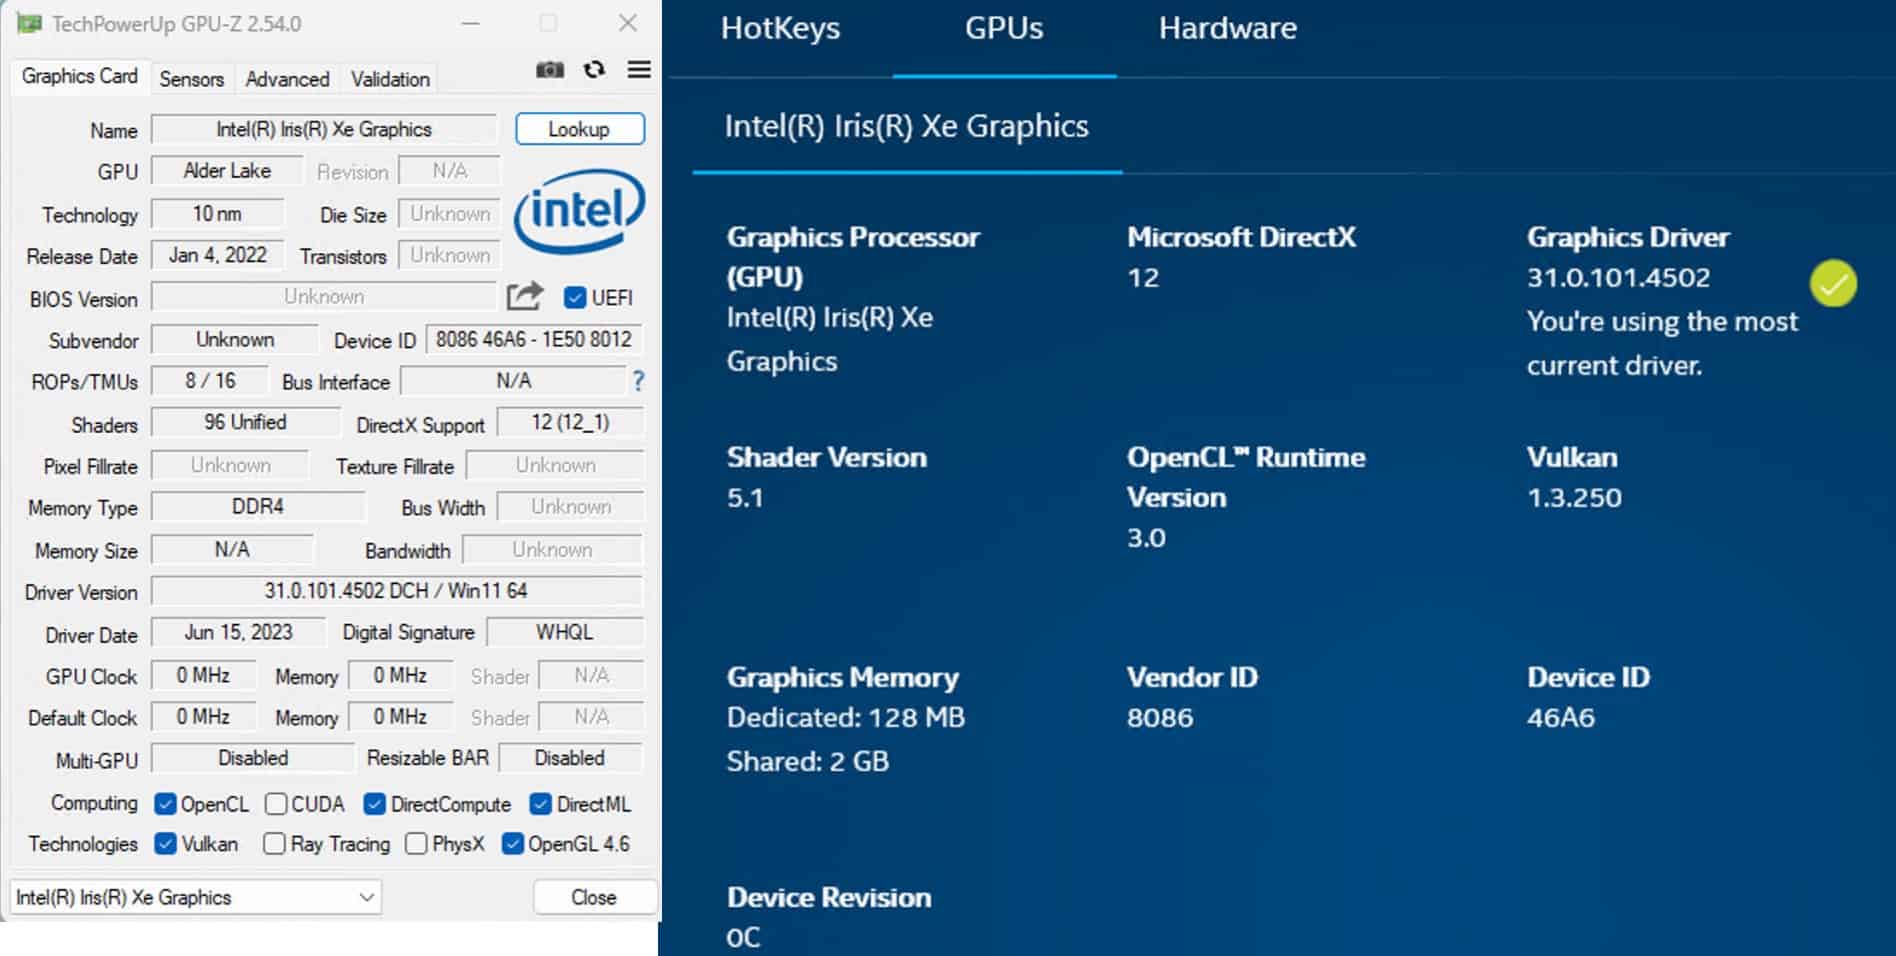
And as you can see in the screenshot below, Windows and the Intel drivers are none the wiser. It looks like a regular Intel UHD graphics card to Windows. And you install the regular Windows 11 Intel drivers, and they just magically work.
Update November 23, 2023: I’ve completely re-written this post for Proxmox 8.1 (and 8.0). All of the content I covered here is refreshed, plus new content added. Please refer to the new post: Proxmox VE 8.1: Windows 11 vGPU (VT-d) Passthrough with Intel Alder Lake This post now should only be used for viewing user comments at the end of the post. The new post works for BOTH Proxmox 8.0 and 8.1.
Update July 7, 2023: Windows 11 Pro continues to be rock solid with zero issues for several weeks of 24/7 usage. But take note that I’m not passing the Windows VM through to a physical HDMI port. I’m only accessing the Windows 11 VM via RDP. The Linux vGPU drivers have some issues. Namely, a Plex LXC doesn’t properly support HDR tone mapping. The video stream is corrupted. However, regular hardware transcoding works just fine.
So, if you want to host multiple Windows 11 VMs on your Proxmox server using vGPU, that should work just fine. If you want to use Linux based VMs or LXCs, do thorough testing to see if it works or not. It may not.
My Working Configuration
Now not all CPUs support VT-d/SR-IOV with their GPU. Intel only supports it on 11th Generation and later CPUs. It considers prior generations “legacy”. So what did I test and verify works?
- Beelink Mini S12 Pro (Intel 12th Gen N100)
- Beelink SEi12 Pro (Intel 12th Gen Core i5-1240P)
- Proxmox VE 8.0
- Windows 11 Pro (22H2)
- Intel GPU Driver 31.0.101.4502
You can read more about my Beelink servers here: Hands On: Beelink Mini-PCs for Proxmox, Home Assistant and Plex. From reading various posts on forums, it seems that Intel 11th Gen vGPU VFs have issues in Windows with the Intel drivers. It may work on Linux, but not Windows. There’s a nice thread on the Intel forums about it.
Proxmox VE 8 Host Prep
Note: At the Proxmox host BIOS level you must make sure that Intel VT-d is enabled.
- First we need to clone the Dynamic Kernel Module System (DKMS) repo and edit the config. In the Proxmox UI open a host shell (click on the Proxmox host, in the middle pane click on Shell). Run the following commands:
					apt-get install git
mkdir repo
cd repo
git clone https://github.com/strongtz/i915-sriov-dkms.git
cd i915-sriov-dkms/
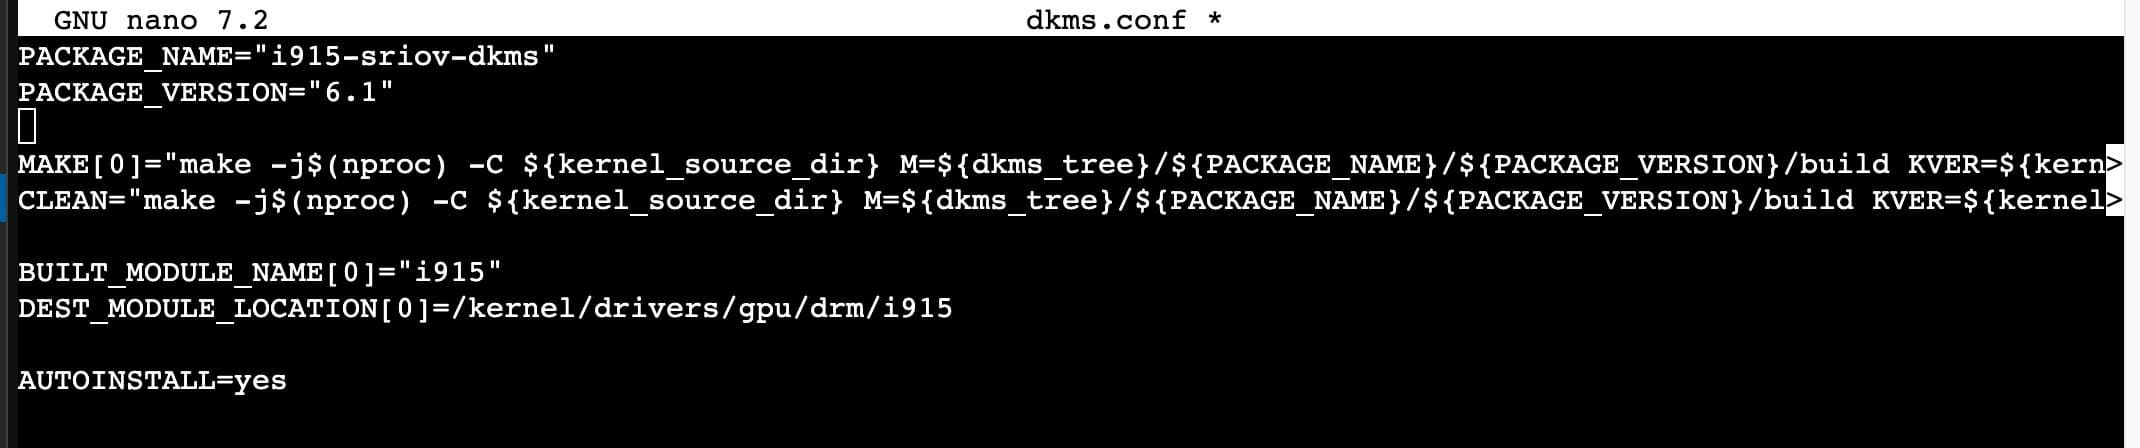
2. We need to modify the dkms.conf file to change the package name and package version.
nano dkms.conf
3. Delete the first two lines of the file and then paste in the two lines below. Save and exit Nano.
					PACKAGE_NAME="i915-sriov-dkms"
PACKAGE_VERSION="6.1"
4. Run the following commands
					cd ..
mv i915-sriov-dkms/ /usr/src/i915-sriov-dkms-6.1
apt update && apt install pve-headers-$(uname -r)
apt install git dkms build-* unzip -y
5. Run the following command to build and install DKMS.
dkms install --force -m i915-sriov-dkms -v 6.1
6. Now let’s make sure DKMS status looks good.
dkms status

7. We need to modify GRUB for vGPU SR-IOV. I am providing two GRUB configuration options. The first is for vGPU SR-IOV only. The second adds the needed parameters for a Google Coral PCIe TPU to be passed through to a VM. Comment out your existing GRUB_CMDLINE_LINUX_DEFAULT and then paste either the first or second line below.
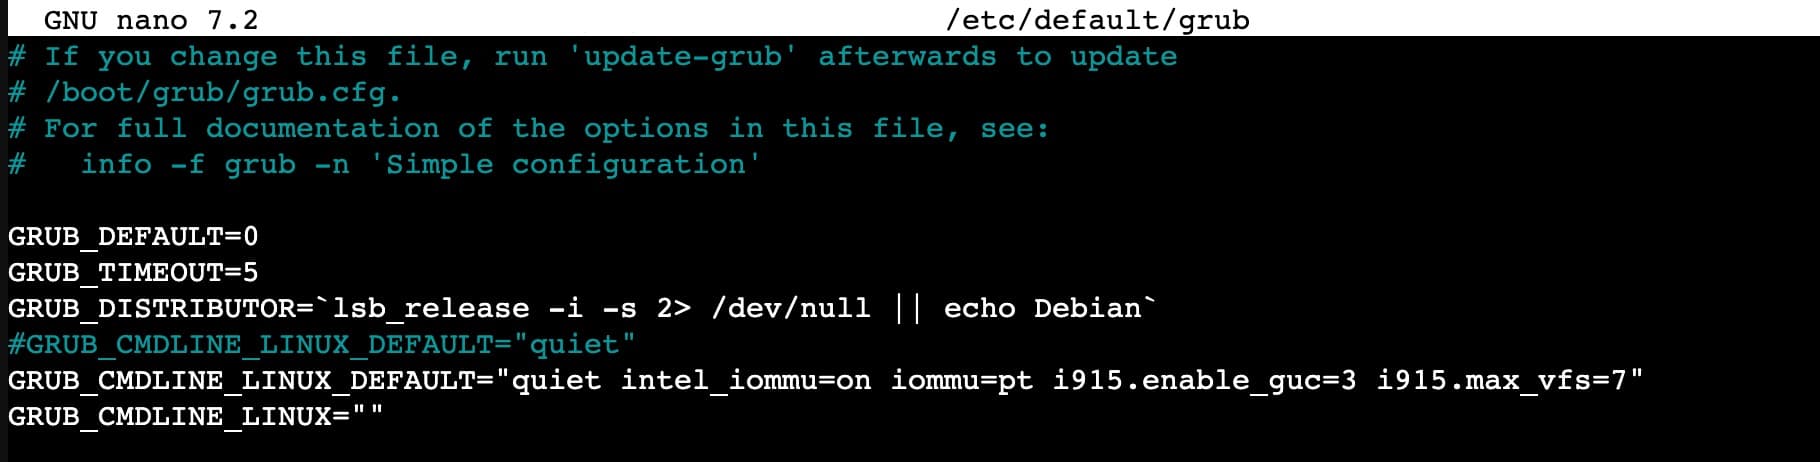
What we need to add to Grub is: intel_iommu=on iommu=pt i915.enable_guc=3 i915.max_vfs=7
Note: The pasted line might look a little funny if it wraps the console window. Don’t worry. Save, exit, then open Nano again to verify it looks right. It should.
nano /etc/default/grub
Use the line below if you are NOT using a Google Coral PCIe TPU:
GRUB_CMDLINE_LINUX_DEFAULT="quiet intel_iommu=on iommu=pt i915.enable_guc=3 i915.max_vfs=7"
Use the line below if you ARE using a Google Coral PCIe TPU:
GRUB_CMDLINE_LINUX_DEFAULT="quiet intel_iommu=on iommu=pt i915.enable_guc=3 i915.max_vfs=7 initcall_blacklist=sysfb_init pcie_aspm=off"
Below is a screenshot from a host that does NOT have a Google Coral PCIe TPU.
Note: If you are using ZFS (most aren’t), then the community suggested the following steps. DO NOT run the steps below if you aren’t using ZFS. I don’t use ZFS so haven’t tested them.
ZFS users ONLY:
Append intel_iommu=on iommu=pt i915.enable_guc=3 i915.max_vfs=7 to /etc/kernel/cmdline then do update-initramfs -u -k all, followed by proxmox-boot-tool refresh
8. Update grub and install the sysfsutils.
					update-grub
update-initramfs -u
apt install sysfsutils -y
9. Now we need to find which PCIe bus the VGA card is on. It’s typically 00:02.0.
lspci | grep VGA

10. Run the following command and modify the PCIe bus number if needed. In this case I’m using 00:02.0.
echo "devices/pci0000:00/0000:00:02.0/sriov_numvfs = 7" > /etc/sysfs.conf
11. Reboot the Proxmox host.
12. Login to the Proxmox host, open a Shell, then run the command below. It should return A LOT of data. If everything was successful, at the end you should see Enabled 7 VFs.
dmesg | grep i915
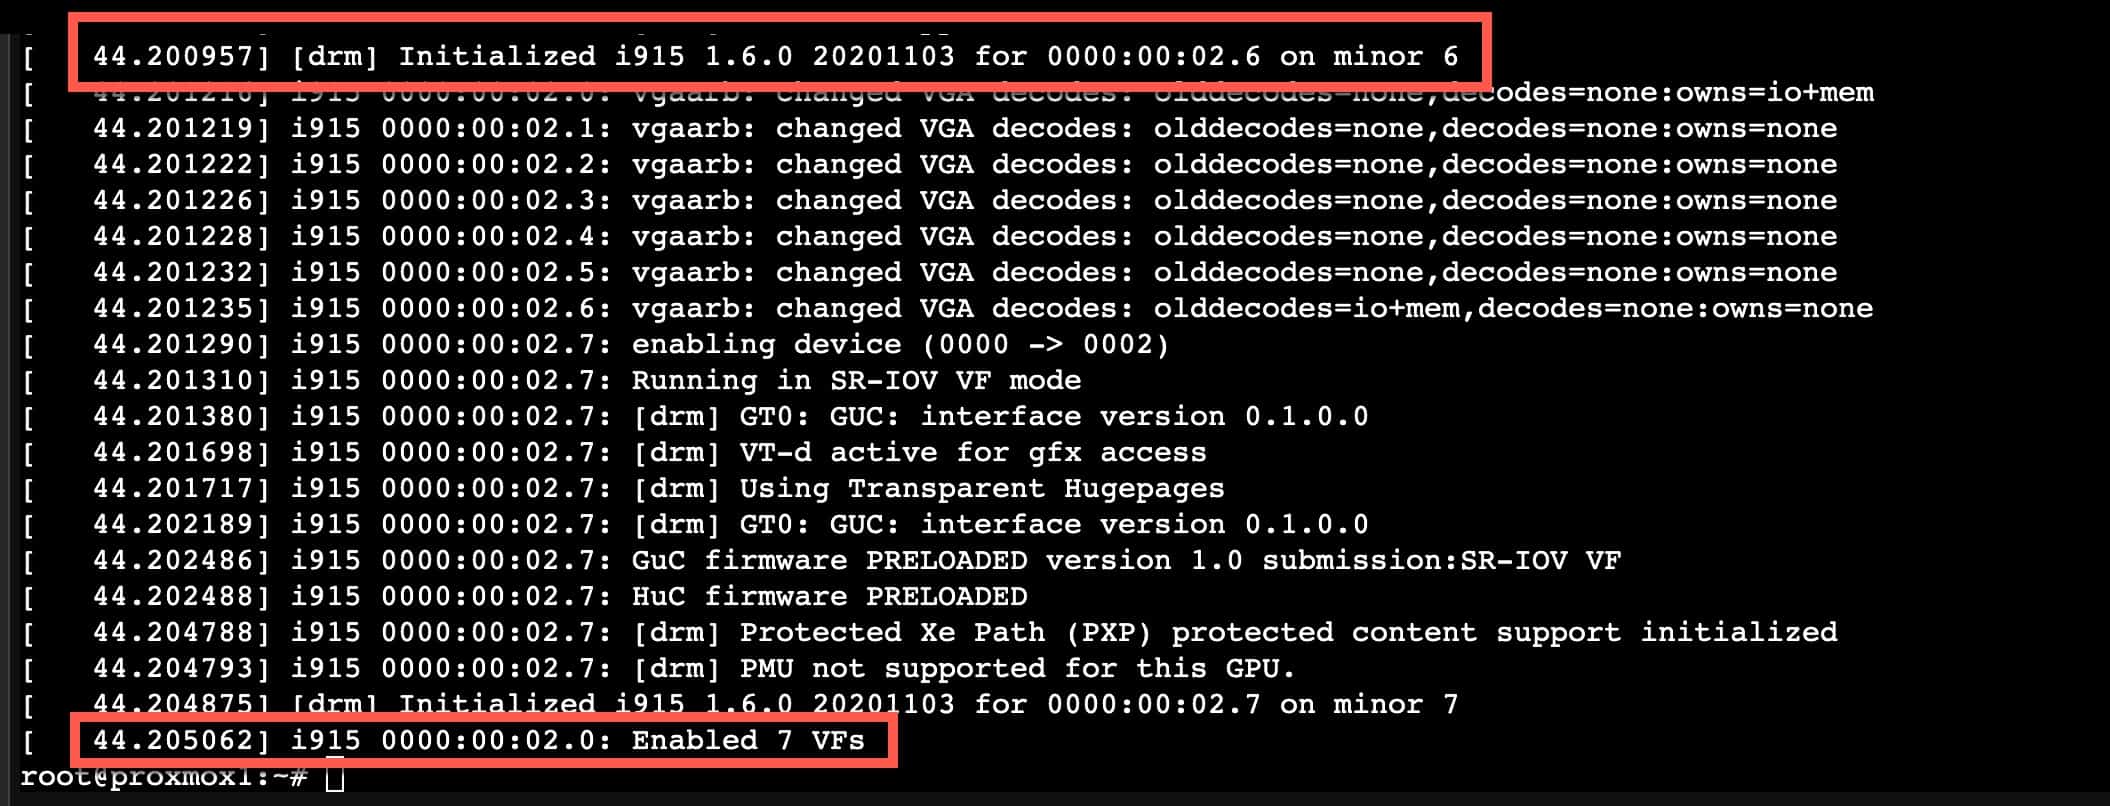
13. Now that the Proxmox host is ready, we can install and configure Windows 11 (22H2). If you do NOT see 7 VFs enabled, stop. Troubleshoot as needed. Do not pass go, do not collect $100 without 7 VFs.
Windows 11 Installation
Configuring Windows 11 for vGPU is a little finicky and could result in the Intel driver giving you a “Code 43” error and not working. In my example I’ll be using a password less Microsoft account, which creates complications to enable (and use) RDP. But it is possible, so I’ll walk you through the whole process.
- Upload your Windows 11 (22H2) ISO to the Proxmox server.
- Start the VM creation process. On the General tab enter the name of your VM. Click Next.
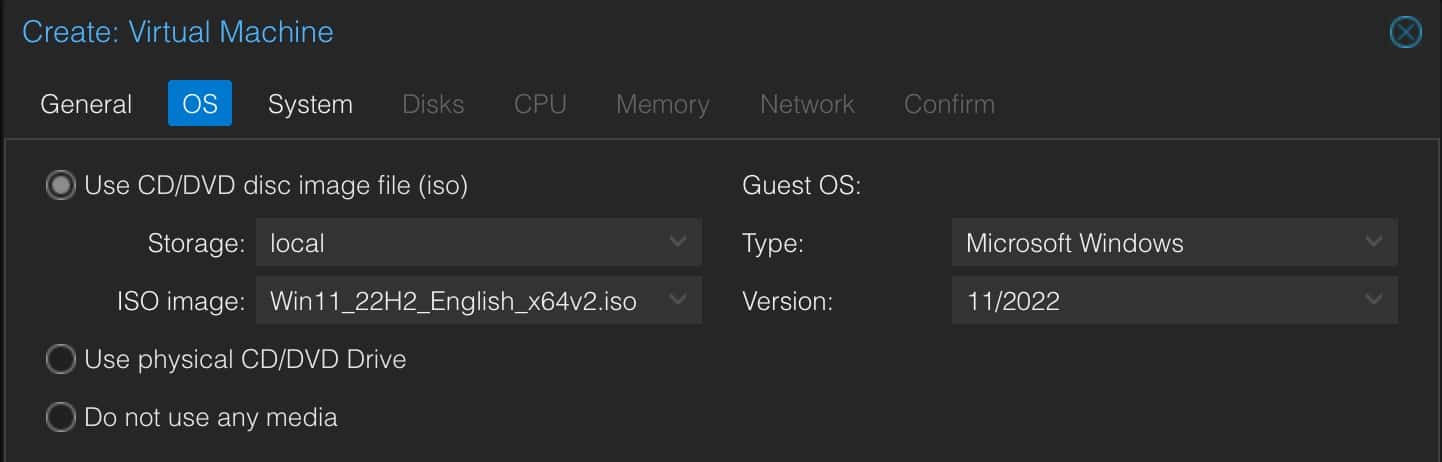
- On the OS tab select the Windows 11 22H2 ISO, and change the Guest OS as shown below to match. Click Next.
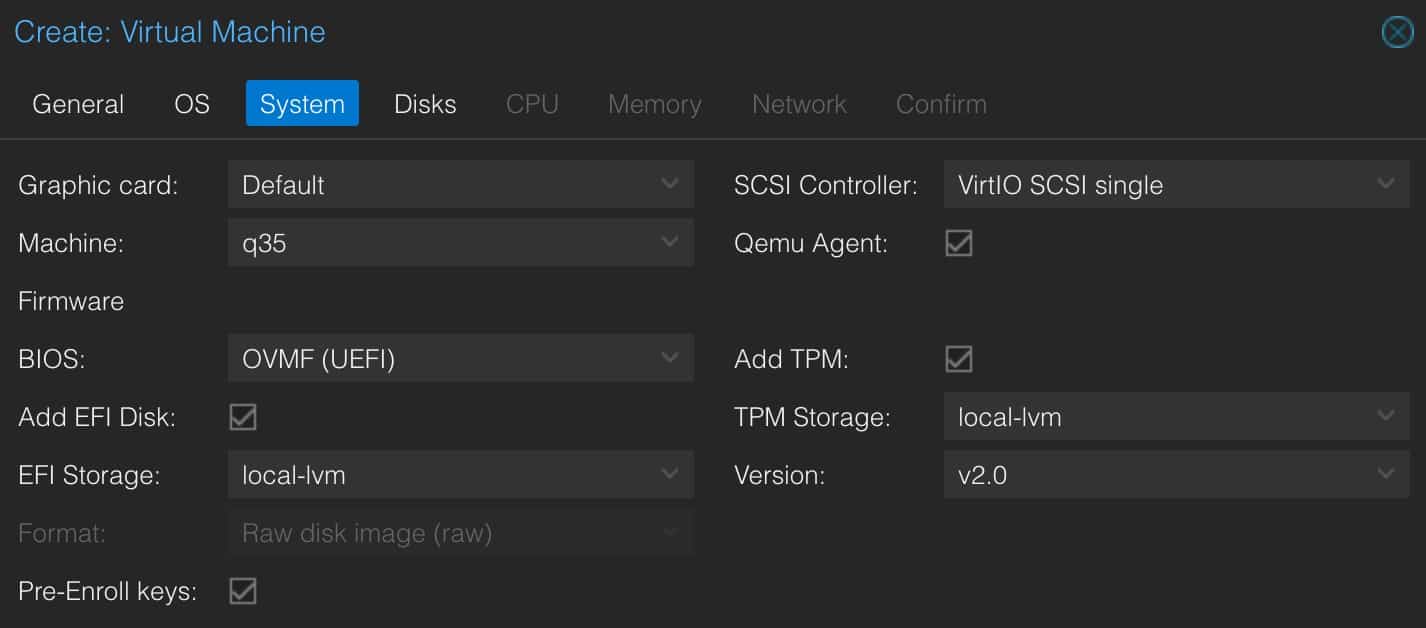
4. On the System page modify the settings to match EXACTLY as those shown below. If your local VM storage is named differently (e.g. NOT local-lvm, use that instead).
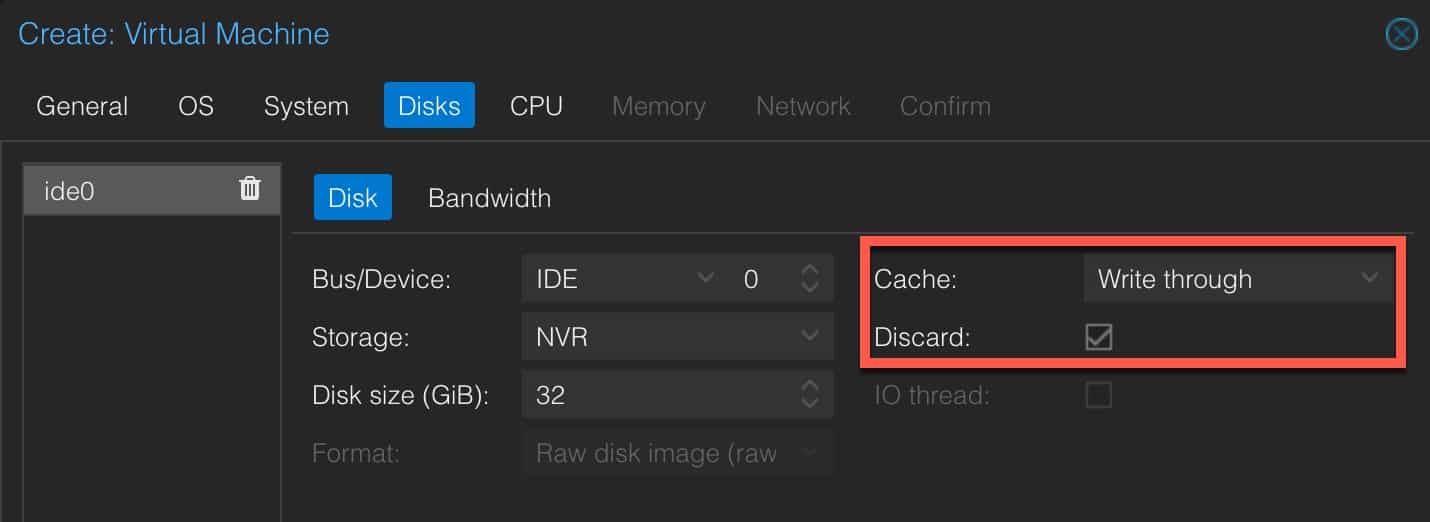
5. On the Disks tab, modify the Cache as shown and enable Discard (if you are using SSD/NVMe storage). I suggest at least 64GB disk size, as 32GB is super tight.
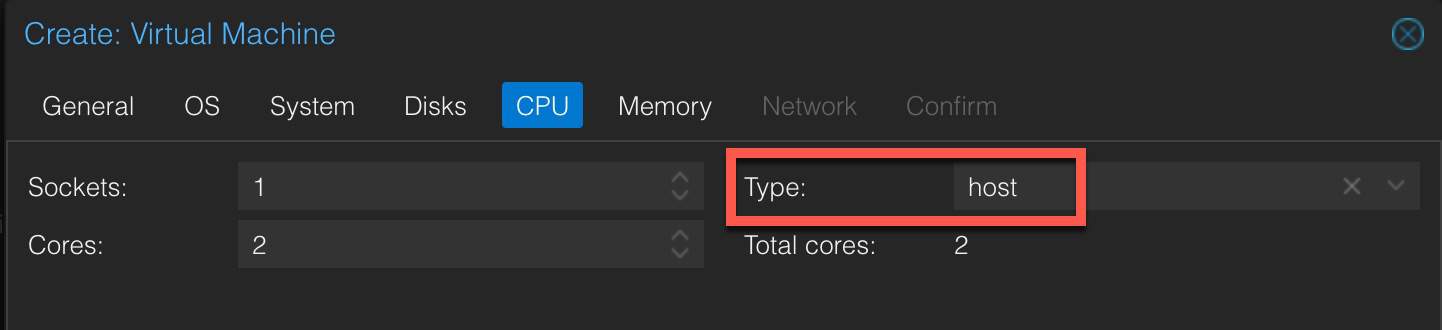
6. On the CPU tab, change the Type to host. Allocate however many cores you want.
7. On the Memory and Network tabs, configure as you wish. Leave the default Intel E1000 NIC. We will change it to VirtIO later.
8. Open a Proxmox console to the Windows VM. If the Windows installer doesn’t boot, “reset” the VM and press a key to start the installer.
9. Proceed through the Windows installation wizard, selecting the edition (I picked Windows 11 Pro), then Custom install. Wait for Windows to install and reboot.
Windows 11 Configuration
- Run through the Windows setup wizard. When you finally reach the desktop, proceed.
- Download the latest Windows VirtIO driver ISO. Upload it to the Proxmox host and mount it to the Windows VM. You can click on the graphic below to directly download the ISO from the official Fedora site, or click here.
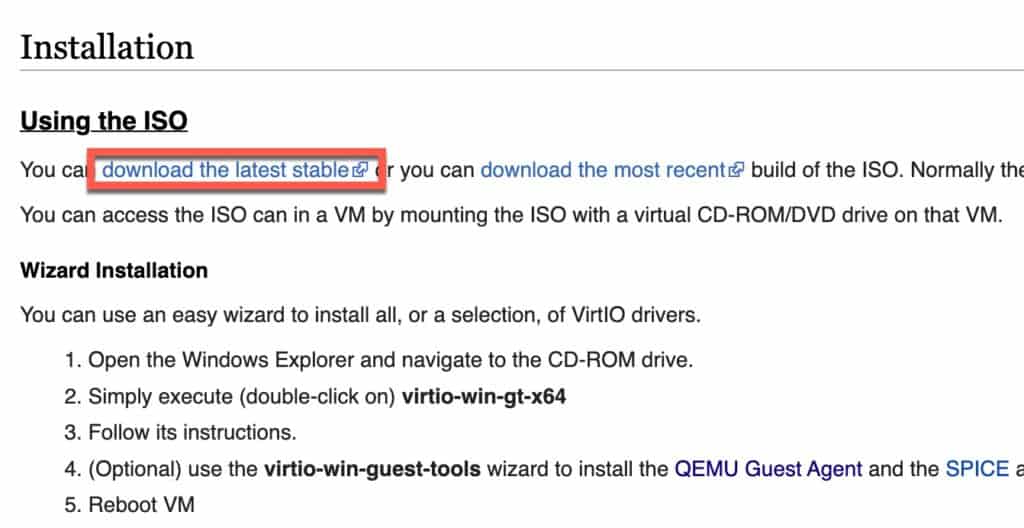
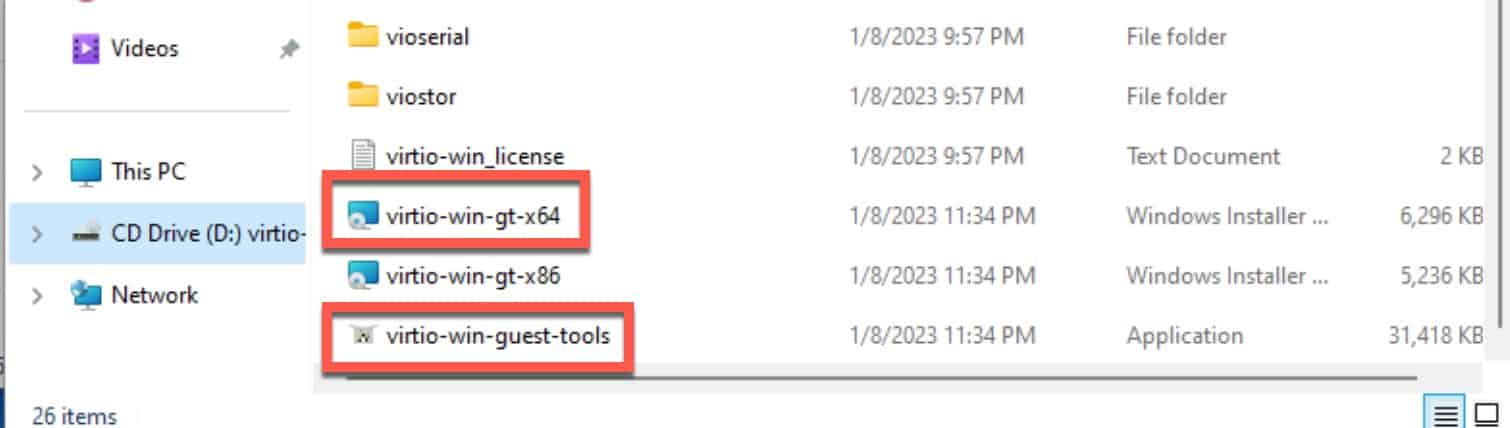
3. In Windows open the mounted ISO in Explorer. Run virtio-win-gt-x64 and virtio-win-guest-tools. Use all default options. Reboot after they are both installed.
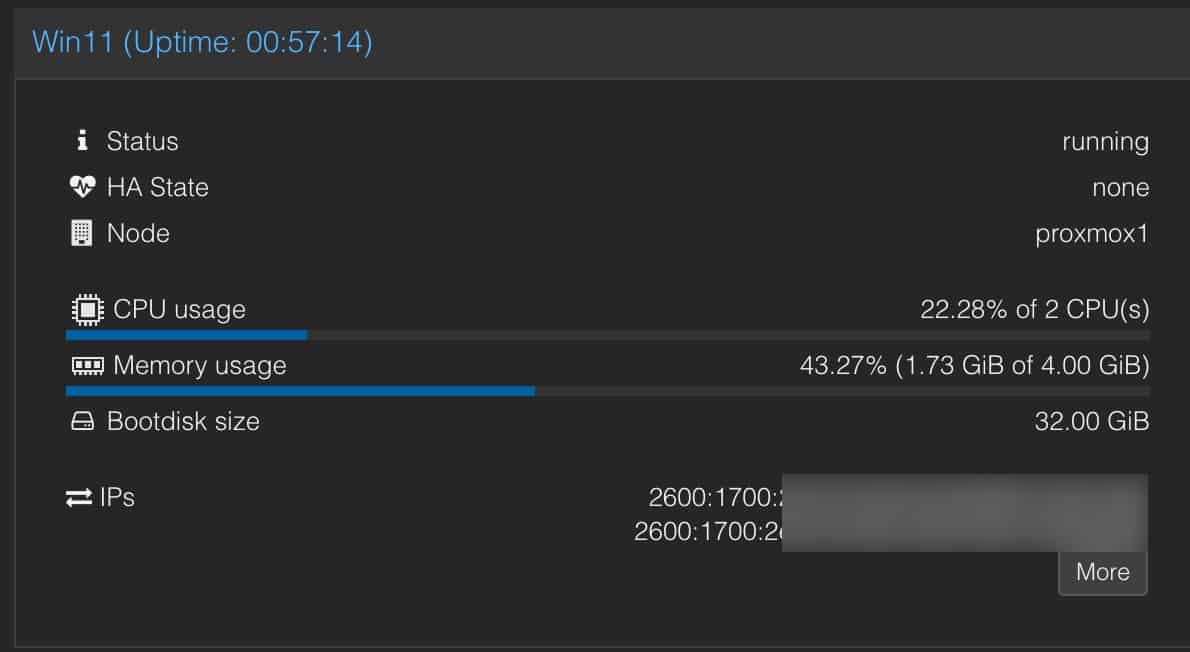
4. In the Proxmox UI review the Summary for the Windows VM and verify it lists one or more IPs. This means the QEMU agent is working.
5. Open a Proxmox console to the VM and login to Windows 11.
6. Click on the Windows icon in the start bar. Click on your account name in the lower left. Select Change Account Settings.
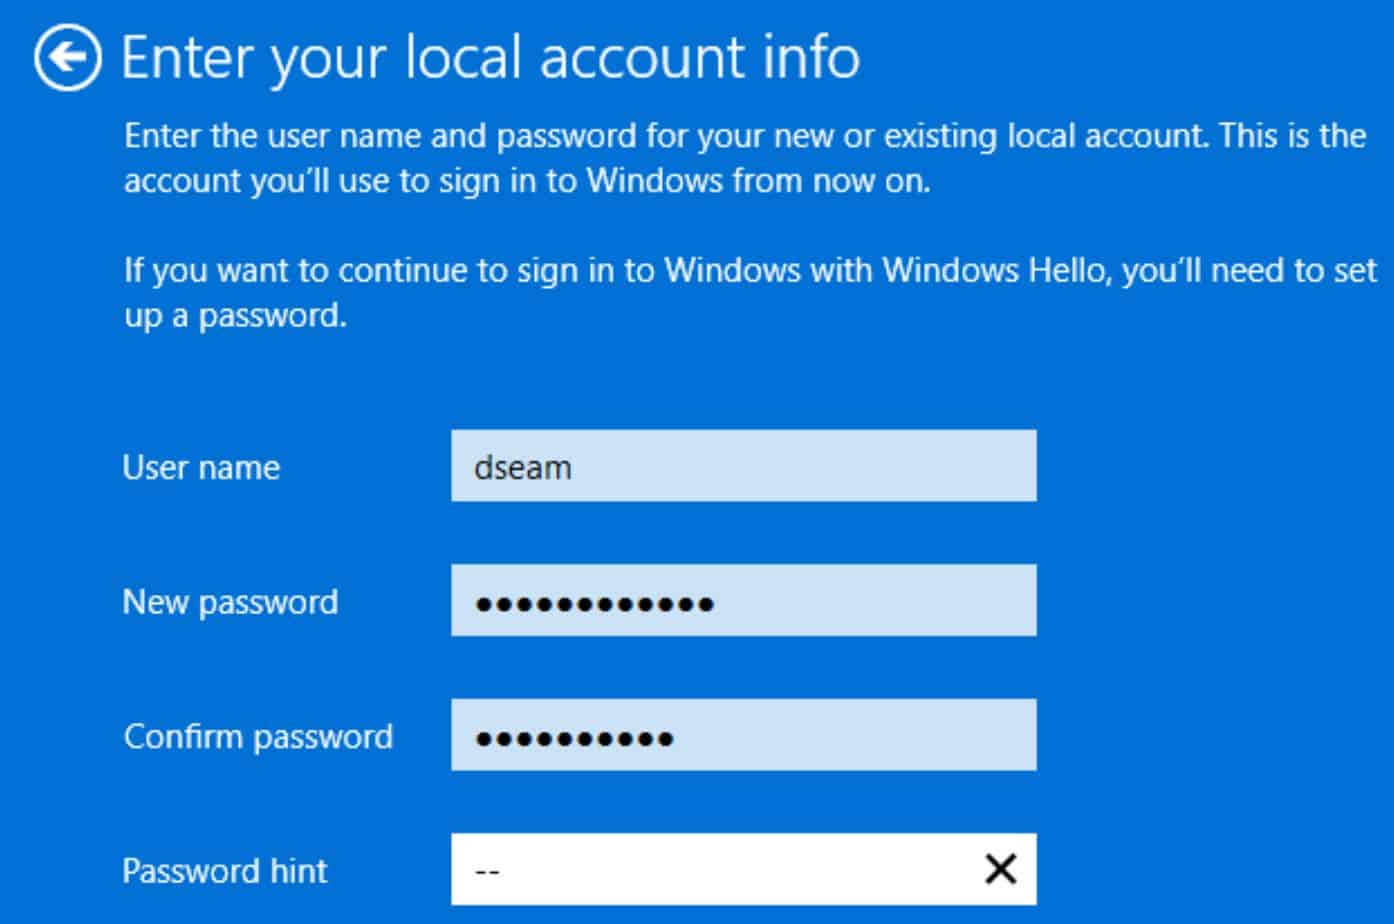
7. Click on Sign in with a local account instead.

8. Walk through the wizard and make note of your user name, then set a password and password hint. Write this information down!
9. Log back into the Windows VM via the Proxmox console.
10. In the search bar type remote desktop then click on Remote desktop settings.
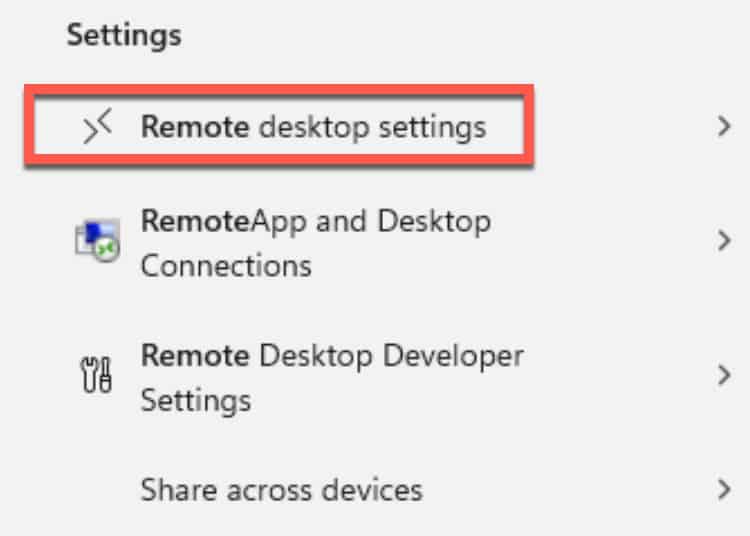
11. Enable Remote Desktop.
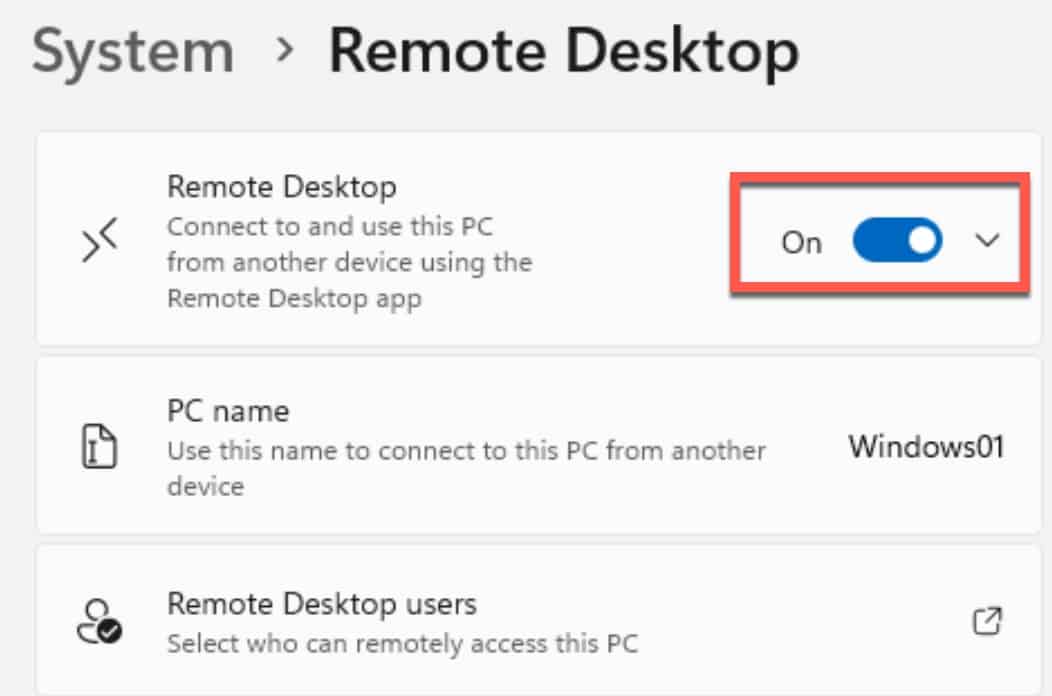
12. Open your favorite RDP client and login using the user name and credentials you setup in Step 8. You should now see your Windows desktop and the Proxmox console window should show the lock screen.
13. Inside the Windows VM open your favorite browser and download the latest Intel “Recommended” graphics driver from here. In my case I’m grabbing 31.0.101.4502.
14. Shutdown the Windows VM.
15. In the Proxmox console click on the Windows 11 VM in the left pane. Then click on Hardware. Click on the Display item in the right pane. Click Edit, then change it to none.

Note: If in the next couple of steps the 7 GPU VFs aren’t listed, try rebooting your Proxmox host and see if they come back. The try adding one to your Windows VM again.
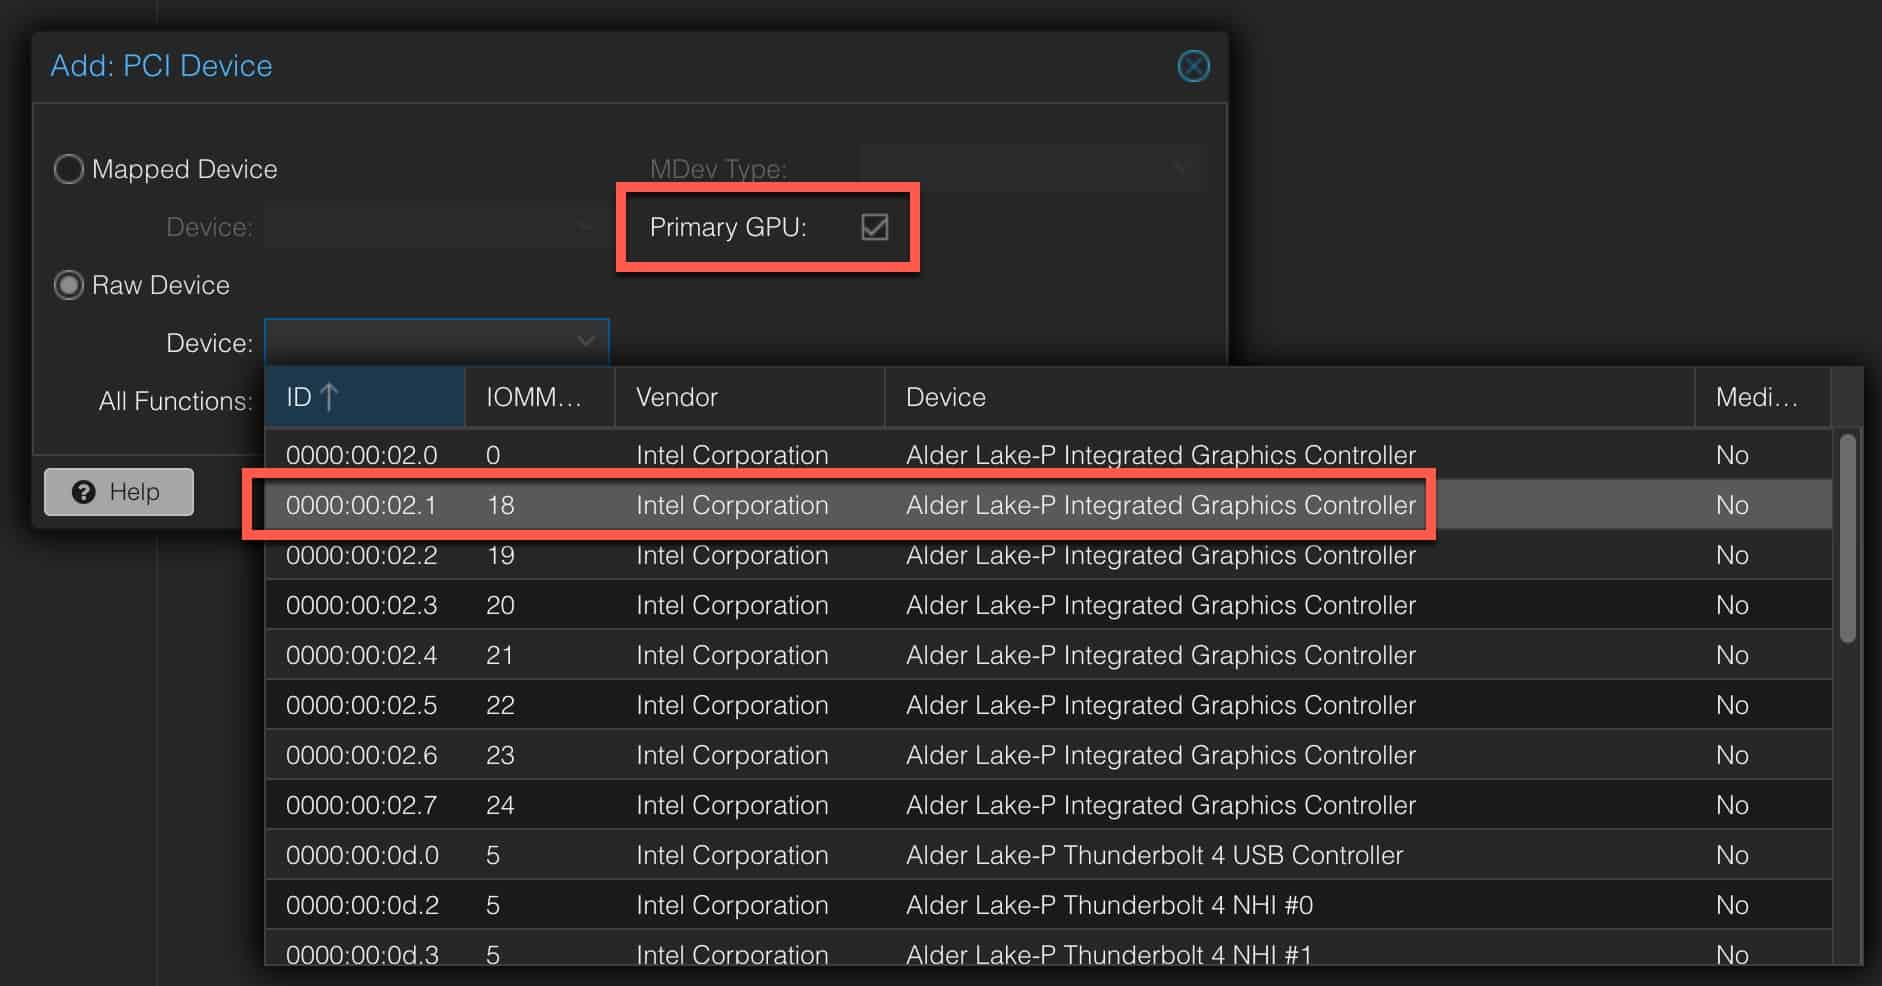
16. In the top of the right pane click on Add, then select PCI Device.
17. Select Raw Device. Then review all of the PCI devices available. Select one of the sub-function (.1, .2, etc..) graphics controllers (i.e. ANY entry except the 00:02.0). Do NOT use the root “0” device, for ANYTHING. I chose 02.1. Click Add. Do NOT tick the “All Functions” box. Tick the box next to Primary GPU.
18. Power on the Windows 11 VM and wait a couple of minutes for it to boot and RDP to become active. Note, the Proxmox Windows console will NOT connect since we removed the virtual VGA device. You will see a Failed to connect to server message. You can now ONLY access Windows via RDP.
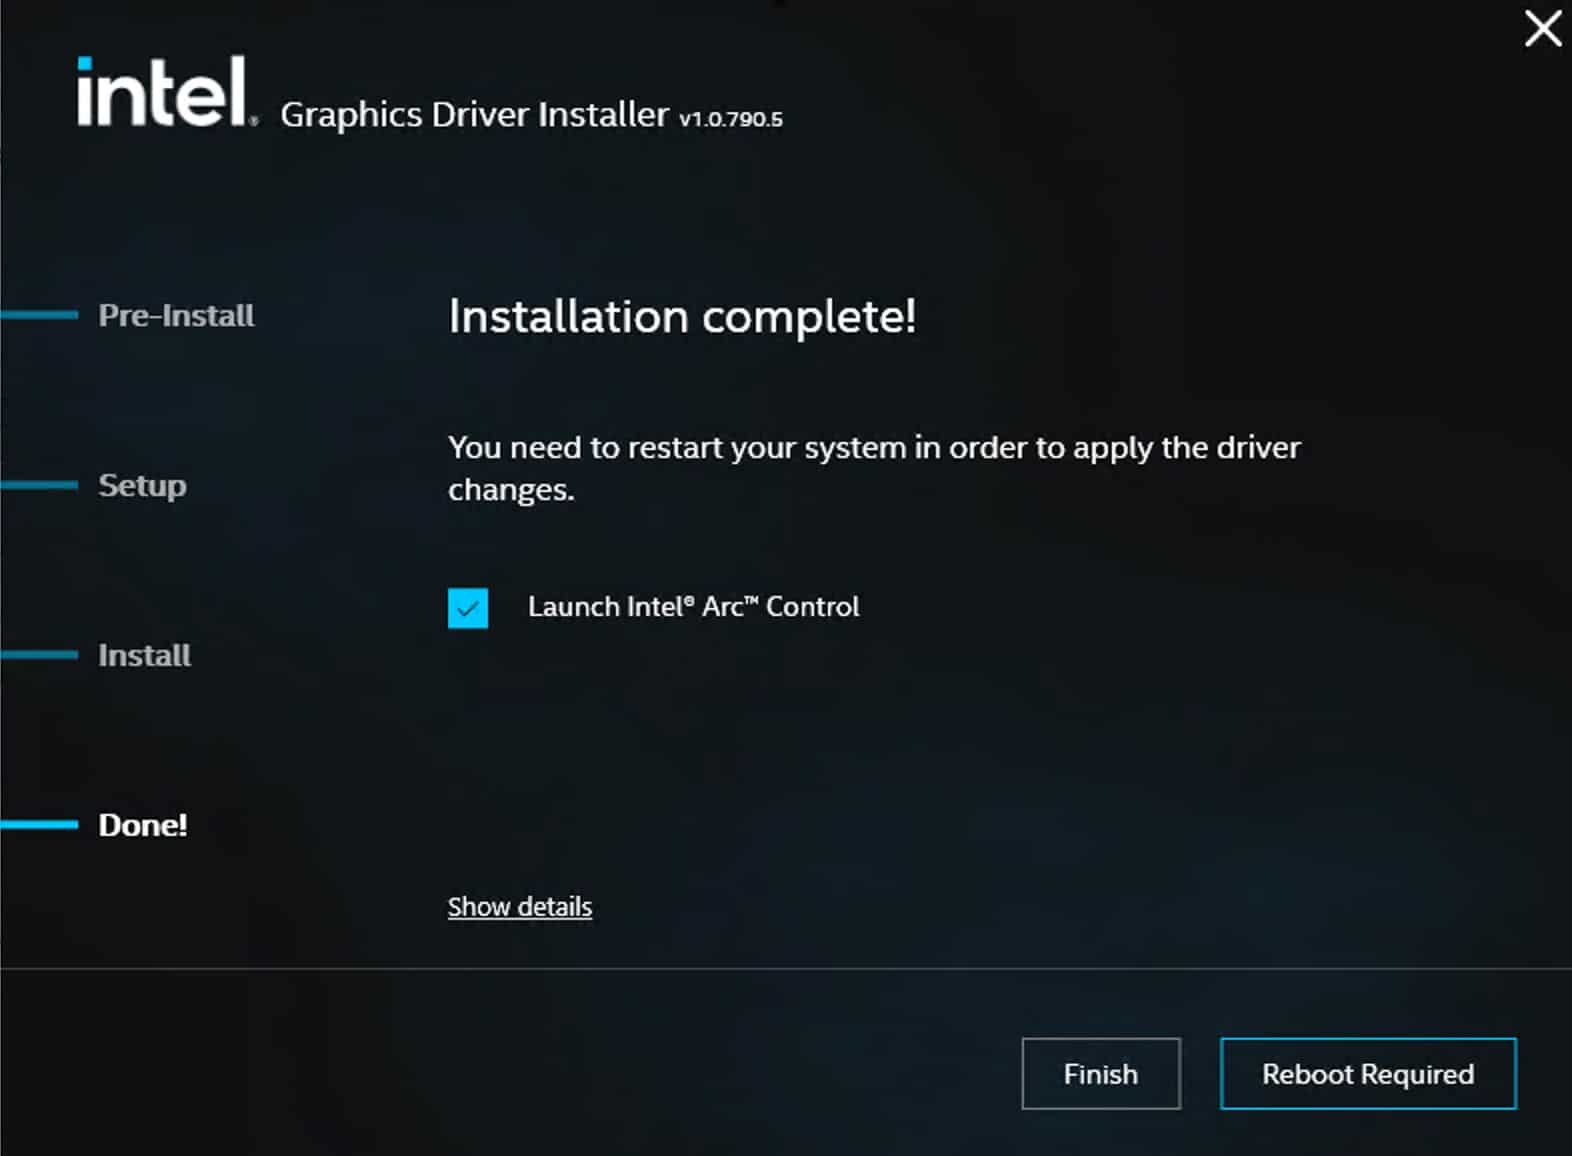
19. RDP into the Windows 11 VM. Locate the Intel Graphics driver installer and run it. If all goes well, you will be presented with an Installation complete! screen. Reboot. If you run into issues with the Intel installer, skip down to my troubleshooting section below to see if any of those tips help.
20. RDP into Windows and launch Device Manager.
21. Expand Display adapters and verify there’s an Intel adapter in a healthy state (e.g. no error 43).
22. You can also launch the Intel Graphics Command Center and view the GPU status.
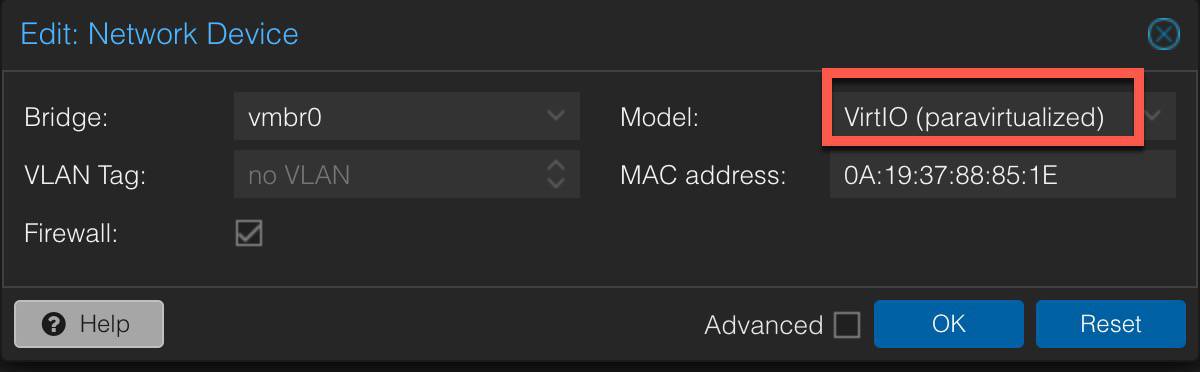
23. If you wish to improve network performance, you can go back to the Proxmox console, and hot-swap the NIC to VirtIO (paravirtualized). The RDP session should reconnect after a few seconds.
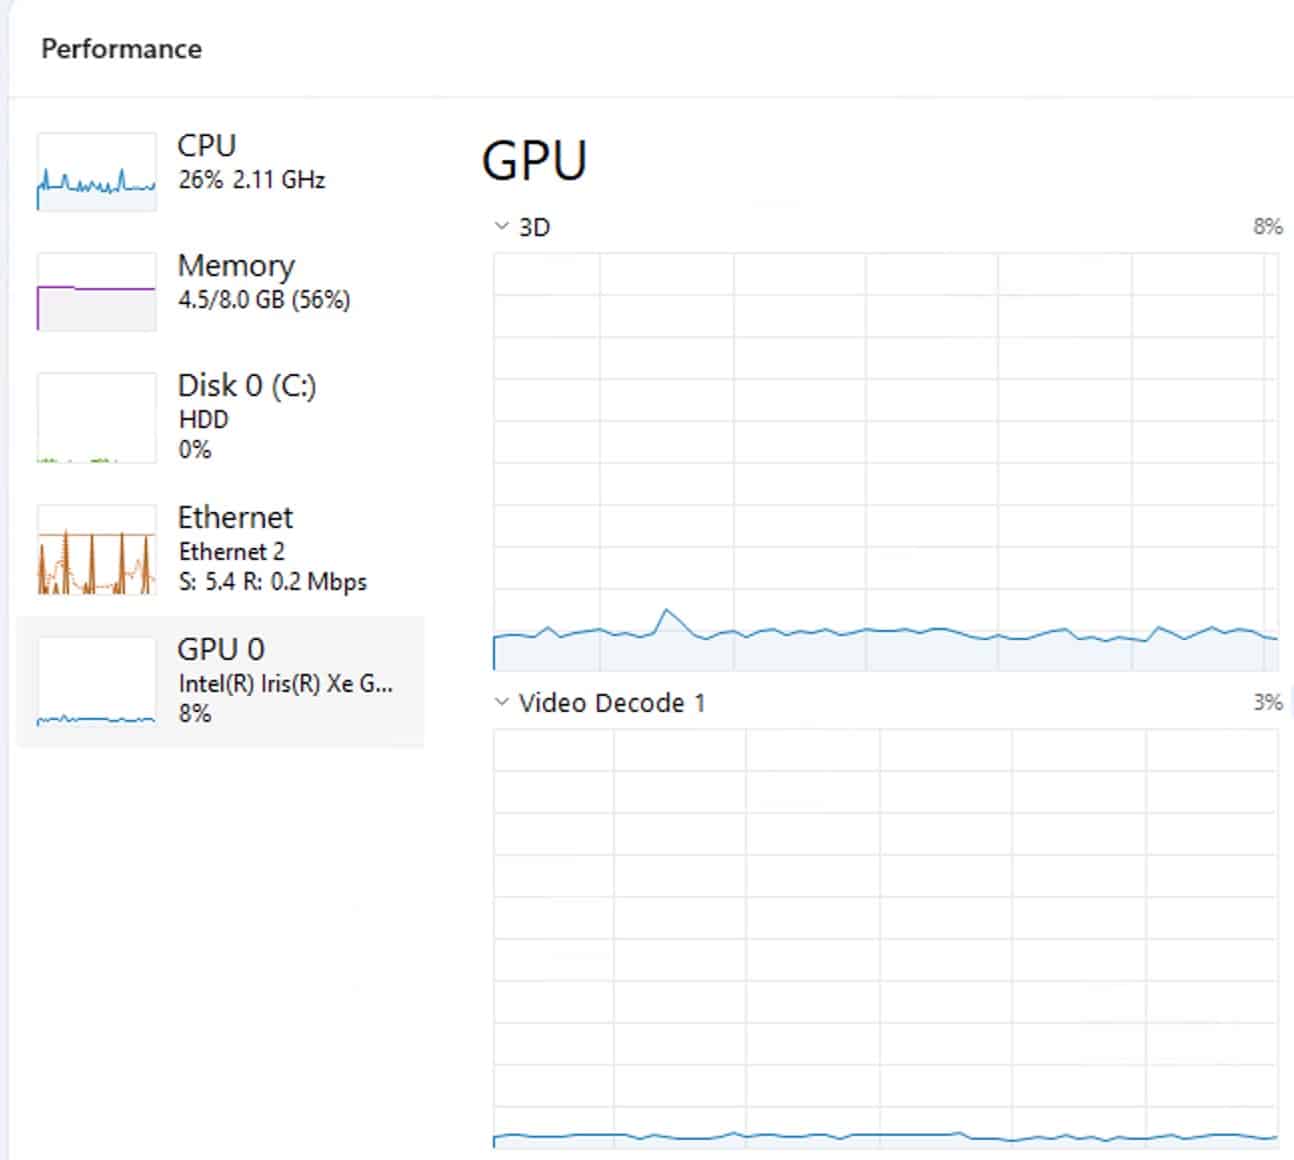
24. I played a Youtube video in Edge and you can see the GPU being used.
Troubleshooting Intel Driver Installation
The first time I did this on my N100 Proxmox server the Intel drivers had issues installing. For some reason the RDP session would freeze mid way through the install, or would get disconnected and then fail to connect. I had to reboot the VM from the Proxmox UI and then re-start the Intel installer using their “clean” option. After a couple of re-installs, it ran just fine. It ran flawlessly the first time on my i5-1240P server. If after a VM reboot RDP can’t connect after a few minutes, reboot the VM and try again.
Summary
Getting Proxmox VE 8 to use VT-d for vGPU passthrough with Windows 11 Pro is a bit tedious, but I got it working on both of my Intel 12th Gen Alder Lake Beelink mini-PCs. Windows 11 Pro with the stock Intel GPU drivers uses the vGPU virtual function like a champ. By using virtual functions (VFs), you are able to share the Intel GPU with up to 7 other VMs on the Proxmox host. This is far better than legacy GPU passthrough where only a single VM could use the GPU. Make sure if you deploy additional VMs that need vGPU resources that you assign it a different vGPU VF. Do NOT assign the same PCIe device to two or more VMs.


Hi Dave, would this work for 11th Gen as well? I’ve got a Lenovo M70 Gen2 that I tried all kinds of guides for to try and get iGPU passthru working for to allow me to host Jellyfin in a container, but ended up giving up and installing Server 2022 which just works, and then spinning up Hyper-V to run Proxmox for messing about with.
Tried the guide above but don’t get the “Enabled 7 vfs” in the output, instead:
According to this thread: https://community.intel.com/t5/Intel-NUCs/VT-D-SR-IOV-for-Iris-XE-on-Intel-NUC-11th-gen-NUC11TNHV50L/m-p/1339183/highlight/true
Intel 11th Gen GPU VF functions doesn’t work properly on Windows. 12th Gen does. 11th Gen may work on Linux.
Thanks Derek. I think at the moment I’m going to go back to hosting Jellyfin directly on the HyperV host where I know it works ok with the QuickSync functionality, and then just spin up a VM to host Proxmox for all the other messing around.
I’ve trawled so many of these guides, so I appreciate all the work you and the other authors have done.
[ 0.000000] Command line: BOOT_IMAGE=/boot/vmlinuz-6.2.16-3-pve root=/dev/mapper/pve-root ro quiet intel_iommu=on iommu=pt i915.enable_guc=3 i915.max_vfs=7
[ 0.047848] Kernel command line: BOOT_IMAGE=/boot/vmlinuz-6.2.16-3-pve root=/dev/mapper/pve-root ro quiet intel_iommu=on iommu=pt i915.enable_guc=3 i915.max_vfs=7
[ 4.191484] i915 0000:00:02.0: [drm] VT-d active for gfx access
[ 4.191599] i915 0000:00:02.0: vgaarb: deactivate vga console
[ 4.191648] i915 0000:00:02.0: [drm] Using Transparent Hugepages
[ 4.193769] i915 0000:00:02.0: vgaarb: changed VGA decodes: olddecodes=io+mem,decodes=io+mem:owns=io+mem
[ 4.194471] mei_hdcp 0000:00:16.0-b638ab7e-94e2-4ea2-a552-d1c54b627f04: bound 0000:00:02.0 (ops i915_hdcp_component_ops [i915])
[ 4.195982] i915 0000:00:02.0: [drm] Finished loading DMC firmware i915/rkl_dmc_ver2_03.bin (v2.3)
[ 5.046203] i915 0000:00:02.0: [drm] [ENCODER:184:DDI A/PHY A] failed to retrieve link info, disabling eDP
Ah.. truncated!
wow, that’s impressive.
I am installing it on my beelink sei12 i7 1260p.
2 notes here:
I also had to start the intel video driver a second time. The first time it just disappeared. Second install went as expected. After rebooting it all worked !!!!
Thank you SO MUCH for doing this. I don’t think I would have figured it out myself.
Will running proxmox updates keep everything ok ?
I also have an older 11th gen i7 intel nuc. Do you think The above steps will work here as well ? (except for video driver ofcourse)
Thanks again man. Owe you one.
thanks I’ve made those two changes to the guide. From my reading Intel 11th Gen Windows Intel drivers are broken for VFs.
great tutorial!
What if I want to pass the whole iGPU including the HDMI port to the Windows 11 Pro guest OS? I want the Win11 to own the HDMI port so that I can display the Windows desktop on TV. TIA.
I don’t use the HDMI connection on my Proxmox host as it is headless in a closet. So I can’t give you a definitive answer. But, I’m 98% sure you can NOT use vGPU VFs with any physical HDMI port. For any chance of using the HDMI port you’d need to do full GPU passthrough to the Windows VM. No other VMs on the Proxmox host could use the GPU. If you want to try this I’d suggest you can leave the Proxmox host configured with vGPUs but for the Windows VM do PCIe passthrough for the root (00:02.0) VGA card. Do NOT use any of the VF PCIe devices like .1, .2, etc. I haven’t tried this myself, so I’m only going on what I think might work. If this doesn’t work, I’d suggest asking on a Proxmox forum where people with more GPU experience can help you out.
I updated the system with a newer kernel (6.2.16-4) and it broke the above changes. vm no longer sees the 7 pci devices.
Follow up to this issue. I backed up my vm and re-installed proxmox from scratch. Fully updated proxmox first (new kernel) then applied the above changes. Restored my vm and all is working again as it should.
So Derek, how do we re-apply the above changes when a kernel update has been installed? I tried doing hte same steps and it didn’t work, it would not recognize the 7 devices.
For each new version of the kernel, I have carried out the following (where pve-headers-6.x.xx-x-pve matches new kernel):
That’s all ? Thank you ! Will try this out next update.
thanks, i used a slightly different approach to ensure i was less likely to make a mistake
update the kernelreboot
apt install pve-headers-$(uname -r)
dkms install -m i915-sriov-dkms -v 6.1 --force
reboot
Thanks! Haven’t tried your steps myself, but good to have another method.
I seem to attract issues messing with it.
Updated to latest changes and I see this when I execute dmesg |grep i915. What does VF1 FLR mean ? YEs, I did use the 02.1 entry and not the first one.
Follow up on this. I also own a nuc12 i7. I set it up with the latest proxmox version and restored the vm that won’t work on the beelink sei12 i7. Somehow the intel nuc does work with passthrough.
The intel nuc also shows the “VF1 FLR” in the logs so I don’t think that is the problem here. I’m going to compare the two logs and see what is going on… hopefully…
Derek, does your beelink still work good with the windows 11 vm with passthrough ?
ok, ignore the previous stuff. I think I figured it out. It looks like it’s a good ole intel driver issue. I reinstalled version 101.4502 and now igpu passthrough works just fine. Thanks intel ! sigh
So this morning I logged in again and the driver wasn’t working again. Upon checking it looks like microsoft-update updates the graphics driver to an older version (30.0.101.1369) which doesn’t work.
Intel’s latest version is 30.0.101.4575 which works just fine. I did rollback driver in device manager so it’s back on 4575. Hopefully ms-update will leave it alone now. (it should from what I researched)
I got the same problem, I have tried different version of the drivers, but none of them worked. I also got
VF[X] FLRoutput. Have you solved this problem?Any idea how to fix the kvmgt mod from failing;
root@pve1:/usr/src/i915-sriov-dkms-6.1/drivers/platform/x86# modprobe -v kvmgt
insmod /lib/modules/6.1.10-1-pve/kernel/drivers/gpu/drm/i915/kvmgt.ko
modprobe: ERROR: could not insert ‘kvmgt’: Invalid argument
Tried multiple kernels and rebuild of DKMS
Hi Derek,
Thanks for the instructions, I have exactly the same Beelink i5-1240p. I followed your instructions and I get the Enabled 7 VFs. However when I go to add a PCI device to a VM, on the box that comes up, I get the message no IOMMU detected, please activate it. See Documentation for further information. If I click Raw Device, then select the dropdown box device, all the ID’s from 2.0 to 2.7 for the Alder Lake-P Integrated Graphics Controller are there. I was just wondering did you have to make any BIOS settings to enable it? I’m not sure what else to do at this stage.
There is a BIOS setting for enabling VT-D. Don’t recall the exact setting name.
Derek, I updated Proxmox today, which of course killed my Windows VM with “Error: no PCI device found for ‘0000:00:02.1”. Probably from the kernal upgrade
I have not memorized these steps, fortunately your blog was still there and I got my VM running again! It’s to bad these mods are not the default for Proxmox
Thank you so much for writing this guide, it works great on my VE8 Proxmox with Windows 11 and N100 passing through the iGPU when the “legacy” full GPU passthrough didn’t work (code 43) error.
Thanks, this worked brilliantly on my intel 13ty gen nuc.
Question, once I have installed the new sriov module can I uninstall the build package and dependencies?
Probably, but I haven’t done that myself. To disable SRIOV I just modified the GRUB parameters to not create the additional VFs.
thanks, i was more referring to could i uninstall the unneeded packages like build (i like to keep my systems clean as possible) – i now realize the answer is ‘not really’ as each time the kernel is updated i need to rebuild.
Thanks for the guide it was indispensable.
Hello, first of all many thanks for the good introduction here for the gen 12 CPU.
My MinisForum MINIS FORUM Mini-PC NAB6, Intel Core i7-12650H does not show 7 GPUs like yours unfortunately only:
ID: IOMMU Vendor Device
0000 00 02 0 0 Intel Corporation AlderLake-P GT1 (UHD Graphics)
Only one. Just and then in W11 only one non-functional GPU. I followed the instructions and got the GPU displayed in WIndows at all.
Can anyone give me another tip?
(VT-D and SR-IOV are activated in the BIOS).
All the best
Rene
Hi dave, thanks for this tutorial. I have been looking for a solution to pass the i5-12400’s UHD 730 to a Windows VM for a long time. This way seems to be very good, however at the end I do not get the message that the 7 VFs are available. The following shows up for me:
root@pve:~# dmesg | grep i915
[ 0.000000] Command line: BOOT_IMAGE=/boot/vmlinuz-6.2.16-10-pve root=/dev/mapper/pve-root ro quiet ipv6.disable=1 intel_iommu=on iommu=pt i915.enable_guc=3 i915.max_vfs=7 cpufreq.default_governor=powersave pcie_aspm.policy=powersave
[ 0.085407] Kernel command line: BOOT_IMAGE=/boot/vmlinuz-6.2.16-10-pve root=/dev/mapper/pve-root ro quiet ipv6.disable=1 intel_iommu=on iommu=pt i915.enable_guc=3 i915.max_vfs=7 cpufreq.default_governor=powersave pcie_aspm.policy=powersave
[ 4.187730] i915: module verification failed: signature and/or required key missing – tainting kernel
Kindest regards
I’m having the same issue after pounding at it for most of the day its just skipping over the gpu for some reason
# dmesg | grep -e DMAR -e IOMMU
[ 0.019236] ACPI: DMAR 0x0000000074B0F000 000088 (v02 INTEL EDK2 00000002 01000013)
[ 0.019273] ACPI: Reserving DMAR table memory at [mem 0x74b0f000-0x74b0f087]
[ 0.078190] DMAR: IOMMU enabled
……
[ 0.187463] DMAR-IR: Enabled IRQ remapping in x2apic mode
[ 0.498556] pci 0000:00:02.0: DMAR: Skip IOMMU disabling for graphics
Please make one for 13th gen 🤔💪
I have been using the ‘no display & RDP’ option until recently and it works just great. Came across another post where it used a combination of vGPU pools and VirtIO-GPU Display. Reconfigured my VM this way and it works just fine too (with noVNC). Github user, scyto, has documented the steps out rather nicely here
root@pve:~# dkms install –force -m i915-sriov-dkms -v 6.1
Sign command: /lib/modules/6.2.16-3-pve/build/scripts/sign-file
Binary /lib/modules/6.2.16-3-pve/build/scripts/sign-file not found, modules won’t be signed
Error! Your kernel headers for kernel 6.2.16-3-pve cannot be found at /lib/modules/6.2.16-3-pve/build or /lib/modules/6.2.16-3-pve/source.
Please install the linux-headers-6.2.16-3-pve package or use the –kernelsourcedir option to tell DKMS where it’s located.
Any idea how to fix this problem?
Hi Derek, great HowTo!
Are there any news about using heads with SRV-IO?
My use case is to use one head for the Proxmox host, one head for an Android guest and the third head for a windows guest.
Thanks for the tutorial!
I went through all the steps and everything seems to work but the end result is that I still see Intel UHD and not Iris
Two things are different (I Have N100):
Thanks
Since you have a N100 everything is as expected. Of course proxmox and the device manager in Windows are showing you informations based on your actual hardware:
1. N100 does not have any P-Cores!
2. N100 has Intel UHD graphics – not Iris graphics!
I’m unable to connect to the VM with Parsec & Moonlight/Sunshine even though passing one of thee vfs through works fine.
I’ve tried using the virtual display within parsec but still no dice.
I have the same problem. Passthrough of one VF to a Windows VM works fine. Connecting with RDP the driver shows active and acceleration is working. Parsec however is not working, neither using the virtual display functionality nor using a HDMI Faker Dongle (should behave the same as connecting a physical display).
I have the same issue with Intel N100. I tried Parsec and sunshine but neither of them works.
Hello, I loved the guide and followed step by step. I have an issue with rdp client, it connects without an issue once the VM is freshly rebooted, if I close the rdp, it gives me an error each time I try to reconnect usually error 0x104. I get disconnected often too when using rdp. I changed power settings in windows 11 VM but it didn’t help. What is the problem, thank you
Are you sure the VM isn’t sleeping? Did you look in the Proxmox console to see the VM state?
Followed the above process and trying to pass a vGPU through to an Ubuntu 22.04 LTS VM. The VM seems to see the GPU, but things in the VM don’t seem able to use it. Do I need to update the drivers in the VM to make it work?