Now that our root Windows Server 2019 certificate authority is installed and published to Active Directory from Part 1, it is time to bring online our subordinate CA. The subordinate CA will be our online issuing CA, since it will be the CA which issues all certificates, be they for users, computers, VMware ESXi hosts, Nutanix Prism, etc. The VM will be joined to the domain, and be online 100% of the time.
As with the offline root, you should perform hardening of this VM as well. Enabling the Windows firewall (or a third party one), anti-virus software and following Microsoft security baseline settings are all strongly recommended. If you have security software that can monitor file changes or system integrity, that too would be a great idea. Auditing tools such as Splunk, for real time alerting, would be ideal for defense in depth.
Blog Series
Install Windows Server 2019 Subordinate CA
1. Use Notepad and create a file called CAPolicy.inf in C:\Windows on your subordinate VM. Use the code snippet below, but change the URL to match that previously used in configuring your offline root.
					[Version]
Signature="$Windows NT$"
[PolicyStatementExtension]
Policies=InternalPolicy
[InternalPolicy]
OID= 1.2.3.4.1455.67.89.5
Notice="Legal Policy Statement"
URL=http://crl.lab.local/pki/cps.txt
[Certsrv_Server]
RenewalKeyLength=2048
RenewalValidityPeriod=Years
RenewalValidityPeriodUnits=5
LoadDefaultTemplates=0
AlternateSignatureAlgorithm=0
2. Run the following PowerShell commands.
					Add-WindowsFeature Adcs-Cert-Authority -IncludeManagementTools
Add-WindowsFeature Adcs-web-enrollment
Add-WindowsFeature Adcs-Enroll-Web-Svc
3. Launch Server Manager and in the upper right corner click on the yellow warning symbol, then click on Configure…
4. Click Next on the credentials screen.
5. Check the boxes ONLY for the top two options (CA and CA web enrollment).
6. Click Next on the type of CA screen
7. Click Subordinate CA and click Next.
8. Click Next on the create a new private key screen.
9. Click Next on the cryptographic options.
10. Change the CA names as desired.
11. Click Next on the Request a Certificate screen.
12. Click Next on the database locations screen.
13. Click on Configure, then Close.
14. Copy the resulting request “.req” file (located in the C:\ directory) to the offline CA.
15. On the offline CA type the following command, using your filename:
certreq -submit YourRequstName.req
16. You will now see that the request is pending. Take note of the RequestId, as it will be unique to you.

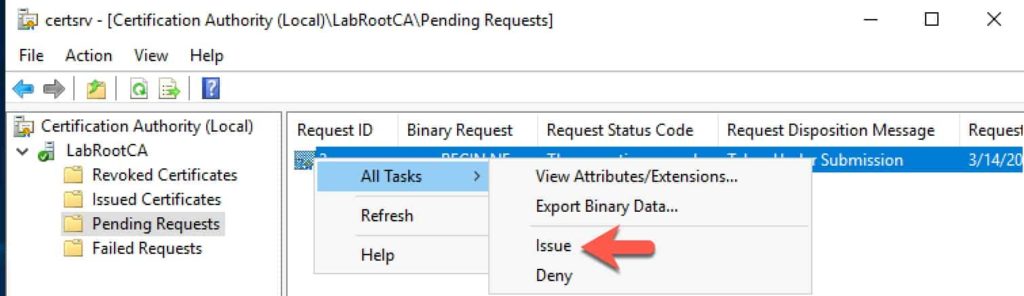
17. Open the CA Manager snap-in on your offline root and issue the pending certificate.
18. While still on the offline CA, enter the following command to download the new certificate. Replace “2” with your request ID, and change the filename as you see fit.
certreq -retrieve 2 c:\LabRootCA.crt
19. Copy the certificate file to the online subordinate CA. Note: Do NOT place it in the pki directory. Run the commands below (on the subordinate CA) to install the new certificate. Once the certificate is installed, delete the file and empty the trashcan.
					Certutil –installcert c:\LabRootCA.crt
start-service certsvc
copy c:\Windows\system32\certsrv\certenroll\*.cr* c:\pki\
Configure Cert Enrollment Web Service
- Launch Server Manager and in the upper right hand corner click on the yellow warning icon. Click on Configure.
- Click Next on the credentials screen.
- Check the box next to Certificate Enrollment Web Service.
- Click Next on the Specify CA screen.
- Click Next on the authentication screen.
- Click on Use the built-in application pool identity and click Next.
- Click on the certificate, then click Next.
- Click Configure.
Configure Subordinate CDPs
1. Next up we need to configure the proper CRLs for our subordinate CA. Enter the following commands in an elevated Powershell on your subordinate CA.
					$crllist = Get-CACrlDistributionPoint; foreach ($crl in $crllist) {Remove-CACrlDistributionPoint $crl.uri -Force};
Add-CACRLDistributionPoint -Uri C:\Windows\System32\CertSrv\CertEnroll\%3%8%9.crl -PublishToServer -PublishDeltaToServer -Force
Add-CACRLDistributionPoint -Uri http://crl.lab.local/pki/%3%8%9.crl -AddToCertificateCDP -Force
Add-CACRLDistributionPoint -Uri file://\\WINCAIssuing.lab.local\pki\%3%8%9.crl -PublishToServer -PublishDeltaToServer -Force
$aialist = Get-CAAuthorityInformationAccess; foreach ($aia in $aialist) {Remove-CAAuthorityInformationAccess $aia.uri -Force};
Add-CAAuthorityInformationAccess -AddToCertificateAia http://crl.lab.local/pki/%1_%3%4.crt -Force
Certutil -setreg CA\CRLPeriodUnits 2
Certutil -setreg CA\CRLOverlapPeriodUnits 12
Certutil -setreg CA\ValidityPeriodUnits 5
certutil -setreg CA\AuditFilter 127
restart-service certsvc
certutil -crl
Troubleshooting
At this point your online issuing CA should be fully functional, and the Application event logs should not have any dire CA related messages. If you do see an Error Event ID 44 stating no valid templates, you can safely ignore that error. We will address that in Part 3. If you see a very recent (after the last restart) Error Event ID 74, stating it could not publish a base CRL, you can try the following:
1. Open the Certificate Authority MMC and open the properties of the CA.
2. On the Extensions tab remove all three CRL entries.
3. Restart the CA service.
4. Open an elevated PowerShell prompt and re-enter lines 2,3,4 under Configure Subordinate CDPs (above).
5. Restart the CA service and review event logs for errors.
Summary
In this installment we’ve done the bulk of the subordinate CA configuration. At this point the CA is now functional, although no templates have been configured. So coming up in the next installment is, among other things, the process to configure templates and computer auto-enrollment. You can find Part 3 here.


A couple of questions pertaining to the subordinate CA setup, Derek.
Root CA
Sub-CA1 – Web Enrollment only
Sub-CA2 – Enterprise enrollments
Sub-CA3 – both web and enterprise, but connected and placed offline. The server would be scheduled to talk to WSUS only for updates once a month and then scheduled to auto-shutoff afterwards.
The Sub-CA3 is really meant for ransomware events/attacks or issues where Sub-CA1 and Sub-CA2 are compromised and instead of getting RootCA up and potentially having it compromised, use Sub-CA3 to do the re-issuance?