Its been quite some time since I wrote up how to setup a Microsoft Windows two-tier certificate authority (CA). While Windows Server 2019 is not new, I did want to write up how to set a two-tier certificate authority (CA). I’m building out a new home lab, and thought this is an opportune time to write it up. My last CA blog series was for Windows Server 2012 R2. Not a lot has changed in the CA world since 2012 R2 (for better or worse), but a fresh post is worthwhile. I’ll probably do a Windows Server 2022 post in the future, after it has GA’d.
In this short series of posts, I’ll walk you through the process of setting up a two-tier PKI infrastructure using Windows Server 2019. There will be a “offline” root (a best practice), and an online enterprise issuing CA. It should be noted that standing up a PKI infrastructure for a real enterprise is a lengthy process, and needs a lot of processes and controls around it. You may want to use a HSM (hardware security module) to store the private keys. However, for a lab set this series should get you up and running and show you the concepts on how to do an offline root and an online issuing CA.
Blog Series
Offline Root CA Hardening
While hardening Windows Server 2019 is out of the scope for this blog series, I do want to remind you that it’s important to apply all required security controls to every Windows server in your environment. Things such as password policy, auditing, patches, renaming accounts, etc. should be baked into your image. Since by definition the offline root CA will be offline (and NOT domain joined), you need to harden the image without your domain group policies.
In a production environment, you also want to think about how you will preserve the offline root CA VM. It won’t need to be powered on, and it certainly shouldn’t be connected to the network. So you can easily remove/disable the virtual NIC, to prevent accidents. You could also export the VM as an OVA and store it safely in a vault for even higher security. For a lab environment I think it’s sufficient to just power it off and leave it be.
Install Offline Root CA
- Provision your Windows Server 2019 offline root CA VM as you normally would. Apply any an all security hardening, patches, etc. For a lab environment I’d suggest for the sake of simplicity to connect a virtual NIC and put it on the network but DO NOT join it to a domain.
- Use Notepad and create a file called CAPolicy.inf and place it in C:\Windows. Use the template text below as an example. Be sure to modify any parameters that you think are important to change, and make sure the URL is set properly. After you save the file, make sure it doesn’t have any extraneous extensions like .txt.
For the URL, this will be a placeholder for things such as our certificate policy, CRLs, etc. So pick something that you can live with for the long term (e.g. crl.yourdomain.local).
					[Version]
Signature="$Windows NT$"
[PolicyStatementExtension]
Policies=InternalPolicy
[InternalPolicy]
OID= 1.2.3.4.1455.67.89.5
Notice="Legal Policy Statement"
URL=http://crl.lab.local/pki/cps.txt
[Certsrv_Server]
RenewalKeyLength=2048
RenewalValidityPeriod=Years
RenewalValidityPeriodUnits=20
CRLPeriod=weeks
CRLPeriodUnits=26
CRLDeltaPeriod=Days
CRLDeltaPeriodUnits=0
LoadDefaultTemplates=0
AlternateSignatureAlgorithm=0
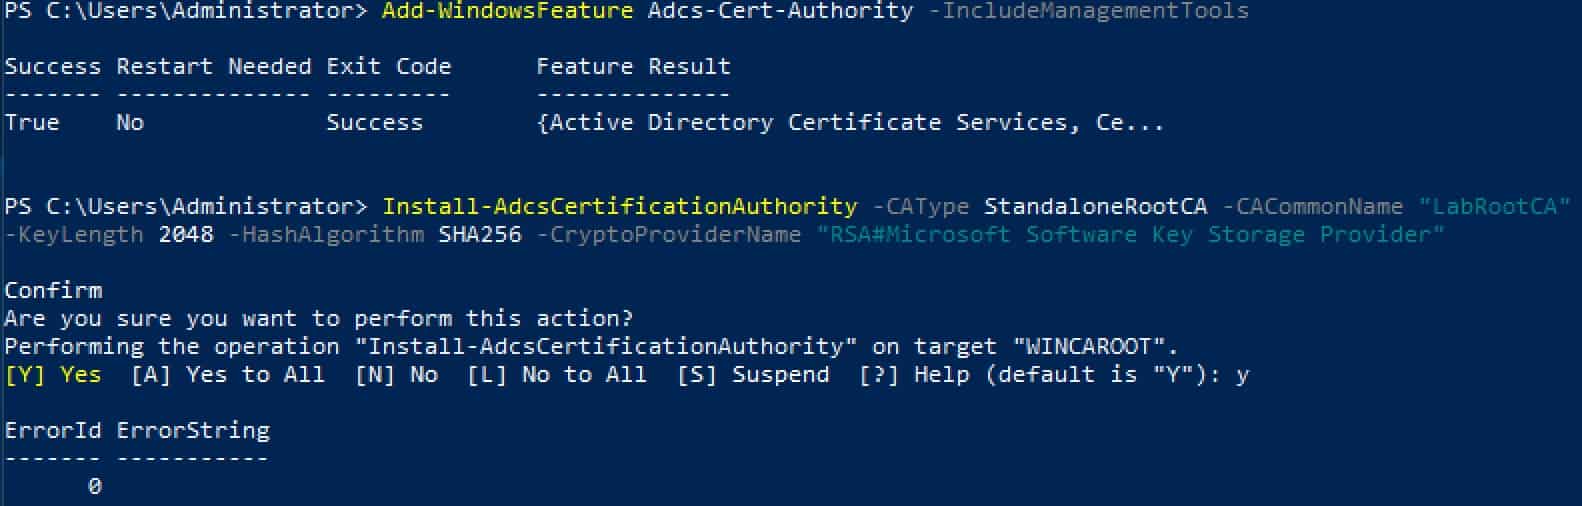
3. Run the following PowerShell command. Change the CACommonName as needed. I would make it clear in the name that this is the Root CA. This name will be present in all issued certificates, so make it obvious what it is and not just some generic hostname that is not meaningful. Notice that we are using SHA256 here, since SHA1 is no longer considered secure.
					Add-WindowsFeature Adcs-Cert-Authority -IncludeManagementTools
Install-AdcsCertificationAuthority –CAType StandaloneRootCA –CACommonName "LabRootCA" –KeyLength 2048 –HashAlgorithm SHA256 –CryptoProviderName "RSA#Microsoft Software Key Storage Provider"
4. Run the following commands, using the appropriate URL for your organization. We aren’t using HTTPS here, because that requires SSL and certificate validation. This is just used to download the CPS and CRLs, so don’t get clever and use HTTPS here. We will configure SSL for the web enrollment module (on the issuing CA), though.
					$crllist = Get-CACrlDistributionPoint; foreach ($crl in $crllist) {Remove-CACrlDistributionPoint $crl.uri -Force};
Add-CACRLDistributionPoint -Uri C:\Windows\System32\CertSrv\CertEnroll\%3%8.crl -PublishToServer -Force
Add-CACRLDistributionPoint -Uri http://crl.lab.local/pki/%3%8.crl -AddToCertificateCDP -Force
$aialist = Get-CAAuthorityInformationAccess; foreach ($aia in $aialist) {Remove-CAAuthorityInformationAccess $aia.uri -Force};
Certutil -setreg CA\CRLOverlapPeriodUnits 12
Certutil -setreg CA\CRLOverlapPeriod "Hours"
Certutil -setreg CA\ValidityPeriodUnits 10
Certutil -setreg CA\ValidityPeriod "Years"
Certutil -setreg CA\AuditFilter 127
restart-service certsvc
certutil -crl
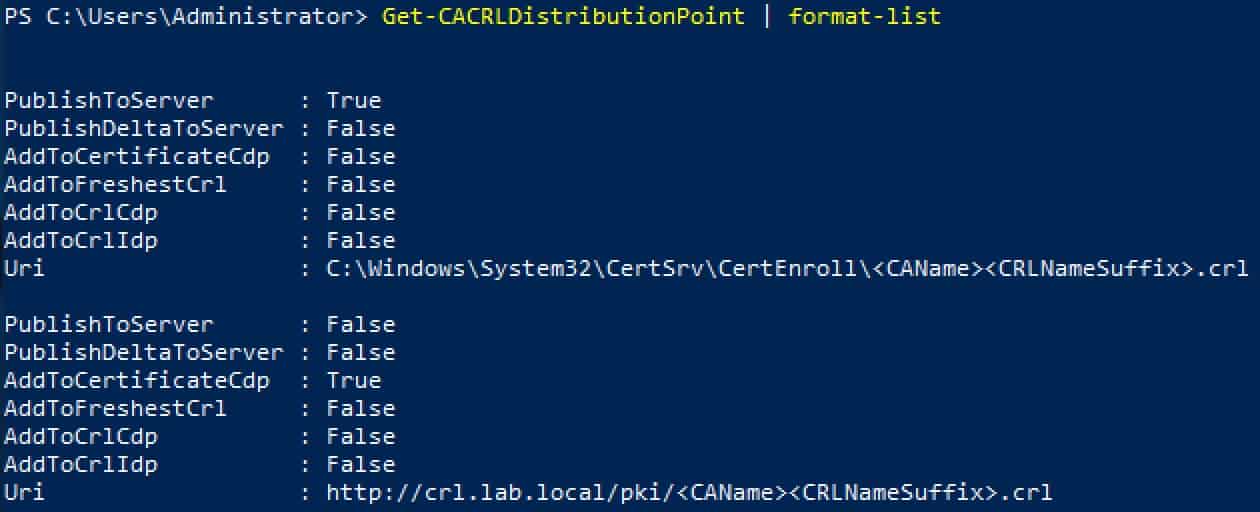
5. Verify that two and only two CRL distribution points are configured.
Get-CACRLDistributionPoint | format-list
6. Navigate to C:\Windows\System32\CertSrv\CertEnroll. You should see two files, one ending in CRL and another ending in .CRT. These two files need to be copied to what will be the online subordinate CA.

Publish Root CA to the Forest
1. Provision a Windows Server 2019 VM which will be your online CA. Join it to the domain. In my case the VM is named WINCAIssuing. Do not try and be clever and use a Domain Controller. The server will later need IIS installed and access to local accounts, which is not possible on a DC. So use a member server for your online CA, even in a home lab.
2. Login to what will be your online subordinate CA with an account that is a member of both Domain Admins and Enterprise Admins. Mount the media which has the two files copied from your offline CA. Open an elevated Powershell and enter the following commands, using the file names for your instance. This will publish the offline root CA information to AD, just as if it were an online CA. By doing this all domain joined clients will automatically trust your root CA. If you have standalone computers, then you can import the .crt file into their trusted certificate store.
					certutil –dspublish –f WINCARoot_LabRootCA.crt RootCA
certutil –addstore –f root WINCARoot_LabRootCA.crt
certutil –addstore –f root LabRootCA.crl
CPS and CRL Distribution
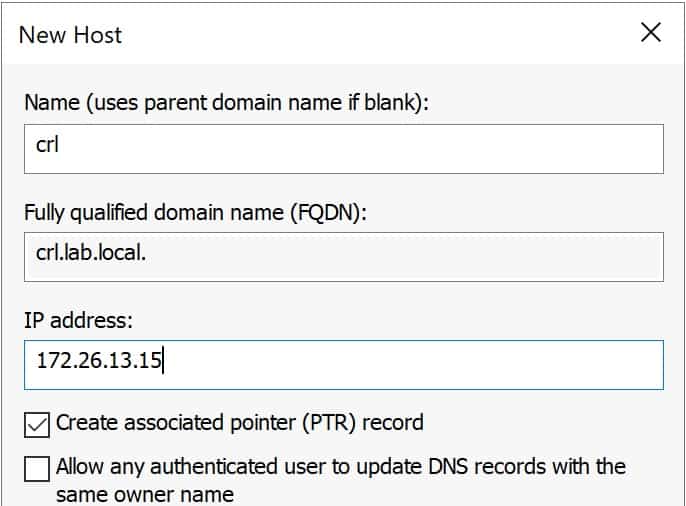
1. Now you need create a DNS A record for the host that will be publishing your online CA information. In this case it’s WinCAIssuing, and per my previous steps I stuck with ‘crl’ as the host name. I’m assuming the proper DNS zone already exists, since you have a domain with Active Directory up and running. This must be configured prior to continuing, as the subordinate will fail to properly configure if the CRL file is not available.
2. We need to install IIS, since we will be distributing the CPS and CRL via the HTTP. On the VM which will be your online CA, run the following command:
Install-WindowsFeature Web-WebServer -IncludeManagementTools
3. Open an elevated PowerShell and enter the following commands. If you have an official CPS, then you can skip the second command and just copy your cps.txt file to the directory. If you want higher security, you could put the PKI directory on a D drive.
					new-item -path C:\pki -type directory
write-output "This is a sample CPS." | out-file C:\pki\cps.txt
new-smbshare -name pki C:\pki -FullAccess SYSTEM,"lab\Domain Admins" -ChangeAccess "lab\Cert Publishers"
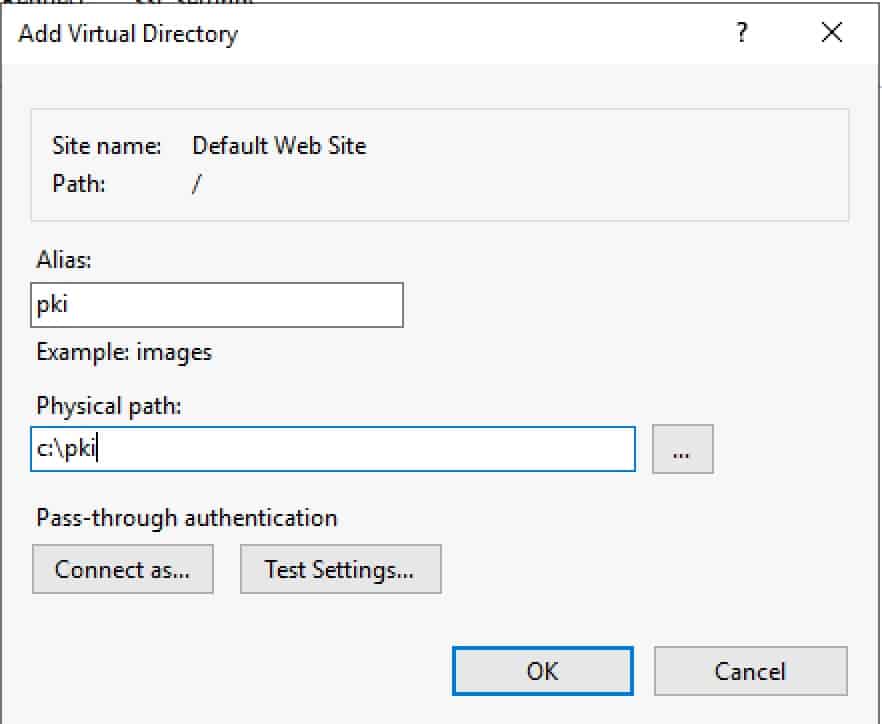
4. Open the IIS Manager, right click on Default Web Site, and add a Virtual Directory as shown below.
5. Verify pki is selected in the left pane, then single click Authentication in the middle pane, and in the right Actions pane click on Edit Permissions.
6. Select the Security tab and select Edit. Add the Cert Publishers group with Modify permissions (which will add several others under it).
7. In the same dialog box, click add but change the from this location to the local computer. Manually enter IIS AppPool\DefaultAppPool. Leave the default permissions. If you use the user/group browser this will not be listed, so please manually enter it.
8. At this point any anonymous browser can now read your CPS statement and see the public root certificate. You can test this by going to http://crl.lab.local/pki/cps.txt and verify the sample file opens.
9. In the middle IIS Manager pane, with pki still selected, double click on Request Filtering. In the right pane click on Edit Feature Settings and check the box next to Allow double escaping.
10. Run iisreset from an elevated Powershell command.
Summary
In this installment we’ve configured our offline root CA, performed some hardening, and published the root CA information to the forest. All computers in the domain will now trust your offline root CA. We also configured IIS to serve up your CPS and CRLs to anonymous users.
Now that you are this far in the setup process, I would strongly urge you to take VM snapshots of your domain controllers, and two CA server VMs. In Part 2 we do more configuration, which is a bit tedious and could be error prone. Taking snapshots here is a good check-point, and one you can easily revert to if things go south in Part 2. I actually powered down both of my DCs and the two CA servers to snapshot them. Note: Just do this in a lab, as reverting AD servers in production is not a good idea.


Hi Thanks for this. I will be setting this up for a customer. Is the .inf file called?
Update
Disregard I see what it used for. 🙂
Excellent read I am saving your blog.
thank you for this article
for core server installation, the permissions to apply on C:\PKI\ in items 6 and 7 of “CPS and CRL Distribution” are:
Thanks!
for anyone else looking to set this up on core, you can use the following to set the virtual directory referenced in step 4.
New-WebVirtualDirectory -Site ‘Default Web Site’ -Name ‘pki’ -PhysicalPath ‘C:\pki’
Also, to “Allow double escaping”, you can run the following:
Set-WebConfigurationProperty –pspath ‘MACHINE/WEBROOT/APPHOST’ –filter ‘system.webServer/security/requestFiltering’ –name ‘allowDoubleEscaping’ –Value ‘true’
Minor update to Roland’s code above. The code suppied with allow double escaping to the Default Web Site. If this is required only for the PKI folder, use:
Set-WebConfigurationProperty -PSPath “IIS:\Sites\Default Web Site\pki\” -Filter “system.WebServer/security/requestFiltering” -Name “allowDoubleEscaping” -Value $true
Hi Derek,
Just wondering is there a reason why you would not go a key length of 4096 for the root cert?
FYI, the powershell command to Install-AdcsCertificationAuthority is missing two values compared with the Server Manager steps in https://learn.microsoft.com/en-us/previous-versions/windows/it-pro/windows-server-2012-R2-and-2012/hh831348(v=ws.11)?redirectedfrom=MSDN which I think was the basis for this article.
In your step by step, the root CA cert will only be issued with a 5 year validity period, which isn’t appropriate given the subordinate also has 5 year validity. You need to have something like the following command for it to be 20 years:
Install-AdcsCertificationAuthority –CAType StandaloneRootCA –CACommonName “ExampleRootCA” –KeyLength 2048 –HashAlgorithm SHA256 -ValidityPeriod Years -ValidityPeriodUnits 20 –CryptoProviderName “RSA#Microsoft Software Key Storage Provider”
Note the additional “-ValidityPeriod Years -ValidityPeriodUnits 20”
Otherwise great article, would also be great to have examples of the process of renewing the root and subordinate CAs, given that’s the likely thing that will need to occur next for people. I wonder how many offline root CAs are out there with 5 year periods now…