Microsoft System Center Service Manager 2012 is an integrated platform for automating and adapting an organization’s IT service management best practices. It has built-in processes for incident and problem management, change management, service request fulfillment, release management, service level management and configuration management. As part of the System Center suite it has connectors available for Virtual Machine Manager, Orchestrator, Operations Manager and Configuration Manager. Below is a sample architecture from Microsoft’s Infrastructure Planning Guide.

Refer to the massive amount of documentation in the System Center 2012 Service Manager Survival Guide, found here. Suffice it to say, to implement SM properly is no small task and the product should be well understood and processes mapped out prior to installing the product. The remainder of this article will just show you how to get the basics installed and launch the Administrator console.
Pre-Requisite check:
- Server should be allocated at least 8GB of RAM and two cores
- Latest Windows Server 2008 R2 service pack
- Full-text search is installed on your separate SQL 2008/R2 Server
I would strongly suggest you review the Service Manager 2012 Planning Guide for additional details, as your environment will be different. Depending on the number of users, high availability requirements, etc. you may need a lot more server resources than what the installer checks for. If all you want to do is get a basic install done for testing in a lab, this is the guide for you. Configuring a high availability instance with SQL mirroring, load balancers, and other features is far beyond the scope of this article.
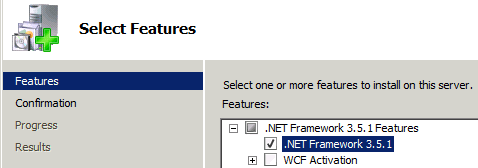
1. On your Windows Server 2008 R2 Service Manager 2012 server to be install the .Net Framework 3.5.1 ‘feature’.
2. Download and install Microsoft Analysis Management Objects.
3. Download and install Microsoft Report Viewer Redistributable 2008.
4. Download and install SQL Server 2008 R2 SP2 Native Client.
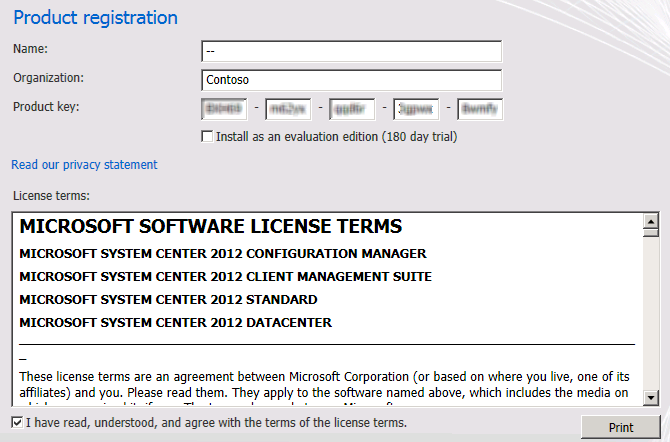
5. Launch the Service Manager installer and select Service Manager management server. On the Product Registration screen enter your name, organization, product key, and accept the license terms.
3. Change the installation location, if desired, then wait for the requirements check to complete. If all goes well, you should see no red errors, but possibly a couple of yellow warnings depending on how you configured your CPUs and RAM. Assuming no red errors, continue with the installation.
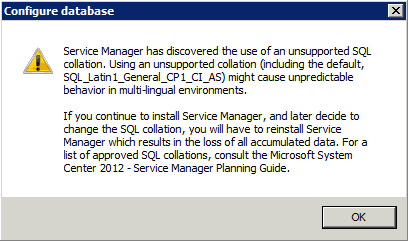
4. Configure the database server name then click on the instance drop down. Should a collation warning pop up, like the one below, pause for a minute and contemplate the implications. If you will only be installing Service Manager for English language users, then you can safely ignore the error. However, if you will be using Service Manager in a multi-lingual environment then consult the Service Manager Planning Guide for what to do.
5. If you acknowledge the error but still can’t proceed with the install, you probably overlooked the pre-req I pointed out at the beginning of this post, SQL Full Text search. At this point you need to install the Full Text search capability on your SQL server. After you complete that operation, and you select the SQL instance, the window will populate with additional options. Configure these options as needed, as your paths will be different than mine.

6. Next you need to name your management group, and select a group that will be the Management Group administrators. Use whatever you like. I have a strict RBAC naming convention that I like to follow.

7. Two service accounts are required for Service Manager. The first is for the system services, and the second will be for the workflows. Create the first service account in Active Directory, then add it to the local administrator’s group on the Service Manager server. Test the credentials to verify everything is good to go.
Note 1: There seems to be a bug in the installer if you test one service account, realize you want to use a different account, and use the new service account. It caches the first name you try, no matter what you use during subsequent installation attempts and the installer will fail and you will have to comb through the installation logs to see why it failed.
Note 2: Don’t try and outsmart the installer and manually add the SM service account to the SQL server logins. The installer will barf if the security principal already exists, so let the installer do the work for you (thank you Microsoft!).

8. The second service account does NOT need local admin rights on the Service Manager server.

9. Join or skip the customer experience program as you wish.
10. Configure Microsoft Update as you wish.
11. Review the Installation Summary to verify everything looks good and click Install. Assuming everything is correctly configured the installer will proceed, import default management packs, then after quite a long install you will be presented with the screen below. Make sure you check the option to run the encryption key wizard.

12. Run through the backup key wizard and save the keys to a safe place and with a password that you will remember. After the wizard complete the console will open up and you should see the following screen.

The basic installation of System Center Service Manager 2012 is now complete, but there is still configuration to do. Stay tuned for future articles, time permitting, on additional configuration steps.


