
Windows Server 2012 R2 Certificate Authority
The process is fairly simple: Build an offline root, create an online issuing CA, setup a couple of templates, setup auto-enrollment, then do a little post setup configuration. This requires two VMs, each running Windows Server 2012 R2 (or plain 2012 if you wish).
Building an enterprise CA is non-trivial, and should be highly process oriented. While this short series will provide the steps how to configure a two tiered hierarchy, it alone is not enterprise grade and ready for a fortune 500 company. Many operational procedures, access controls, etc. need to be defined by the organization. For example, who can issue certificates? Who can revoke them? Do users need PKI certificates or just computers? How about key recovery? Disaster recovery? Do you need a hardware security module (HSM)? Do you require FIPS compliance? What ciphers and hashing algorithms will you allow? Where do you store the offline CA?
As you can see, there are many questions and processes that need to be well documented for a solid PKI solution. However, for a lab environment where you want to test out a two-tiered model, then this short series is for you. Please don’t take this solution as-is and throw it into production. You will have a false sense of security and possibly do more harm than good.
The Microsoft CA issues industry standard certificates (x.509), and thus will work with third party hardware and software. For instance, they will work perfectly fine on the Linux vCenter appliance, or your hardware load balancers. You just need to use the proper certificate template, and verify compatible algorithms.
Offline Root CA Hardening
1. Provision a standalone Windows Server 2012 R2 server. I used vCenter 5.5 with customization specifications to create the VM. You can use the ‘standard’ edition of the OS since all SKUs in 2012 have the exact same feature set, unlike 2008 R2 and earlier. For security purposes I would not provision a NIC, or remove the NIC after you’ve built the CA to prevent future network attacks.
2. Configure a virtual floppy for the offline CA VM. This is a good way to transfer data between the offline CA and the subordinate, which is required during the configuration process. Yes you could connect a NIC, but then your offline CA is no longer offline and exposed to network attacks. Media needs to be read/write, so an ISO image will not suffice. You can use a tool like WinImage to create a floppy image.
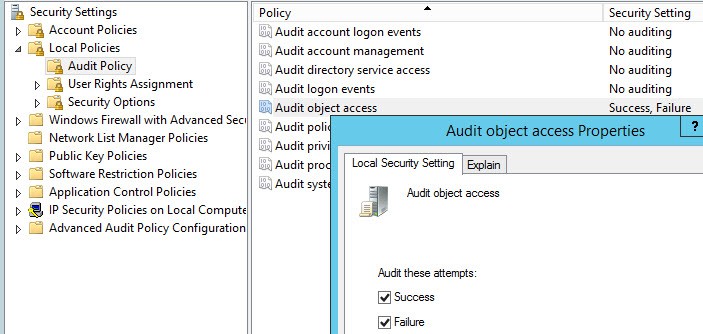
3. Open the local security policy and modify the Audit Object Access to record Success and Failures. This is needed to audit certain CA actions, in conjunction with a CA flag we will set later on.
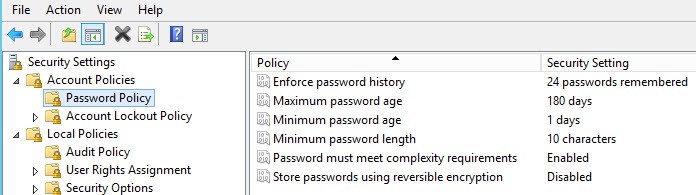
4. Depending on your VM template hardening, you may or may not need to modify the password policy. Again in the Local Security editor. Modify to meet your organization’s security requirements.
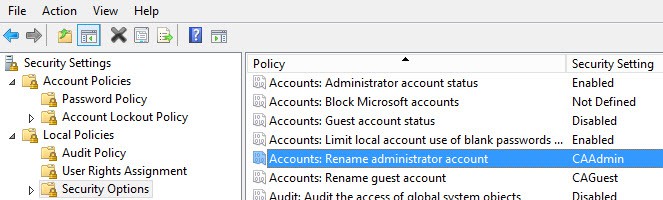
5. You should also rename the Administrator account, if that’s not already built into your templates. Make sure to record the new name, or you could be in a pickle. For good measure I’d rename the guest account, although it should be disabled.
6. Obviously you should change the administrator password and not use your template default. Be sure to record the password in a secure location.
7. You should also think about where you will store the offline CA VM once it is build and this project is complete. If you leave it sitting on a production ESXi host, then it would be fairly trivial to power on the VM and compromise it. I would not call storing your “offline” CA in a powered off state on a production ESXi host “offline”. I would look at exporting the VM to an OVF file, then storing that file on removable media in a very secure location. You could use a DVD, Blu-Ray, or USB stick.
Install Offline Root CA
1. After your VM is provisioned and hardened, make sure the computer name is configured. In my case the offline CA is name D002CA01. Reboot if you changed the name.
2. Use Notepad and create a file called CAPolicy.inf in C:\Windows. Use the code snippet below, but change the URL. This URL is where your Certification Practice Statement (CPS) is located. It will also be where the CRL (certificate revocation list) will be published. For a production deployment you’d want to create a CPS, but for this exercise we will skip it, however the URL will be configured for future usage. For additional details see this TechNet link. You probably want to use a different URL like CA.yourdomain or PKI.yourdomain since we will be publishing other data to this address such as the CRL. For simplicity I stuck with www.contoso.local. Make sure the filename does not have any extra extensions like .txt. Verify from the command line.
[Version]
Signature="$Windows NT$"
[PolicyStatementExtension]
Policies=InternalPolicy
[InternalPolicy]
OID= 1.2.3.4.1455.67.89.5
Notice="Legal Policy Statement"
URL=http://www.contoso.local/pki/cps.txt
[Certsrv_Server]
RenewalKeyLength=2048
RenewalValidityPeriod=Years
RenewalValidityPeriodUnits=20
CRLPeriod=weeks
CRLPeriodUnits=26
CRLDeltaPeriod=Days
CRLDeltaPeriodUnits=0
LoadDefaultTemplates=0
AlternateSignatureAlgorithm=1
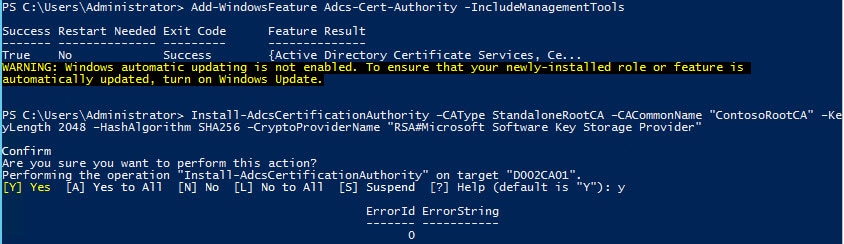
3. Run the following PowerShell command. Change the CACommonName as needed. The command will complete instantly. I would make it clear in the name that this is the Root CA. This name will be present in all issued certificates, so make it obvious what it is and not just some generic hostname that is not meaningful. Notice that we are using SHA256 here, since SHA1 is no longer considered secure. You could also use SHA512.
Add-WindowsFeature Adcs-Cert-Authority -IncludeManagementTools

Install-AdcsCertificationAuthority –CAType StandaloneRootCA –CACommonName "ContosoRootCA" –KeyLength 2048 –HashAlgorithm SHA256 –CryptoProviderName "RSA#Microsoft Software Key Storage Provider"
4. Run the following commands, using the appropriate URL for your organization. We aren’t using HTTPS here, because that requires SSL and certificate validation. This is just used to download the CPS and CRLs, so don’t get clever and use HTTPS here. We will configure SSL for the web enrollment module, though.
$crllist = Get-CACrlDistributionPoint; foreach ($crl in $crllist) {Remove-CACrlDistributionPoint $crl.uri -Force};
Add-CACRLDistributionPoint -Uri C:\Windows\System32\CertSrv\CertEnroll\%3%8.crl -PublishToServer -Force
Add-CACRLDistributionPoint -Uri http://www.contoso.local/pki/%3%8.crl -AddToCertificateCDP -Force
$aialist = Get-CAAuthorityInformationAccess; foreach ($aia in $aialist) {Remove-CAAuthorityInformationAccess $aia.uri -Force};
Certutil -setreg CA\CRLOverlapPeriodUnits 12
Certutil -setreg CA\CRLOverlapPeriod "Hours"
Certutil -setreg CA\ValidityPeriodUnits 10
Certutil -setreg CA\ValidityPeriod "Years"
Certutil -setreg CA\AuditFilter 127
restart-service certsvc
certutil -crl
5. Verify that two and only two CRL distribution points are configured.
Get-CACRLDistributionPoint | format-list
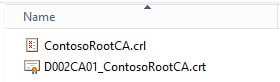
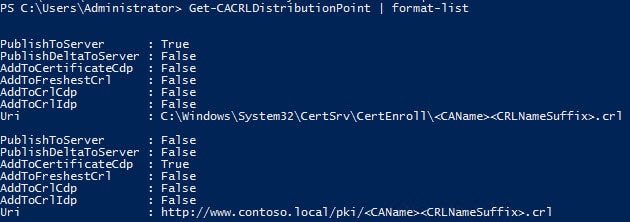 6. Navigate to C:\Windows\System32\CertSrv\CertEnroll. You should see two files, one ending in CRL and another ending in .CRT. These two files need to be copied to what will be the online subordinate CA.
Publish Root CA to the Forest
1. Provision a Windows Server 2012 R2 VM which will be your online CA. Join it to the domain. In my case the VM is named D002MISC01. Do not try and be clever and use a Domain Controller. The server will later need IIS installed and access to local accounts, which is not possible on a DC. So use a member server for your online CA, even in a home lab.
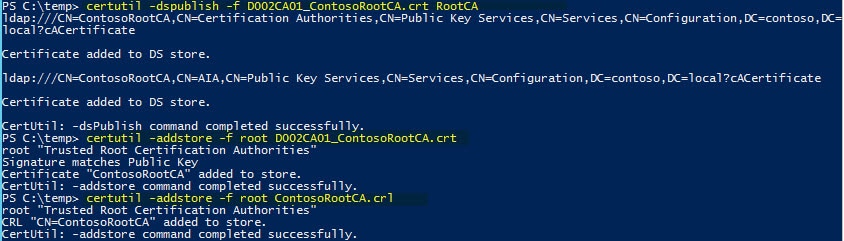
2. Login to what will be your online subordinate CA with an account that is a member of both Domain Admins and Enterprise Admins. Mount the media which has the two files copied from your offline CA. Open an elevated Powershell and enter the following commands, using the file names for your instance. This will publish the offline root CA information to AD, just as if it were an online CA. By doing this all domain joined clients will automatically trust your root CA. If you have standalone computers, then you can import the .crt file into their trusted certificate store.
certutil –dspublish –f D002CA01_ContosoRootCA.crt RootCA
certutil –addstore –f root D002CA01_ContosoRootCA.crt
certutil –addstore –f root ContosoRootCA.crl
CPS and CRL Distribution
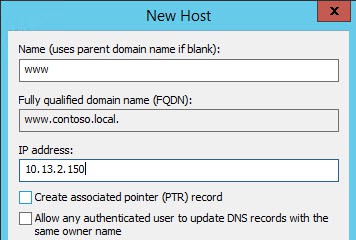
1. Now you need create a DNS record for the host that will be publishing your online CA information. In this case it’s D002MISC01, and per my previous steps I stuck with ‘www’ as the site name. I’m assuming the proper DNS zone already exists, since you have a domain with Active Directory up and running. This must be configured prior to continuing, as the subordinate will fail to properly configure if the CRL file is not available.
2. We need to install IIS, since we will be distributing the CPS and CRL via the HTTP. On the VM which will be your online CA, run the following command:
Install-WindowsFeature Web-WebServer -IncludeManagementTools
3. Open an elevated PowerShell and enter the following commands. If you have an official CPS, then you can skip the second command and just copy your cps.txt file to the directory. For security purposes I’d recommend putting the files on the D: drive, so you aren’t serving content from the OS drive.
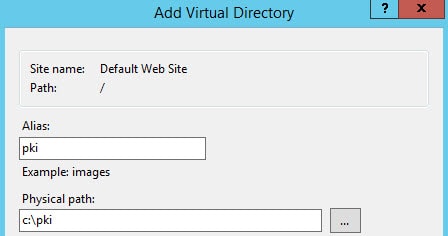
new-item -path D:\pki -type directory
write-output "This is a sample CPS. Modify as needed." | out-file D:\pki\cps.txt
new-smbshare -name pki D:\pki -FullAccess SYSTEM,"Contoso\Domain Admins" -ChangeAccess "Contoso\Cert Publishers"
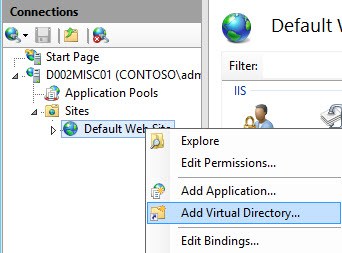
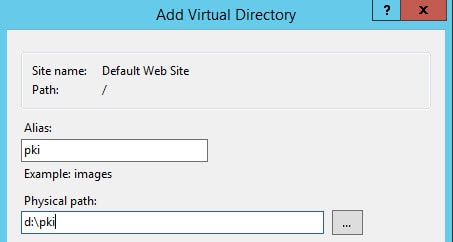
4. Open the IIS Manager and add a Virtual Directory as shown below.
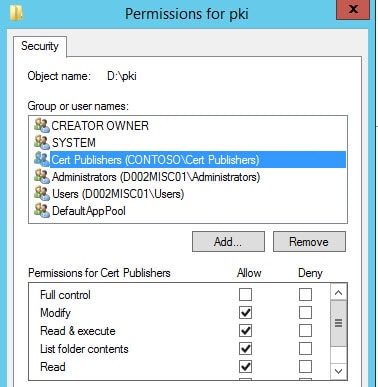
5. Verify pki is selected in the left pane, then single click Authentication in the middle pane, and in the right Actions pane click on Edit Permissions.
6. Select the Security tab and select Edit. Add the Cert Publishers group with Modify permissions (which will add several others under it).
7. In the same dialog box, click add but change the from this location to the local computer. Manually enter IIS AppPool\DefaultAppPool. Leave the default permissions. If you use the user/group browser this will not be listed, so please manually enter it.
8. At this point any anonymous browser can now read your CPS statement and see the public root certificate. You can test this by going to http://www.yourdomain/pki/cps.txt and verify the sample file opens.
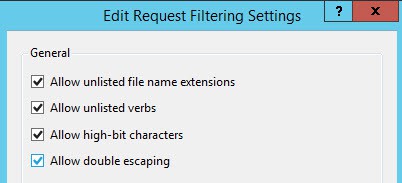
9. In the middle pane, with pki still selected, click once on Request Filtering. In the right pane click on Edit Feature Settings and check the box next to Allow double escaping.
10. Run iisreset from an elevated Powershell command.
Summary
In this installment we’ve configured our offline root CA, performed some hardening, and published the root CA information to the domain. All computers in the domain will now trust your root CA. We also configured IIS to serve up your CPS and CRLs to anonymous users. Next up is configuring the online subordinate CA. Check out the next installment in Part 2.


When I try to Installl Offline Root Ca at point 4. I get this message: Get-CACrlDistributionPoint : CCertAdmin::GetConfigEntry: The parameter is incorrect. 0x80070057 (WIN32: 87 ERROR_INVALID_PARAMETER) At line:1 char:12 + $crllist = Get-CACrlDistributionPoint; foreach ($crl in $crllist) {Remove-CACrlD … + ~~~~~~~~~~~~~~~~~~~~~~~~~~ + CategoryInfo : NotSpecified: (:) [Get-CACrlDistributionPoint], ArgumentException + FullyQualifiedErrorId : System.ArgumentException,Microsoft.CertificateServices.Administration.Commands.CA.GetCrlDistributionPointCommand Add-CACRLDistributionPoint : CCertAdmin::GetConfigEntry: The parameter is incorrect. 0x80070057 (WIN32: 87 ERROR_INVALID_PARAMETER) At line:2 char:1 + Add-CACRLDistributionPoint -Uri C:WindowsSystem32CertSrvCertEnrollNameRoot … + ~~~~~~~~~~~~~~~~~~~~~~~~~~~~~~~~~~~~~~~~~~~~~~~~~~~~~~~~~~~~~~~~~~~~~~~~~~~~~~~~ + CategoryInfo : NotSpecified: (:) [Add-CACrlDistributionPoint], ArgumentException + FullyQualifiedErrorId : System.ArgumentException,Microsoft.CertificateServices.Administration.Commands.CA.AddCdpCommand Add-CACRLDistributionPoint : CCertAdmin::GetConfigEntry: The parameter is incorrect. 0x80070057 (WIN32: 87 ERROR_INVALID_PARAMETER) At line:3 char:1 + Add-CACRLDistributionPoint… Read more »
I had the same issue and could not find a solution online. Eventually I figured it out, and have written it up here: http://pcloadletter.co.uk/2014/09/30/adcs-error-0…
Nice write up David!
I'd like to point out that the "AlternateSignatureAlgorithm=1" in the CApolicy.inf could cause a lot of headaches for those that use Firefox to access intranet sites with certs issues by this process, Adobe Acrobat Pro signing PDFs or Server 2003 compatibility.
The 1.2.840.113549.1.1.10 RSASSA-PSS has caused lots of problems, I'd set the "AlternateSignatureAlgorithm" to 0.
Just my 2c
Brad
I second that, Brad. I went through a vSphere deployment, and used 1 instead of 0. Ended up having to rip out my CA and start all over again. In fact, RSASSA-PSS is not supported for vSphere 5.5, and had I not read Brad's comment here, I'd still be pulling my hair out 🙂
Excellent write up none-the-less, Derek! Thank you for your very informative blogs.
Great post Derek,
I tried to follow it without provisioning a NIC at all but got a 0x800704cf when trying to install the offline CA after adding the role using Powershell.
Adding a NIC instantly solves the issue even if there is no network connectivity.
Hi Derek,
great series. We have planned to do a deployment very similar to yours (using Windows Server 2008 R2) and we have some doubts about the hardware sizing for the servers. What do you recommend us? We have planned to deploy 10.000 certificates for mobile devices.
Thnaks
Plan for this quarterly occasion well in advance and perhaps leverage your weekly efforts for this quarterly
production. Firstly, you will need to constantly stay away from
the torrent websites. It is an entry level cash register for small businesses.
–HashAlgorithm SHA256 is now –HashAlgorithmName SHA256
Thanks for the write up it was the only thing to help me build a working PKI in my lab. One thing when you are adding the crls I had to remove the second url of it otherwise my crls were published wrong.
Once again thanks!
Do we need to obtain OID number for our organization or just use the one shown in the CAPolicy.inf file?
I’ve been doing a lot of reading on lengthening the validity of an existing Root CA Cert. I thought you didn’t need CAPolicy.inf anymore in 2012R2? Or is the ability to use registry settings to modify the CERT only for that?
Thx,
Steve