Today, on June 22, 2023, Proxmox Virtual Environment 8.0 is now out of beta and has been released to the public. This post will walk you through an in-place upgrade of Proxmox VE 7.4 to 8.0. Proxmox is a very popular virtualization platform for home enthusiasts to run their servers on. It’s a great platform for Home Assistant, Plex, Docker containers, and a lot more. This guide is aimed at home labs and NOT an enterprise that uses Proxmox in production.
You can read the full press release, but here are the highlights:
- Based on Debian 12 (Bookworm)
- Standard install uses Linux Kernel 6.2 (optional on 7.4)
- QEMU 8.0.2
- LXC 5.0.2
- ZFS 2.1.12
- Ceph Quincy 17.2.6
- Text-based UI for installer ISO (bypass graphical issue on some GPUs)
The list of features isn’t monumental, but defaulting to Linux kernel 6.2 and the text based ISO installer option addresses two pain points users may experience when using the latest generation of CPUs.
This post will cover the upgrade process from Proxmox VE 7.4 to 8.0. The upgrade can be done in-place, and is minimally disruptive with just a host reboot needed. Please note my upgrade covers a non-clustered configuration, and I’m not using Ceph. If you are using Ceph or want to refer to the official upgrade procedure you can check out the Proxmox Upgrade from 7 to 8 wiki.
I used Proxmox Backup Server 2.4 to take backups before and after the upgrade. Version 2.4 doesn’t appear to have any issues with Proxmox VE 8.0. As of the date of this post I haven’t seen a beta for the post 2.4 version. I’m sure there will be a version based on Bookworm at some point. One of my Proxmox hosts has a PCIe Google Coral TPU using passthrough to a Frigate VM and it is working flawlessly post-upgrade.
Spoiler: I found two issues, both of which are minor and related to third-party products and not Proxmox VE 8.0 itself:
- The Glances performance monitoring tool breaks after upgrading to VE 8.0. However, I’ve updated my post Home Assistant: Monitor Proxmox with Glances post to resolve the issue.
- In Home Assistant I use the HACS Proxmox add-on. A number of entities related to Proxmox host CPU, memory and disk stats were unavailable. However, there was a new set of the same counters that do work. So I had to delete all of the unavailable entities and clean up some dashboard cards.
Update June 24, 2023:
- There’s a fix for the Glances compatibility issue with Proxmox VE 8.0. I updated my Spoiler section above to provide a link to my Glances installation post that has the Proxmox VE 8.0 fix. It’s now working fine. Thanks to tteck for suggesting the fix.
- I’ve added a new automated upgrade section that uses the awesome tteck Proxmox upgrade script. The end result is the same, but he makes it easy with almost no human intervention. This is my recommended method. But the manual procedure is still available if you wish to use that instead.
More Proxmox Guides
I’ve written a number of how-to guides for Proxmox, including installing Home Assistant, Plex, and a lot more. You can find those guide here:
Derek Seaman’s Proxmox How-to Guides
Proxmox VE 8: Windows 11 vGPU (VT-d) Passthrough with Intel Alder Lake
Proxmox 7.4 to 8.0 Pre-Flight Check
Before we proceed with doing the upgrade, let’s first get everything ready and make sure the upgrade will proceed without any issues.
- Perform a full off-host backup of all your workloads, including VMs and LXCs. Perform validation that your backups are good.
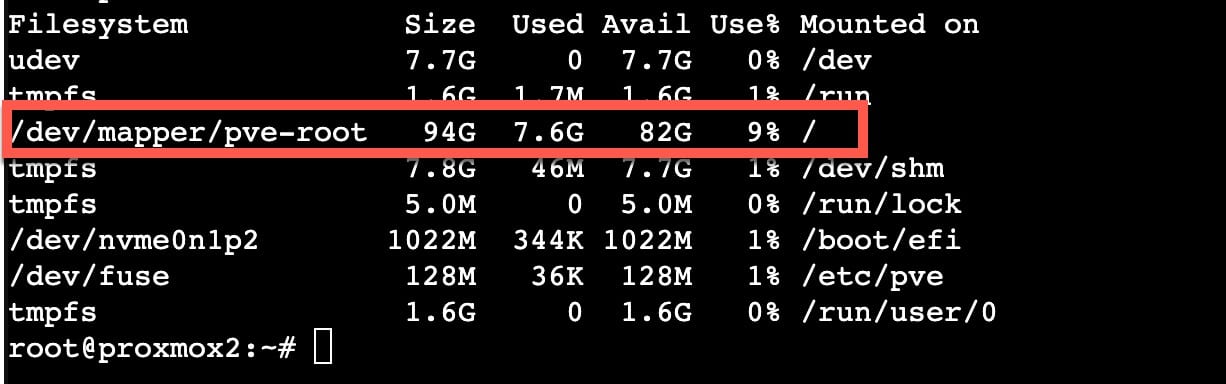
- Verify at least 5GB of free disk space on the root partition of your Proxmox host. If you have LESS than 5GB free space, STOP. DO NOT UPGRADE. Find more space.
df -h
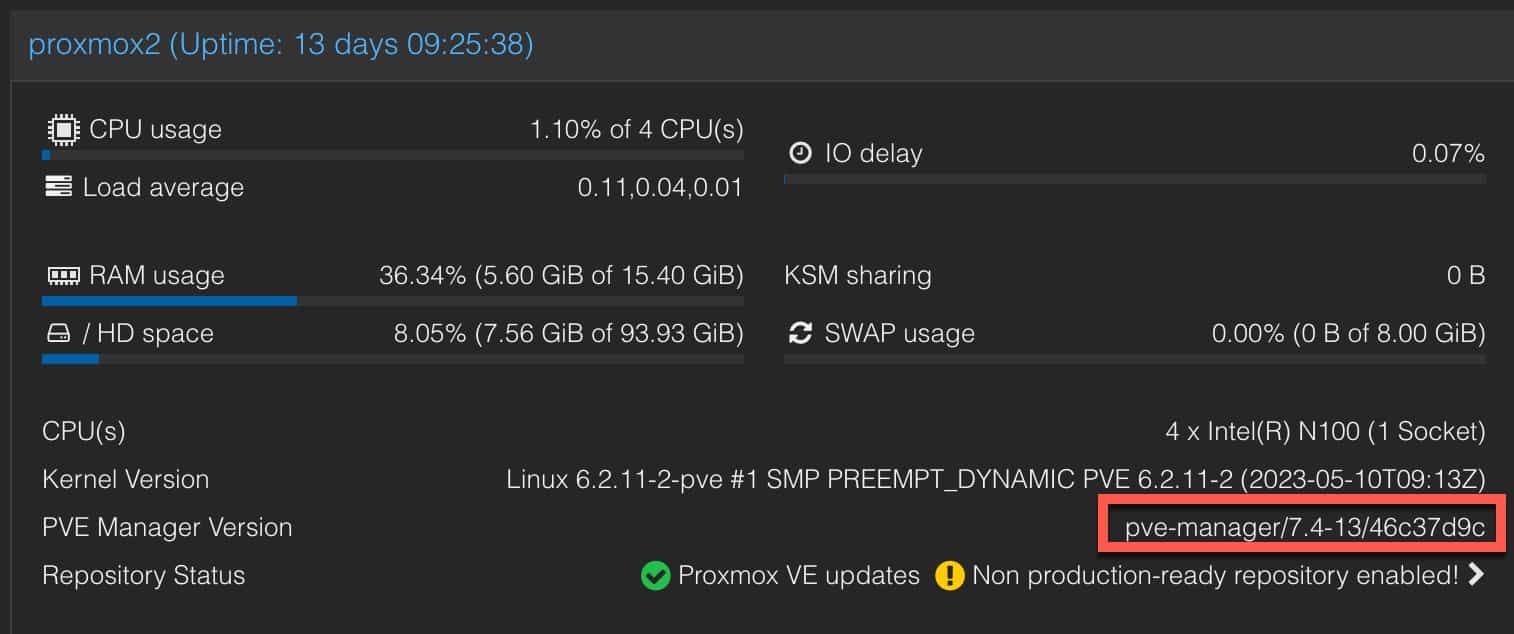
3. Verify you are running at least Proxmox VE 7.4-13. If you aren’t this current, see the next step for updating. If up to date, skip to step 9.
4. Let’s use the awesome tteck Proxmox VE post-install script to update Proxmox. It will set the proper repositories and then prompt you to update. This will ensure you won’t encounter errors while trying to update. Open the Proxmox GUI, click on your Proxmox host, then in the middle pane click on Shell. Paste the following command and run it:
bash -c "$(curl -fsSL https://raw.githubusercontent.com/community-scripts/ProxmoxVE/main/tools/pve/post-pve-install.sh)"
5. When prompted to Start the Proxmox VE Post Install script, answer Y and press enter. If a recommendation for Proxmox 8 is shown, acknowledge it.
6. Press ENTER on all prompts. Once the script gets to the Updating Proxmox VE (Patience) step, DO NOT CLICK AROUND IN THE GUI. WAIT.
7. When prompted to Reboot, press enter on yes.
8. After the host has rebooted, log back into Proxmox and open another host shell.
9. Run the following command:
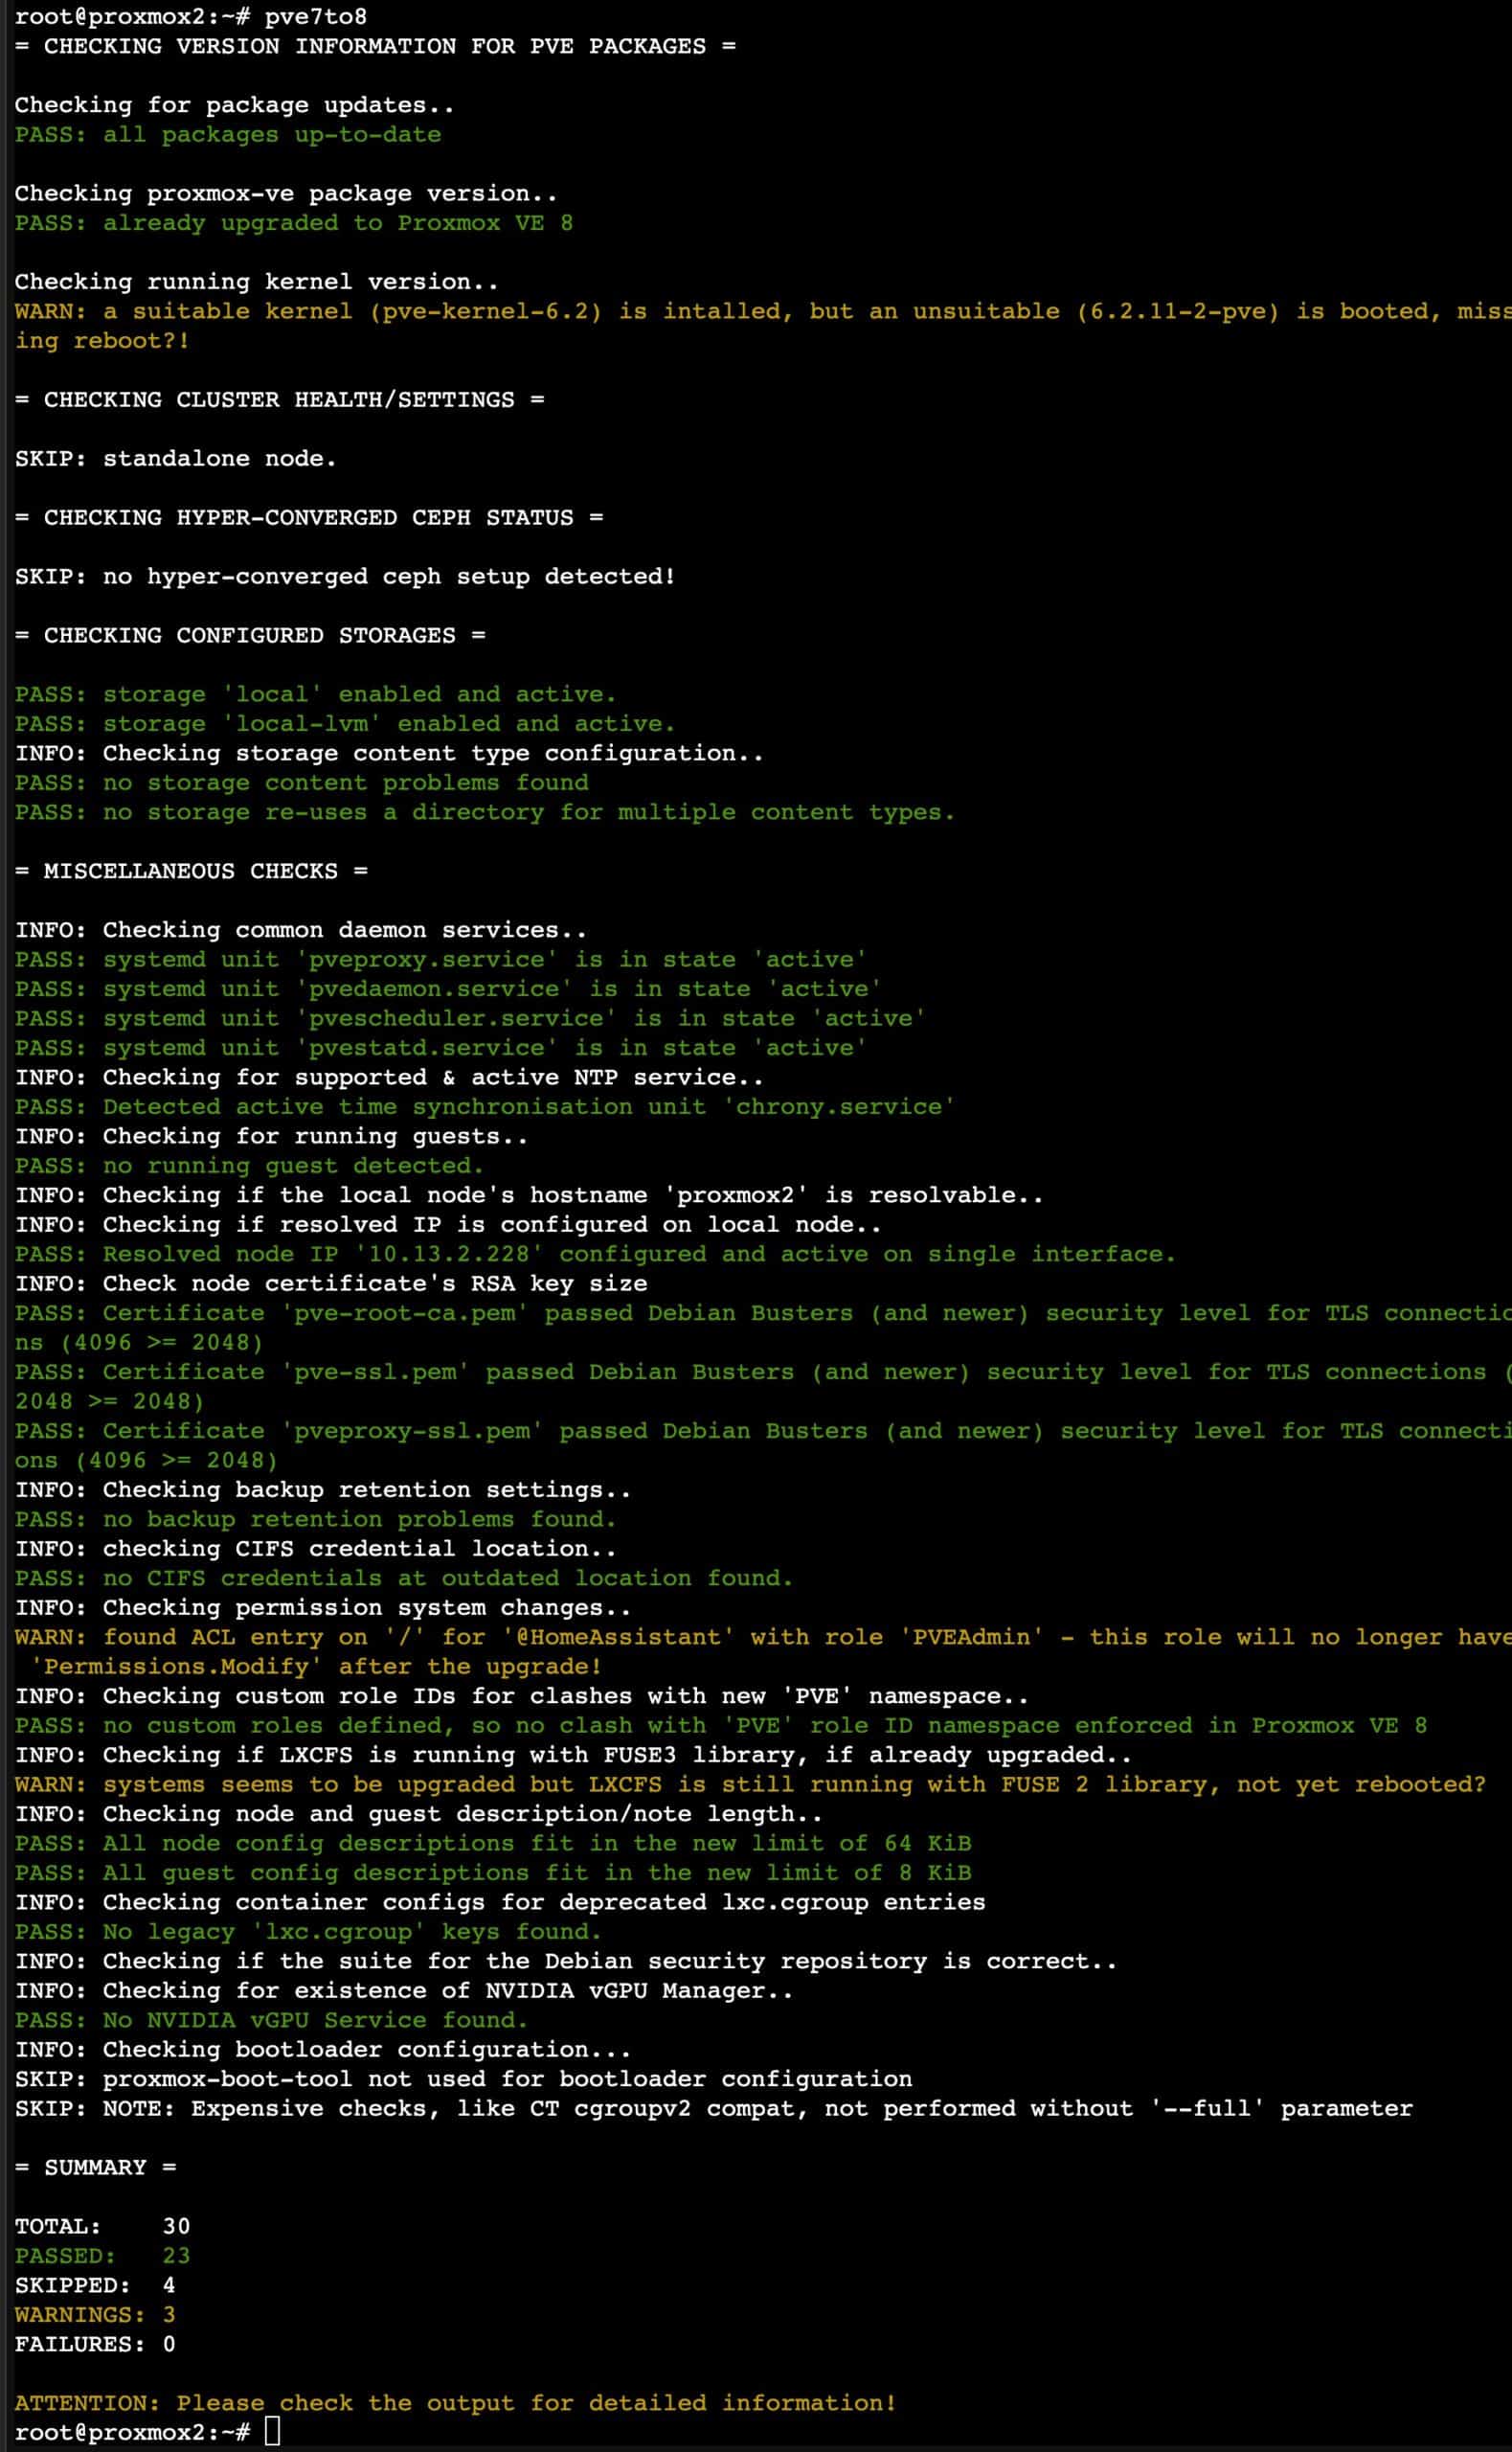
pve7to8 --full
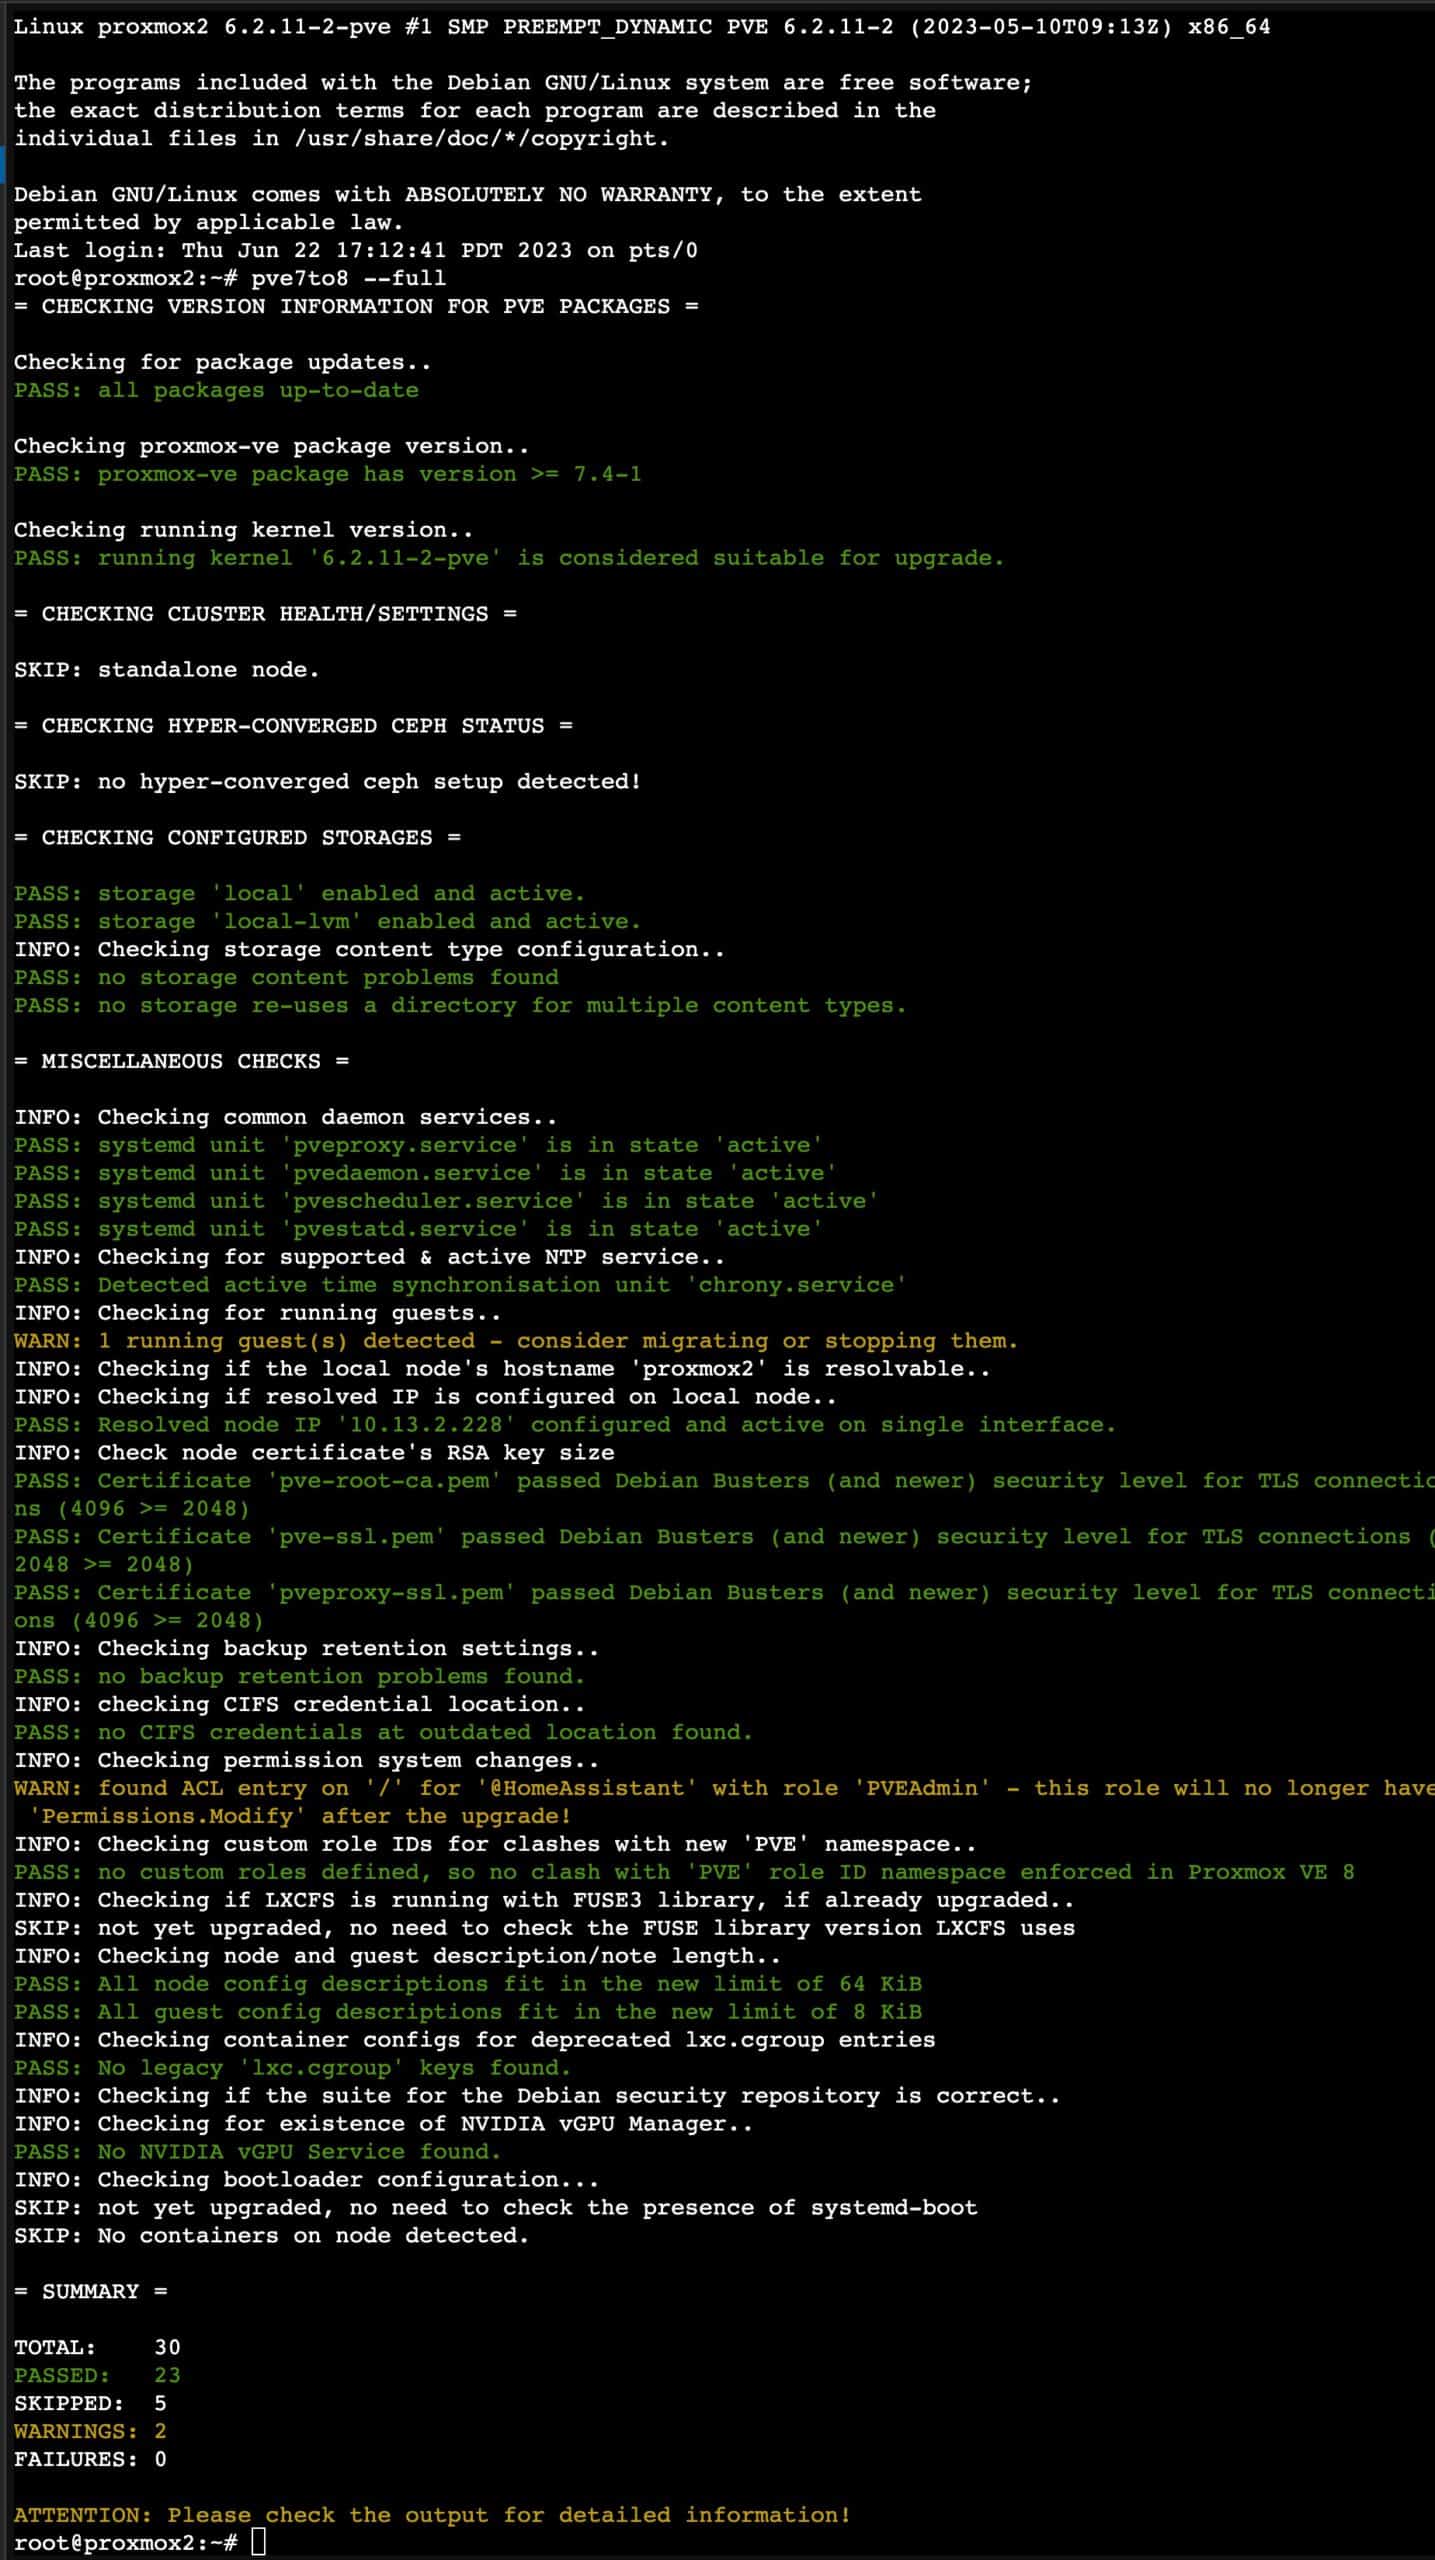
10. Review the entire output and verify everything checks out. Make note of any warnings. Resolve any issues.
Automated Proxmox 7.4 to 8.0 Upgrade
This section uses the awesome tteck Proxmox upgrade script. His script automates the whole process and basically just requires you to press ENTER a few times, then reboot at the end. I recommend this method as it’s easier and less error prone. If you prefer a more manual process that is largely based on the official Proxmox upgrade guide, you can skip to the next section.
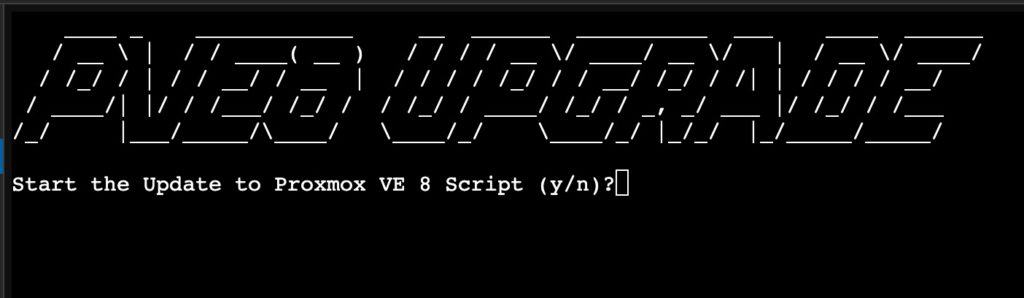
- Run the following script to kick off the upgrade process. Type Y and ENTER.
bash -c "$(wget -qLO - https://github.com/tteck/Proxmox/raw/main/misc/pve8-upgrade.sh)"
2. Press ENTER on all of the questions about changing repositories, etc. When you get to the following prompt make sure you are ready to start the upgrade process. This will download all the packages and will ultimately reboot your Proxmox host. So make sure all workloads are in a state they can be rebooted when the time comes. Press ENTER when ready to kick off the upgrade.
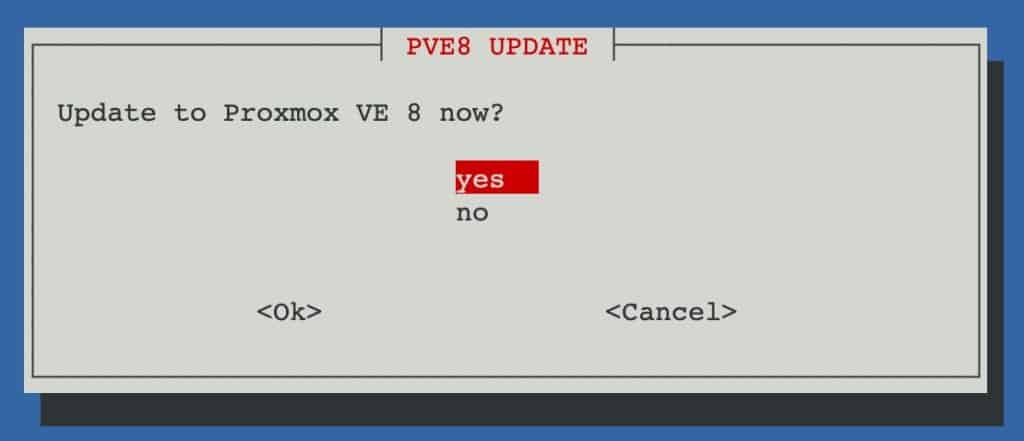
3. After some period of time, the upgrade will complete and you will be prompted to reboot. Press ENTER to reboot.
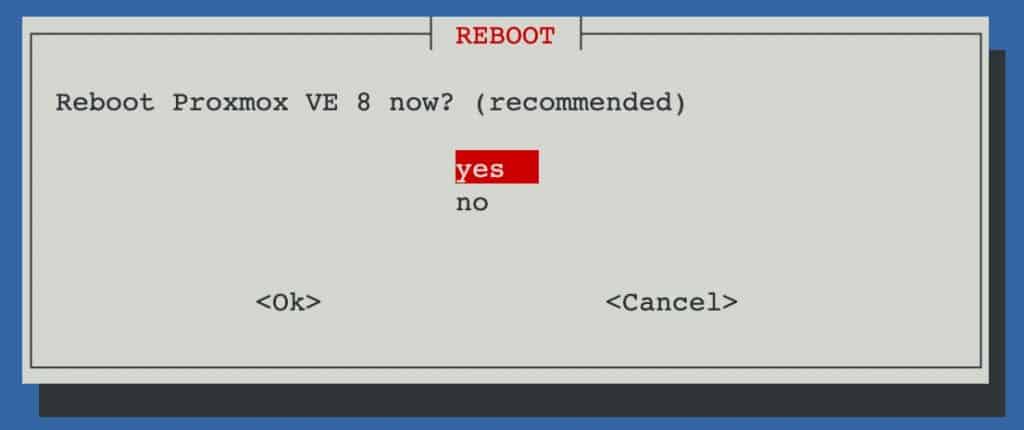
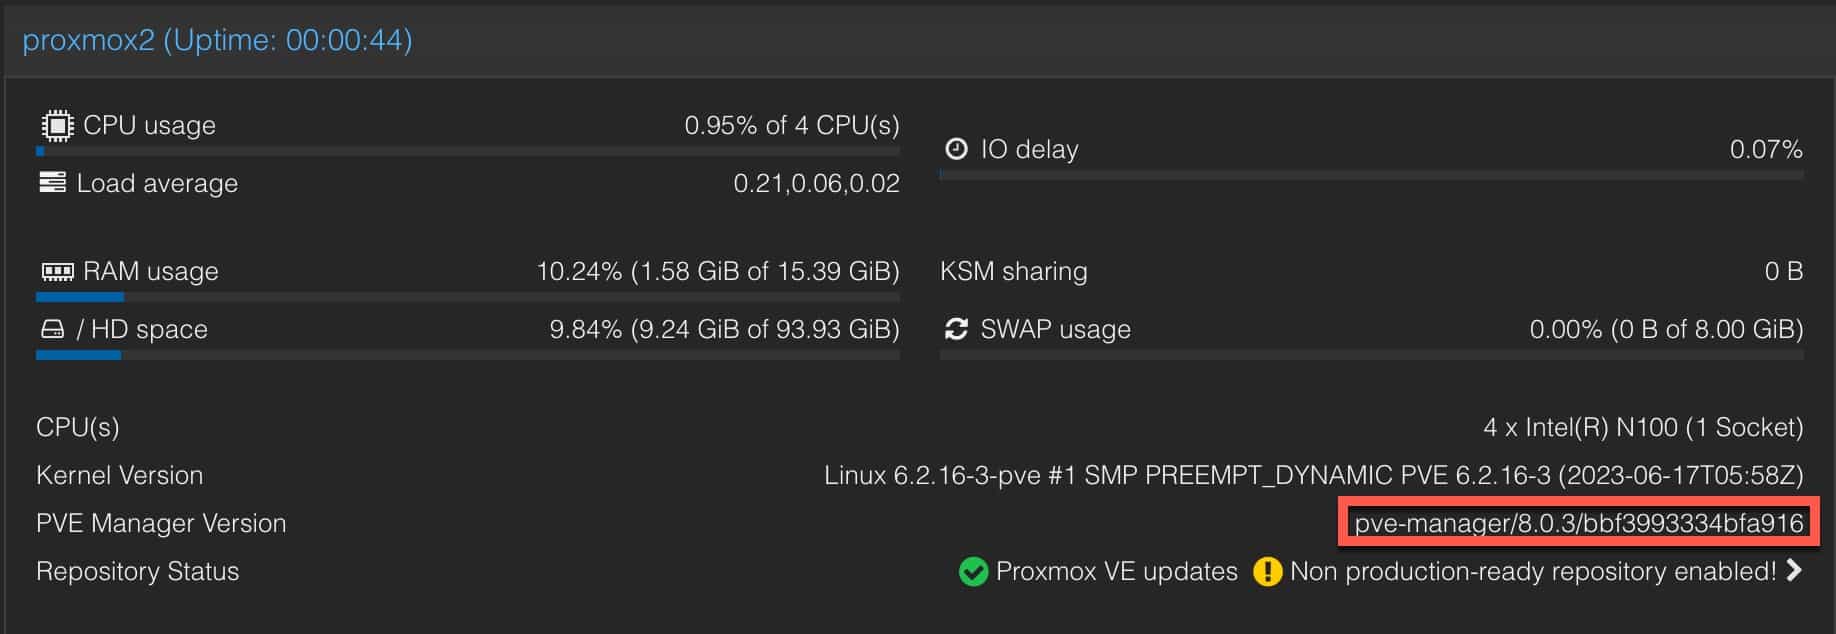
4. After the Proxmox host reboots, log in and verify you are on Proxmox VE 8.x.
5. Skip down to the Verification section below for some tips on spot checks you can perform. There’s also a kernel cleanup section as well, which I strongly recommend.
Manual Proxmox 7.4 to 8.0 Upgrade
Note: This procedure is based on the official Proxmox 7.4 to 8 upgrade process as outlined on the Proxmox site. The preceding section using tteck’s upgrade script is easier and quicker and does the same process, just automated.. But if you want to do it more manually, follow this procedure.
- Stop all workloads including VMs, LXC containers, Docker containers, etc.
- Run the following command to update the repos for Debian bookworm:
sed -i 's/bullseye/bookworm/g' /etc/apt/sources.list

3. Run the following commands and verify that no Debian Bullseye entries. If so, comment them out. Only Bookworm entries should be shown.
					cat /etc/apt/sources.list.d/pve-enterprise.list
cat /etc/apt/sources.list

4. Run the following command update repo index:
apt update
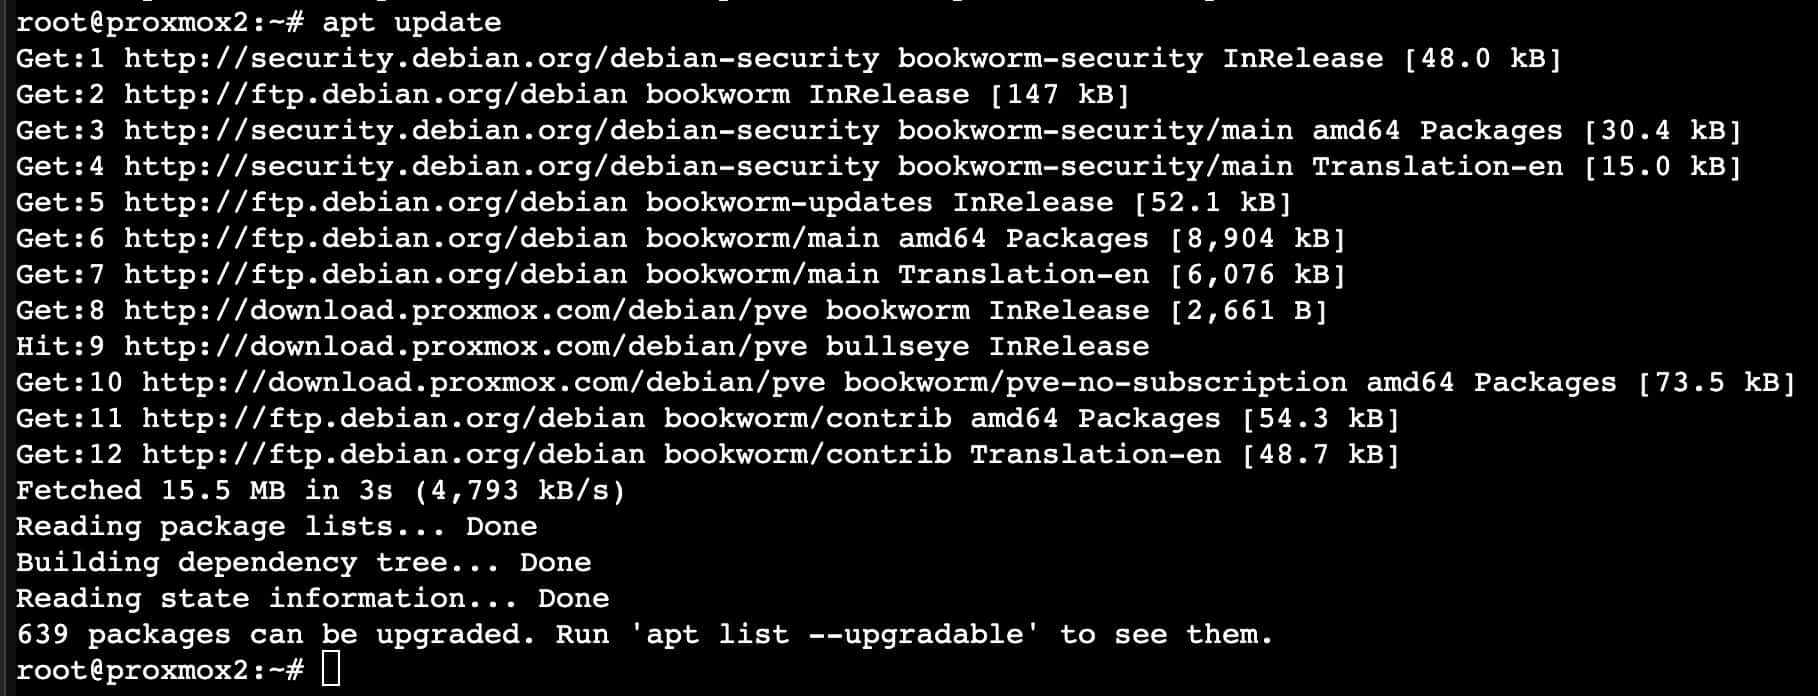
5. The time to complete the following command will vary wildly depending on a number of factors. It could range from 5 to 60 minutes. Be patient. When prompted if you want to continue, type Y and ENTER. The repos seem to be throttling download speeds, so even with my Gigabit internet the repo downloads were painfully slow. After all the downloads complete proceed to the next step. My wait was about 20 minutes for the first host, and much shorter for the second.
apt dist-upgrade
6. When you see a few pages of change logs for various packages press Q to quit.
7. If you are presented to select a keyboard layout, select the proper one.
8. If you are presented with a status showing /etc/issue items, it’s safe to press N to over-write the old version.
8. When prompted to restart services without asking tab to Yes and press enter.
9. If a window appears about openssh-server, press enter on Keep the local version currently installed.
10. If prompted about changes in /etc/lvm/lvm.conf, consider if you made any custom changes to that file. If not, press Y then ENTER.
11. If prompted about changes to /etc/default/grub. STOP and think. Did you make any GRUB changes for PCIe or GPU passthrough, or other tweaks? If so, you need to make a decision on what to do. You can review the file differences in various ways. Document how your configuration differs from the stock file. It’s your call if you proceed with overwriting or keeping your config.
12. If prompted about changes to pve-enterprise.list, press N and ENTER.
13. Wait for the update to complete, and verify there are no exit errors.
14. Let’s run the upgrade checker again. You may see some warnings that are related to not have yet rebooted into the update. Ignore those warnings, but check for anything else out of the ordinary.
pve7to8
15. Let’s reboot into Proxmox VE 8.0. Wait a couple of minutes for the host to reboot. Attempt to open the Proxmox web UI. Verify that you are now running PVE 8.0 and using a Linux 6.2.x kernel. Congratulations, the upgrade is complete!
reboot
Verification
If you have any “advanced” configurations like PCIe or GPU passthrough, USB-passthrough, etc. verify that the VMs or containers have maintained access to their devices. I would also spot check your VMs, LXCs, logs, Home Assistant integrations, etc. to verify everything looks good. If all is well, I’d recommend doing another full backup of everything on the host. If you do run into issues you can check the Proxmox Upgrade from 7 to 8 wiki. On my I5-1240P Beelink server I was running with updated Intel microcode under Proxmox VE 7.4. I verified post-upgrade that the microcode was still being loaded.
If you are using Glances or Home Assistant, verify that any of your add-ons that monitor the Proxmox VE host are still working as expected. As mentioned in the intro, Glances and the HACS Proxmox VE add-ons had issues. The Proxmox HACS add-on was easily cleaned up. And my updated Glances post fixes the Proxmox VE 8.0 issues.
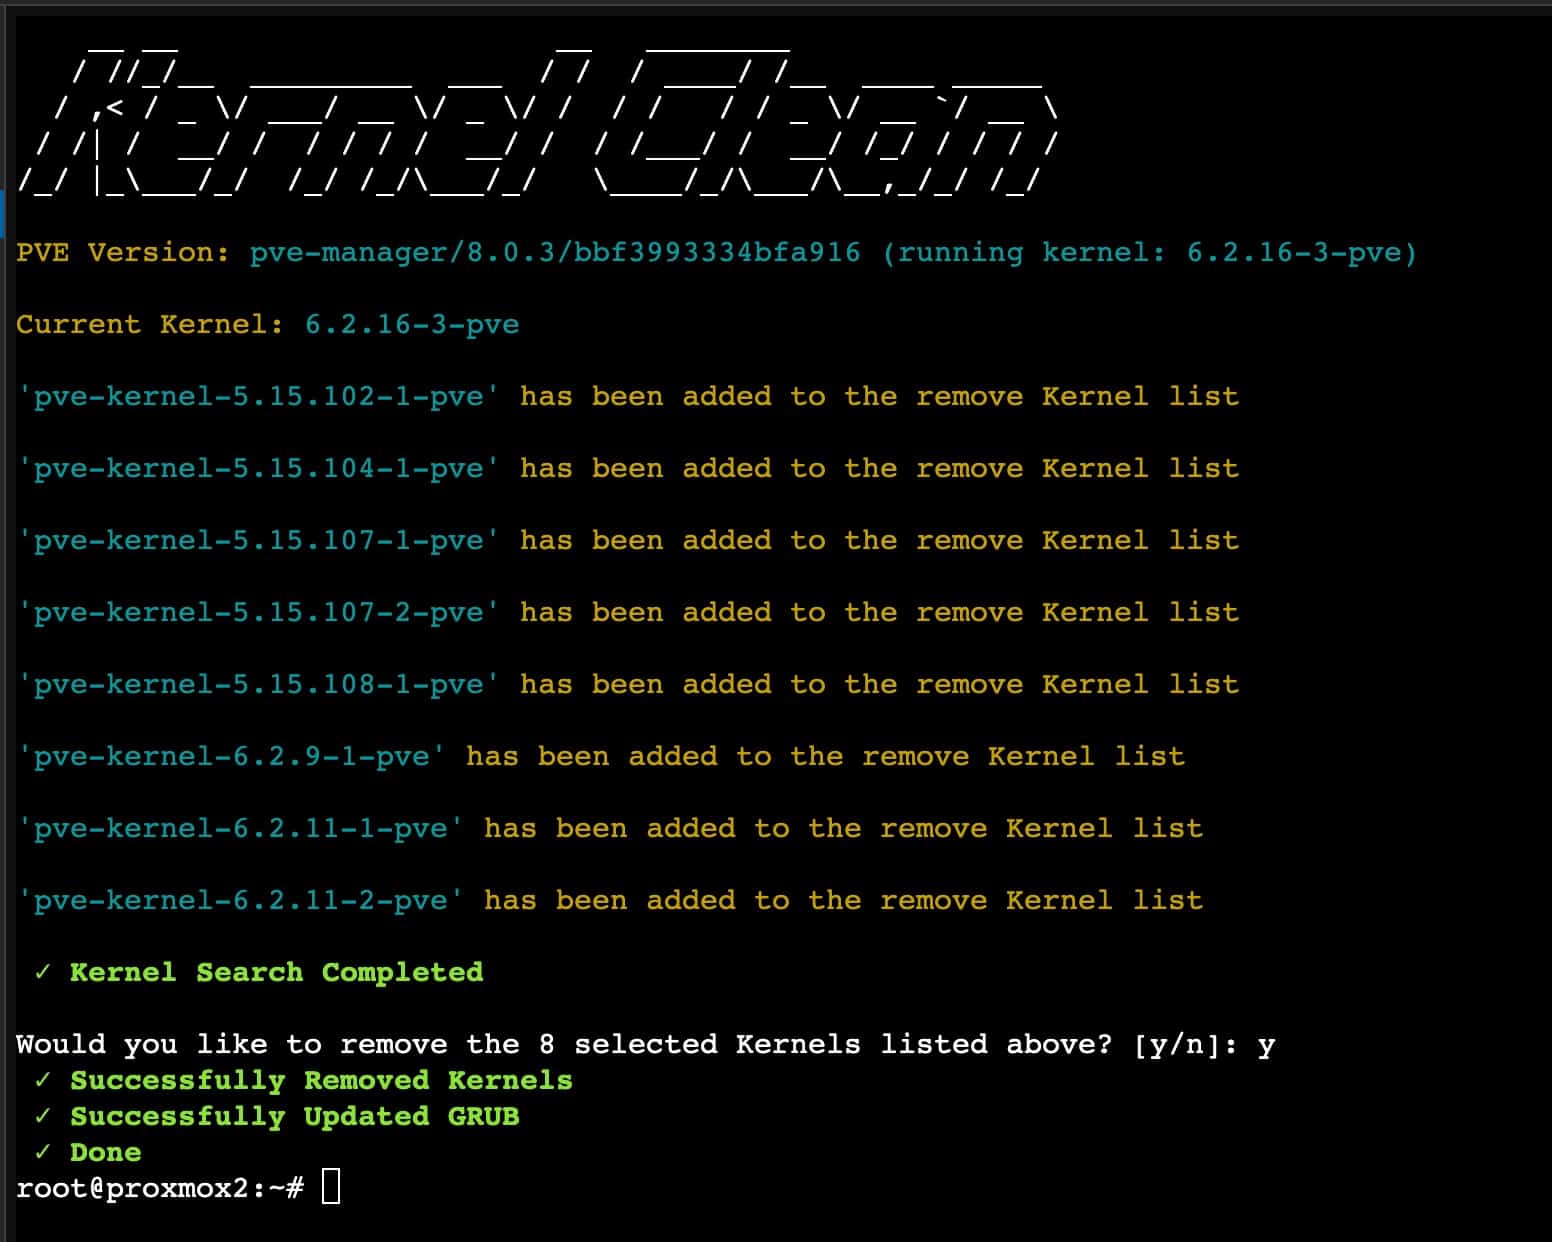
Kernel Cleanup (Optional)
The famous tteck has a great Proxmox kernel cleanup script. Let’s run that. Go into the Proxmox GUI, open a shell, and run the following command:
bash -c "$(wget -qLO - https://github.com/tteck/Proxmox/raw/main/misc/kernel-clean.sh)"
Summary
Upgrading a vanilla Proxmox VE 7.4 server to 8.0 is a pretty straight forward process. If the Proxmox repos aren’t throttling downloads, then the upgrade process is pretty darn quick. I’ve done this on two production hosts and only experienced issues with the local Glances install and the Home Assistant HACS Proxmox add-on. Both can be easily resolved. I also have a Google Coral PCIe TPU passed through to a Frigate VM and it worked flawlessly after the upgrade.


Your script worked perfectly on my Proxmox (3 nodes).
Thank you 🙂
Hi,
Thanks a lot for your great job.
Works fine after the upgrade (1 node / 10 LXC / 1 VM)
Glad it worked for you!
Worked well except I forgot I was running pihole as a node on proxmox. so the upgrade script bombed when trying to download the v8 packages.
Either ensure you leave the pihole node running, or more correctly change the dns settings on the proxmox machine 🙂
After following all steps, my machine will not fully boot into the new kernel. systemd-journald.service fails to start and it just sits there doing nothing. I have to reboot into kernel 5.15 where it runs just fine. Any ideas?
Your script worked perfectly on my Proxmox . Proxmox VE 7.4.16 to 8.0.4 Upgrade
Thank you 🙂
not the first time I used your Upgrade scripts for pve and pbs.
For me both work perfect on some servers
Very, very thank you!
Great Job!
It safes me a lot of time :-))
Thank you very much for scripts!
Thank you!
Upgrade 3 nodes from v7.4-16 to v8.0.4
Thank you for the detailed procedure!
It was easy to follow and execute!
I went from 7.4.17 to 8.0.4 without issues at all!
Thanks for the great scripts and guides 🙂
I ran the script i am getting warning for Kernel
root@pve:~# pve7to8
Checking running kernel version..
WARN: unexpected running and installed kernel ‘6.8.4-3-pve’.
That kernel version is for Proxmox 8.2. Not sure how you are running that under 7.x.
The script thinks I have an older version of Proxmox (7.4-20). Somehow it’s misinterpreting that 20 as less than 16.
Yes, unfortunately the maintainer of the original Proxmox community scripts died. In the new repo that the community established, they don’t appear to have migrated the upgrade script. I would follow the ‘official’ Proxmox upgrade path.
pve-manager/7.4-20/5d6e3351 (running kernel: 5.15.158-2-pve)
After running the script I get an error.
This version of Proxmox Virtual Environment is not supported
I couldn’t write a comment. The button is not active. I wrote it here.
Yes, unfortunately the maintainer of the original Proxmox community scripts died. In the new repo that the community established, they don’t appear to have migrated the upgrade script. I would follow the ‘official’ Proxmox upgrade path
wow!!! Very nice detailed instruction to help us with the easy upgrade steps. FYI: since i don’t use backup manager, I had to manually backup the configs stuff using this script: https://github.com/DerDanilo/proxmox-stuff?tab=readme-ov-file.