If you are running Proxmox on your network and wish to increase its security by using a FREE trusted SSL certificate from Let’s Encrypt, then you are in luck! This post will walk you through the entire process. The process is quick and easy, assuming you already have a public domain via a registrar and a supported DNS server.
If you are accessing Home Assistant via HTTPS and want to surface Proxmox as an iFrame in your Home Assistant console then it will need a publicly trusted SSL certificate…so this post is perfect for you. Instructions for setting up an iFrame with a custom Proxmox icon are at the end of this post.
Let's Encrypt Requirements
In order for Let’s Encrypt to issue you a trusted SSL certificate for the FQDN of your Proxmox server you need a couple of things.
You need to own a public domain via a registrar (any registrar).
You need to be using a DNS provider supported by the Proxmox ACME client.
For this post we will be using the Cloudflare DNS provider. But you can substitute any supported provider. Proxmox has a massive list of supported DNS providers so chances are yours is listed.
DNS Redirect
Since we are configuring the Proxmox server for a trusted SSL certificate you will want to access your Proxmox server via FQDN from inside your home network. This will prevent any browser warnings. It also keeps all traffic (including DNS queries) within your home network. To do this you need to configure a DNS redirect rule on your router, firewall, Pi-hole, AdGuard server or with NextDNS.
What is a DNS redirect rule? Basically when your home computer does a DNS query for proxmox.mydomain.com we want the private internal IP address of your Proxmox server returned, not a public IP address of your ISP’s modem. This means your router/firewall will intercept that request to the public DNS server and respond with the private (internal) IP of your Proxmox server. See the diagram below for the traffic flow.
Before proceeding create a DNS direct rule that points the FQDN of your Proxmox server to the private (internal) IP address of your Proxmox server. You should not create a record in your public DNS Cloudflare zone that has the private IP of your Proxmox server. Do the redirect on an internal device.
Skip to the Cloudflare API Tokens & ID section below if you are using a DNS redirect rule.
DNS Redirect Network Flow
Create Public DNS Record (Optional)
If you really want to use port forwarding or a reverse proxy to expose your Proxmox server to the internet (STRONGLY discouraged), then you can read this section for creating a public DNS record.
I would advise using other methods like a WireGuard VPN or Cloudflare Tunnels (also free) instead of opening up a hole in your home firewall. If you do want the public FQDN for your Proxmox server pointing to your home’s public IP address then I would really encourage using DDNS (Dynamic DNS). If you want to do it manually (not recommended), then follow this procedure:
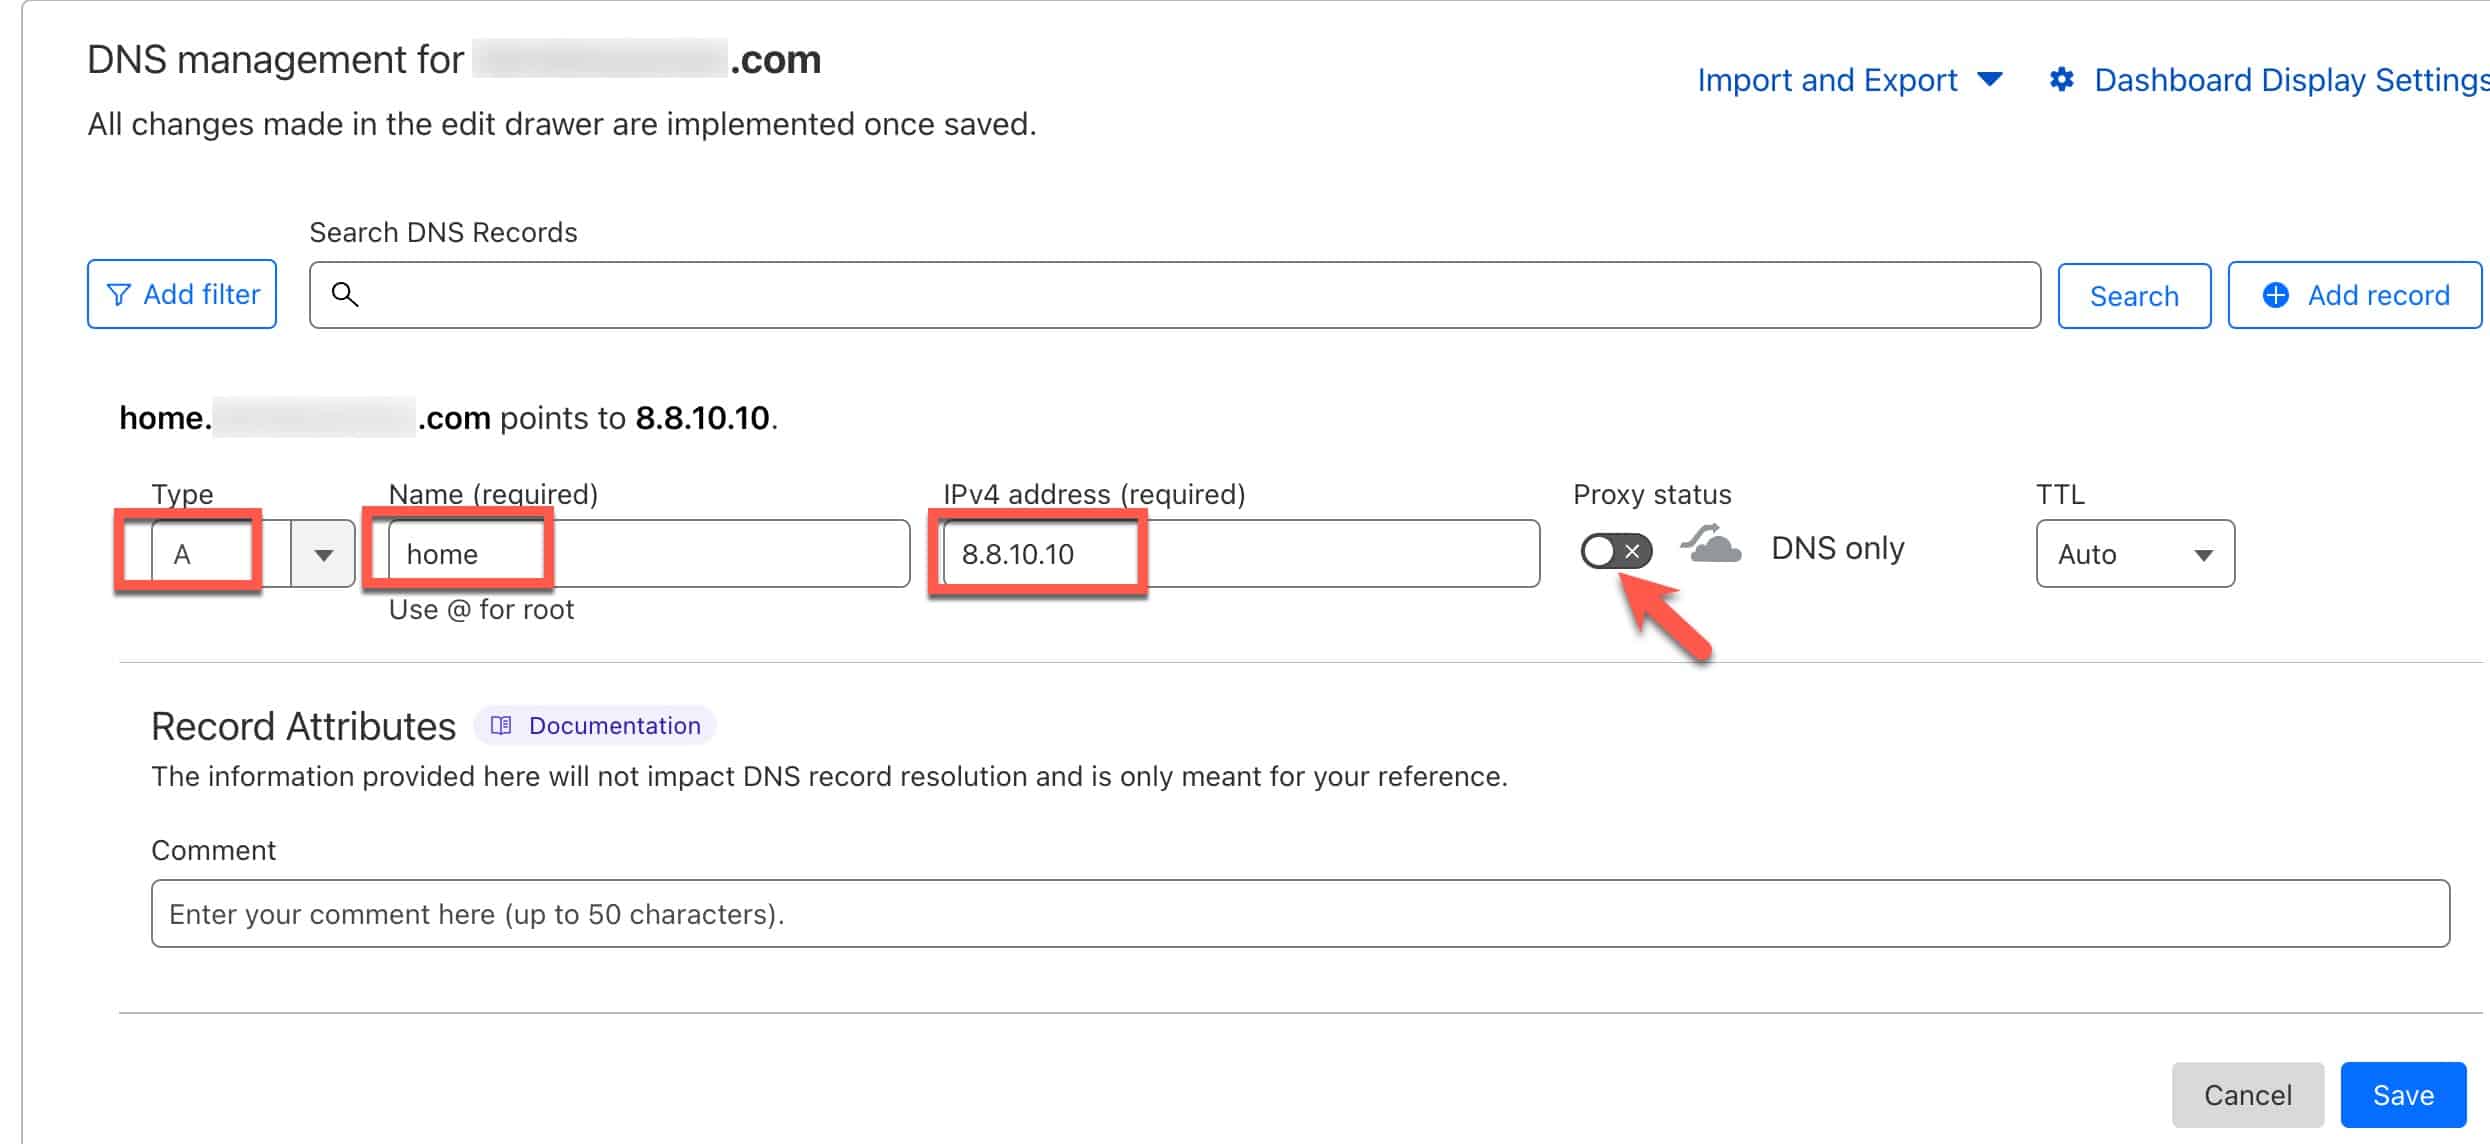
Login to Cloudflare, locate your DNS zone, and manually add a record as follows:
Type: A Name: (e.g. proxmox) IPv4: Public IP address your ISP assigned to your modem Proxy status: Disable TTL: Auto
Click Save. Usually the DNS record will update pretty quickly around the world. From any computer open a shell and do a nslookup of your new FQDN. Make sure it returns your home public IP address. Once you have the DNS record, then configure whatever means by which you want to expose Proxmox to the internet. Again, NOT recommended. Use a more secure method.
Cloudflare API Tokens & ID
If you don’t already have the API token (NOT a global token) for your DNS zone and your Cloudflare Account ID, go through this post and save the information in a safe place: Getting your Cloudflare DNS Zone API Key and Account ID
Creating Let's Encrypt Proxmox Accounts
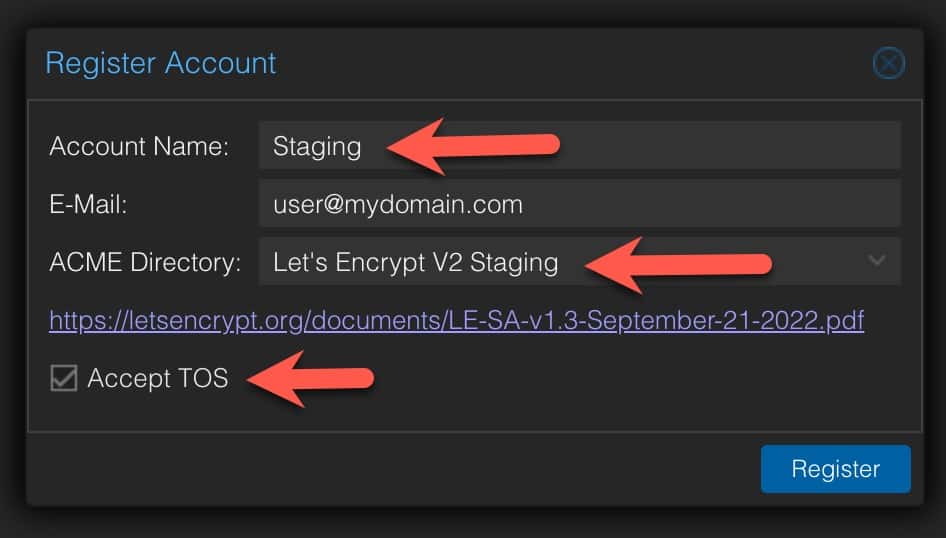
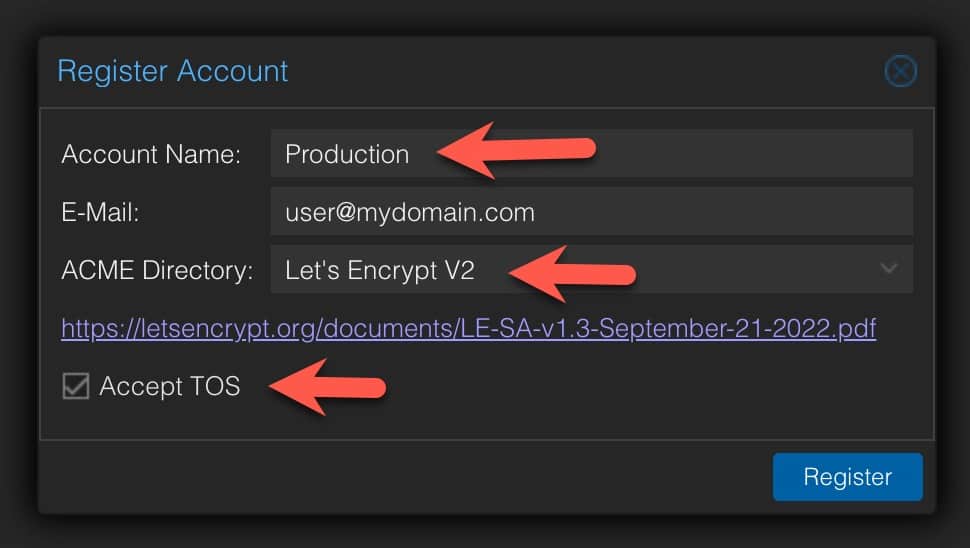
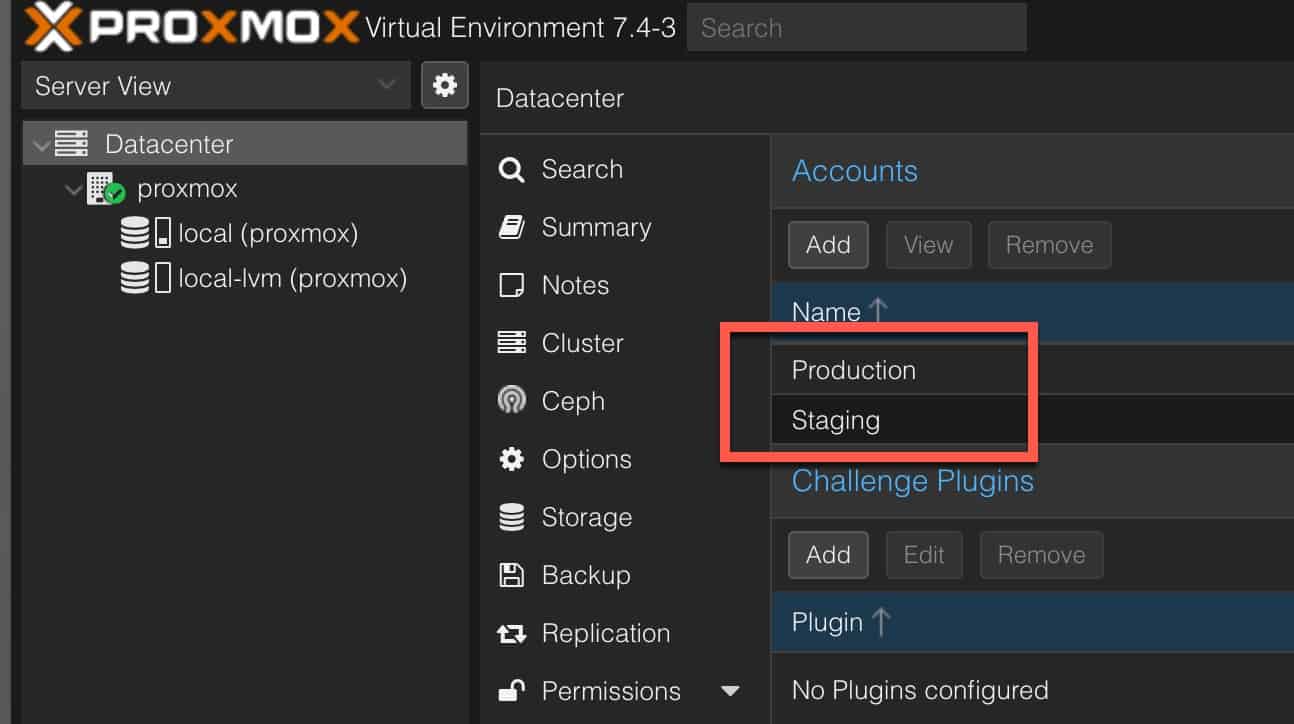
We need to create two accounts in Proxmox so we can generate staging and production certificates.
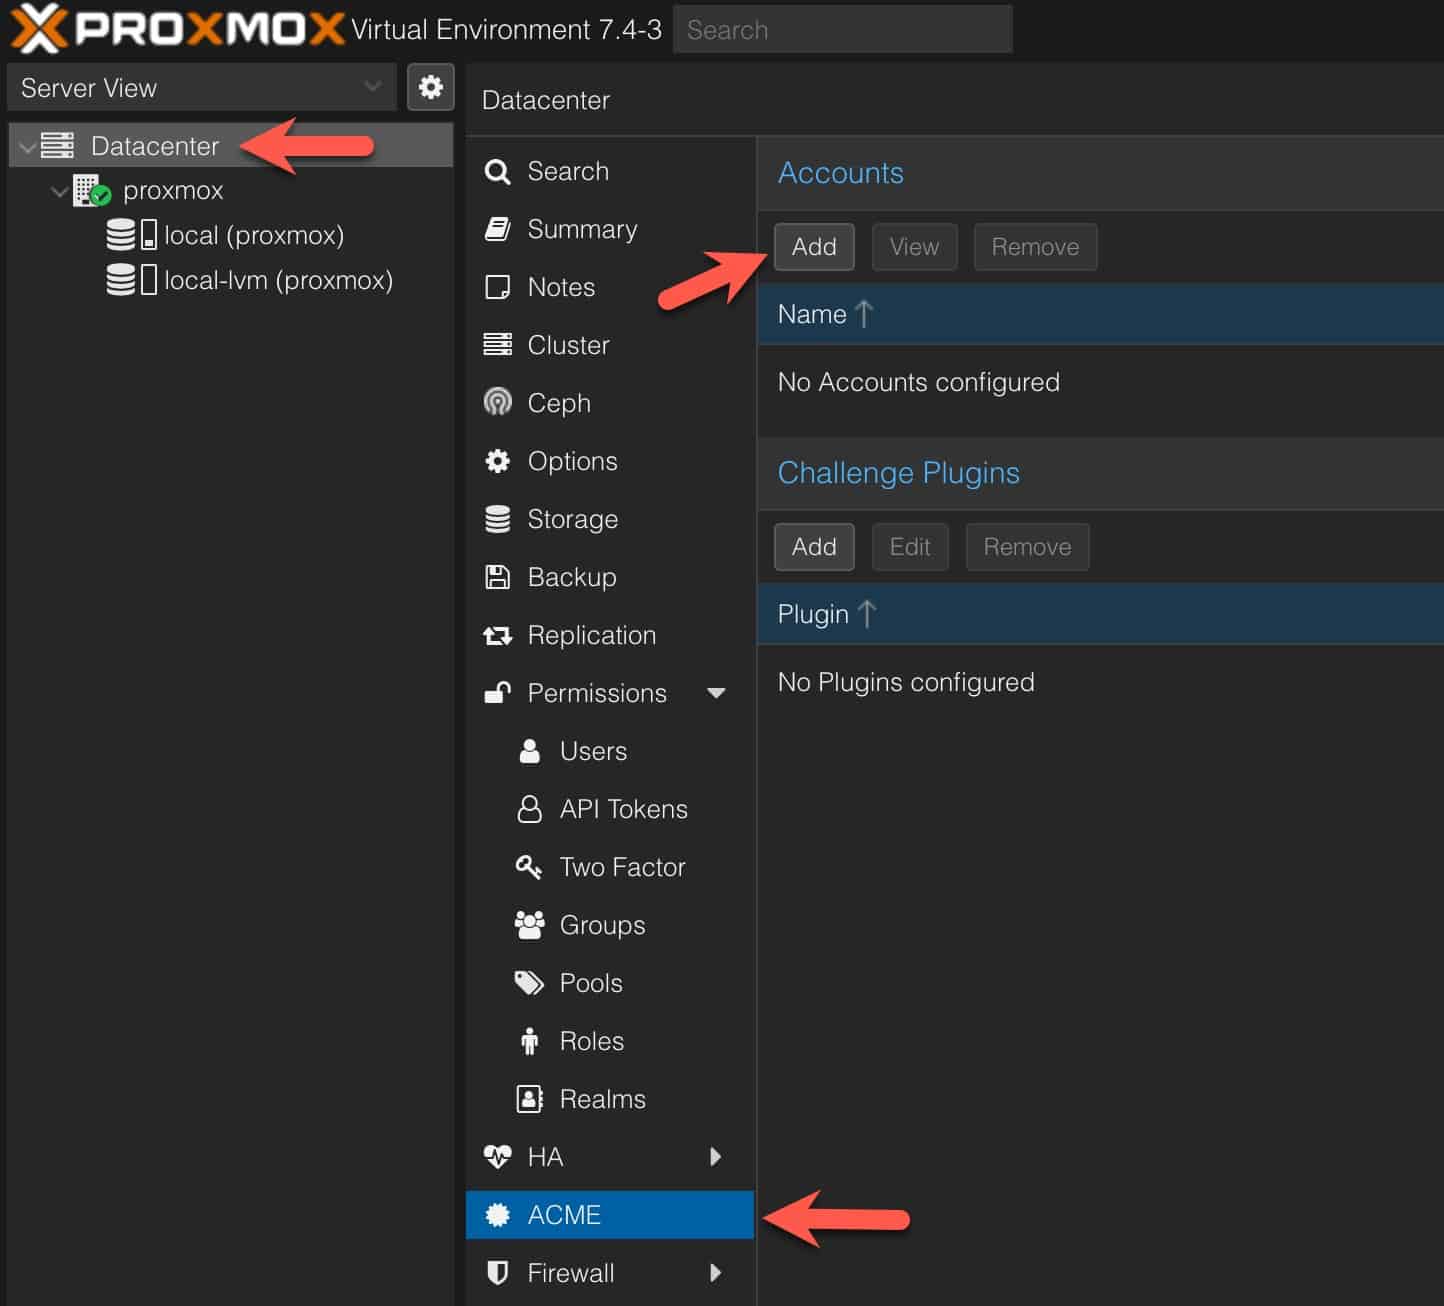
1. In the left pane click on Datacenter, then in the middle pane select ACME, and in the right pane click on Add under Accounts.
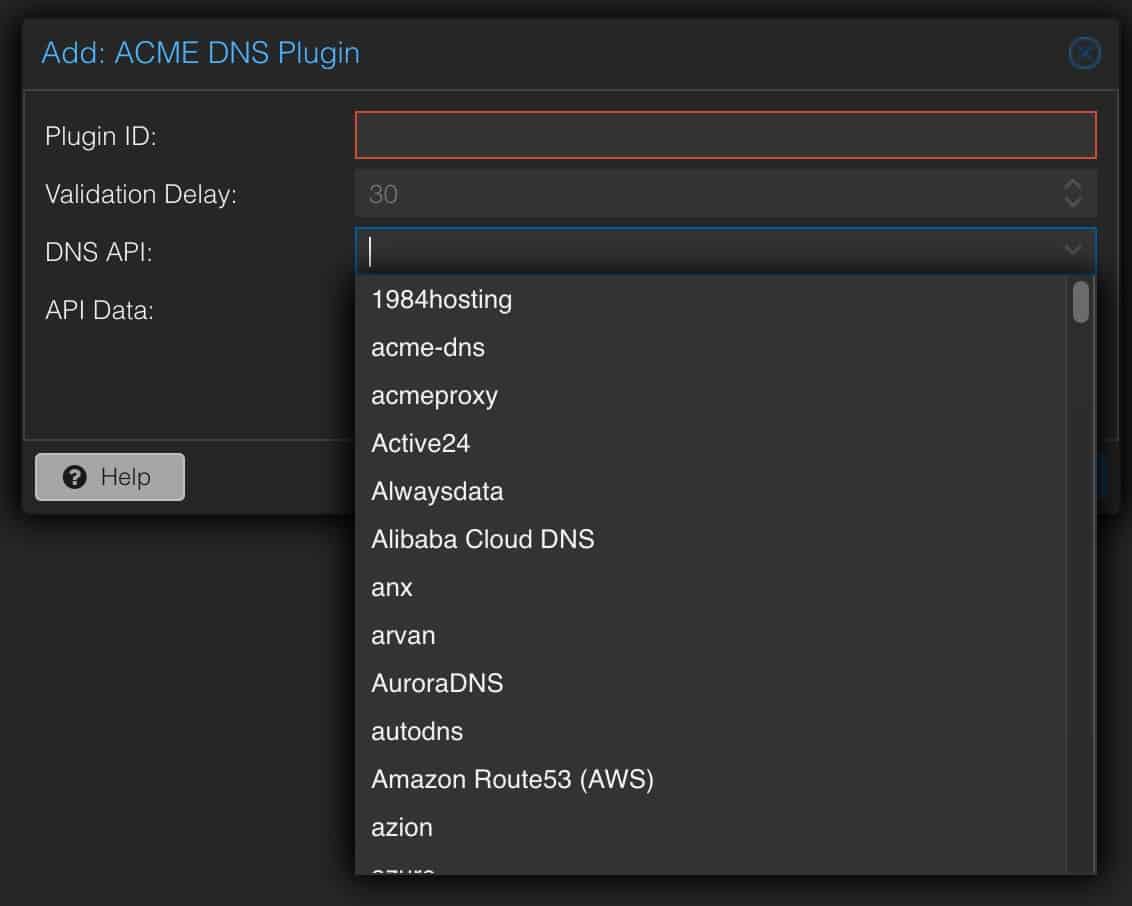
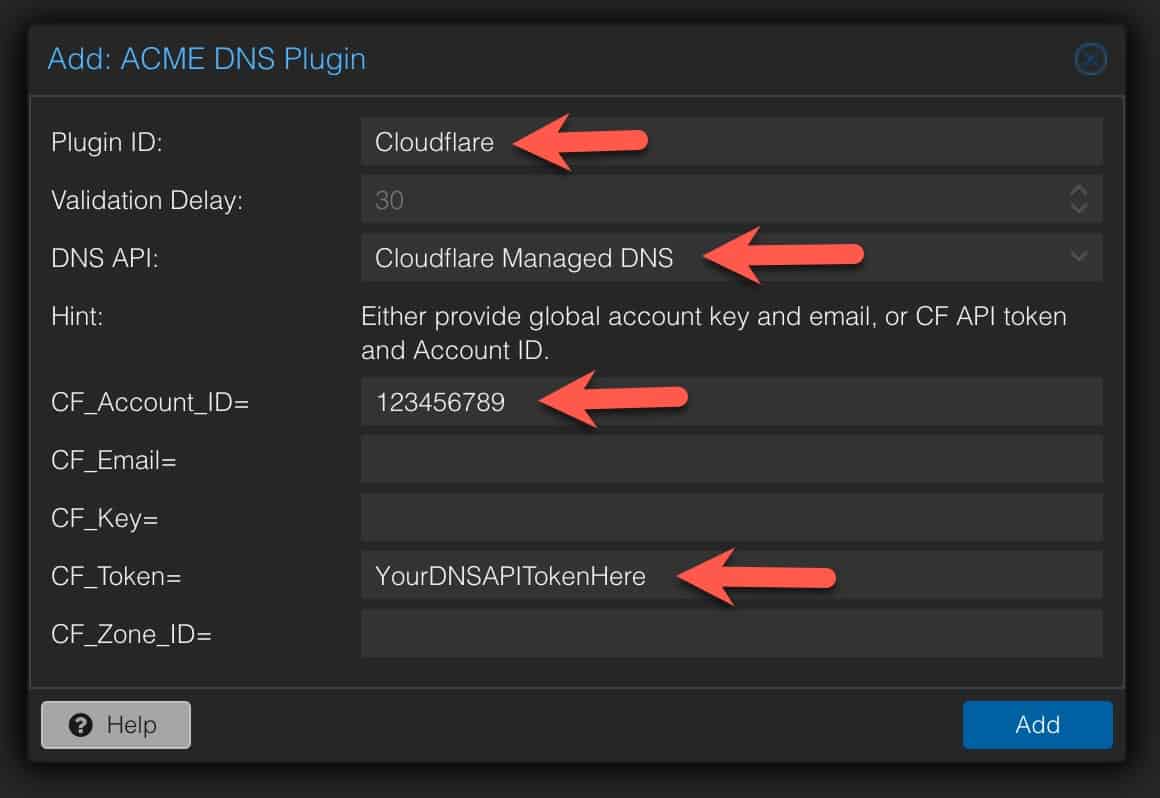
The ACME DNS Plugin is what contains the necessary code to talk to the Cloudflare API and create the TXT record needed to prove to Let’s Encrypt you own the domain you want the certificate issued to. Proxmox has a number of built–in DNS providers, so if you aren’t using Cloudflare DNS review the list for a plugin to see if your provider is listed.
1. In the ACME pane under Challenge Plugins click Add. Fill in the following information:
Plugin ID: Cloudflare DNS API: Cloudflare Managed DNS CF_Account_ID= Your Cloudflare Account ID CF_Token= Your Cloudflare DNS API Token (Not Global token)
Click Add.
Configure Domain ACME Challenge
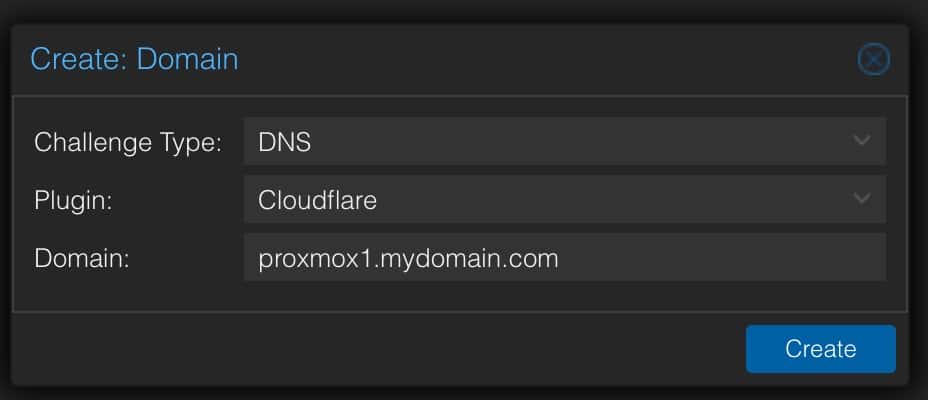
This step configures the domain name that we want the certificate issued to.
1. In the left pane click on your Proxmox physical server then in the middle pane click on Certificates. 2. Under ACME click on Add. Configure the following. Make sure you use the FQDN of your Proxmox host (e.g. proxmox1.mydomain.com) for the domain. Do NOT just enter your registered domain name.
Challenge Type: DNS
Plugin: Cloudflare
Domain:FQDN
Click on Create.
Minting your Let's Encrypt SSL Certificate
This section will mint your staging and production certificates. If your staging certificate request is a success, then proceed to doing the Production request. Let’s Encrypt rate limits production requests so ensure everything works in Staging before doing a Production request.
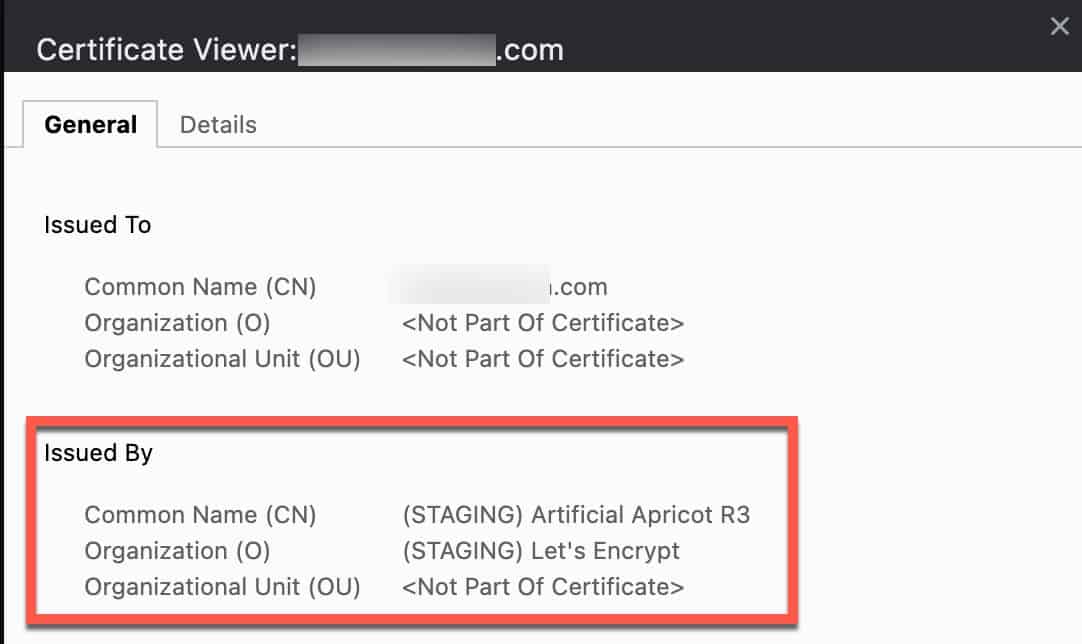
1. Under ACME and next to Using Account: click on Edit. Select Staging, then click Apply. 2. Click on the domain you added. Click on Order Certificates Now. 3. Monitor the Task viewer for any errors. If everything is successful Promox will restart its web server and you can refresh your browser. Your browser will still show an invalid SSL certificate, but if you look at the properties you will see it’s issued by Let’s Encrypt staging.
Let's Encrypt Staging Certificate
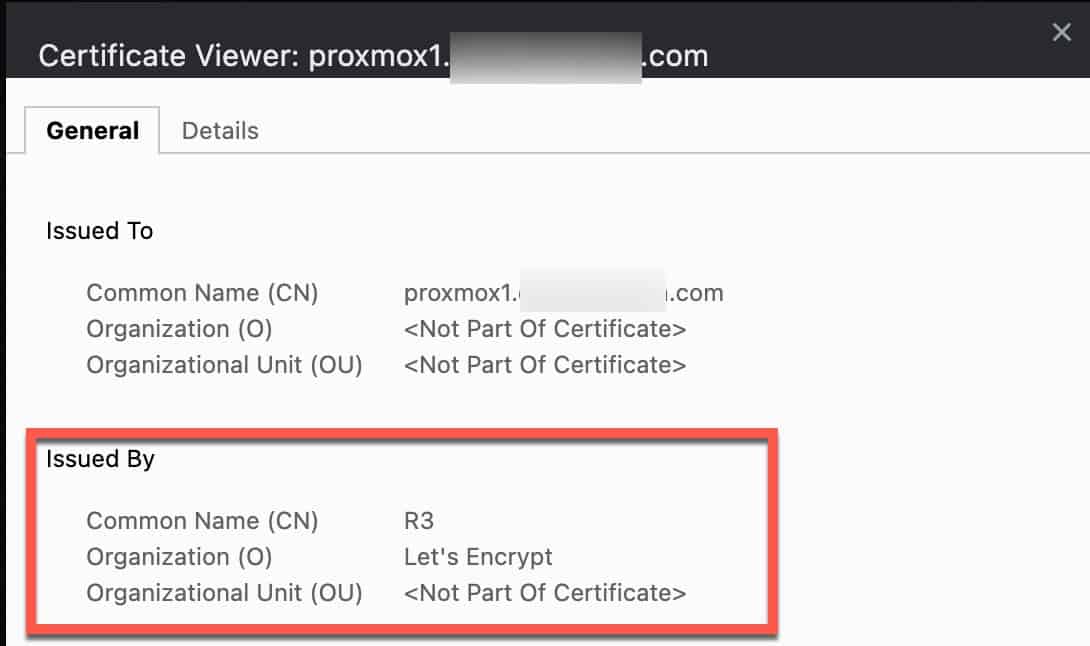
4. Next to Using Account click Edit and change to Production. 5. Click on Order Certificates Now. 6. Monitor the Task viewer for any errors. If all goes well the Proxmox UI will restart, then refresh your browser and make sure you are connecting via your domain’s FQDN and port 8006. You should not see any SSL certificate errors in your browser.
Note: Some browsers may need you to close the old Proxmox webpage and open a new tab/window with the FQDN to get rid of the certificate warning.
Let's Encrypt Production Certificate
Home Assistant iFrame (Optional)
If you are accessing Home Assistant over HTTPS and want to add the Proxmox console as an iFrame, this is very easy to do. Open your configuration.yaml file and add the following:
If you want a Proxmox icon displaying, you can use the custom-brands-icon package. It is installed via HACS and provides hundreds of icons that you may find very useful. To use them on the HA front-end, add the following extra_module_url line to your configuration.yaml file. Restart Home Assistant.
Proxmox iFrame in Home Assistant Console via HTTPS
Summary
Configuring Promox to use a trusted SSL certificate from Let’s Encrypt is super easy. Once you request a production certificate a background job will take care of renewing your certificate in an automated fashion. You can forget about touching your Proxmox SSL certificate ever again. If you are using Home Assistant, you can easily access the Proxmox console via an iFrame over HTTPS.
11 thoughts on “Proxmox Let’s Encrypt SSL: The Easy Button”
Deepak
Hi Derek,
Nice blog. Just wondering, if I have to use Lets Encrypt for a proxmox server within my home network, do I need to expose to the internet via port-forwarding? Can I still manage to get the certs without any port-forwarding?
Great post you put up there! I really enjoyed it, but I’m a bit confused about something. In the part where you talk about “Configure Domain ACME Challenge”, you mention something about “proxmox1.mydomain.com”. Does this mean that if my host is “proxmox.mydomain.com”, should I use “proxmox1.mydomain.com”?
I’d really appreciate it if you could help me out with this. Thanks!
I’m struggling to understand the DNS Redirect step. I’ve spent a few days trying to accomplish it on my router alone. I don’t see a way on my Asus router to make my FQDN lead to my internal IP address. Should I have my own custom DNS set up somehow?
Im trying to expose my proxmox through duo network gateway. I got my SSL cert via your method, but I also need to private key associated with that request. Did that get dumped somewhere within the system? Or do I need to go the old fashioned way by creating a csr and saving the key?
Hi,
I’ve followed some of your guides (they are awesome, thank you!) and have a running installation of proxmox with a HA VM and some other LXCs. I need to replace my server HDD to a bigger one and would like to know if you have any suggestions/insights?
Backup VMs/LXCs, fresh install of proxmox (need to redo all the SSL configs on this guide, right?) and restore VMs/LXCs?
Hey there, thanks for these great guides. I am struggling with using proxmox in HA via iFrame. I guess https is mandatory once I have it enabled on my proxmox with your proxmox quick start guide. However, I can’t figure out how to setup https for HA without exposing it to the internet. Any hints?
As a way of testing my https connection to Proxmox without sorting out a dns redirect rule for my specific domain, is it a valid test to simply put an entry into my Windows Hosts file which points my domain at my internal Proxmox IP?


Hi Derek,
Nice blog. Just wondering, if I have to use Lets Encrypt for a proxmox server within my home network, do I need to expose to the internet via port-forwarding? Can I still manage to get the certs without any port-forwarding?
Thanks
If you can do DNS validation via a TXT record, then NO port forwarding is needed. I exclusively use DNS validation.
Do you have a tutorial for how to perform DNS validation? Specifically with cloudflare?
No just the secure token method.
Great post you put up there! I really enjoyed it, but I’m a bit confused about something. In the part where you talk about “Configure Domain ACME Challenge”, you mention something about “proxmox1.mydomain.com”. Does this mean that if my host is “proxmox.mydomain.com”, should I use “proxmox1.mydomain.com”?
I’d really appreciate it if you could help me out with this. Thanks!
I’m struggling to understand the DNS Redirect step. I’ve spent a few days trying to accomplish it on my router alone. I don’t see a way on my Asus router to make my FQDN lead to my internal IP address. Should I have my own custom DNS set up somehow?
I use NextDNS cloud service for my internal redirects. You could use Pi-Hole, or other options as well.
Im trying to expose my proxmox through duo network gateway. I got my SSL cert via your method, but I also need to private key associated with that request. Did that get dumped somewhere within the system? Or do I need to go the old fashioned way by creating a csr and saving the key?
Hi,
I’ve followed some of your guides (they are awesome, thank you!) and have a running installation of proxmox with a HA VM and some other LXCs. I need to replace my server HDD to a bigger one and would like to know if you have any suggestions/insights?
Backup VMs/LXCs, fresh install of proxmox (need to redo all the SSL configs on this guide, right?) and restore VMs/LXCs?
Thanks
Hey there, thanks for these great guides. I am struggling with using proxmox in HA via iFrame. I guess https is mandatory once I have it enabled on my proxmox with your proxmox quick start guide. However, I can’t figure out how to setup https for HA without exposing it to the internet. Any hints?
As a way of testing my https connection to Proxmox without sorting out a dns redirect rule for my specific domain, is it a valid test to simply put an entry into my Windows Hosts file which points my domain at my internal Proxmox IP?