Notice: This post is now deprecated. Please use my brand new 2025 version instead: How To: Synology NFS for Proxmox Backup Server Datastore (2025)
This post covers deploying a Proxmox Backup Server (PBS) and using a Synology NAS NFS mount as a datastore for backups. And optionally you can run the PBS server as a VM on your Synology NAS as well. Why would you want to use Proxmox Backup Server? Here are a few reasons:
- Built-in data deduplication. I’m getting nearly 20:1
- Verification jobs to ensure the backup is not corrupted
- Ability to protect a specific backup for a VM/LXC to retain for long term storage
- Easier to browse and find all restore points for an object
- Optional backup encryption
- Tape backup support (ok, not really a home user feature)
- Ability to replicate PBS backups to a remote PBS server
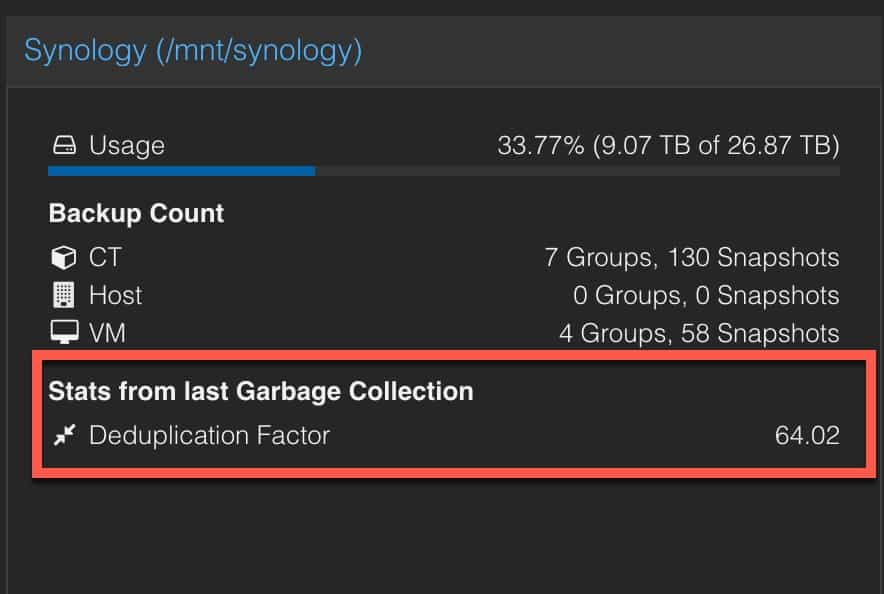
This biggest advantage for me is the dedupe. I replicate the PBS Synology share to a cloud provider. So saving space is critical to reduce cloud costs (including storage and egress data costs). After a few weeks of usage my PBS dedupe ratio was an amazing 64:1 and keeps climbing.
You can run the PBS server almost anywhere….as a VM on your Synology (only certain models with adequate HW resources), as a baremetal appliance, or a VM on a Proxmox host. A cheap mini-PC (like a Beelink Mini S12 Pro with 12th Gen N100) is great for doing a baremetal PBS server.
If you have a Synology NAS that has the resources and horsepower to run a PBS VM, this guide will walk you through that process. If you want your PBS running elsewhere, no worries, you can still follow the Synology NFS file share setup, regardless of where your PBS is running on your LAN. This guide uses the awesome tteck Proxmox post setup script to streamline the PBS initial setup.
My configuration is as follows:
- Synology DS918+ with 8G of RAM and running DSM 7.2
- Proxmox VE 8.1
- Proxmox Backup Server 3.1
- NFS share from the Synology to the PBS server for the backup datastore
Note: Configuring a NFS share for the proper Proxmox Backup Server permissions can be quite, quite challenging. The permissions requirements for PBS are different from just a basic NFS mount to a Proxmox VE host that you use for VE backups, ISOs, etc.
I’ve gone through many failed Synology NFS procedures to find one that works and is relatively simple. This procedure does NOT require fiddling with UIDs/GIDs or changing the NFS squash settings mid-way through the datastore setup to workaround a permissions error.
Update August 21, 2025: This post is now deprecated. Please use my brand new 2025 version instead: How To: Synology NFS for Proxmox Backup Server Datastore (2025)
Update July 21, 2025: Corrected the Github repo to point to the new Proxmox community. RIP Tteck.
Update November 23, 2024: Added NFS client installation steps in the PBS VM. Updated the PBS post-install script location to the new repo (RIP tteck).
Update February 21, 2024: The recycle bin for the Synology file share should be disabled for the best chance of success. Original post made that step optional, but now it’s mandatory.
Update December 2, 2023: Updated content for Proxmox Backup Server 3.1.
Update July 1, 2023: I’ve since upgraded to Synology DSM 7.2 and Proxmox VE 8.0. Proxmox released a new version of Proxmox Backup Server, version 3.0. I wrote an upgrade guide: How-to: Proxmox Backup Server 2.4 to 3.0 Upgrade Guide. PBS 3.0 is virtually the same as 2.4, but is based on Debian Bookworm and includes Linux Kernel 6.2. I recommend using v3.0. The installation/configuration process is the same. I also modified the Synology max NFS version and set it to v3. Even though the fstab mount command specified v3, setting the Synology side higher might have been confusing.
Proxmox Backup Server Installation
If you aren’t installing the PBS on your Synology, you can skip down to step 15 after you get to the Proxmox Backup Sever initial install screen in your environment. You can run the PBS server wherever you want. I would not recommend running it on the host(s) you are backing up, but that’s your call.
1. Download the latest Proxmox Backup Server ISO from the Proxmox Download page. v3.1 is the latest as of December, 2023.
2. Upload the ISO to a folder on your Synology NAS.
3. Login to your Synology, open Package Center, and search for Virtual Machine Manager. Click Install.
4. Click Start on the VMM Setup Wizard.
5. Click Next on Check Host Settings.
6. Select a volume for the storage.
7. Once you are in the VMM console, in the left pane click on Virtual Machine.
8. Click on Create. Select Linux. Select Storage.
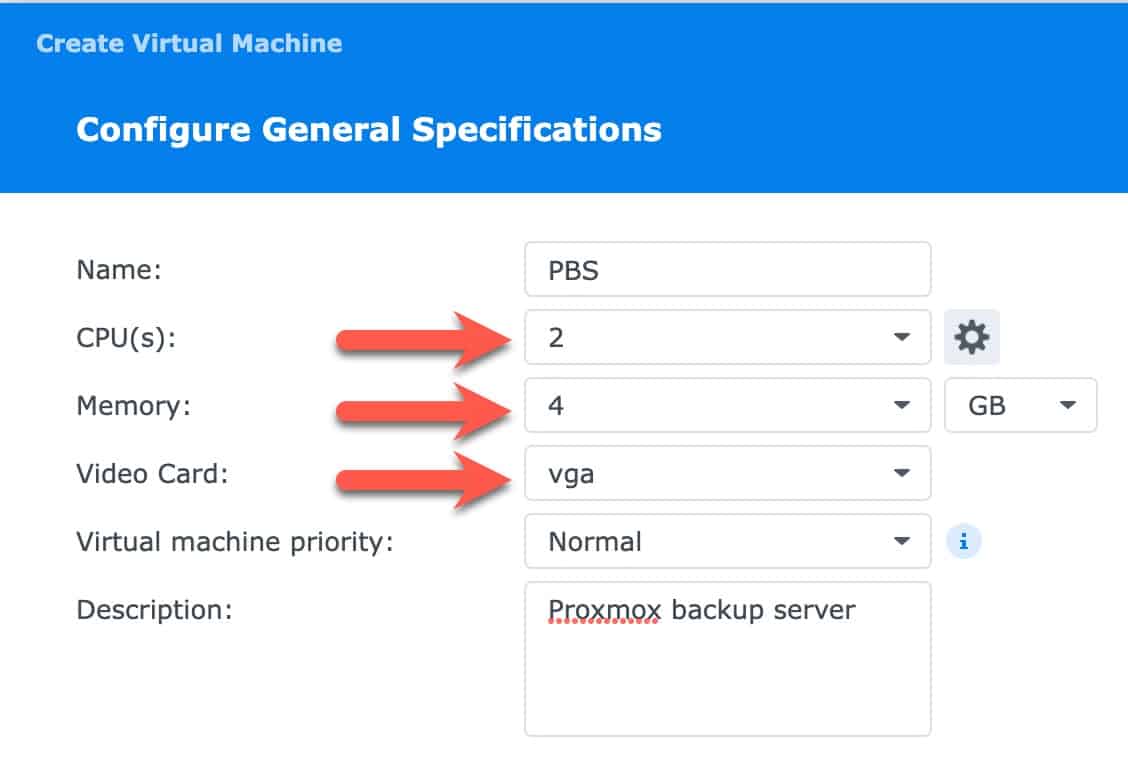
9. Enter a VM name, 2 CPU cores (or more), 4GB RAM. Change the Video card to vga. Enter a description. Click Next.
10. 32GB Virtual Disk 1. Use Default VM network.
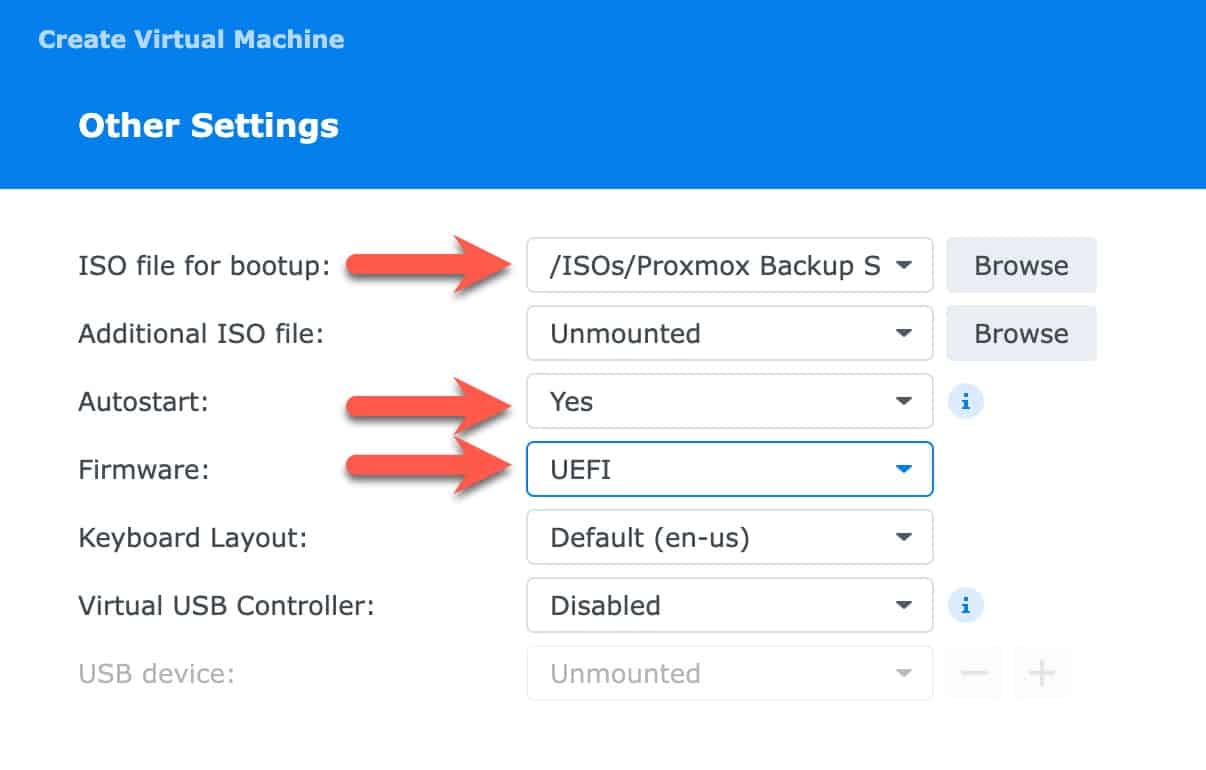
11. Configure Other Settings as shown (use your path to the ISO):
12. Assign Power Management Permissions as needed. You can leave blank and admins can control by default.
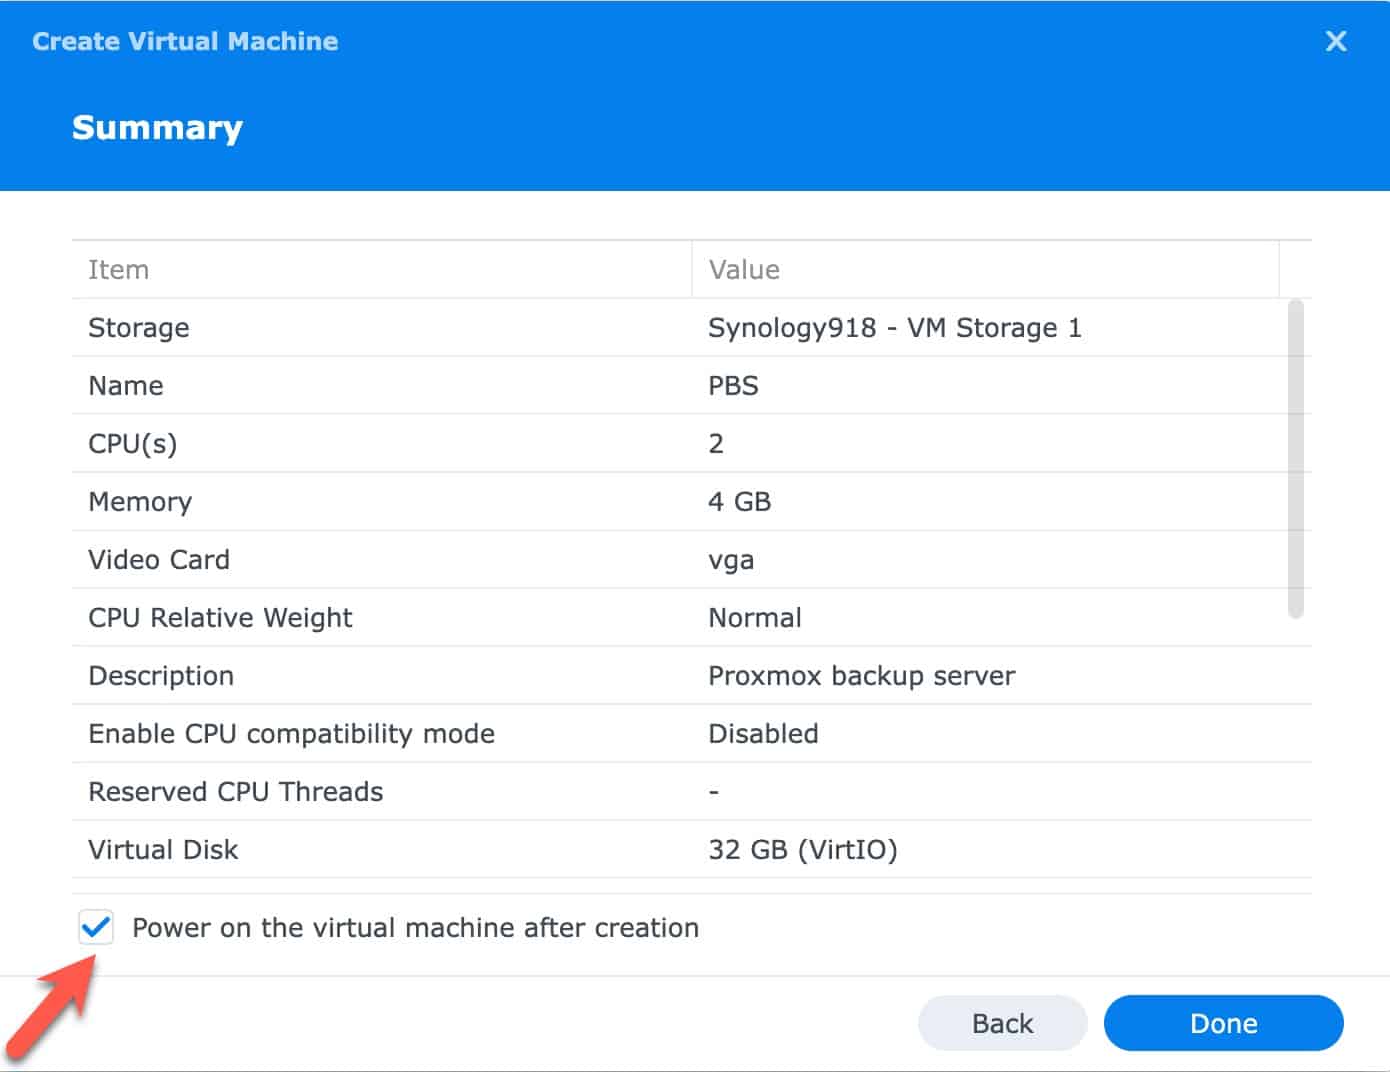
13. Review Summary page for accuracy. Check box to power on the VM after creation. Click Done.
14. Click on the PBS server and click Connect.
15. Press enter on Install Proxmox Backup Server screen.
16. Click I agree on the license terms.
17. Click Next on the Target Harddisk screen.
18. Change your Country, time zone and keyboard as needed.
19. Enter a complex root password and alerting email address.
20. Enter a Hostname, IP, gateway and DNS server.
21. Review Summary for accuracy and click Install.
22. Wait for the install to complete. Open a browser and go to https://ip:8007 and verify you get the Proxmox Login window.
Proxmox Backup Server Initial Config
1. Login to PBS.
2. Acknowledge the subscription warning.
3. In the left pane click on Shell, and run the following command to run tteck’s post-configuration script:
bash -c "$(curl -fsSL https://raw.githubusercontent.com/community-scripts/ProxmoxVE/main/tools/pve/post-pbs-install.sh)"
4. Run through the script prompts and answer Y to everything. Do NOT click around in the PBS UI while the script is running. Wait for it to complete. Reboot when requested.
5. Refresh your browser window after PBS reboots. Login to PBS.
6. If you are running PBS as a VM on a QEMU/KVM based hypervisor (Proxmox, Synology, etc.) it’s best to install the QEMU guest agent. Reboot after you install the agent.
apt install qemu-guest-agent
Synology NFS Setup
1. On the Synology open the Control Panel then click on Shared Folder.
2. Click on Create and select Create Shared Folder.
3. Enter a share name (e.g. pbs). Disable the recycle bin. IMPORTANT!
4. Skip folder encryption.
5. Enable checksum. Do NOT enable file compression. Don’t enable a quota unless you want to.
6. Confirm settings.
7. Configure permissions. Give the ‘admin’ account read/write (yes, even if the actual admin account is disabled.)
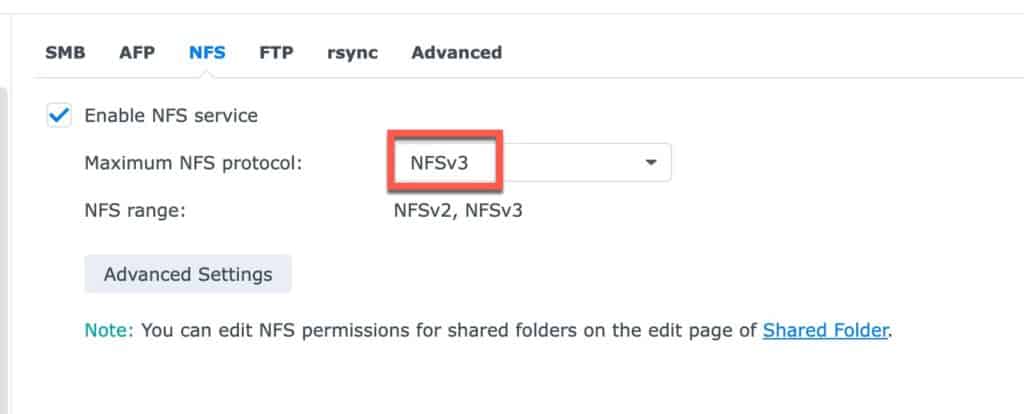
8. In the Synology Control panel to go File Services in the left pane.
9. Make sure Maximum NFS protocol is NFSv3. Click Apply.
8. In Control Panel -> Shared Folder select the PBS share and click Edit.
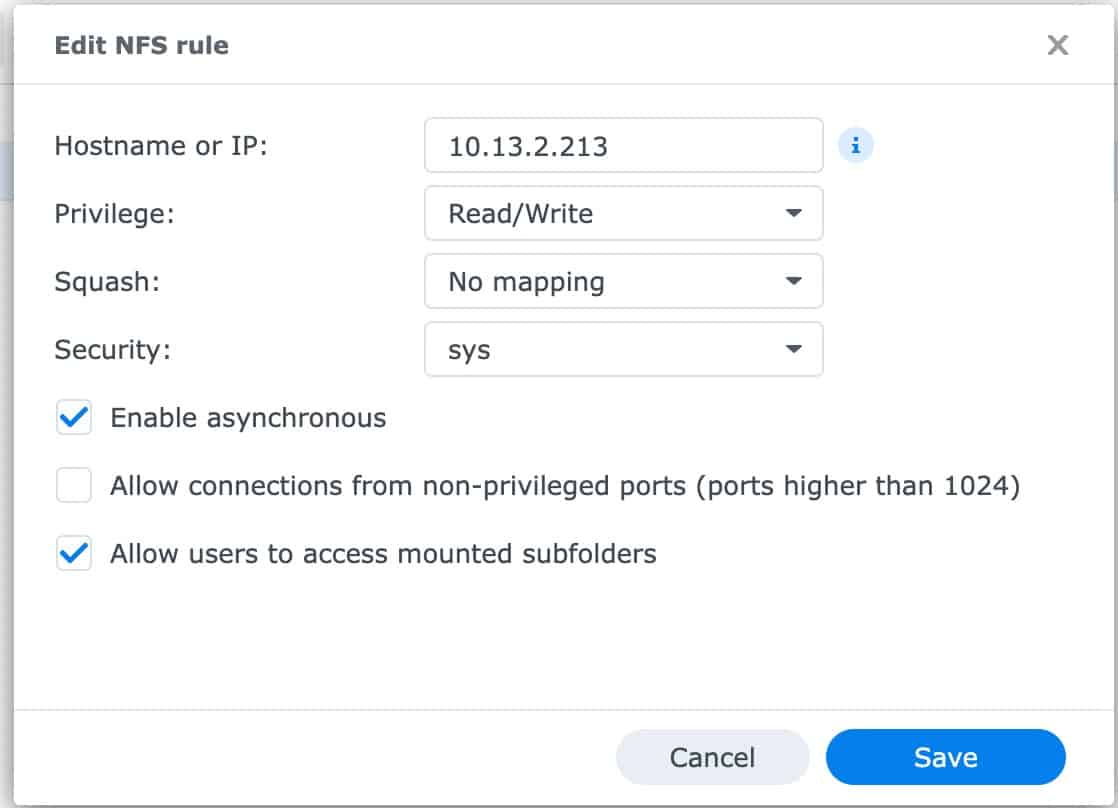
9. Click on the NFS Permissions tab. Click Create.
4. Add the IP address of your PBS server.
5. Change the Squash to No mapping. Make sure Security is sys.
6. Click Save. Click Save again.
7. Optional: Open the Snapshot Replication app. Configure a snapshot schedule to suit your needs. I suggest keeping 7 days worth of snapshots.
8. SSH into your PBS server. Create a mount directory (pick any name or path you want), and then change the permissions (very important).
					sudo apt update
sudo apt install nfs-common
mkdir /mnt/synology
chown backup:backup /mnt/synology
chmod 775 /mnt/synology

Note: If you run into permissions issues, a reader commented that removing the PBS NFS IP on the Synology side, re-adding it, then changing the permissions on /mnt/synology helped him.
13. Modify the command below to change your IP (Synology NAS) and volume paths as needed. This will append a line to /etc/fstab. Make sure the NAS path starts with volumex, as appropriate for your share location. Most of you will probably use volume1, as that’s the Synology default.
echo "10.13.2.230:/volume1/pbs /mnt/synology nfs vers=3,nouser,atime,auto,retrans=2,rw,dev,exec 0 0" >> /etc/fstab
14. Test the mount. You should not get any permission denied or other messages. Silent completion means it worked.
Note: A tip from a reader mentioned he got a permission denied error with mount -a. He had to re-run the chmod 775 /mnt/synology command. So you might try that if you get stuck.
mount -a
15. I suggest you verify that creating a file on the mount point results in a file on the NAS share. So run the following command, then go to the Synology UI and open the share and verify the file exists.
touch /mnt/synology/testfile.txt
16. If all is well, run the following command to reload your fstab:
systemctl daemon-reload
17. Now that the NFS share is mounted, let’s reset the permissions again:
chmod 775 /mnt/synology
Proxmox Backup Server Configuration
1. Login to the PBS web UI.
2. In the left pane click on Add Datastore.
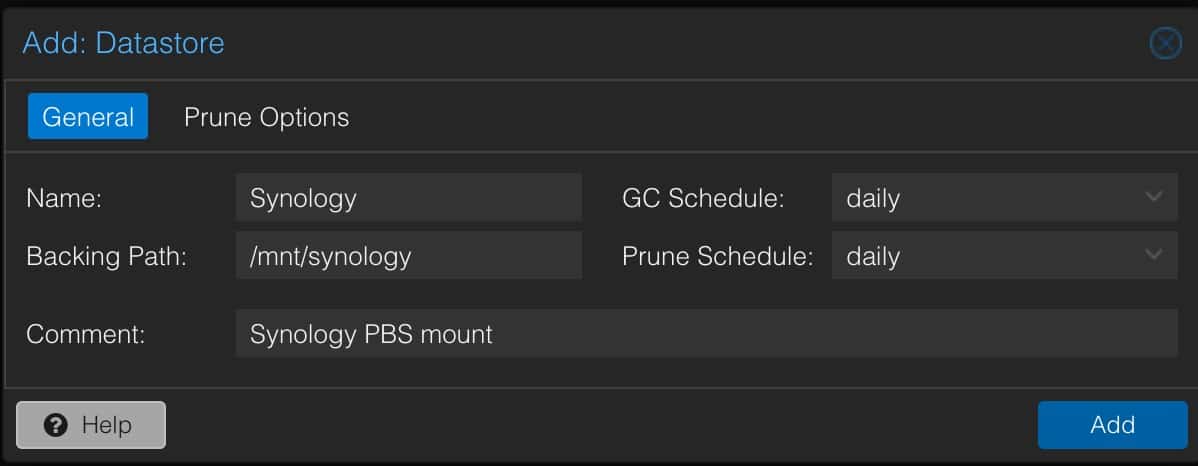
3. Configure the datastore with your parameters:
- Name: Synology
- Backing Path: /mnt/synology
- GC Schedule: daily
- Prune Schedule: daily
- Comment: Synology PBS mount
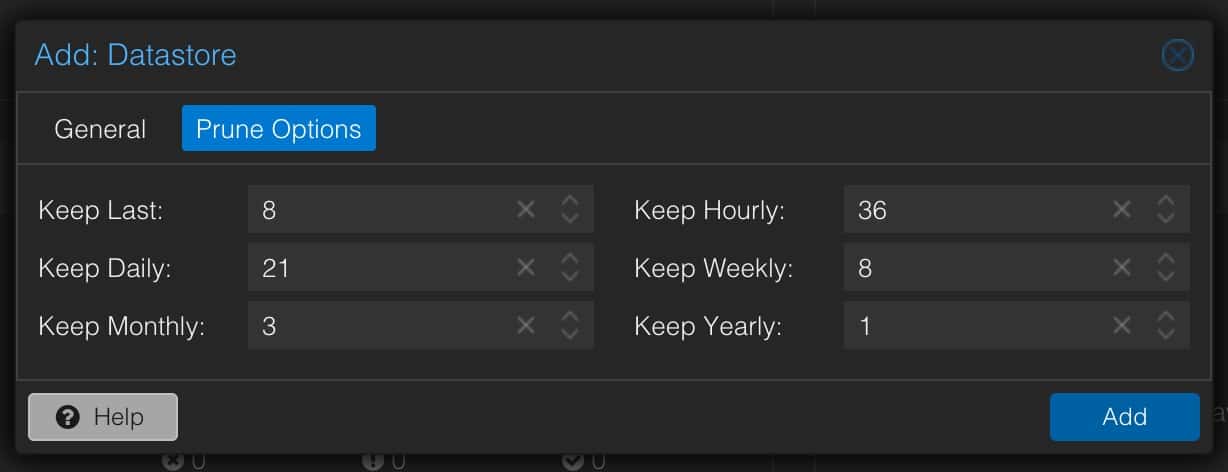
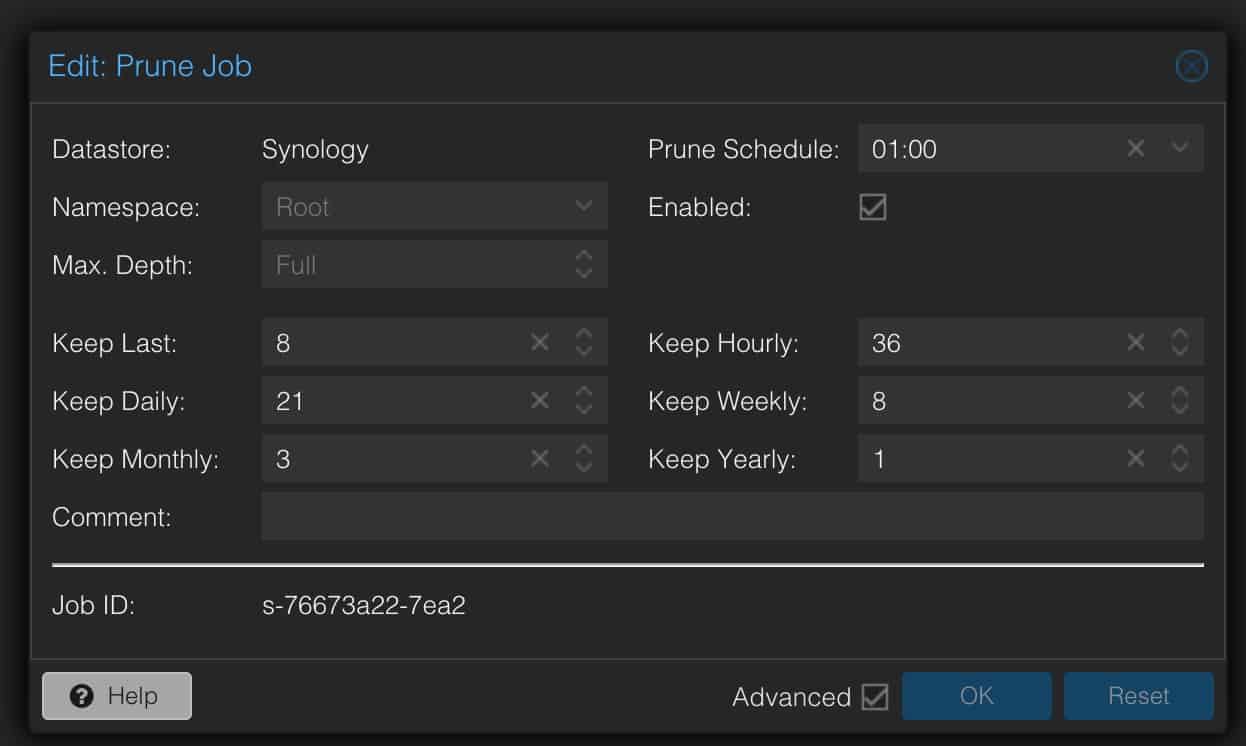
4. Click on Prune Options. Configure as you see fit. Each Prune period (e.g. daily) value corresponds to the number of days/months/hours/weeks. So entering “2” for Monthly keeps monthly backups for 2 months. A Daily value of 14 keeps Daily backups for 14 days. “Keep Last” refers to the number of snapshots to keep. Click Add. The creation process should take a few minutes.
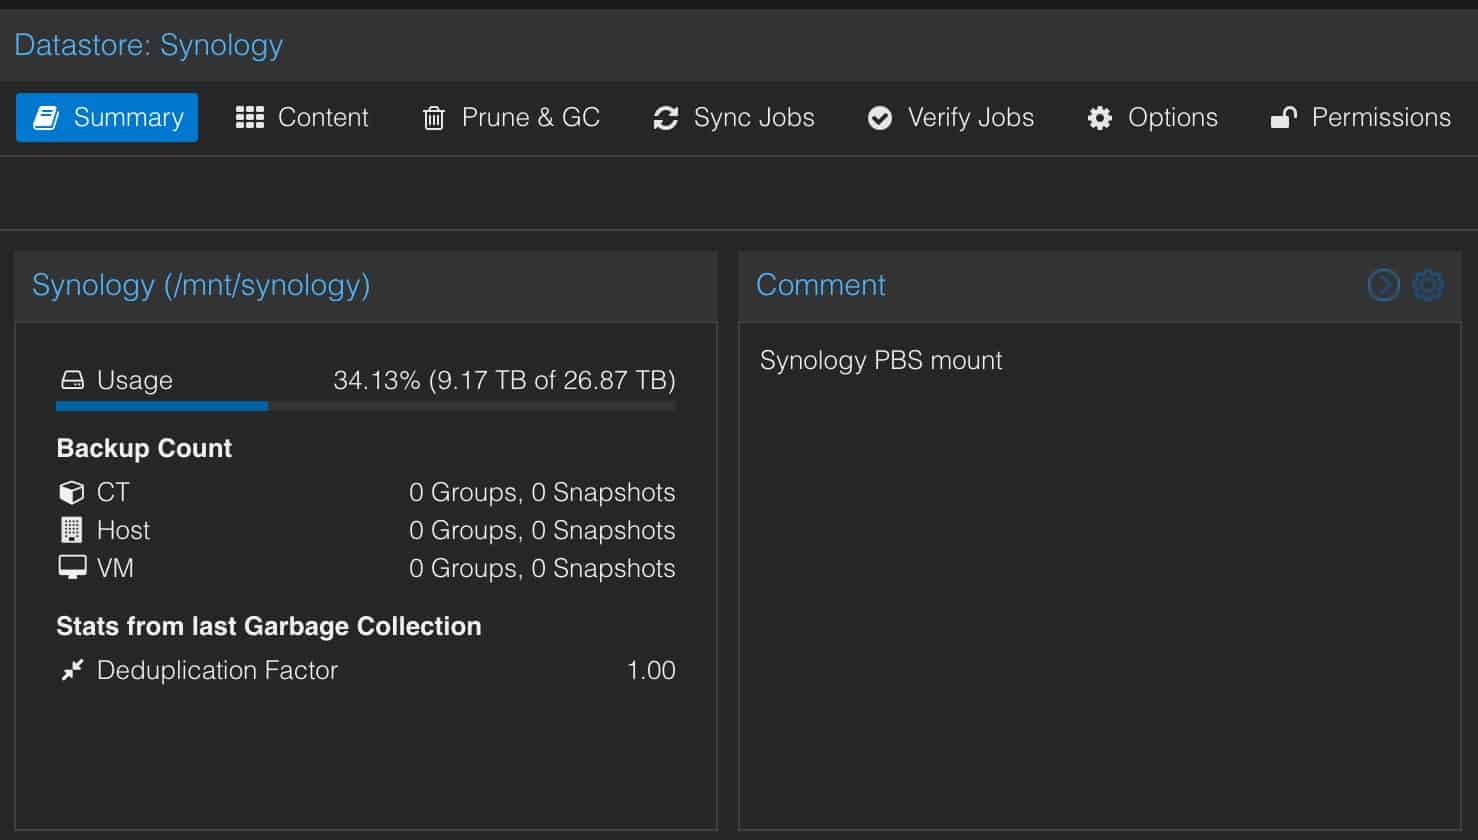
5. After the datastore is created, click on the datastore, click on Content. You should not see any errors. Click on Summary to make sure storage stats populate. If you have errors go to the end of this article and look through the Troubleshooting section for help.
Proxmox Backup Server Let's Encrypt SSL
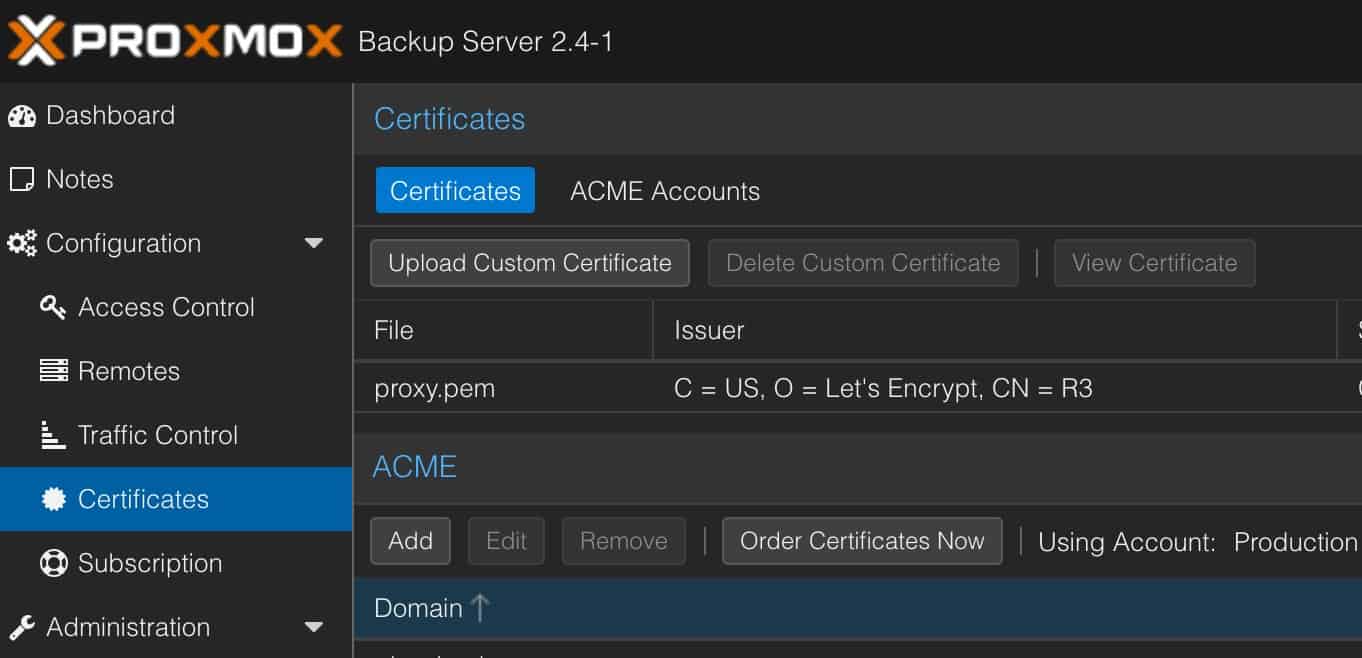
This section is optional, but recommended if you meet the requirements for a trusted Let’s Encrypt SSL certificate. PBS will work just fine with self-signed certificates.
If you have a registered domain and you wish to configure your Proxmox Backup Server with a Let’s Encrypted trusted SSL certificate, you can follow my post here: Proxmox Let’s Encrypt: The Easy Button
Note: The above procedure is the same for PBS, except the location of some buttons are in a different place but once you find the button, the UI is the same. After both the staging and production certificate installs I had to reboot the PBS server for them to take effect. Make sure to open a new browser tab/window after the reboot to fully refresh the certificate state in the browser.
PBS Backup Account Configuration
Here we are going to create a dedicated account for the Proxmox VE server to do backups. It would not be wise to use the ‘root’ account.
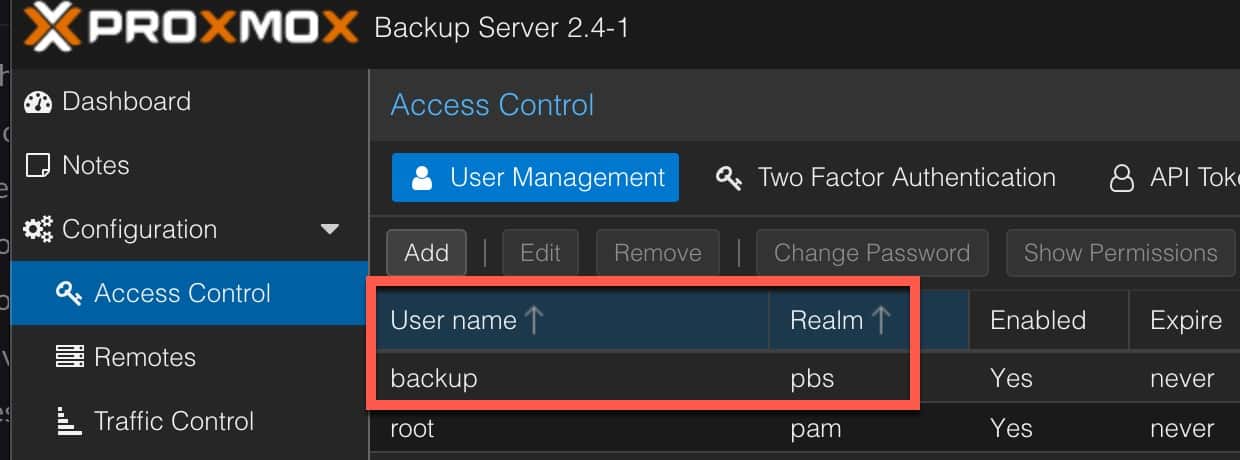
1. In the PBS UI in the left pane click on Access Control.
2. Click Add under User Management.
3. Enter a username (e.g. backup) and password. Save this in a safe place. Click Add.
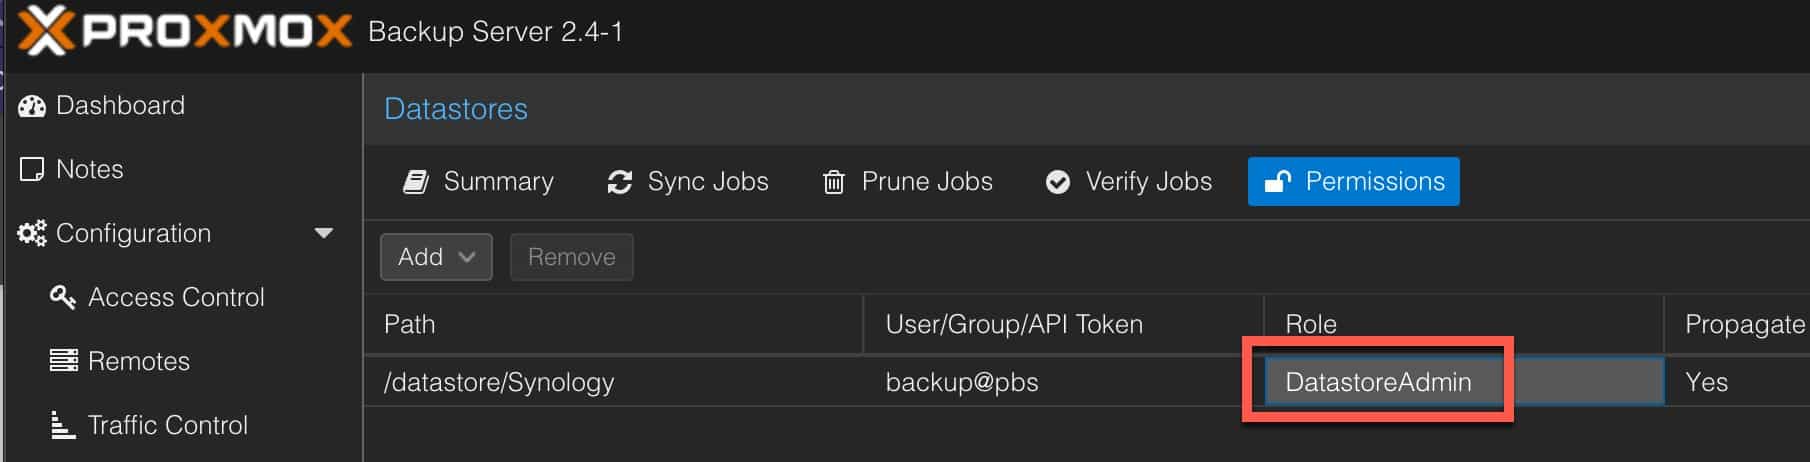
4. Click on your Datastore name in the left pane.
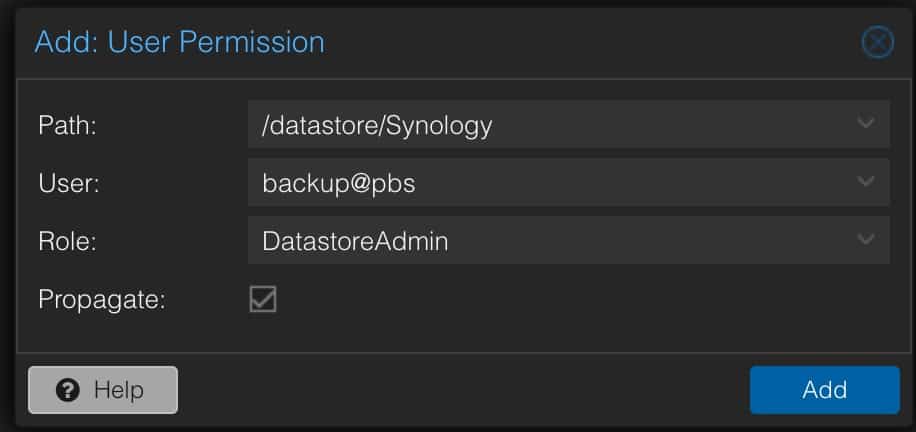
5. Click on Permissions. Click on Add -> User Permission.
6. Select the backup user you created and assign the DatastoreAdmin role.
7. After the account is created take note of the Realm for your backup user.
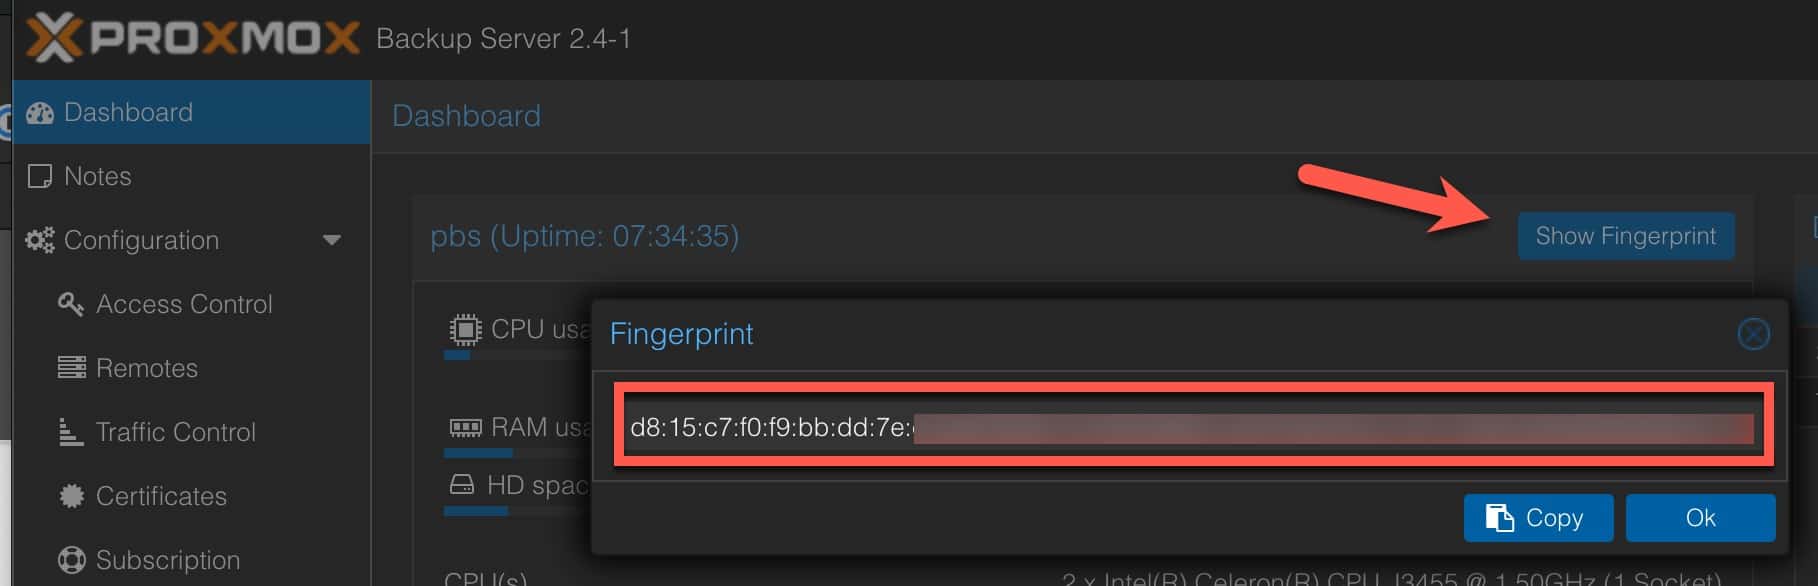
8. If you are using self-signed certificates (NOT a Let’s Encrypt cert), then we need the fingerprint of the self-signed cert for a step later on. In the PBS screen click on Dashboard and in the right pane click on Show Fingerprint. Copy it to the clipboard.
Configure Proxmox VE Host
1. Login to your Proxmox VE host. In the left Pane click on Datacenter, then in the middle pane click on Storage.
2. Click on Add in the right pane and select Proxmox Backup Server.
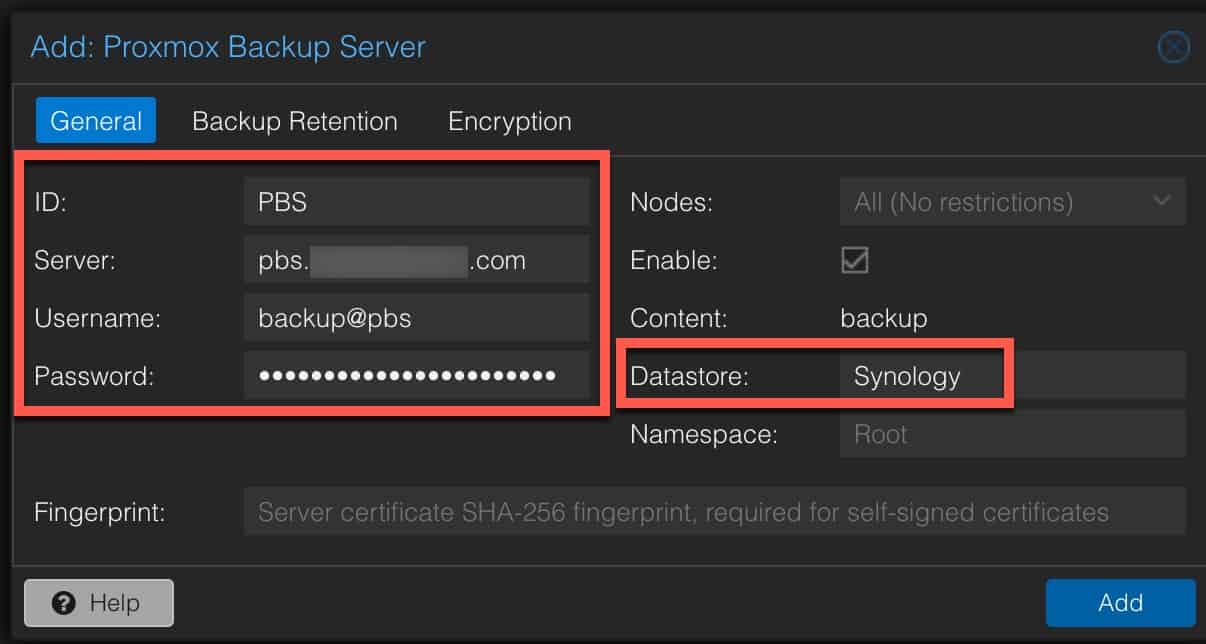
3. Enter the following information:
- ID: Any name you wish
- Server: The FQDN of your PBS server if using Let’s Encrypt cert, or IP if self-signed cert.
- Username: The name of the backup account you created and add the @Realm from the previous screenshot.
- Datastore: The name of the PBS datastore that you added
- Fingerprint: Only needed if using self-signed certs. Do NOT enter for Let’s Encrypt certs. Use the value you copied from the previous section.
Proxmox VE Test Backup
1. In the Proxmox VE UI locate a VM or LXC in the left pane and click on it.
2. In the middle pane click on Backup.
3. In the right pane click on Backup now.
4. Change the Storage to PBS. Click Backup.
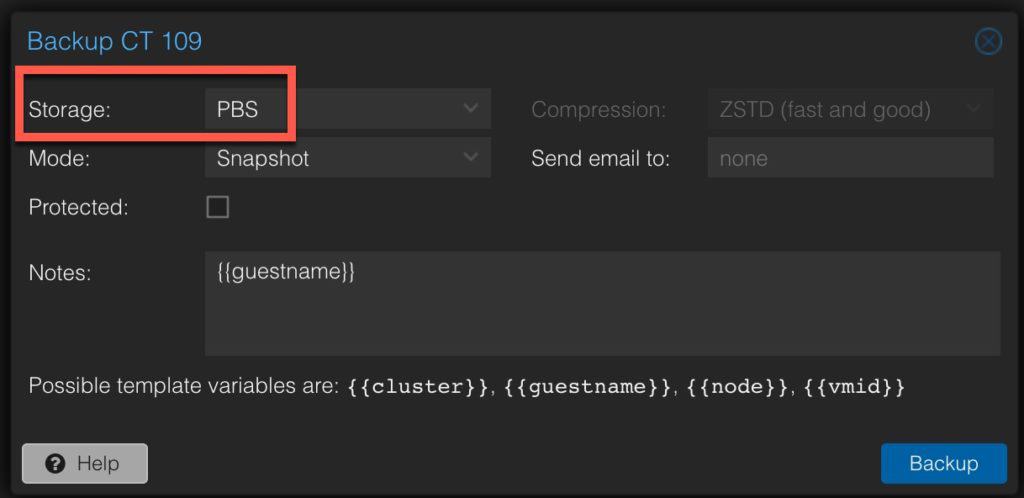
5. Wait for the backup to complete. Monitor the status to make sure it completes with an OK status.
6. Flip over the PBS UI and click on Dashboard in the upper left corner. Make sure the task summary shows at least one green check mark.
Proxmox Backup Server Job Configuration
This section is optional, but I’d strongly encourage you to do this configuration. This section will setup nightly backups for your VMs and LXC containers. Here’s the job schedule I setup:
Prune – Daily 01:00
Backup Job – Daily 01:30
Verification Job – Daily 02:30
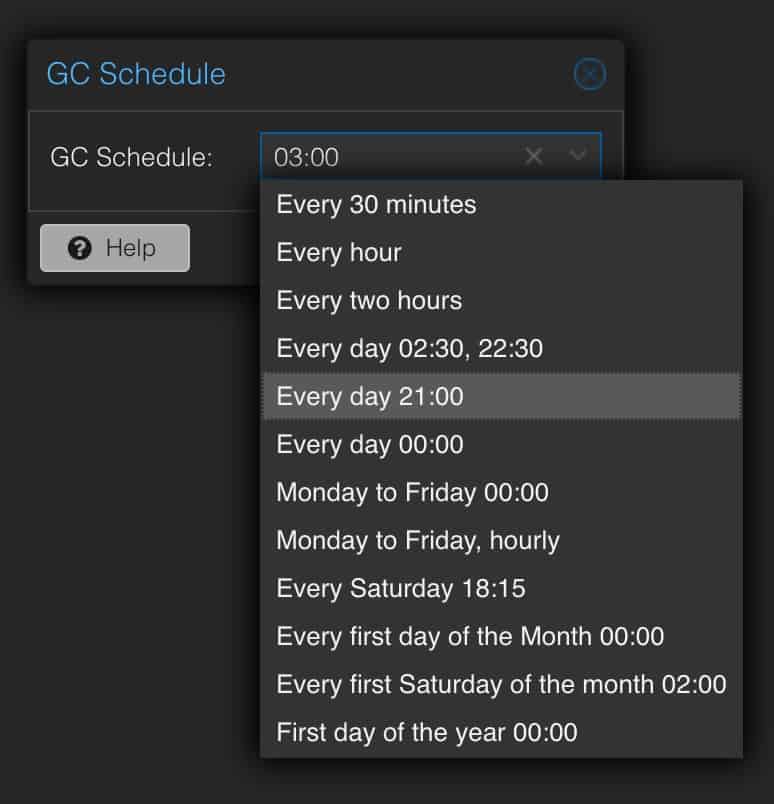
Garbage Collection – Daily 03:00
Synology to Cloud Replication – Daily 04:00
My goal is to do nightly backup and run all of the Proxmox jobs well before my Synology replicates to the cloud, so I have a clean a full backup to replicate.
1. In the PBS UI click on your Datastore. In the right pane click on Prune & GC.
2. If there’s a Prune Job, open it up and verify it has your desired parameters.
3. In the right pane under Garbage Collection click on the Daily schedule then Edit. I run my backups at 02:00, so I selected Every day 21:00 from the drop down then modified the time to be 03:00.
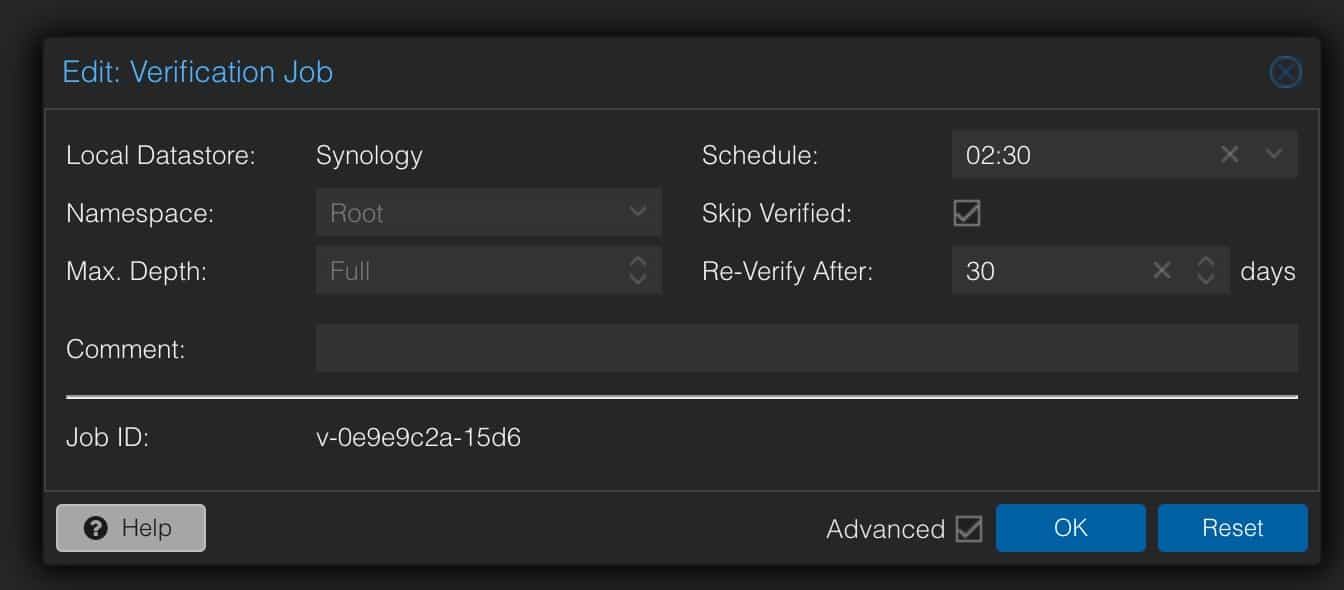
4. In the middle pane click on Verify Jobs.
5. Add a Verification Job by clicking on Add. From the Schedule dropdown I selected Every day 21:00 and changed the time to 02:30. I suggest Re-Verify After 30 days. Click Add.
6. Click on Options in the right pane.
7. Click on Verify New Snapshots, then click Edit.
8. Check the box and click OK.
Proxmox VE Backup Job
1. Login to your Proxmox VE host that you want to backup.
2. In the left pane click on Datacenter (Server View). In the middle pane click on Backup.
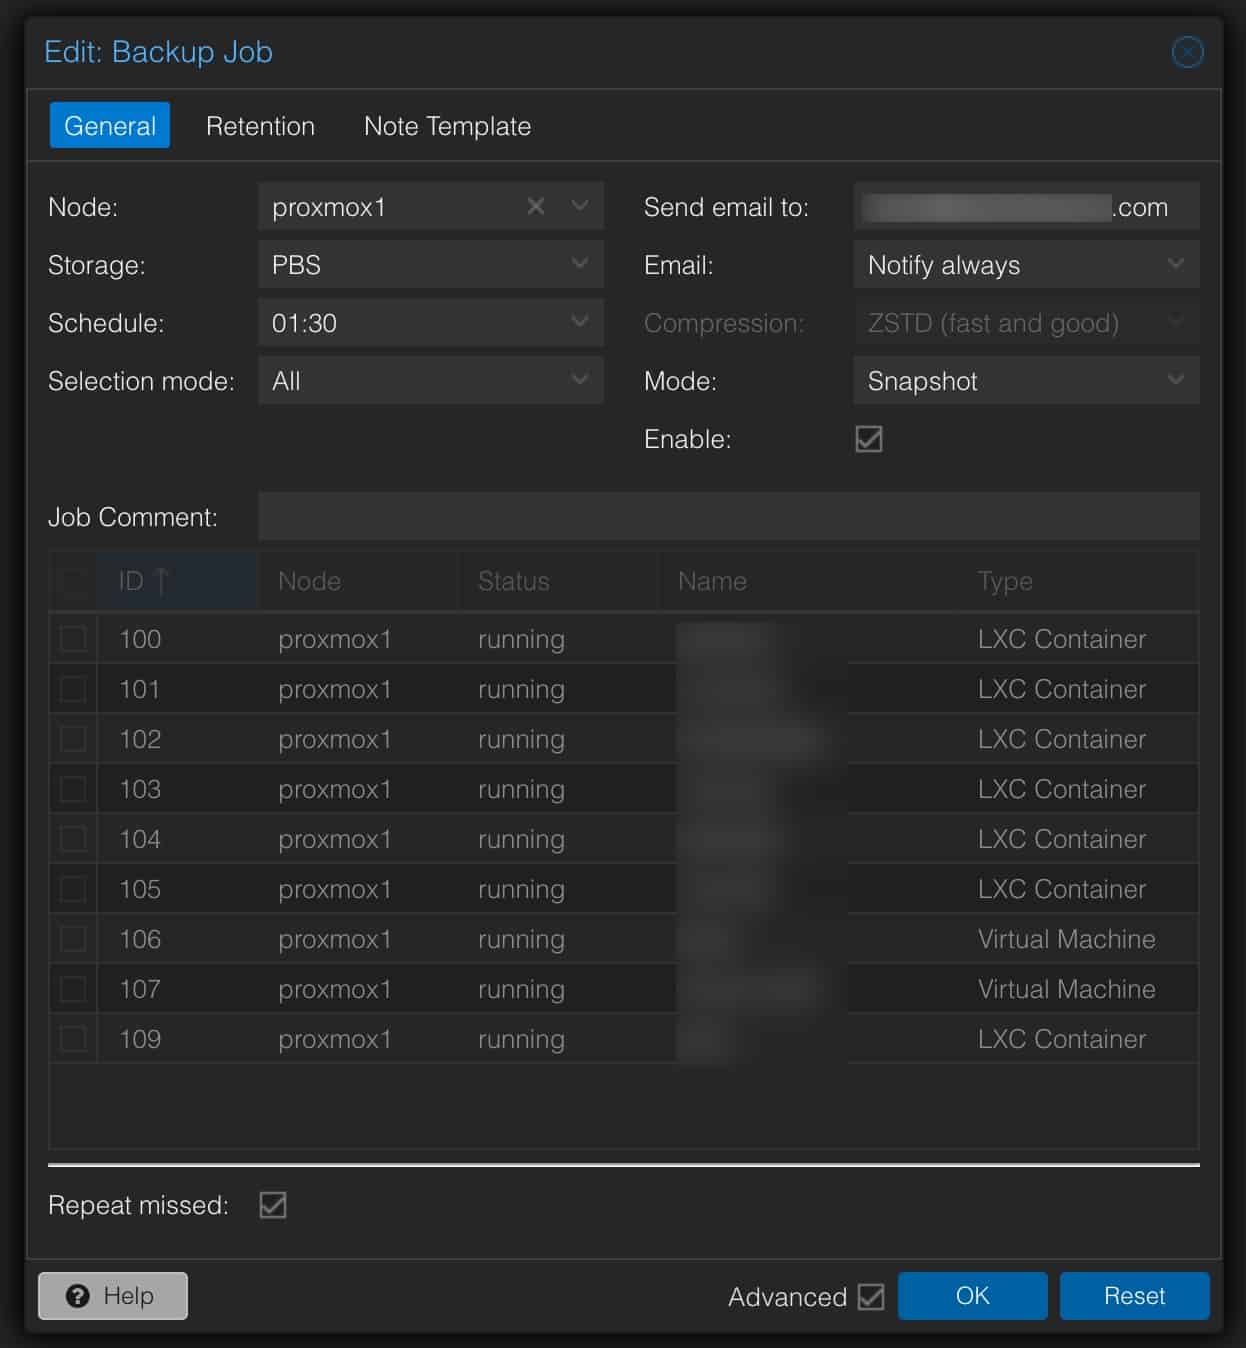
3. Click on Add in the right pane. Configure the job as you see fit. Make sure to select PBS as the Storage location. I configured my backups to run daily at 01:30. Click on Retention and setup the policy as you see fit. Click OK to save.
Import Existing PBS Datastore (Optional)
If you already have a Proxmox Backup Server datastore and just want to import it as-is, that’s easy to do. I will assume you know how to mount your old PBS datastore, so I’m skipping that procedure.
1. If your old PBS server is functional, we can look at the datastore configuration that we want to import. If your old PBS server died, it’s not hard to recreate the datastore entry.
more /etc/proxmox-backup/datastore.cfg
2. On your new PBS server run the nano command to open a (likely blank) config file.
nano /etc/proxmox-backup/datastore.cfg
3. Modify the contents below to suite your needs and specific configuration. Not all lines are required. Line 1 and the path (line 10) are the bare minimum you need. Save and exit nano.
datastore: Synology
	comment Synology PBS mount
	gc-schedule daily
	keep-daily 21
	keep-hourly 36
	keep-last 8
	keep-monthly 3
	keep-weekly 8
	keep-yearly 1
	path /mnt/synology
	prune-schedule daily
	verify-new true
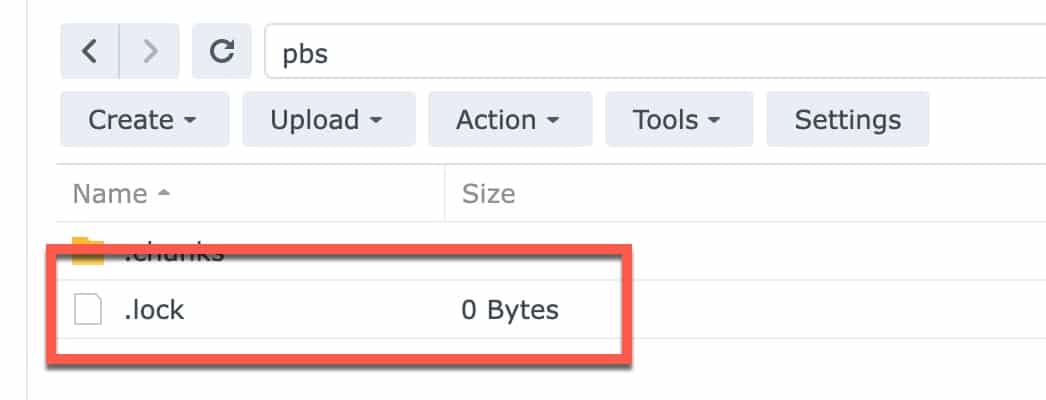
4. Verify your datastore is mounted at the path you specified above. If there’s a residual .lock file at the root level of your datastore (hidden file), delete it. Then reboot your new PBS and verify in the UI that the datastore is mounted and the backup contents are recognized.
Troubleshooting
Getting the permissions and settings right on both the Synology NFS side and on the PBS mount point is not easy. If you have a permissions issue you will likely see errors similar to:
Bad Request (400)
unable to open chunk store ‘Synology’ at “/mnt/synology/chunks” – Permission denied (os error 13)
Or:
Error: EPERM: Operation Not permitted
Things to try:
1. Double check all Synology NFS settings and permissions.
2. Re-run chmod 775 /mnt/synololgy
3. Try running this chmod command:
chmod -R 777 /mnt/synology/.chunks
4. On the Synology side remove the PBS NFS IP, re-add it, then re-run the /mnt/synology mount ownership and permissions commands.
5. Double check the PBS /mnt/synology mount point permissions. The chown and chmod steps are vital.
6. If all of those steps fail, we can try changing a Synology setting. First, unmount the NFS share within the PBS VM.
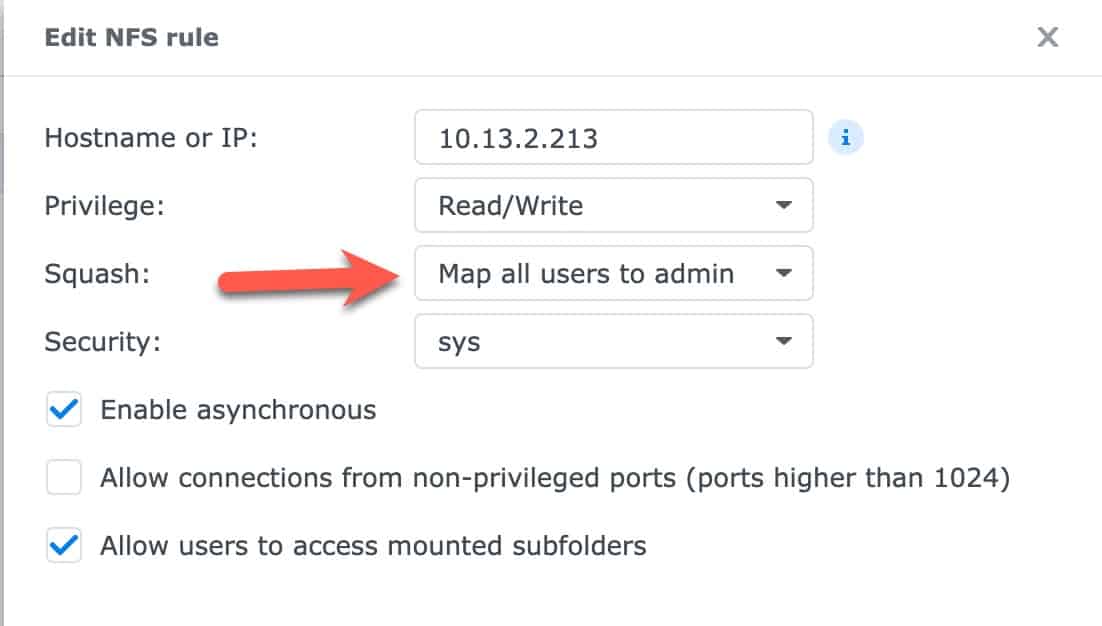
umount /mnt/synology
7. On the Synology change the PBS share NFS permission setting to Squash: Map all users to admin.
8. On the Synology browse to the PBS share and delete the .lock file. This step is critical!
9. Back in the PBS SSH session remount the share:
mount -a
10. In the PBS UI, refresh the browser window, click on the Synology datastore, click on Summary, and verify you see storage usage and other stats. If not, reboot the PBS and see if that helps.
Note: If you still have permission errors, troubleshoot as needed. However, I’ve observed that once you have datastores in a weird state that PBS may refuse to properly mount or still have chunks permission errors, even if the permissions are correct. The only solution I found was to blow away the PBS VM and rebuild it from scratch once the NFS permissions were fixed. You could also try deleting the /etc/proxmox-backup/datastore.cfg file, reboot PBS, then reconfigure the datastore within PBS.
Summary
Configuring the proper Synology NFS permissions for a Proxmox Backup Server datastore can be extremely frustrating. Precise steps must be followed to ensure everything will work. There are many other posts out there providing alternative paths to what they claim is success. After spending many, many hours of testing and troubleshooting, the procedure I’ve outlined seems like the simplest to get PBS working with a Synology NFS share. And a big hat tip to tteck’s PBS post-install script that really helps speed up the deployment process. Check out his Github repo for a lot more Proxmox scripts that automate the deployment of all kinds of LXCs and VMs.


Great article!
I solved the unable to open chunk store ‘Synology’ at “/mnt/synology/chunks” – Permission denied (os error 13) problem running after mount -a:
Thanks for the update. I’ll review my post and see if if it needs any modification or add a tip to help others.
Your screenshot shows 777 as permissions, not 775.
Would 777 help with backing up unprivileged containers?
Why “Do NOT enable file compression” when create and select shared folder?
Compression should not be enabled for a “cold storage”? Why?
Compression is to save space, and uses additional CPU resources. And compression is useless for videos/photos. I would never use it.
Yes, compression uses cpu but when creating backup space it makes sense to enable this option. After all, we will keep the backup for a reasonable period of time
HA backups are small, and even storing 100+ of them use very little space. NASes usually have many TBs of space, so using compression makes little sense.
For me, the .chunks permission error 13 was solved by
chmod -R 775 /mnt/synology/.chunks
I also had to change the max NFS protocol on synology down to 3 instead of 4.1 otherwise it would not mount correctly. The fstab entry of 3 also worked instead of 4.1. This was all the more confusing that it did work manually via
mount -t nfs -o vers=4.1 xxx.xxx.xxx.xxx:/volume1/pbs /mnt/synology
Yeah, this was extremely painful to figure out is an understatement. Thanks for writing this up, definitely a great help and gave great avenues of things to work through systematically.
Thank you! I’ve tweaked the article to add your troubleshooting step, and I modified the Synology max NFS side to v3 to help avoid confusion.
Awesome; saved me a ton of time, had this working in minutes following the guide except I successfully used NFS 4.1, I have done test backups, restores and a forced a garbage collection to check dedupe, so far so good (relief because I have ESX 8 servers using the NAS also and I don’t want to reconfigure them).
The other thing I did different was I left the local /mnt/synology permissions alone (so root only has permission), my thinking is that should the NFS mount fail (say after a reboot) I really DO NOT want PBS writing to the local /mnt/synology folder, once the mount manually completed I set the permission for the backup user on the mount. This way unmounted PBS = access denied, mounted = access granted.
Good tip!
What are your thoughts on creating a large VM for the PBS and backing up to it’s local drives vs using the NFS way? I think I read something about NFS being slow.
Great guide, thanks. Worth noting (to others) that if you have Snapshot and/or Recycle Bin enabled for your NFS share you need to set the user visibility to “No” on Snapshots and allow non-admins to modify the recycle bin or Garbage Collection will fail.
Using the latest version of proxmox and pbs one crucial step is missing: in order for pbs to mount nfs shares, nfs-common needs to be installed. apt install nfs-common
Hi, thanks for the nice article. I did set it up and it is all working except the garbage collection which returns error 13. I did set the permissions to 775 and the store /mnt/synology is owned by backup:backup. I don’t know what else to check to resolve the issue.
root@pbs:~# ls -la /mnt/synology
total 4
drwxr-xr-x 2 backup backup 0 Feb 19 06:33 .
drwxr-xr-x 3 root root 4096 Feb 19 06:05 ..
drwxr-xr-x 2 backup backup 0 Feb 19 06:10 .chunks
-rwxr-xr-x 1 backup backup 0 Feb 19 06:08 .lock
drwxr-xr-x 2 backup backup 0 Feb 19 05:18 ‘#recycle’
drwxr-xr-x 2 backup backup 0 Feb 19 07:16 vm
Any hint?
Did you disable the recycle bin on the shared folder on the Synology side? If not, try that.
Thank you for pointing me in the right direction. Actually the option “Enable Recycle Bin” has a sub option “Restrict access to administrator only”. Both options are selected by default. Deselcting the second one did it. Thank you.
I updated the post with more explicit recycle bin instructions.
Thank you very much for this excellent guide. I followed it to the letter and it worked flawlessly. I would’ve never come up with some of these settings myself, so you saved me a bunch of trail and error. Cheers!
Heya, thanks for this tutorial, found it via Reddit!
One question tho, I’m trying to set up a NFS Share for Synology and TrueNAS, however on TrueNAS the chunk generation alone is taking over 15 minutes already while on Synology it was done in ~1. Do you have any idea why that might be? I used the exact same NFS mount options as for Synology shown here, maybe there lies the issue?
Thanks!
I’ve never used TrueNAS so can’t say.
Figured a solution out for this now, I simply went ahead and checked one of my PVE host’s mount options and what it used, then copied it over to PBS and voila! The speeds are way improved now getting around 250+MBit/s.
If you want to replicate this simply mount your NFS share on a PVE host first, then run the following in a shell:
Search for the host you added and copy those parameters over to your PBS host’s /etc/fstab, in my case this was (censored some data):
This might be a nice addition to the “Troubleshooting” section in case others also have a similar issue than I do, seems PVE with their GUI mounting adds some very good options or does some testing first before to ensure the best options.
if you use snapshots/replication in synology, is there any need to have any retention of backups from Proxmox?
Not working in my case, I will do all the recomendations
mount: /mnt/synology: permission denied.
dmesg(1) may have more information after failed mount system call.
Hello Derek.
I have followed your guides for they are great, including this one.
I’ve been using PBS for a few days and I have some questions.
How do you manage “cloud” backups specificallyfor PBS?
Before, I would create a non encrypted backup of a LXC o VM and just uploaded to a cloud storage, if I had an issue, I would just download it and restore from it.
PBS doesnt seems to work like that using encrypted backups, I guess the chunks folders are different.
How are you dealing with this man?
Thanks again for the guides!
Hi Derek, thank you for the excellent guidance! I installed PBS as LXC with tteck’s script on the PVE VM on my Synology. I thought adding a container above adding another VM would be okay as PVE is used only as third cluster and to run PBS. In order the get NFS running with the PBS LXC I had to take a few more steps: install the LXC privileged, then in the middle pane Options, then on the right Features and check NFS.
Yes, NFS requires a privileged LXC.
Hi Derek 🙂
Thanks for a great guide . Really helped a lot.
The only thing that bothers me, is that chmod 777 would give read access to all users in DSM. They can see the backup folder and the content.
I tried to work with the setup my self. The user in PBS is backup and group is backup as well as I understand it.
I made a new user in DSM with name “backup” and a group “backup” .
Even though I gave the “admin” read/write access and the same to backup user and group, I cant get PBS to get a connection to the storage on the shared folder.
Would be great to spare the users from the backup folder 🙂
Either way – its a super guide and really enjoy my PBS server running to my NFS shared folder .
Thank you for the article! I have a question though… if you already have a PBS VM on a PVE node and its datastore is on your synology, but now you want to move pbs from the vm on a pve node to its own dedicated bare metal box, how do get the new pbs instance to use the original datastore? Is there an easy way? I’d like to retain all my original backups.
Works perfectly – thanks!
I tried to do it using SMB first and failed at the step where the actual backup files were being created before that it looked like it was going to work. I’ll look into it later as I would prefer it over SMB.
One minor annoyance though: The dashboard in the Synology datastore is not working/updating except for the Storage Used chart. The rest (Transfer rates/IOPS/etc.) is empty although everything else works fine.
Do you have that problem too and did you solve it?
Replying to my own question here:
Adding this to fstab worked for me: rw,auto,uid=34,noforceuid,gid=34,noforcegid
Credit to:
Use a Samba (SMB/Cifs) Share as Datastore in Proxmox Backup Server – Steven England’s Weblog (steven-england.info)
I am really curious, the linked article is about SMB and the options
uid,gid,noforceuid, andnoforcegidare CIFS-only. Are you using CIFS or NFS? I’d be surprised if that solved your problem of not getting transfer rates or IOS shown in the UI, but who knows.That was CIFS->SMB.
Tbh I did not try it further and now I no longer own that Synology NAS.
These were the commands, as the link is now dead:
Hi just followed the guide and noticed that by using 775 it gives all the NAS users permissions to see the content. With 770 it works great and its safer.
770 is indeed safer! Thanks for the comment. I plan on doing some NFS vs iSCSI LUN performance testing in a few weeks, so I’ll rebuild a new NFS share with 770 to validate. If that works, I’ll update the post.
Awesome, I also managed to use NFS4.1 without issues
Hi, did you set the NFSv4.1 only in DSM, or also in /etc/fstab?