Now that we have the Windows failover cluster service installed and configured with a management point, we need to configure a witness. A witness is a 'third party' that enables monitoring of the cluster node status and assist with failing over SQL services. The witness can live either in the cloud (Azure) or use a generic file share that could reside on a NAS appliance or a Windows server. The file share witness must NOT reside on either SQL node, as that would defeat the purpose of having a witness. In my lab I deployed a bare bones Windows Server VM to host the FSW.
Create a File Share
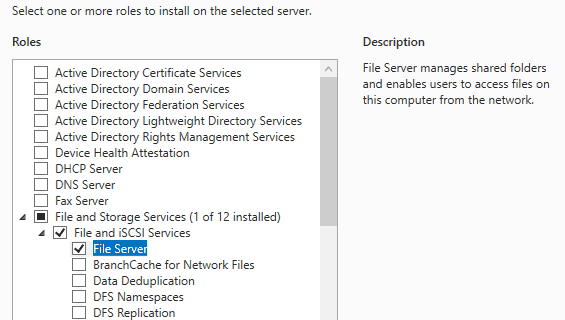
1. On a Windows member server (not either SQL server) open Server Manager, go to File and Storage Services, click on Shares, then from the Tasks menu select New Share. If you don’t have that option, add the File Server Role and wait for the installation to complete. No reboot is needed.

2. Select the SMB Share – Quick file share profile.
3. Select the appropriate volume the share will be created on.
4. Enter the new share name. I suggest this format: <Cluster name>-FSW (e.g. SQL2017CLA-FSW). Make note of the remote share path, as we will need this in a couple of minutes.
5. Enter a description in the format of: <Cluster Name> Cluster File Share Witness.
6. Uncheck allow caching of share and enable encrypt data access.
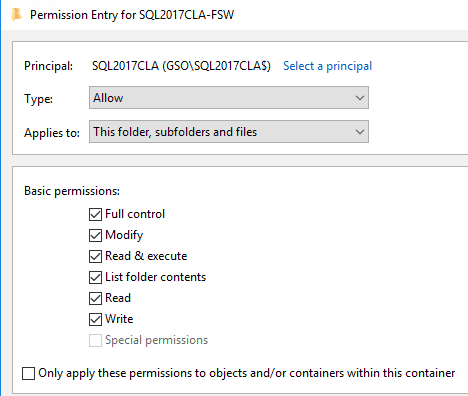
7. Customize the permission, disable inheritance and remove all inherited permissions.
8. Give the cluster computer object (e.g. SQL2017CLA) full control. If you want, you could also give administrators access so they can peek inside. Make sure to enable the search for 'computer' objects when you 'Select a principal' or it won't find your computer account.

9. Finish the wizard and wait for the share to be created. If you get an access denied message, re-run the wizard with the same settings and see if a second attempt will work.
Fileshare Witness Cluster Configuration
1. On either SQL server launch the Windows Failover Cluster Manager.
2. Right click on the root cluster object (e.g. SQL2017CLA), select More Actions and then click Configure Cluster Quorum Settings.
3. Select Select the quorum witness.
4. Select Configure a file share witness.
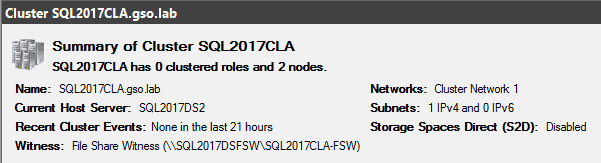
5. Enter the file share path you made note of from above. Click through the remainder of the wizard and verify the FSW was successfully configured.
6. Verify Quorum configuration is now using a file share witness. Note that you only need to do these steps once per cluster.

Summary
In this post we configured the Windows Cluster service with a file share witness. The FSW is needed to properly manage node failover. The FSW can be co-located with other services on another server, be a share from a NAS appliance, or use the cloud (Azure). It cannot be created on either SQL node.
Now that the Windows cluster services are fully configured, we will return to configuring SQL. The next installment will configure the pre-reqs for setting up an AAG, and then configure one AAG. You can find Part 8 here.
SQL 2017 Installation Series Index
SQL 2017 Always-on AG Pt. 1: Introduction
SQL 2017 Always-on AG Pt. 2: VM deployment
SQL 2017 Always-on AG Pt. 3: Service Accounts
SQL 2017 Always-on AG Pt. 4: Node A SQL Install
SQL 2017 Always-on AG Pt. 5: Node B SQL Install
SQL 2017 Always-on AG Pt. 6: Cluster Configuration
SQL 2017 Always-on AG Pt. 7: File Share Witness
SQL 2017 Always-on AG Pt. 8: AAG Setup
SQL 2017 Always-on AG Pt. 9: Kerberos (Coming)
SQL 2017 Always-on AG Pt. 10: SSL Certificates (Coming)
SQL 2017 Always-on AG Pt. 11: Max Mem & Email Alerts (Coming)
SQL 2017 Always-on AG Pt. 12: Maintenance Jobs (Coming)


Good stuff. Can’t wait for the other 5 parts!
Do you still plan to finish this series in the near future? Thanks!!!
Yes..just been exceptionally busy!