
Blog Series
SQL 2014 Always-on AG Pt. 1: Introduction
SQL 2014 Always-on AG Pt. 2: VM Deployment
SQL 2014 Always-on AG Pt. 3: Service Accounts
SQL 2014 Always-on AG Pt. 4: Node A Install
SQL 2014 Always-On AG Pt. 5: Unattended Node B
SQL 2014 Always-on AG Pt. 6: Cluster Configuration
SQL 2014 Always-on AG Pt. 7: TempDB
SQL 2014 Always-on AG Pt. 8: Max Mem & Email
SQL 2014 Always-on AG Pt. 9: SQL Maintenance
SQL 2014 Always-On AG Pt. 10: AAG Setup
SQL 2014 Always-On AG Pt. 11: File Share Witness
Cluster Role Installation
1. From the Server Manager dashboard launch Add Roles and Features.
2. Select Role-Based or Feature-Based Installation.
3. Select the local server when prompted.
4. Skip the Server Roles page and on the Features page check Failover Clustering. When prompted, add the required features.
6. Continue through the rest of the wizard and wait for the installation process to complete.
7. Install Windows Failover Clustering on the second SQL node.
Cluster Validation
1. On Node A launch the Failover Cluster Manager, and in the left pane right click on Failover Cluster Manager and select Validate Configuration.
2. Enter the two hostnames of the SQL servers you are configuring. Run all of the tests. Review the cluster report for any errors. Some warnings are normal, such as:
- Only one pair of network interfaces
- No disks to perform cluster validation on (and all associated disk tests)
3. Download and install Windows8-RT-KB2803748.x64.msu on both nodes if you are running Windows Server 2012 (not 2012 R2).
Cluster Configuration
1. Launch the Failover Cluster Manager. Right click on Failover Cluster Manager and select Create Cluster.
2. Add the two nodes of the cluster and click Next.
3. Enter a cluster name (e.g. SDSQL03) and the IP address of the cluster name. Click Next.

4. Validate the cluster information is correct and click Next. Un-check the box to add all storage devices. Wait for the cluster to be created.
5. Verify the cluster was successfully formed. You can safely ignore warnings about no disks being found and regarding an even number of nodes.
6. Verify all of your drives are still visible. If they have disappeared, then go into the cluster manager and remove all drives as a cluster resource. Then open the Computer Manager and online each of the drives. Reboot the SQL server if you had to do this procedure, so SQL can startup normally.
6. Open the DNS Manager console, locate the cluster hostname (e.g. SDSQL03) in the forward lookup zone, open the record, and uncheck the box to update the pointer record. Re-check the box to create a pointer record. Verify a pointer record was created.
Cluster Aware Updating Configuration
1. In ADUC create a computer object with cluster name with a –CAU suffix (e.g. SDSQL03-CAU), in the appropriate server OU. Change the description on the object to SQL Cluster SDSQL03 Cluster Aware Updating Object.
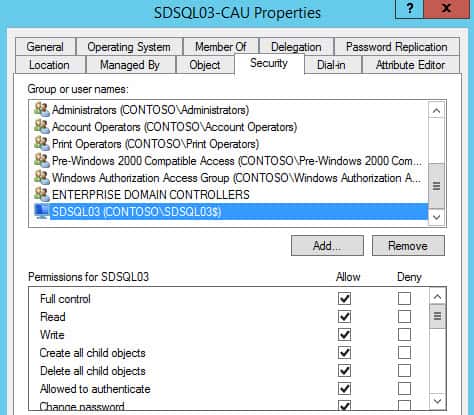
2. Modify the security permissions on the CAU computer object to give the cluster object (e.g. SDSQL03) full control.
3. On each node open the Windows Firewall manager and enable the two remote shutdown rules shown below.

4. In Server Manager from the Tools menu select Cluster-Aware Updating.
5. Enter the cluster name (e.g. SDSQL03) and connect.
6. In the right pane select Analyze cluster update readiness.
7. Verify that all results show Passed, except for the machine proxy and the CAU role, which can be ignored. Close the results windows.
8. In the right pane select Configure cluster self-updating options.
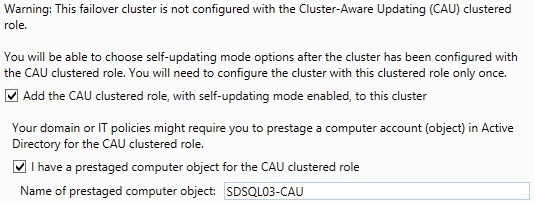
9. Check the box to add the CAU role.
10. Check the box next to I have prestaged computer object for the CAU clustered role. Enter the CAU computer object name you created (e.g. SDSQL03-CAU). Click Next.
11. Configure the schedule as determined by your environment.
12. On the Advanced Options screen check the box to require all nodes online.
13. If desired, on the Additional Options screen check the box to install recommended updates.
14. Click through the remainder of the wizard and wait for the installation to complete.
15. Re-run the Analyze cluster updating readiness. Verify everything passes, except for the proxy warning.
Summary
In this installment we’ve installed and configured the Windows failover clustering role. We’ve also optionally configured Windows cluster aware updating, which makes patching life easier. In the Part 7 we will configure TempDB. Click here for that installment.


Hey Derek – Enjoy your blog posts and I'm going through this series to set up an SQL 2012 AAG to host my VMware databases in my new home lab setup. I did notice an issue though which was resolved, but I had to manually create the related cluster DNS entries. I also had to go back in and make sure to select the box that says “Allow any authenticated user to update DNS record with the same owner name". Without doing the second part I was getting Event 1196 thrown.
Thanks for the information. Maybe some others have run into the same problem and this will help them out.
Hi, We're finally delving into clustering VM's for the first time with AAG and file share witness. We've long done MSCS clustering on physical servers with quorum and DTC resources and associate shared storage. We've always precluded VM's from this due to the shared storage aspect and related complexity and lack of mobility this brings to VM's. We are unsure of whether we need to have dedicated heartbeat NIC's setup as we normally do on physicals? The info above kind of indicates that we do not need this which would be helpful on our situation. Thank you for a great… Read more »