Last August I wrote a blog post about this great new VMware SSL tool by VSS Labs called vCert Manager, which replaces many of your VMware SSL certificates all from the comfort of a nice GUI. It’s a full certificate lifecycle management tool for VMware vSphere and related components. For the full feature list and comparison with the free VMware tools, check out my post here. I’ll wait for as you read through that long article.
Ok with that out of the way, this time up I’ll actually walk you through the installation process, and see how easy it is to replace your vCenter 5.5 and ESXi host SSL certificates, all from a nice GUI. vCert manager is a licensed tool, but as you will see, has a lot of great features that no other tool that I’m aware of has.
If you are cash strapped and can only afford a free tool, then please remember my vSphere Toolkit script + the VMware certificate replacement tool combination. While the combination is less painful than the manual procedures, they fall very much short of the vCert Manager tool in terms of both functionality and ease of use.
VSS Labs has a special vExpert program, where you can get a NFR license that supports two vCenter servers and up to 10 ESXi hosts, for non-production usage. Their standard eval license supports 1 vCenter and 5 ESXi hosts.
What does it Update?
The list below is all of the VMware components that vCert Manager v1.2 can update:
- vCenter 5.0: vCenter, Update Manager, Inventory Service, web client
- vCenter 5.1: SSO, Inventory Service, vCenter, Web Client, Update Manager, Orchestrator
- vCenter 5.5 (single location): SSO, Inventory Service, vCenter, Web Client, Update Manager, orchestrator
- ESX/ESXi: 4.0 through 5.5
My Environment
In my environment I have Microsoft vCenter 5.5 server, and three ESXi 5.5 hosts. All of the vCenter components are installed on one server. I also have a two tiered Microsoft CA hierarchy. The root is offline, and I have an online issuing CA. Both are Windows Server 2012 R2. I have also setup a certificate template for VMware products, which you can read about here. You must have a certificate template, so if you don’t, go configure one following my guide.
Installation
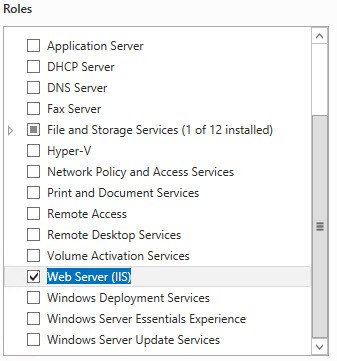
1. I provisioned a Windows Server 2012 R2 VM from my standard template, which has no additional roles or features beyond .NET Framework 3.5 and .NET Framework 4.5. The tool is IIS and ASP.NET based, so we need to install IIS and ASP.NET to get started. Launch Server Manager and select the Web Server (IIS) role.
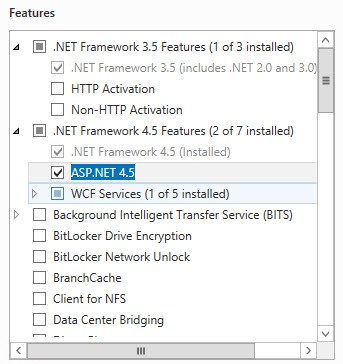
2. On the Features page expand .NET Framework 4.5 and select ASP.NET 4.5. Click through the rest of the wizard and wait for the components to install.
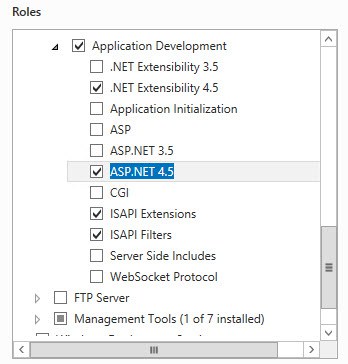
3. Go back to server manager and under Web Server enable ASP.NET 4.5, ISAPI Extensions and ISAPI Filters. Wait for the installation to complete.
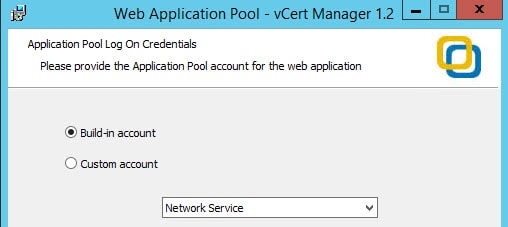
4. Download the VSS Labs vCert Manager binary and start the installer. Click through the wizard until you get to the following screen. I chose the defaults, which are shown below. If you wanted, you could create a custom service account which the application pool would run under.
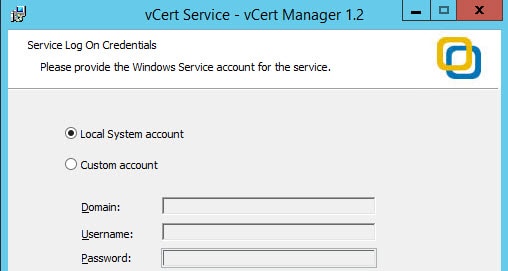
5. Next up you can specify an account which the service uses to logon. Again, I left the default here. By using this default the computer machine account will need SQL database permissions, which I cover later.
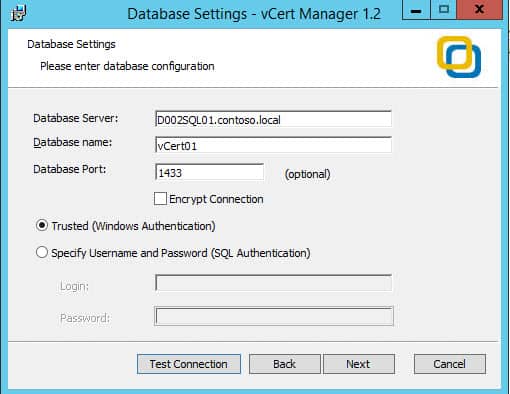
6. Now we need to specify the SQL database connectivity, so that it can create and use a SQL database. I simply entered the database server, database name, and port. A great feature is supporting SQL encryption. According to the install guide a future version will support a system ODBC connection. The account I was logged in as has SQL sysadmin rights, so the Test Connection passed.
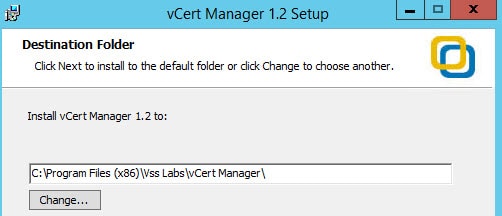
7. Finally you can change the installation directory. I choose the default here. The installation took less than a minute after I completed the wizard.
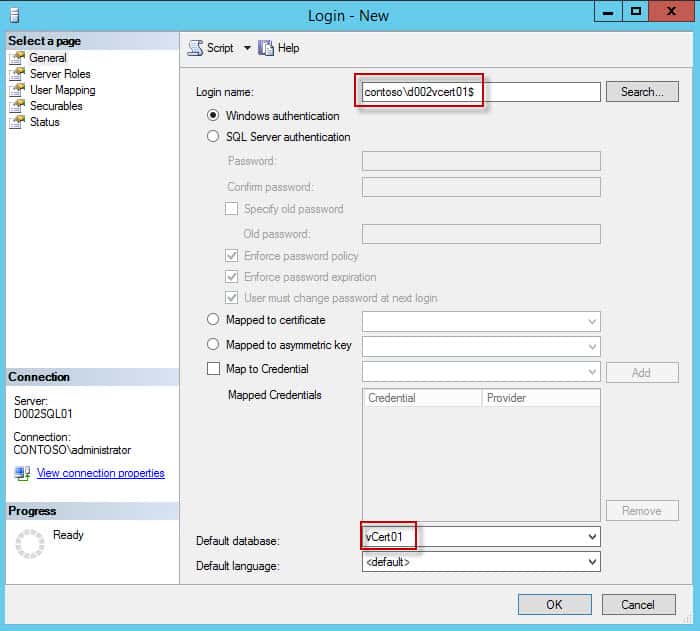
SQL Permissions
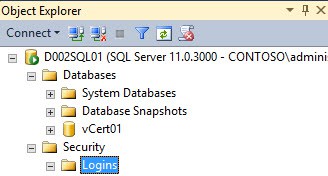
1. Go to your SQL server and add a new security login. Use the computer name (followed by a $) that vCert manager is installed on and change the database to the vCert manager database that was created during the installation process.
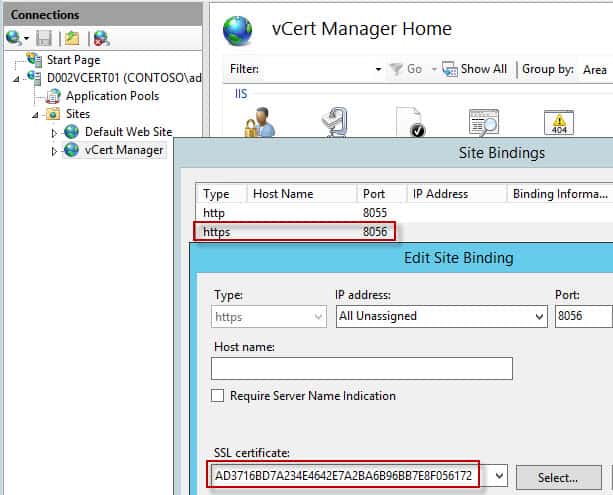
IIS SSL
The installer will create a non-trusted SSL certificate, which I recommend we replace with one from your trusted CA. In my case I have an autoenrollment policy so that my computer already has a machine certificate that I can bind with in IIS. If your machine does not already have a machine certificate, then issue one and install it in the machine’s certificate store.
1. Open IIS and navigate to the vCert Manager site in the left pane. In the right pane click on Bindings then modify the bindings for the 8056 port entry. Select the thumbprint for your trusted machine certificate.
2. Open a web browser and navigate to https://FQDN:8056 and you should get a nice looking login page. They suggest using Chrome v26, Firefox 20 or IE 10. I used IE 11 and didn’t notice any issues. Verify there are no SSL warnings.
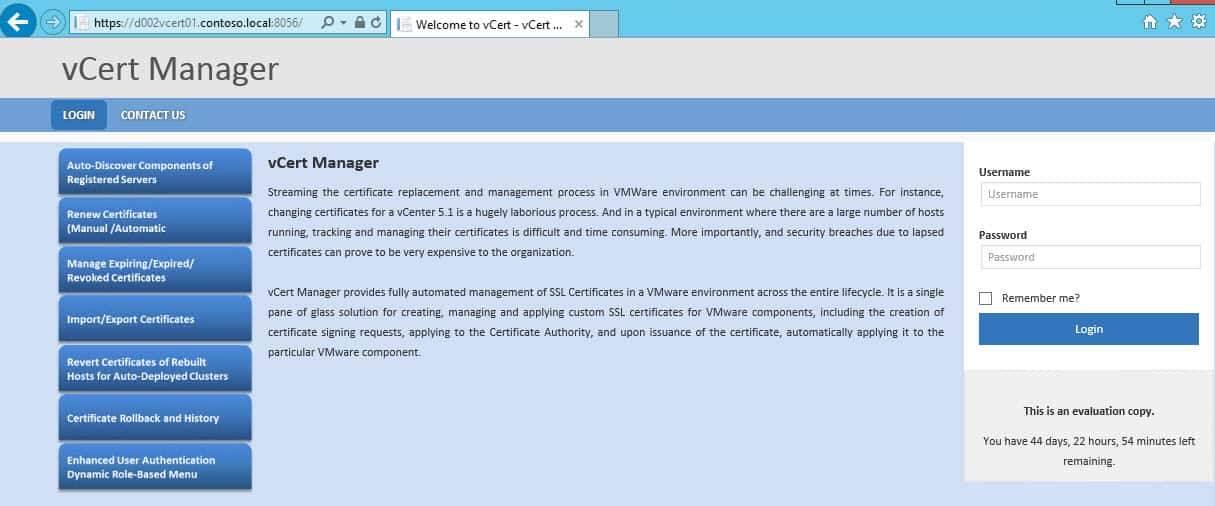
And there you go..vCert manager is now fully installed and secured via a trusted SSL certificate. In the next installment we will dive into the management interface and start replacing certificates.


How did you get this to work on IIS8. I followed your steps to a tee and failed. vCert Manager page loads but all I see is Login and Contact us. No login, no license agreement.
Windows 2012 R2, IIS 8, ASP.net 4.5
In the end I had to install IIS 7 express in order to get this to work.