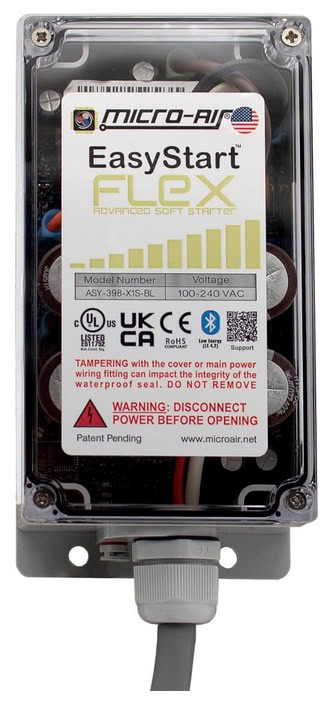
Very recently I purchased the Micro-Air EasyStart Flex and via ESPHome, got it connected to Home Assistant. What is the Micro-Air EasyStart Flex? It is an advanced and versatile soft starter, designed for all sizes of residential A/C units up to 6 tons (72,000 BTUs).
The EasyStart provides a controlled and gentle startup, reducing mechanical stress and extending the lifespan of your air conditioning system. It also dramatically reduces the startup compressor inrush current demands. This is great if you have a generator or solar power and want to run your A/C while grid power is down.
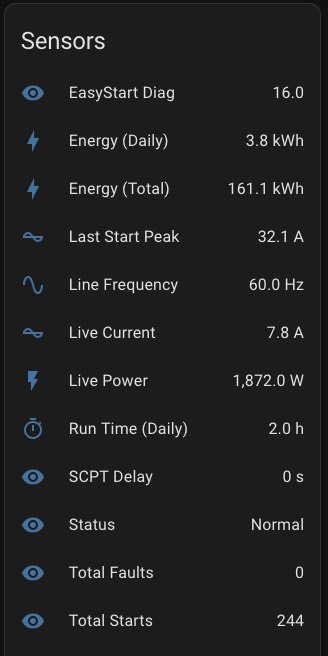
My A/C is rated for 112 LRA (locked rotor amps), as shown on the sticker on unit. This means up to 112 amps is needed to start the compressor. After the installation of the EasyStart the startup current inrush has been reduced to 32 amps. This is much more manageable by portable generators or solar batteries.
The Micro-Air EasyStart flex is designed for DIY installation, and is relatively straight forward to install. However, if you are not fully confident, hiring an electrician or HVAC specialist is strongly recommended. I was able to install it myself relatively quickly.
The Micro-Air EasyStart has built-in Bluetooth which broadcasts real-time telemetry such as power usage and any faults. We can use an ESP32 device to scan for the EasyStart Bluetooth signal and display the telemetry in Home Assistant. The Bluetooth radio seems exceptionally poorly designed with very short range. So your ESP32 may need to be within just a few feet of the EasyStart.
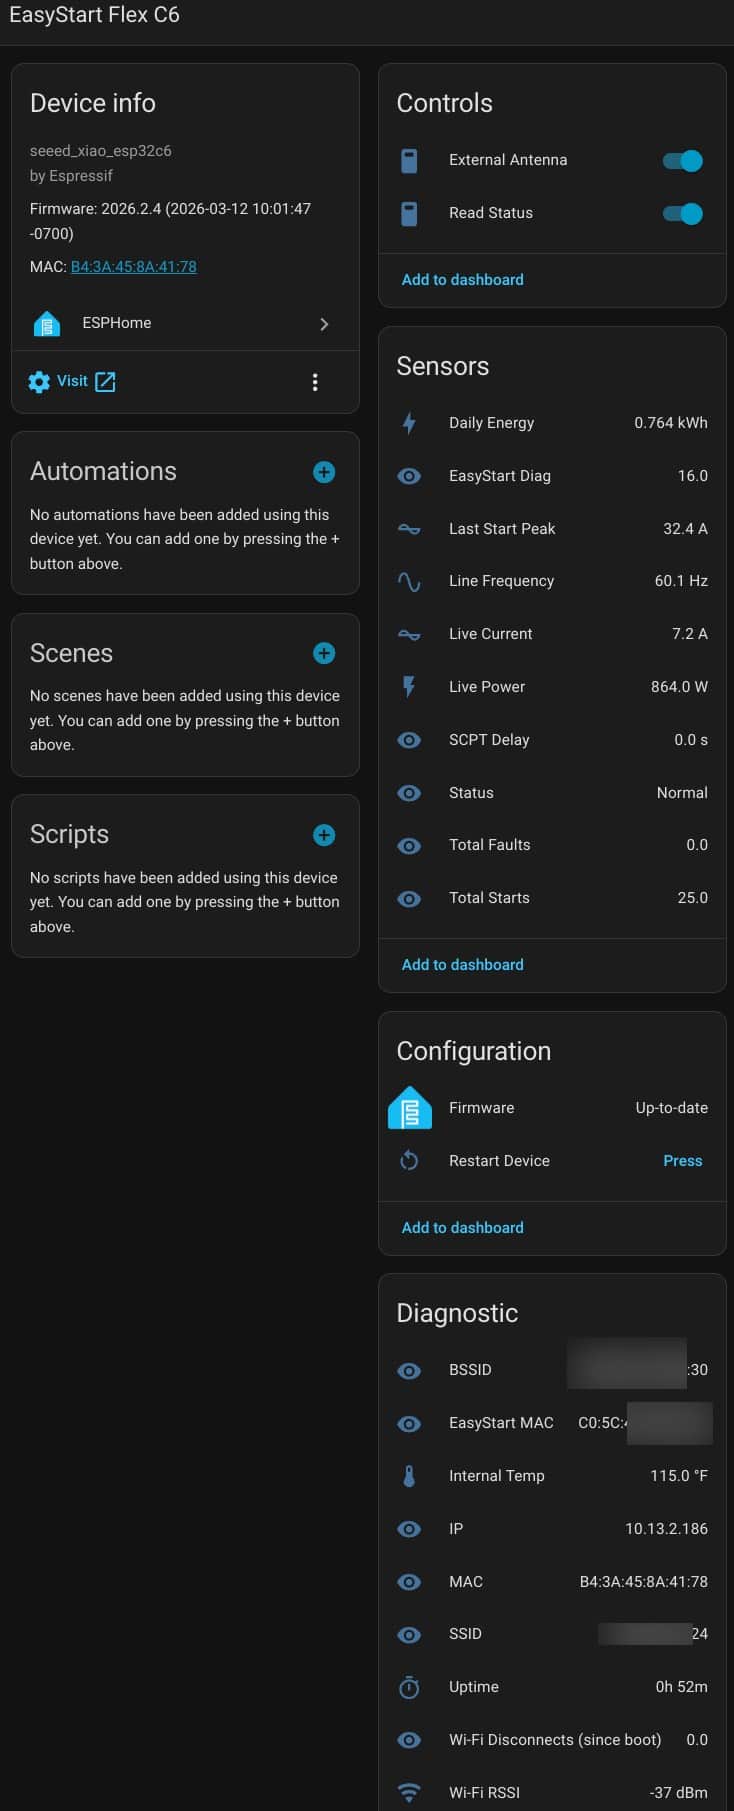
In terms of ESPHome sensors for the EasyStart Flex, their Bluetooth connection provides a number of real time sensors as you can see below. If you are deep into energy monitoring, then the Live Power, Energy (Daily) and Energy (Total) sensors will be of interest to you. This energy data can be used to populate the Home Assistant energy dashboard.
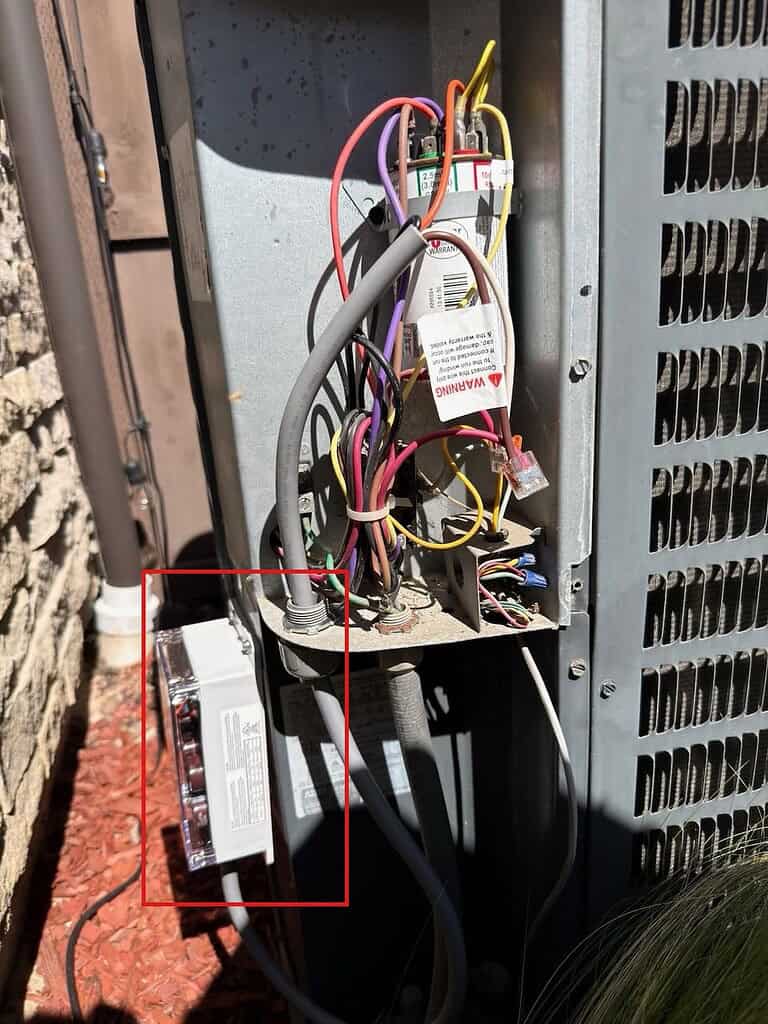
Micro-Air EasyStart Flex Installation
This post is mostly about the Micro-Air EasyStart ESPHome integration, not the physical installation. For a great installation guide, watch the video below. Micro-Air now also offers an “installation kit” SKU, which includes the needed connectors for most installs including Wago connectors and terminated spade connectors. I strongly recommend purchasing the kit version.
For my installation I used the follow parts:

Warning: Always exactly follow the Micro-Air installation instructions. If you are not 100% sure what you are doing, contact an HVAC specialist for installation. Always remove the breaker before opening the access panels on your A/C. The following steps are my interpretation of the Micro-Air instructions which worked for me. If in any doubt, trust Micro-Air instructions or your local HVAC professional. Use at your own risk.
High-level installation steps:
- Remove A/C breaker and verify A/C is de energized.
- Short the terminals on the capacitor with an insulated screwdriver to safely discharge.
- Decide where you want to mount your EasyStart. If needed, drill a hole and insert a grommet or liquid tight connector to protect the cable.
- Connect the EasyStart orange wire to the HERM terminal on the capacitor.
- Trace the Compressor wire (C) to the contactor block. Connect the EasyStart black wire to the same contactor block terminal as the C wire.
- Locate the Run (R) wire from the compressor that connects to the contactor block. 4–6 inches from where it terminates on the contactor block, cut the wire.
- Using the provided Wago connector, strip and connect the Run wire leading to the compressor to the EasyStart brown wire.
- Using the provided Wago connector, strip and connect the Run wire leading to the contactor block to the EasyStart white wire.
- Turn the breaker back on, and cycle your A/C six times to complete the learning process.
EasyStart ESPHome Setup
- In ESPHome Builder open the Secrets file and verify that wifi_ssid, wifi_password and wifi_captive are defined for your Wi-Fi network.
- Go over to my Micro-Air EasyStart Github repo. Go into the examples directory and download the applicable YAML file. Most will need the Micro-Air EasyStart base.yaml file. If you happen to have a Seeed Studio XIAO C3, C5, C6, or S3, use the applicable YAML file.
- In ESPHome Builder create a New Device.
- Click CONTINUE. Select New Device Setup. Enter a name such as EasyStart. Click NEXT.
- Select the applicable device type. Click SKIP on the Configuration created! screen.
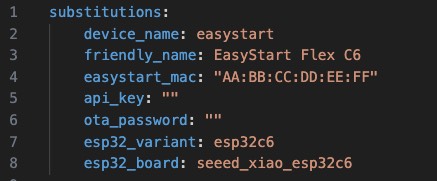
- Open the YAML and copy the board, API key and OTA password to the clipboard.
- Delete all of the automatically generated YAML and paste in the EasyStart YAML from the file you downloaded from my repo.
- At the top of the file in the substituations section, change all of the applicable variables. Modify the board, variant, OTA password, API key, and change the device/friendly names as you desire. Do NOT change the dummy easystart MAC address (we will do this later).
9. Flash your configuration to your ESP32 device and adopt the device in Home Assistant.
10. Position your ESP32 within a few feet of your EasyStart Flex and turn on your air conditioner.
11. Do not connect to the EasyStart using any Micro-Air mobile or desktop apps — only one BLE device can connect at a time.
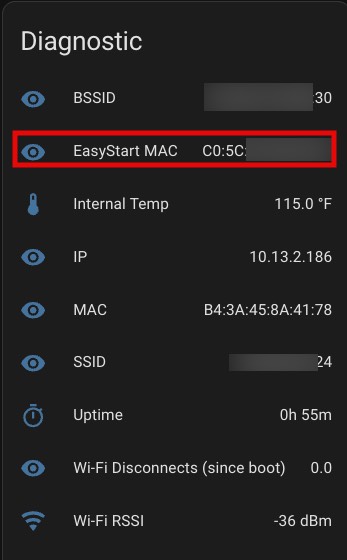
12. Wait a minute or two for the EasyStart MAC diagnostic sensor to populate in the Home Assistant device page. This sensor automatically detects any nearby EasyStart unit by its BLE advertisement name.
13. Copy the discovered MAC address, update the easystart_mac substitution in your YAML, and reflash the ESP32. The device will now auto-connect to your EasyStart on boot.
14. Power on your air conditioner and verify that sensor data is populated.
If all is functioning properly, the Sensors section for your ESP32 device should have real time data when your A/C unit is running. When the A/C is not running, several values such as Live Current and Live Power will show as zero. Because the ESP32 is set to constantly scan for an EasyStart device, when your A/C turns back on it should instantly reconnect and pull the live data. Similarly, the Read Status control should mirror the on/off status of your A/C in real time. Cycle your A/C to verify the Sensors are tracking data in real time.
Troubleshooting
During testing I noticed that the EasyStart changed its broadcasting BLE MAC address after a few hours. This happened when I was trying to connect to the EasyStart via the manufacturer’s (poor) apps.
If your sensors are no longer automatically updating when the air conditioner is on, verify the EasyStart MAC address in the Diagnostic section of the Home Assistant device page matches the value in your YAML. If not, update the YAML and re-flash.
In addition, the EasyStart only supports a single Bluetooth connection. If you install the (terrible) Micro-Air mobile apps, there will be a conflict and either your phone or ESP32 may fail to connect. Since my ESP32 package automatically detects the EasyStart MAC address and pulls the real time data, I would suggest not even installing the terrible Micro-Air mobile app.
For the best stability, I would suggest dedicating an ESP32 device to EasyStart. Due to limited memory, adding additional functionality like BLE proxy may result in instability or ESP32 boot crashes.
The Micro-Air mobile app does have some interesting features such as directly sending error logs to Micro-Air and adjusting EasyStart settings. If you want to use their mobile app, turn off your EasyStart ESP32 otherwise you will face constant connection issues. Once you close the mobile app, power your ESP32 back on.
Summary
The Micro-Air EasyStart Flex is a premium soft start device for your home’s A/C. Among the benefits are dramatically reducing the startup in-rush current (to support generator use), reducing startup noise, and extending the life of your air conditioner. By using the ESP32 package I built, you can place an ESP32 device near your A/C and in real time read telemetry such as power, startup in-rush current, and fault details. I built a generic ESP32 package that can be customized for nearly any BLE ESP32 device. I also included specific YAML files for the Seeed Studio XIAO C3, C5, C6 and S3 boards. Energy entities are defined so you can pull your EasyStart into the Home Assistant energy dashboard.
A special thanks to “Keen-coffee” for decoding the EasyStart Bluetooth data, upon which this package is based.