For a number of years now Nutanix has offered a ‘community edition’ of our AOS and Prism Central software suite. The community edition closely resembles the enterprise versions, but is packaged in a way to allow it to install on commodity hardware, or in a nested virtualization environment. It’s also free, but does require a Nutanix account for registration.
In this blog post we will install Nutanix Community Edition CE-2020.09.16 on a Sphere 7.0 U2 host, then install Prism Central. Please note that you can’t use the enterprise version of Prism Central to manage a CE host. You must use the CE edition of Prism Central.
My physical ESXi host is pretty beefy, but you don’t need anything even close to try out Community Edition. My host is:
Dell Precision 7920 Tower
48 pCores
384GB RAM
5TB of NVMe storage
ESXi 7.0 U2 with vCenter
Downloading the ISO Installer
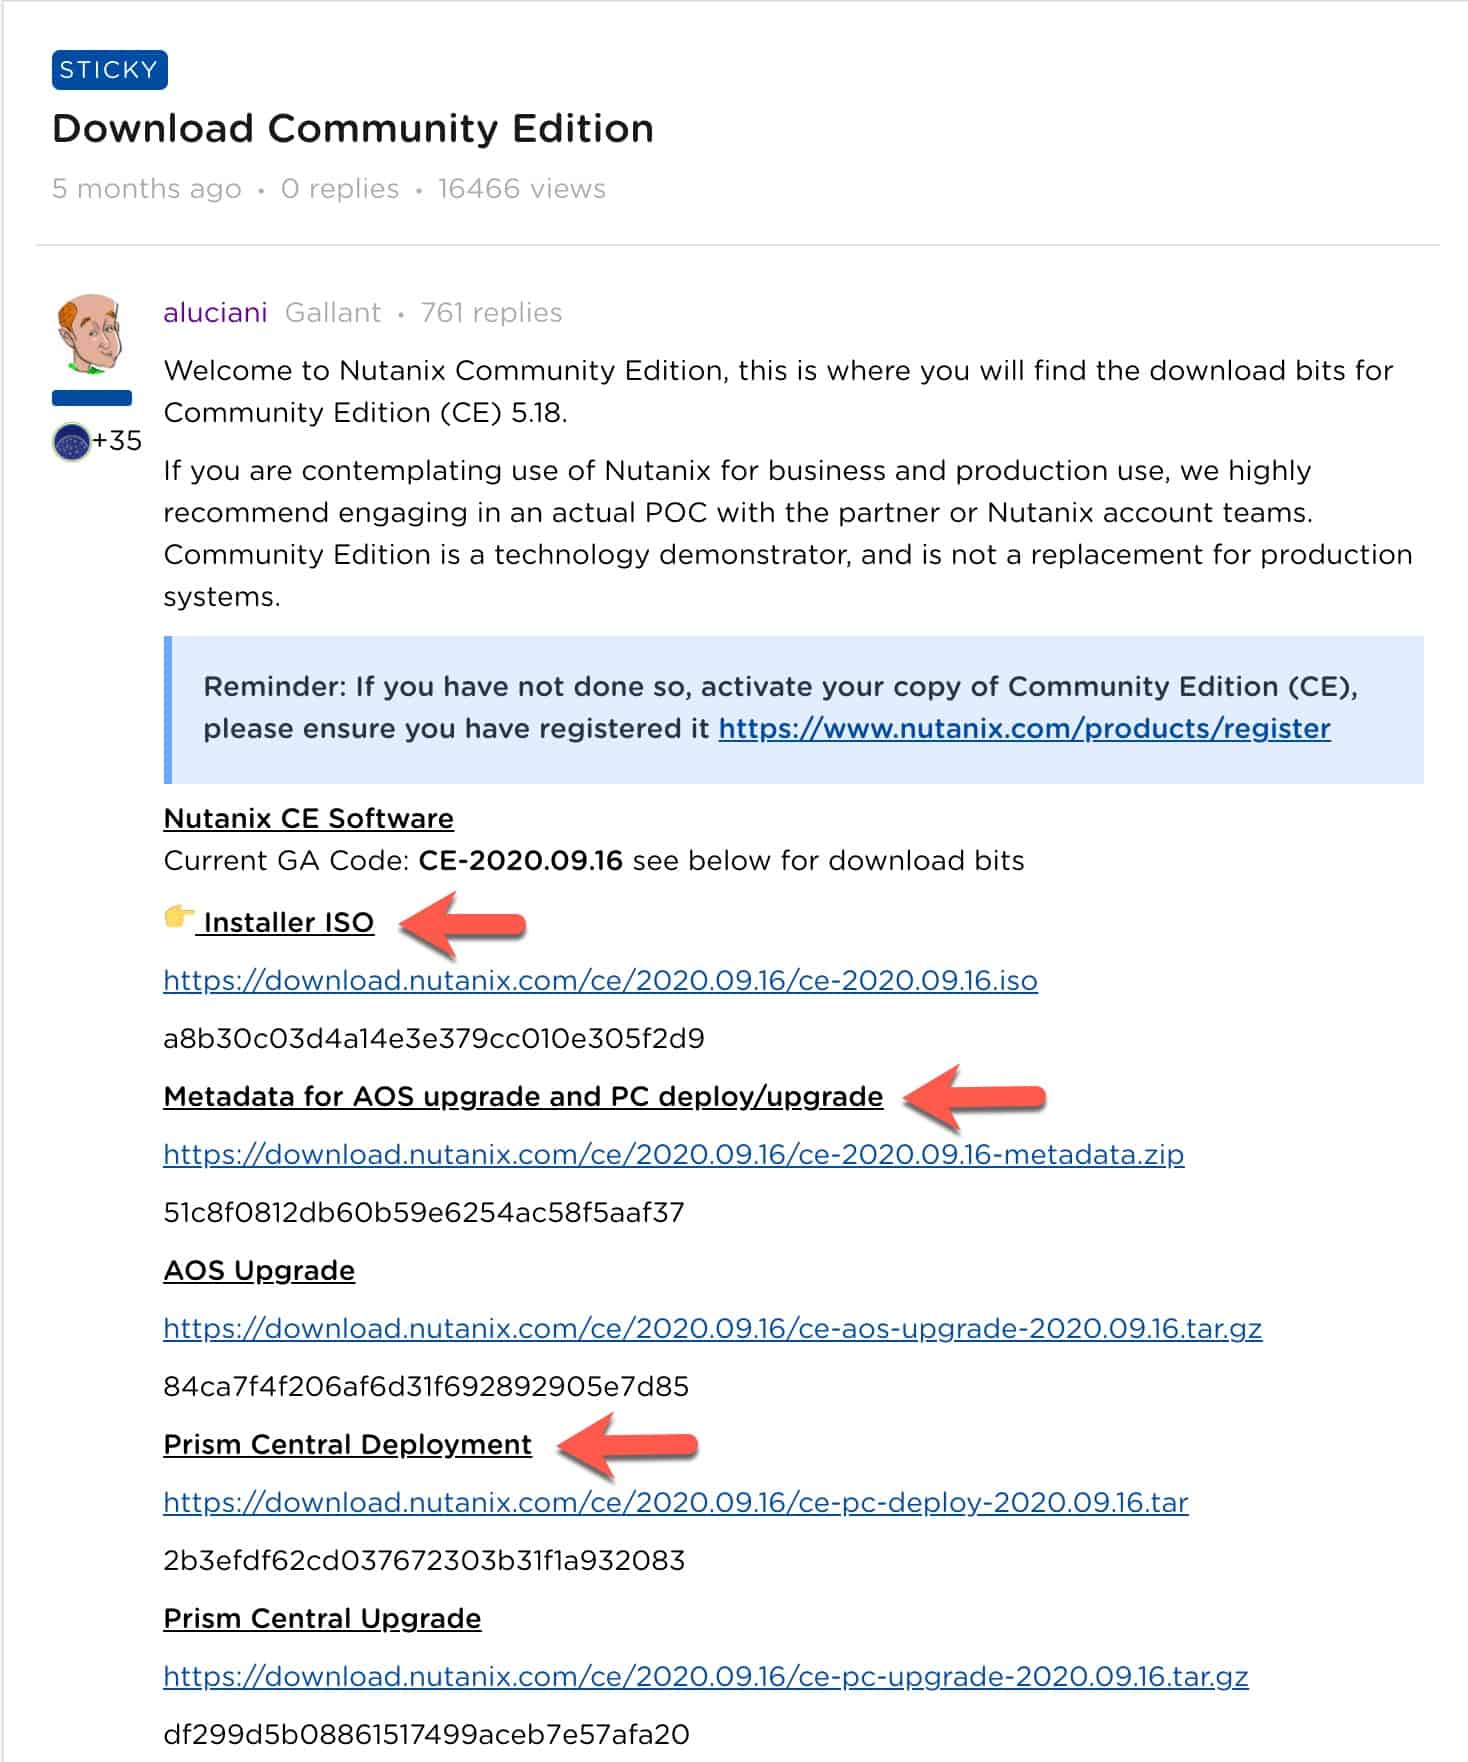
To download Nutanix Community Edition, mosey on over to the Download Community Edition page and login. Download the ISO installer, the metadata file, and the Prism Central tar file. The last two downloads will be used in a subsequent blog post on installing PC.
Creating the Nutanix CE VM
Open vCenter and start the New Virtual Machine wizard.
Select: Create a new virtual machine
Input the VM’s name: (e.g. Nutanix-CE-AOS)
Pick the VM’s location/folder
Select the compute resource
Select the datastore
Select the compatibility level (e.g. ESXi 7.0 U2 and later)
Select the Linux / CentOS 7 (64-bit) guest OS
Change the CPU count to 4.
Expand CPU settings and check the box next to Expose hardware assisted virtualization to the guest OS.
Change the memory to at least 22GB (if not more, I’m using 32GB).
Reconfigure the New Hard disk: 16GB, Thin Provision, New SATA Controller, SATA(0:1) New Hard disk.
13. Add another hard disk, but use 200GB, and use SATA(0:2). Thin provision as well. 14. Add a third and final disk of 500GB, and use SATA(0:3), with thin provisioning. 15. Select the proper network/port group for the VM. 16. Change the CD/DVD drive to Datastore ISO, select the CE ISO, and tick Connect at Power On.
17. Close the VM wizard, power on the CE VM, and open a VM console.
Installing Nutanix CE
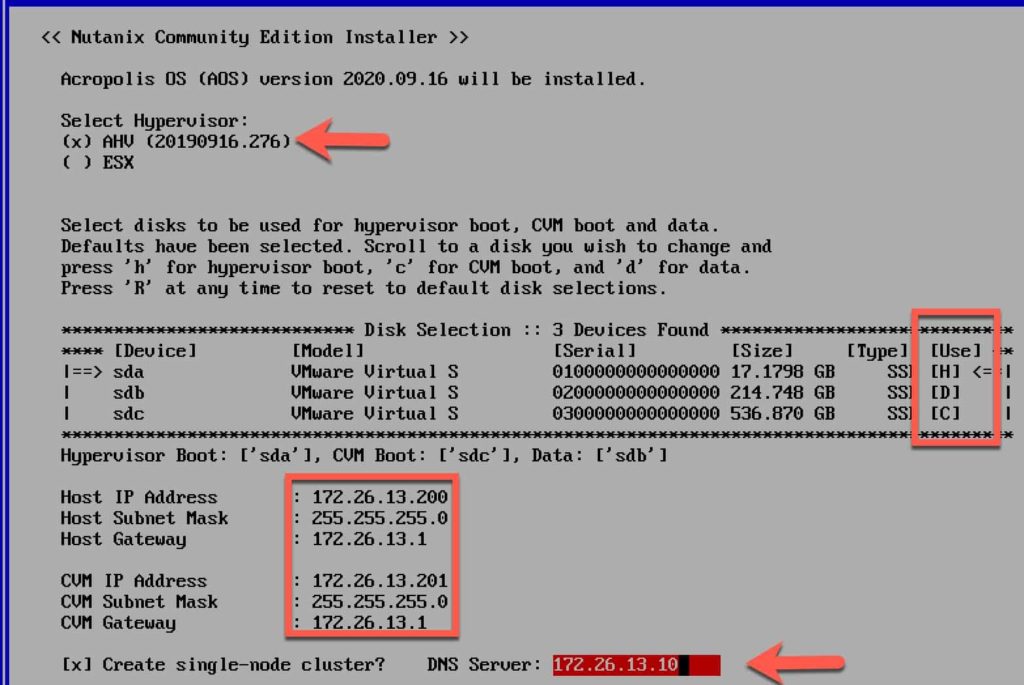
Wait for the CE installer to boot. You should see the screen below.
2. On this screen, review the following:
16GB (Boot), 200GB (Data), 500GB (CVM)
Enter Host IP address, subnet mask, gateway
Enter CVM IP address, subnet mask, gateway
Check the single-node cluster box
Enter the DNS server
3. Press Enter on Next Page. 4. Hold the down arrow down until you scroll to the end of the EULA. 5. Press Enter then press the space bar to accept the EULA. 6. Arrow over to Start and press enter. 7. Wait a little while until the installer finishes. It will prompt you to unplug the virtual media. Go into vCenter and disconnect the DVD drive. 8. Press Y to reboot the VM.
Validating the Nutanix Cluster Status
SSH into the CVM IP address, using these credentials: -Username: nutanix -Password: nutanix/4u
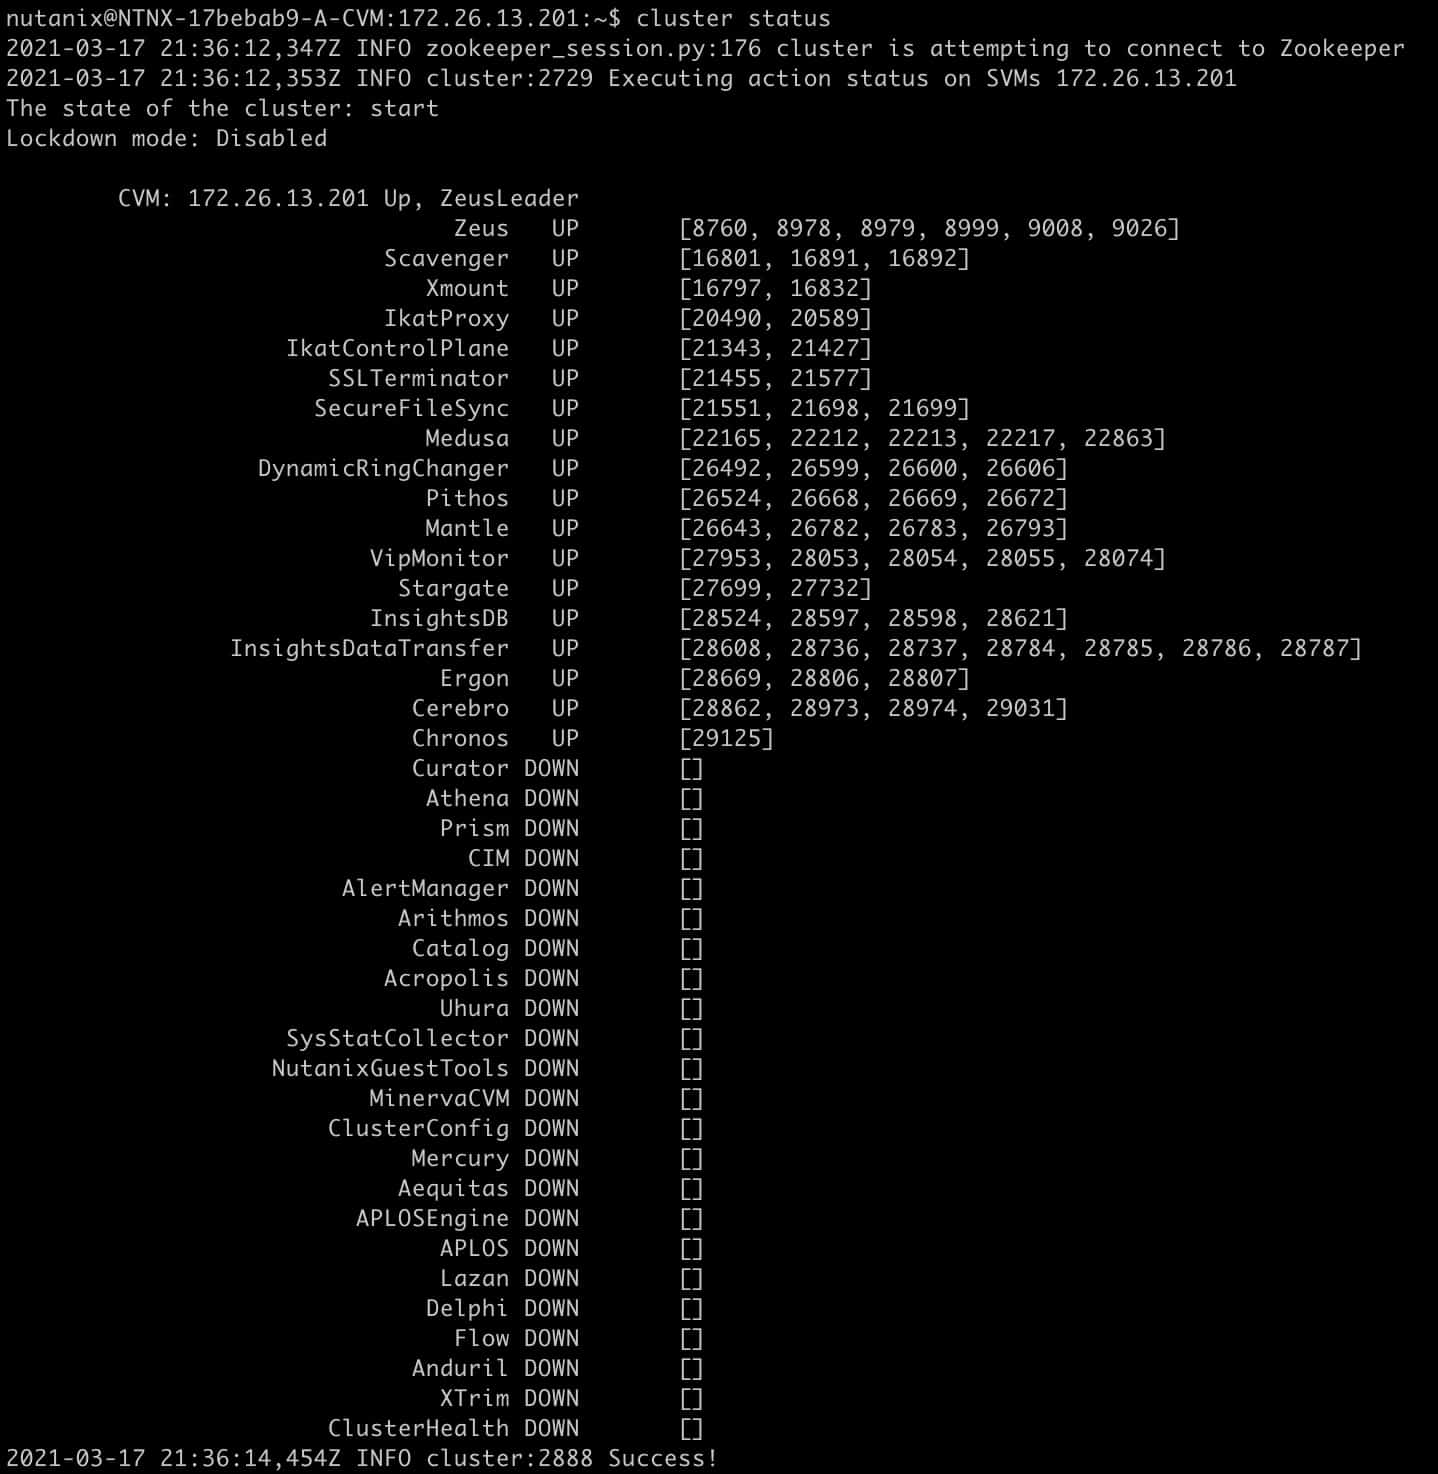
Type the following command to see the status of your cluster:
cluster status
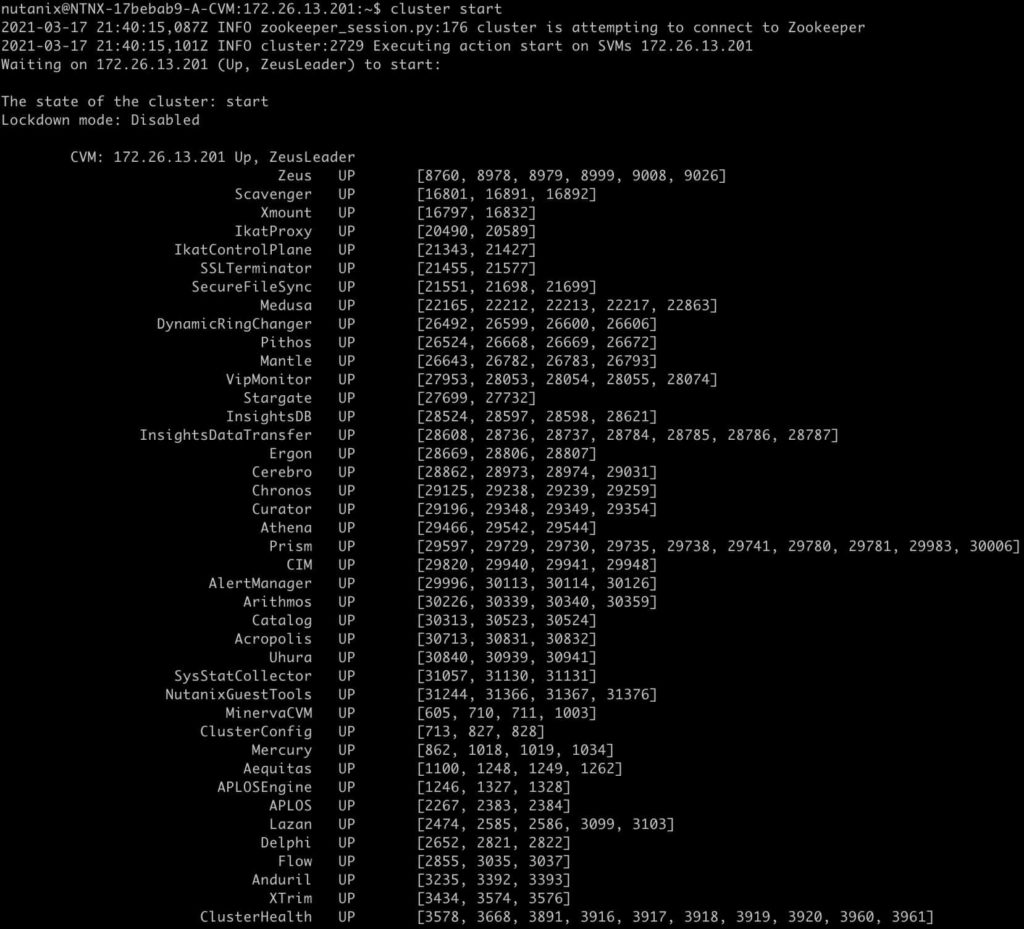
3. In my case some services were ‘down’, so let’s start all cluster services:
cluster start
4. Validate that all services are now started.
Login to Prism
Open your favorite browser and go to this URL: https://<CVP IP>:9440
Ignore any certificate errors, and use the following credentials: -Username: admin -Password: nutanix/4u
Enter a new very complex password when prompted.
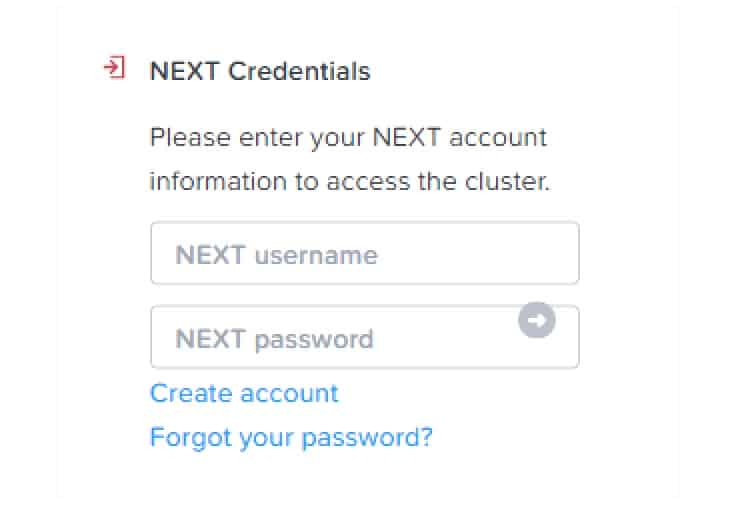
4. When prompted for your NEXT Credentials, enter your Nutanix portal credentials.
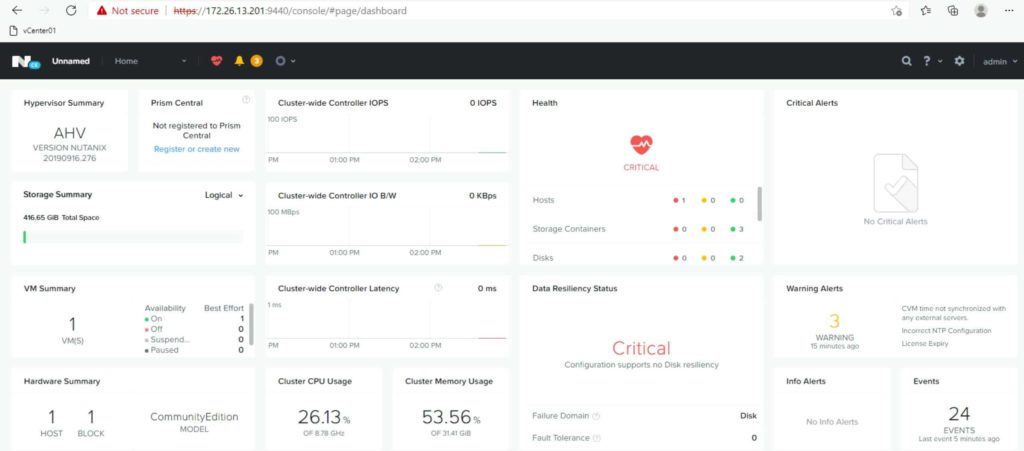
5. Once logged in you should see the familiar Prism interface.
Installing VMware Tools
To make life a bit easier with a nested AOS VM, let’s install the open VM tools.
SSH into the AHV host (not the CVM) using these credentials: -Username: root -Password: nutanix/4u
Enter the following commands to install the open VM tools
Installing Nutanix Community Edition with AHV on top of VMware vSphere is a pretty straight forward process. CE closely mirrors the feature set of the enterprise version, so it’s a great way to use it at home. Next up will be how to install and configure Prism Central, community edition.
I am able to get to the Nutanix community edition installer screen where the AHV option is marked with an x but it wont allow for input. Any ideas as to why im unable to tab or enter through the screens or add networking information for that matter


Nice!
I am able to get to the Nutanix community edition installer screen where the AHV option is marked with an x but it wont allow for input. Any ideas as to why im unable to tab or enter through the screens or add networking information for that matter
can we make a cluster for 3 or more nodes using community edition
I’m new to Nutanix and the community and was trying to deploy Nutanix CE by i have this error. anyone can help me please ?
thanks a lot, this was very helpful.
open-vm-tools wont install any more – the new version of CE does not come with any enabled yum repos.