If you are a Cisco UCS customer and want to install Windows on a physical server, you will quickly realize not all of the needed drivers are baked into Windows. While Cisco does provide small ISO files for various drivers you can mount during the installation process, it requires manual intervention. The process below allows you to integrate the critical drivers (storage, network) into your Windows Server 2008 R2 image for a more seamless installation experience.
The process is basically the same as I described for injecting VMware drivers into your Windows media, which I wrote about here.
1) You will need to download and install the Windows Automated Installation Kit (WAIK). The Windows 7 WAIK fully supports Windows Server 2008 R2. You don’t need the SP1 supplement for just injecting drivers, so don’t bother downloading it. Be sure to use a 64-bit OS to modify the Windows Server 2008 R2 images on.
2) Perform a default installation of WAIK. After the installation is complete, launch the Deployment Tools command prompt.
3) Mount the ISO image of Windows Server 2008 R2. Navigate to the Sources directory and copy boot.wim to your computer, say on the D: drive. Copy install.wim to the same location.
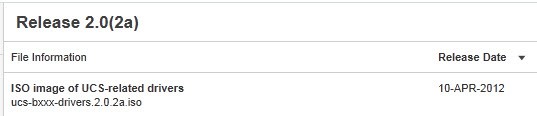
4) Login to the Cisco support site and download the latest version of the UCS B series drivers.
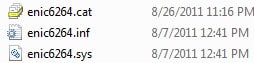
5) Mount the UCS drivers ISO image and drill down to the Windows directory. Depending on what hardware you have purchased, you may want more or fewer drivers in your image. Probably the most common CNAs (converged network adapters) are the Cisco 1280, M81KR and MLOM. Thankfully all of them use the same driver, so less work for us! Create a folder called D:1280N and drill down to the directory WindowsNetworkCisco1280W2K8R2x64 on the UCS drivers disc and copy the following files:
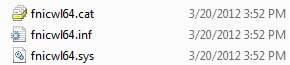
6) Create a folder called D:1280S and drill down to the directory WindowsStorageCisco1280W2K8R2x64 on the UCS drivers disc and copy the following files:
7) If you are using local storage on the UCS blades, then you will also want to grab the LSI storage drivers as well. I recommend you inject all of the LSI drivers, since various blades use different controllers and to make sure all bases are covered, put them all in. The three drivers are 2×08, 1064E and 2004. Repeat the same process as above, creating directories on the D: drive for each model and copying all of the files, except for the small ISOs.
8) If you are using any non-Cisco devices like Emulex, QLogic or Intel adapters, repeat the process for those devices as well. Now that you have all the drivers nicely organized on your D: drive it’s time to mount the WIMs and inject the drivers.
9) Create a folder on the D: drive called
Mount.
10) In the deployment tool command prompt type:
dism /get-wiminfo /wimfile:d:boot.wim
And look at the index numbers. This is key! You must select index 2, the Windows setup image. If you inject the drivers into index 1, the Windows setup routine will NOT see them and you will be banging your head against the wall.
11) In the deployment tool command prompt type:
dism /Mount-Wim /WimFile:D:boot.wim /Index:2 /MountDir:D:mount
12) You should see an operation successful if the image mounted properly. In the deployment tool command prompt type:
dism /image:D:mount /Add-Driver /driver:d:1280Nenic6264.inf
dism /image:D:mount /Add-Driver /driver:d:1280Sfnicwl64.inf
You should see an operation successful if the driver was injected properly.
13) Repeat the process for any LSI and other drivers. The LSI drivers have two .inf files, both of which I would inject using the DISM command above. After you have injected all of the drivers you want, we need to commit the changes:
dism /unmount-wim /mountdir:d:mount /commit
14) Repeat the entire process for the install.wim file as well, so Windows has the drivers when it installs and boots for the first time. Depending on the version of your install.wim file, it may contain numerous WIMs, such as for standard edition, enterprise edition, core, etc. Pick the edition you want to inject the drivers into, and use the same steps above. Unfortunately each image is separate, so if you want the drivers for say standard and enterprise edition you will need to mount each image and do the full driver injection procedure.
15) Create a backup of your OS ISO file, and then use your favorite ISO editing tool (such as UltraISO) and replace the boot.wim and install.wim files in the Sources directory with your modified versions.
This procedure will not modify the Windows Recovery Environment, but don’t fear, I wrote a blog on how to modify that WIM as well. You can find that procedure
here. Again, inject all of the same drivers you did in the previous steps.
Now you can mount your modified ISO via the UCS virtual media, or you could burn a physical DVD and mount via a physical USB DVD drive and install your OS. The UCS drivers disc also has Intel Chipset drivers, which I would manually install after Windows is installed.


I thought UCS had some kind of assistant like the old HP SmartStart that would help with these kind of things, no?