When you install the Citrix NetScaler it comes with a self-signed certificate which is bound to the management IP interface for the purposes of encrypting management traffic. However, using self-signed certificates are not recommended in anything but a lab environment. So that means you need to install and configure the NetScaler to use a new certificate for all management traffic. Thankfully Citrix has made this super easy! These steps were performed on NetScaler v9.3, other versions may slightly vary.
Here’s how!
1. Create a trusted SSL certificate and upload it to the NetScaler. The certificate should be for the FQDN that you want to use for the NetScaler management interface, not any of your Vservers. To do that follow my blog article here.
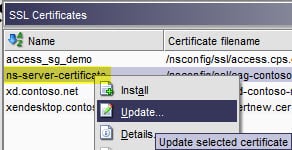
2. In the NetScaler GUI interface navigate to the Certificates folder under SSL, right click on ns-server-certificate and verify that it is bound to several interfaces. The bindings indicate that the certificate is in use, which is good.

3. Right click on ns-server-certificate and select Update.

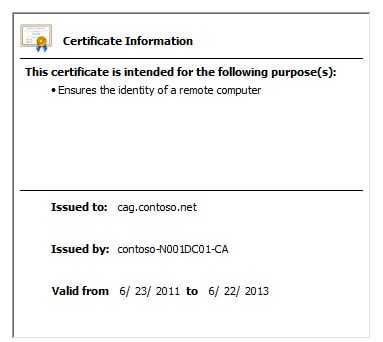
5. Close out the NetScaler management interface and reconnect via HTTPS. Open the certificate properties in your browser and verify that the trusted certificate is being used.