As I mentioned in yesterday’s blog post, any enterprise VDI deployment needs redundant broker services for high availability. Other enterprise applications such as Exchange, Lync, and SharePoint can all benefit from a load balancer, be it virtual or physical. Building on yesterday’s post about configuring SSL on the NetScaler, it’s now time to configure load balancing for the XenDesktop DDCs and Web Interfaces.
I’m making a few assumptions here. First, you already have XenDesktop 5 installed and functioning in your environment, hopefully with redundant WI and DDC servers. Second, you’ve configured the WI servers for SSL. Third, you’ve already deployed the NetScaler and using at least version 9.3. Fourth, you’ve installed a SSL certificates on the NetScaler for the DNS names you’ve assigned to your WI and DDC virtual IPs.
Environment:
XenDesktop combo DDC/WI: 192.168.0.200 and 192.168.0.201
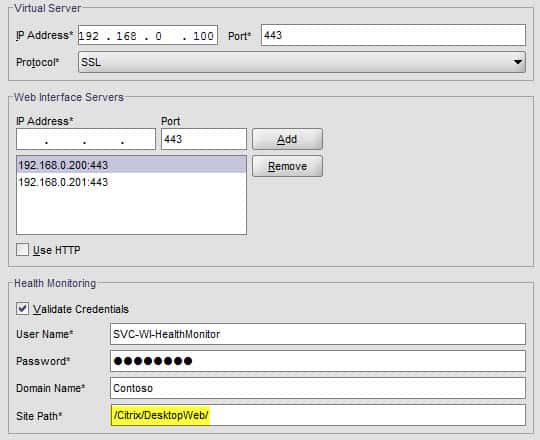
Web Interface virtual IP: 192.168.0.100
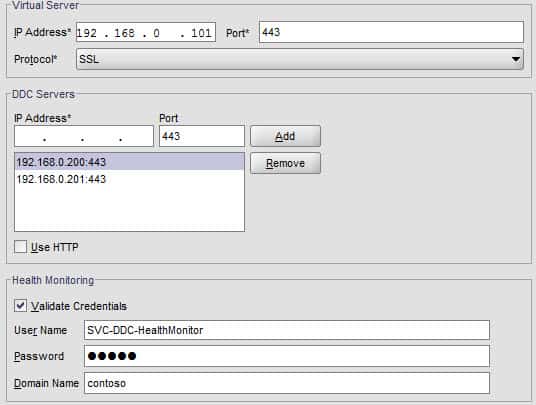
DDC virtual IP: 192.168.0.101
1. Download the Citrix AppExpert template for the Citrix Web Interface here.
2. In the NetScaler open the AppExpert folder, right click on Templates and select Manage Templates.
3. Click on the Upload button and locate the XML file you downloaded in step one.
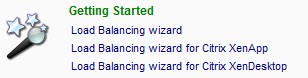
4. After the template imports click on Load Balancing in the NetScaler GUI. You should now see two new wizards under Getting Started.
5. Start the XenDesktop wizard and enter the appropriate information in the WI server wizard screen. The IP addresses are pretty self explanatory. I would recommend configuring a health monitoring service account. This will allow the NetScaler to actively attempt to authenticate to ensure the WI is actually functional. One critical change you need to make to the form is the site path. You MUST remove site/default.aspx, as shown below.
6. For the DDC configuration page it’s pretty clear what you need to input. Remember you will need to use a unique IP address for the DDC virtual server. And again, I’d configure a service account for health monitoring. You could use the same account or a different one.
7. Close the wizard and if everything is correct, it will create the virtual servers, service groups, monitors, and servers for you. It is very likely though that the WI monitor will show a down status, while the DDC monitor may show as UP. If that happens, it’s probably an SSL issue which we can easily resolve.
8. Open the WI virtual server and see if you see the error below, certkey not bound, you are in luck as this is an easy fix.

9. Click on the SSL Settings tab and select the appropriate WI SSL certificate that you either created from my blog yesterday if you are just testing, or your real one if this is a production deployment. Click on Add to move it to the configured column.

10. Close the window and now your WI State should be UP and 100% health.
11. Repeat the SSL assignment exercise for the DDC monitor using another certificate which matches the DDC DNS name you chose earlier.

Next up, open your browser and go to the FQDN for both virtual servers and verify that the XenDesktop login screen appears with no SSL warnings. If so, you’ve now created two VIPs for load balancing critical XenDesktop services and enabled health monitoring. High availability baby!


