With the large amount of digital data that people consider important, safeguarding your critical data against catastrophic loss is more important than ever. Whether it’s a natural disaster, hardware failure, or a cyberattack, the potential for data loss is large. Protecting precious photos, financial documents and other personal or business data is extremely important.
Implementing a robust disaster recovery plan with a layered backup strategy is essential to ensure your information remains secure and recoverable. In this blog post I cover the 3-2-1-1 backup strategy using local and cloud-based technologies. I detail backup strategies for your personal computer, Proxmox servers, Home Assistant, WordPress sites, and your NAS.
With the 3-2-1-1 technique you can protect your vital data from unforeseen events, providing peace of mind and business continuity in the face of disaster.
3-2-1-1 Backup Strategy
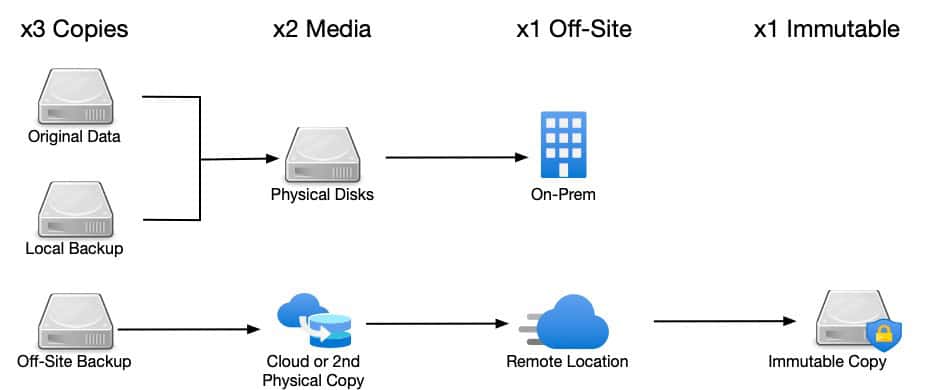
The 3-2-1-1 backup strategy is a well-known method for ensuring data backup and recovery. It is designed to protect data by minimizing the risk of data loss. Here’s how it works:
3 Copies of Your Data: Have at least three total copies of your data. This includes the original data and at least two backups. The idea is to have multiple copies so that if one is lost or corrupted, others are still available.
2 Different Media Types: Store the copies on at least two different types of media. For example, you might use an external hard drive and cloud storage. This diversification reduces the risk of data loss due to media failure. More media types could be even better.
1 Off-site Copy: Keep at least one copy of the data offsite. This could be in the cloud or at a physical location different from where the original data is stored. This protects against local disasters such as fires, floods, or theft that could destroy all local copies.
1 Immutable Copy: As an optional step I suggest considering adding at least one immutable copy. An immutable copy means the storage device make it a read-only copy for a certain period of time, say 30 days. This helps protect you against ransomware attacks which sometimes try and overwrite backup copies. Some cloud providers have this feature, as well as select consumer grade NAS devices.
By following the 3-2-1-1 backup strategy, you can significantly enhance your data protection and ensure that you have reliable backups in place to recover from various types of data loss scenarios.
MacBook Pro Backups
My primary computer is my Apple MacBook Pro. Nearly all of my ‘precious’ data is located on Apple’s iCloud drive and I’ve enabled advanced data protection. This means that nearly all of my data is encrypted at rest on the iCloud servers and Apple does not have access to the decryption key. iCloud drive NOT a backup!
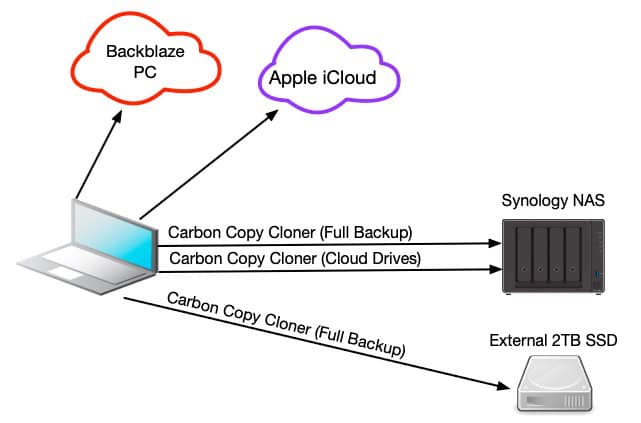
For backing up my MacBook Pro I use two products: Backblaze Personal and Carbon Copy Cloner. Backblaze Personal performs backups of my Mac to the cloud continuously in the background and has a 30 day retention period. This ensures I have a current backup whether I am at home or on the road.
For backups when I’m at home I rely on Carbon Copy Cloner to make various backups to my Synology NAS. I have three CCC jobs that run daily:
- macOS Full backup (USB-C SSD): I have a 2TB Western Digital SSD which runs a full backup every 12 hours. A number of CCC snapshots are stored on the drive, allowing fast point in time recovery.
- macos Full Backup (Synology NAS): Performs a full macOS backup to a dedicated Synology file share every night when I’m sleeping.
- All cloud drives (Synology NAS): CCC has a feature which intelligently backups iCloud drive, Google Drive, Dropbox, OneDrive, Box and other providers. This job runs every four hours and uses a dedicated Synology file share. It can also temporarily download cloud only files to ensure a full cloud drive backup, even if they aren’t all replicated to your Mac.
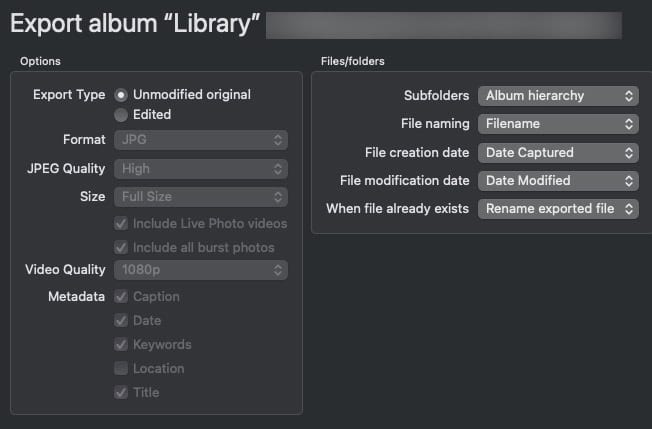
Not shown on the diagram are my periodic, but manual, iCloud Photo exports from PowerPhotos to my Synology NAS. This exports all of my iCloud photos in their original format with all metadata.
WordPress Backups
My blog runs on WordPress and is managed by Gridpane. Gridpane has a built in backup feature which enables both local and cloud backups. For cloud backups I have a dedicated Backblaze B2 bucket set as the target.
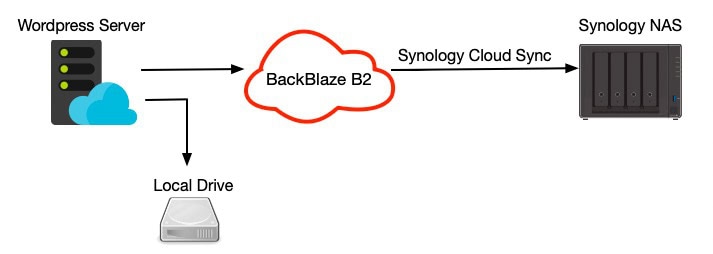
Each night an automated backup job runs that makes both a local and Backblaze B2 backup. On my Synology I use the Cloud Sync app to automatically sync the Backblaze B2 bucket with a Synology shared folder. Not shown on the diagram is my quarterly manual export/backup of my blog. This is a gz archive which I also store on my Synology.
Proxmox VE LXC and VM Backups
For my home lab, I run quite a number of services all hosted on two Proxmox 9.0 hosts. This ranges from Plex, Home Assistant, Influx DB, Kasm, Tailscale, etc. Most are LXCs, but a few are full VMs.
As shown in the diagram below, I have two local Synology NAS systems, each hosting a Proxmox Backup Server 4.0 VM. These PBS VMs have a virtual disk provisioned to them through the Synology VM interface for the backup datastore. No NFS or iSCSI LUN is used for the datastore. PBS VMs are very efficient so even the fairly underpowered CPUs on Synology NASes are sufficient for good backup speeds.
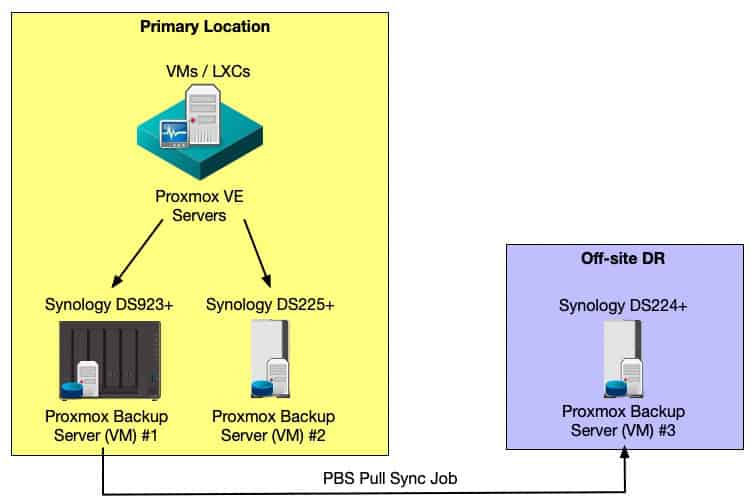
Each day I have backup jobs which backup all the VMs and LXCs running on my Proxmox VE 9.0 hosts to both local PBS instances. This way, if one of the NAS devices becomes unavailable for any reason, I still have a fully functional PBS system on the other NAS which I can continue to use as a backup target, or perform restores.
Off-site I have another Synology NAS, which is also running a small PBS VM instance. From my Synology DS923+ PBS instance I have a PBS “pull sync job” which replicates the local datastore to the remote PBS instance. Should my primary residence suffer a catastrophic loss, all of my LXCs and VMs could be restored from the remote PBS instance.
I specifically used the “pull sync job” for resilience and security reasons. What do I mean? By configuring a ‘pull’ job, my primary PBS server at my house does NOT contain the credentials for my remote PBS instance. If an attacker gained access to my local PBS instance, they would have to hack my remote PBS instance instead of just simply grabbing locally stored credentials. Of course all PBS instances use unique credentials, use 2FA, and fully patched.
Home Assistant Backups
I’m a big Home Assistant fan, and have been using it for several years as my smart home automation hub. As such, I’ve spent countless hours configuring and customizing it. If I had to rebuild it from scratch it would be an overwhelming proposition. So I go to great lengths to make sure my Home Assistant backups are stored in multiple locations.
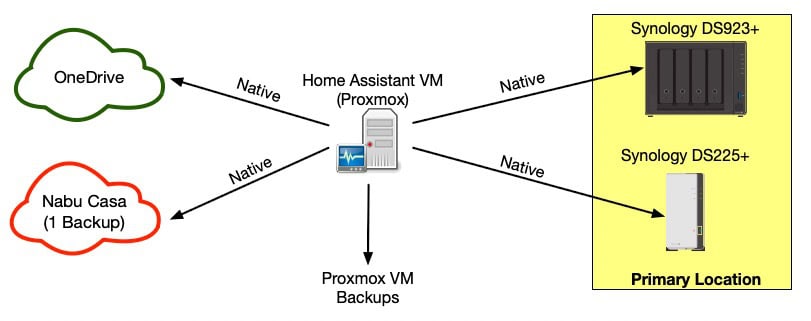
First, Home Assistant is a VM on a Proxmox host, so the backup strategy discussed above for on-site and off-site backups apply. The VM-level backup gives me three copies: Two local, one remote. However, in addition to whole VM backups, I also leverage HA’s native backup feature for additional peace of mind.
Each night I have a full native (built-in) HA backup sent to: OneDrive, Nabu Casa, and both of my local Synology NASes. All backup targets, except Nabu Casa, retain the last 30 backups. Nabu Casa is limited to 5GB of storage, so that just holds one copy.
Between all of these backup methods, I have backups stored in four locations: On-site (four copies – 3 different media), 1 remote on another Synology (via PBS push sync job), and two commercial cloud providers. Four copies are native HA backups, and three copies are of the full VM. Unless there’s a nuclear war, I’m pretty confident at least one of the seven copies can survive most any peril.
As an additional layer of protection, the file shares on all of my Synology servers have immutable share snapshots enabled. This adds yet another layer of protection to my backup data.
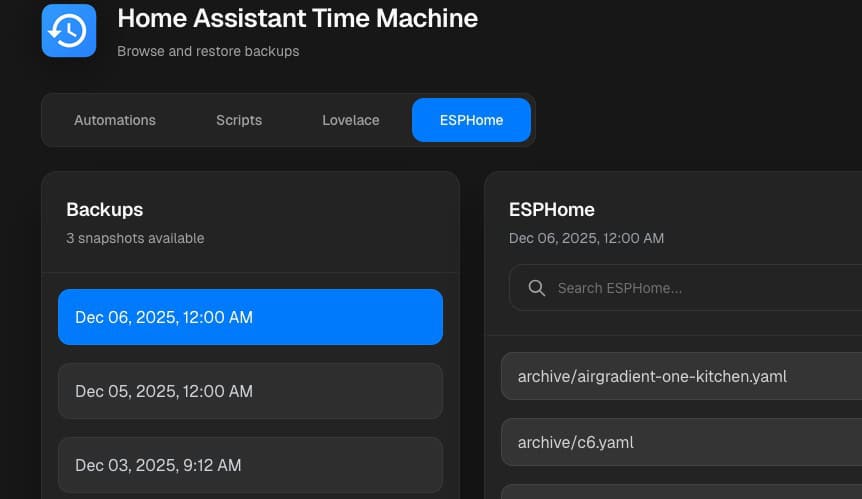
Home Assistant Time Machine
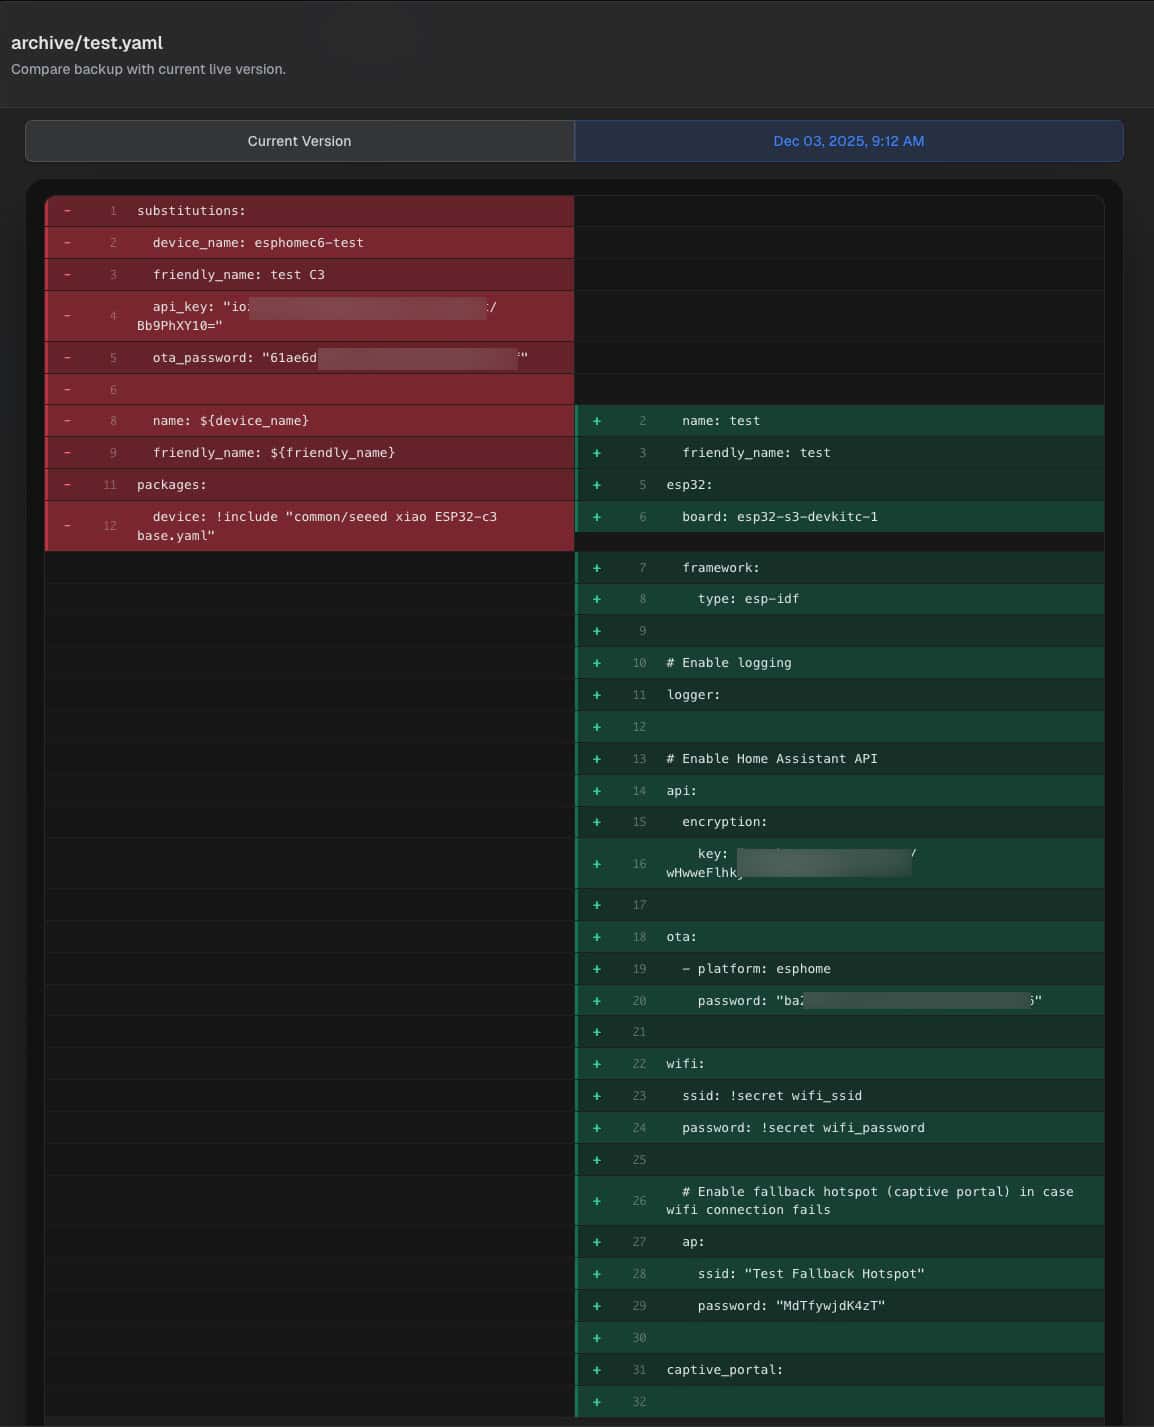
Home Assistant Time Machine is an amazing item-level backup, diff, and restore HACS module. It supports a variety of object types such as automations, scripts, lovelace (dashboards) and ESPHome configurations. It will take daily snapshots, then you can easily browse previous backups and even do instant diffs between your production version and a prior version. Best of all? One click restore. Great for those “oopsie” moments.
Synology NAS Backups
I recently refreshed my local Synology NAS devices, as my DS918+ was getting old and lacked some features like immutable snapshots and full disk encryption. I upgraded my primary NAS to a Synology DS923+, and also purchased a baby DS225+ as a local DR target. I also purchased a DS224+ as a remote DR target for my most critical data.
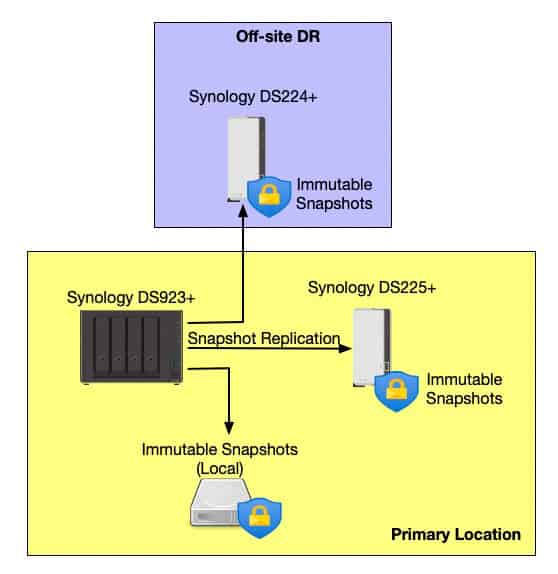
For both my local and remote DR targets I used the built-in Synology Snapshot Replication utility. This runs nightly and replicates my data from my primary NAS to my secondary local NAS and my remote DR NAS. On all three NASes I have immutable snapshots enabled for all file shares.
Between my local primary NAS and remote NAS I use Tailscale, so that I don’t need to open any remote firewall ports, and everything is fully encrypted. Tailscale automatically starts when the NAS boots, which has been very solid. Throughput is also very good.
File Share Snapshots
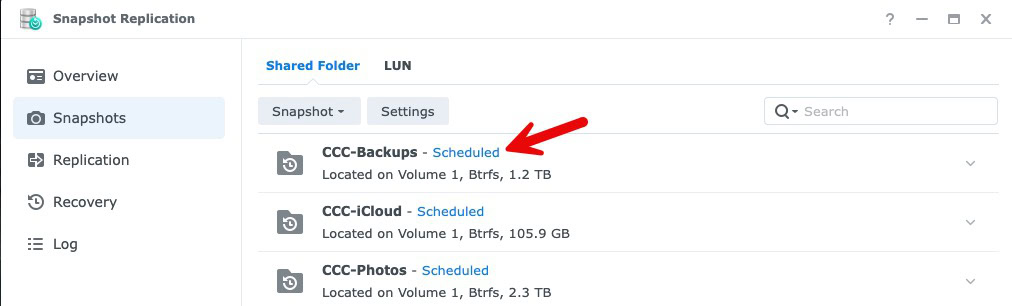
Also in the Snapshot and Replication is a feature that enables local snapshots. File share snapshots are critical, as it lets you quickly and easily restore from logical issues with your data, such as ransomware, data corruption, or accidental data deletion.
For every single share I create I always configure scheduled snapshots. Frequency and retention period depends on the criticality of the data. Since all of my NASes support immutable snapshots, I’ve configured this for each file share.
Backblaze
Backblaze Personal Backups
Backblaze offers a straightforward and effective solution for backing up personal computers, providing users with peace of mind through automatic and continuous data protection. Here’s an overview of what Backblaze Personal Backup offers:
1. Unlimited Backup: Backblaze Personal Backup provides unlimited storage for your data, meaning you can backup all your locally stored files without worrying about exceeding a storage limit. This includes documents, photos, music, movies, and more.
2. Automatic and Continuous: The service runs in the background, automatically and continuously backing up your files as you work. This ensures that your data is always up-to-date without requiring manual intervention.
3. Version History: Backblaze retains multiple versions of your files, allowing you to recover previous versions if needed. By default, it keeps versions for 30 days, but extended version history options are available for an additional fee.
4. Security and Encryption: Backblaze encrypts your data both during transfer and while stored in the cloud, ensuring that your information remains secure. Users can also opt for a private encryption key for added security.
5. Web and Mobile Access: You can access your backed-up files from any web browser or through the Backblaze mobile app, making it easy to retrieve your data from anywhere.
6. Restore Options: Backblaze offers multiple restore options, including downloading files directly from the web, or for larger restores, having your data shipped to you on a USB drive or hard drive.
7. Affordable: At $99/yr for unlimited storage and 30 day file history, Backblaze personal backup is very light on the wallet.
Backblaze B2
Backblaze B2 is a popular cloud storage service which is affordable and simple to configure, making it an excellent choice for implementing robust backup solutions. Backblaze B2 uses AWS S3 compatible APIs, so B2 works with a wide range of backup products. For those using Home Assistant, the 2025.12 release adds Backblaze B2 as a backup target.
Key Features:
1. Cost-Effective Pricing: Backblaze B2 has very competitive pricing, at just $6/TB/month, billed hourly. This makes it an attractive option for individuals and businesses looking to store large amounts of data without breaking the bank. Unlike Wasabi, B2 has no minimum storage duration policy. BackBlaze B2 charges for Class B and Class C transactions. However, for my backup purposes they racked up a mere 10 cents a month in API call costs.
2. Free Egress: Backblaze B2 offers a unique feature that can significantly reduce the costs associated with data retrieval: free egress up to 3 times the average storage volume. The free egress allowance is calculated based on the average amount of data you have stored in Backblaze B2 over the past month. For example, if your average storage volume is 1TB, you can transfer up to 3TB of data out of B2 without paying for egress charges. Egress in excess of this allowance is billed at $0.01/GB.
3. Scalability: Whether you have small backup requirements or are large enterprise, Backblaze B2 can scale to meet your storage needs. You can start with a small amount of data and expand as your requirements grow, ensuring flexibility and adaptability.
4. Easy Integration: Backblaze B2 provides a straightforward AWS S3 compatible API which enables compatiblity with a wide range of third-party tools and services. This makes it easy to integrate into existing workflows and backup solutions, including popular platforms like Synology.
5. High Durability and Availability: Backblaze B2 offers 99.9% uptime SLA and stores data with high redundancy to ensure durability. The service is designed to protect your data against hardware failures and other potential disruptions. You can also selectively replicate buckets to another region for extra protection.
Backblaze B2 is a versatile and cost-effective cloud storage solution that can enhance any backup strategy. Its affordability, ease of integration, and robust security make it a compelling choice for both personal and business use. By incorporating Backblaze B2 into your backup plan, you can ensure that your data is protected, accessible, and ready for recovery when needed.
Backblaze B2 Best Practices
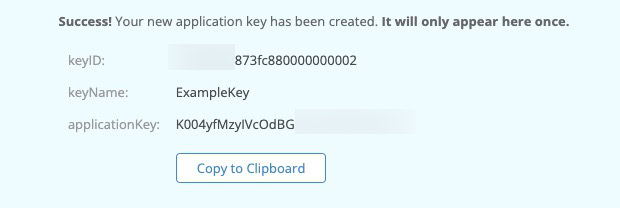
When using Backblaze B2 you need to create Application Keys to allow access to your buckets. For security reasons the applicationKey is only shown once at creation. Be sure to put this information somewhere safe and secure, such as your password manager.
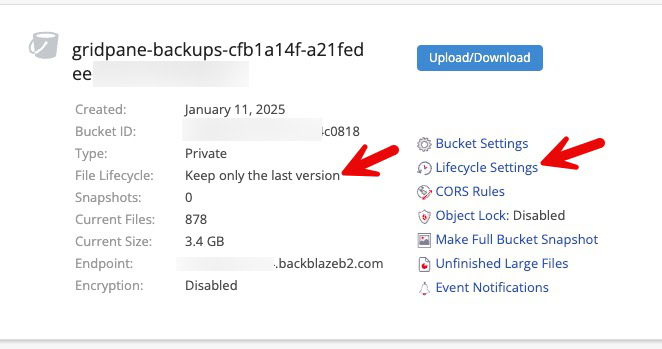
By default Backblaze B2 will enable lifecycle management and store multiple copies of your files, as they change. This uses extra storage space, and by extension, costs you more money. I recommend disabling lifecycle management and only store the last version.
Backup Testing
One very vital, but often overlooked step, is to test all of your back technologies on a regular basis. It’s better to find out now that you lost the encryption key, jobs aren’t running, or other issues are happening before a disaster strikes.
Depending on what kind of data you are backing up, test restores can be pretty easy. If you are using Proxmox, for example, you can simply restore your LXC or VM, pull the virtual NIC, and power it up in a bubble to make sure it boots. For something like Home Assistant I’d suggest testing both a whole VM restore (if running HAOS), and also the built-in backup/restore method to ensure both work.
I suggest putting a recurring event on your calendar, every 3-6 months, to test all backups and ensure they properly restore.
Summary
In this blog post, I provide an overview of effective backup strategies, focusing on the 3-2-1-1 backup method, which involves maintaining three copies of data across two media types, with one copy stored offsite and at least one immutable copy. I cover my personal backup practices, using Backblaze Personal and Carbon Copy Cloner for my MacBook Pro, and a Synology NAS for local backups. Additionally, I replicate data to Backblaze B2 for cloud-based security, integrating multiple tools to protect critical data.
I also discuss backing up systems like WordPress sites, Proxmox servers, and Home Assistant setups, using both local and cloud solutions such as Proxmox Backup Server and Backblaze B2 for redundancy and quick recovery. Emphasizing encryption for cloud backups, I offer tips on optimizing storage costs with Backblaze B2’s features like free egress and lifecycle management. In short, I cover the importance of a multi-layered backup approach to safeguard against catastrophic data loss.