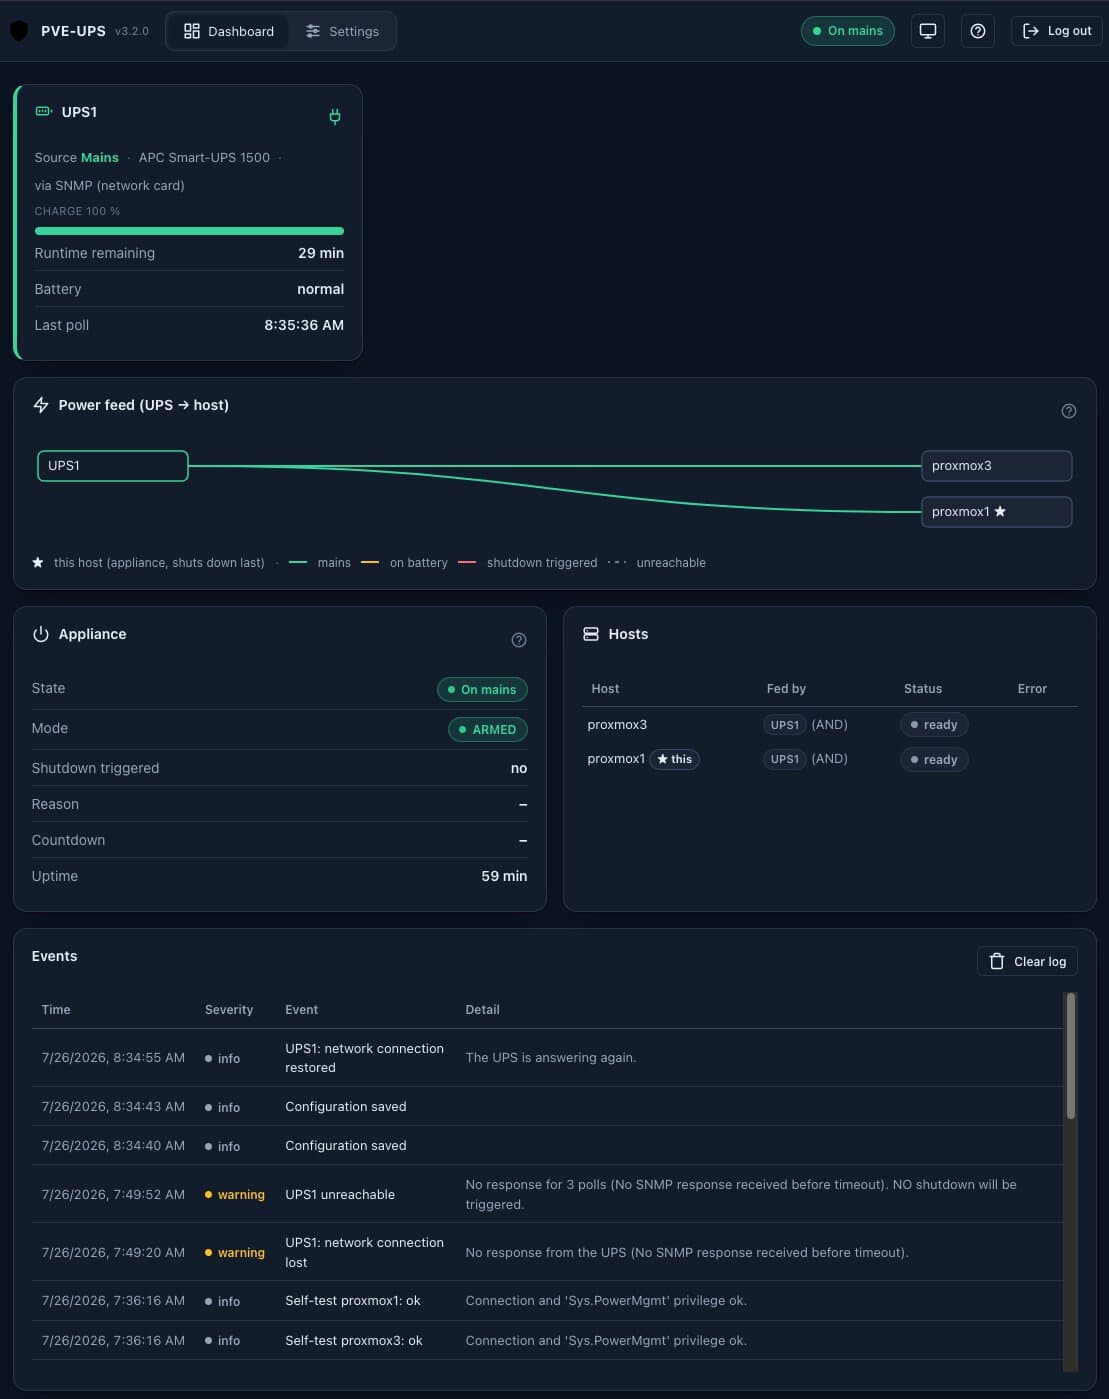
A new project has popped up on GitHub called PVE-UPS. PVE-UPS is a small service running in a LXC or Docker container that monitors UPS devices via SNMP or a NUT server and can gracefully shutdown one or more Proxmox hosts. The entire configuration is done via a nice web interface, so no tinkering with scripts or config files. I was up and running in just a few minutes.
In this post I will show you how to configure both a SNMP enabled UPS and how use PVE-UPS as a NUT client with a Synology NAS for a USB UPS plugged into your NAS.
Update July 26, 2026: Just a day after I wrote this post the developer released a major update to the project. It now supports being a NUT client, so you can use it in conjunction with a USB UPS. He also fixed the SNMP v3 encryption issue, so that is now working. I totally re-wrote this post to cover both use cases.
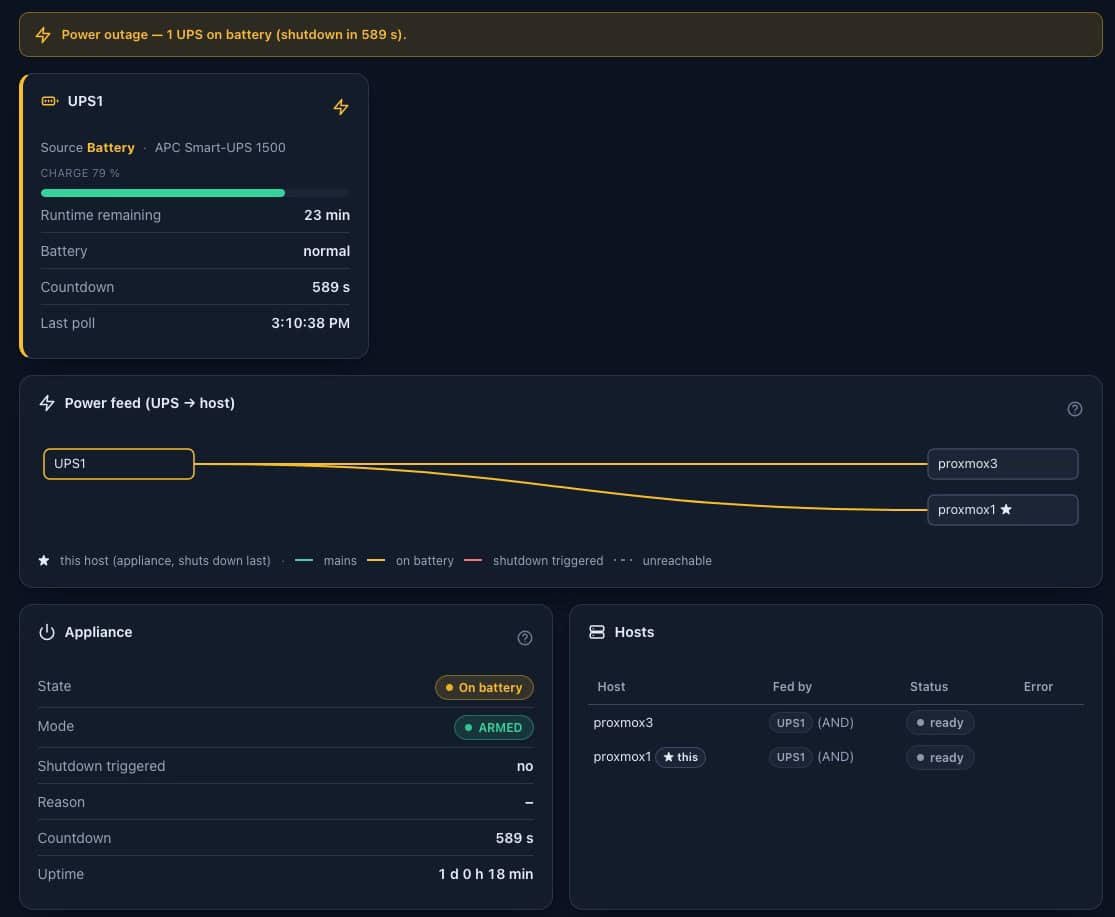
PVE-UPS Dashboard
PVE-UPS has a pretty simple architecture:
The installer script will create a LXC and perform all of the needed installation steps. The LXC is unprivileged, and is allocated 256MB of RAM. Actual use is about 100MB.
Alternatively, the developer provides a Docker image that you can use.
The configuration is entirely web based, so no need to edit any text files.
It uses the Proxmox API (and token) to communicate with Proxmox hosts to send shutdown commands. A local account is created which only has the “Sys.PowerMgmt” privilege.
It supports SNMP v1/v2c/v3 as well as being a NUT client.
PVE-UPS features include:
Supports multiple UPS devices and multiple Proxmox hosts. Has and/or logic to support redundancy or split loads.
Variety of shutdown triggers: Charge level, runtime remaining, time on battery, or UPS reporting low battery.
Configuration import/export.
Visual event log history with ability to clear all events.
PVE-UPS has a robust safety model:
A dropped SNMP connection will not cause a shutdown.
After the installation it defaults to dry-run mode. You can arm it after everything checks out.
If you have multiple Proxmox hosts, the host running the LXC is shutdown last.
PVE-UPS Installation
The PVE-UPS Github page has the full installation instructions, which are well written and easy to follow so I won’t duplicate them here. The installation process at a high level is:
Run the installer script in the Proxmox VE shell, which creates the LXC container and performs all of the needed software installation steps.
Open the web interface and configure your UPS device(s).
Create a local least-privileged Proxmox account to be used by PVE-UPS for shutdown commands.
Add your Proxmox host(s) and configure the shutdown triggers and logic.
SNMP UPS Configuration
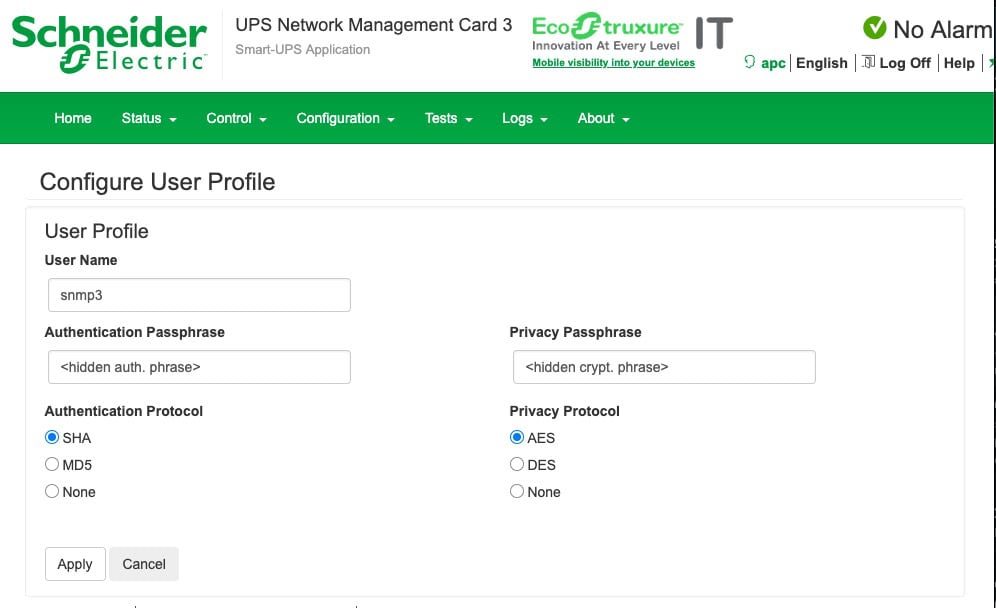
Configuring a SNMP UPS device is very to do. First, go to your UPS network management interface and configure your SNMP settings including version and any security settings. If supported, I suggest using SNMPv3 with authentication and privacy. I chose SHA authentication and AES privacy. In my case I have a Schneider Electric UPS Network Management Card 3.
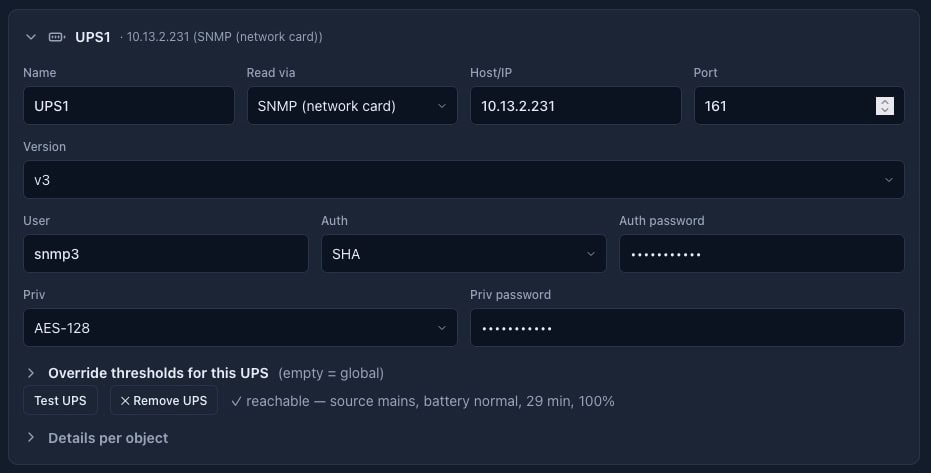
Once your SNMP is configured, you can add your UPS device to PVE-UPS. In PVE-UPS enter the same information as you did during the SNMP configuration on your UPS. Click the Test UPS button to verify the connection.
Synology NUT Server Configuration
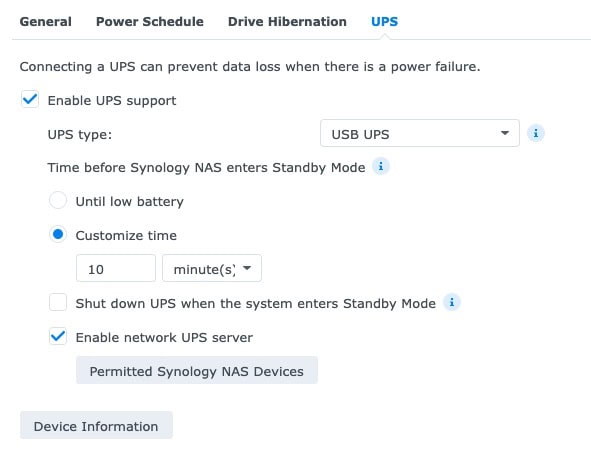
If you have a UPS with USB connectivity and a Synology NAS, you can use the built-in Synology NUT server to monitor the UPS. PVE-UPS can then act as a NUT client and use the Synology NUT server to monitor the UPS and perform a graceful shutdown of your Proxmox VE servers.
1. On your Synology NAS open the Control Panel and go to the Hardware & Power tab.
2. Click on the UPS tab. Make sure your UPS is connected to your Synology and is recognized. Check the box next to Enable network UPS server.
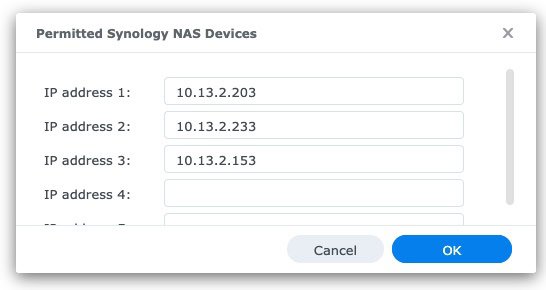
3. Click on Permitted Synology NAS Devices and add the IP address of your PVE-UPS server.
4. Click Apply.
Synology NUT client IP address whitelist:
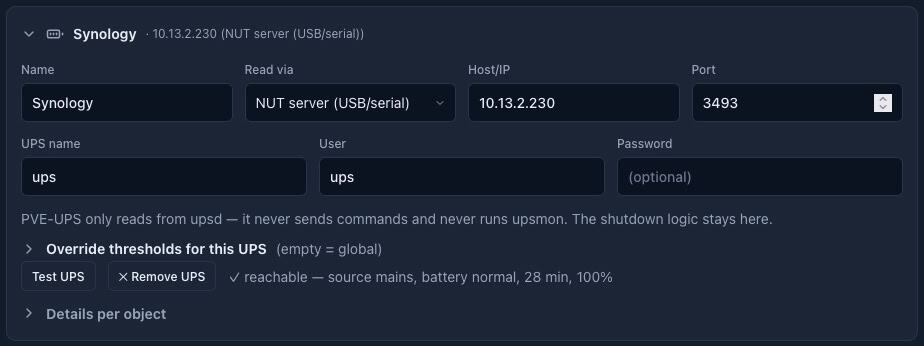
In PVE-UPS click on the Settings tab add a new UPS. Change Readvia to NUT server (USB/serial). Enter the IP address of your Synology NAS. For the UPS name, enter the name of ups (lower case). For the user enter ups (lower case). Don’t enter a password. Click on Test UPS to verify the connection.
Proxmox Host Configuration
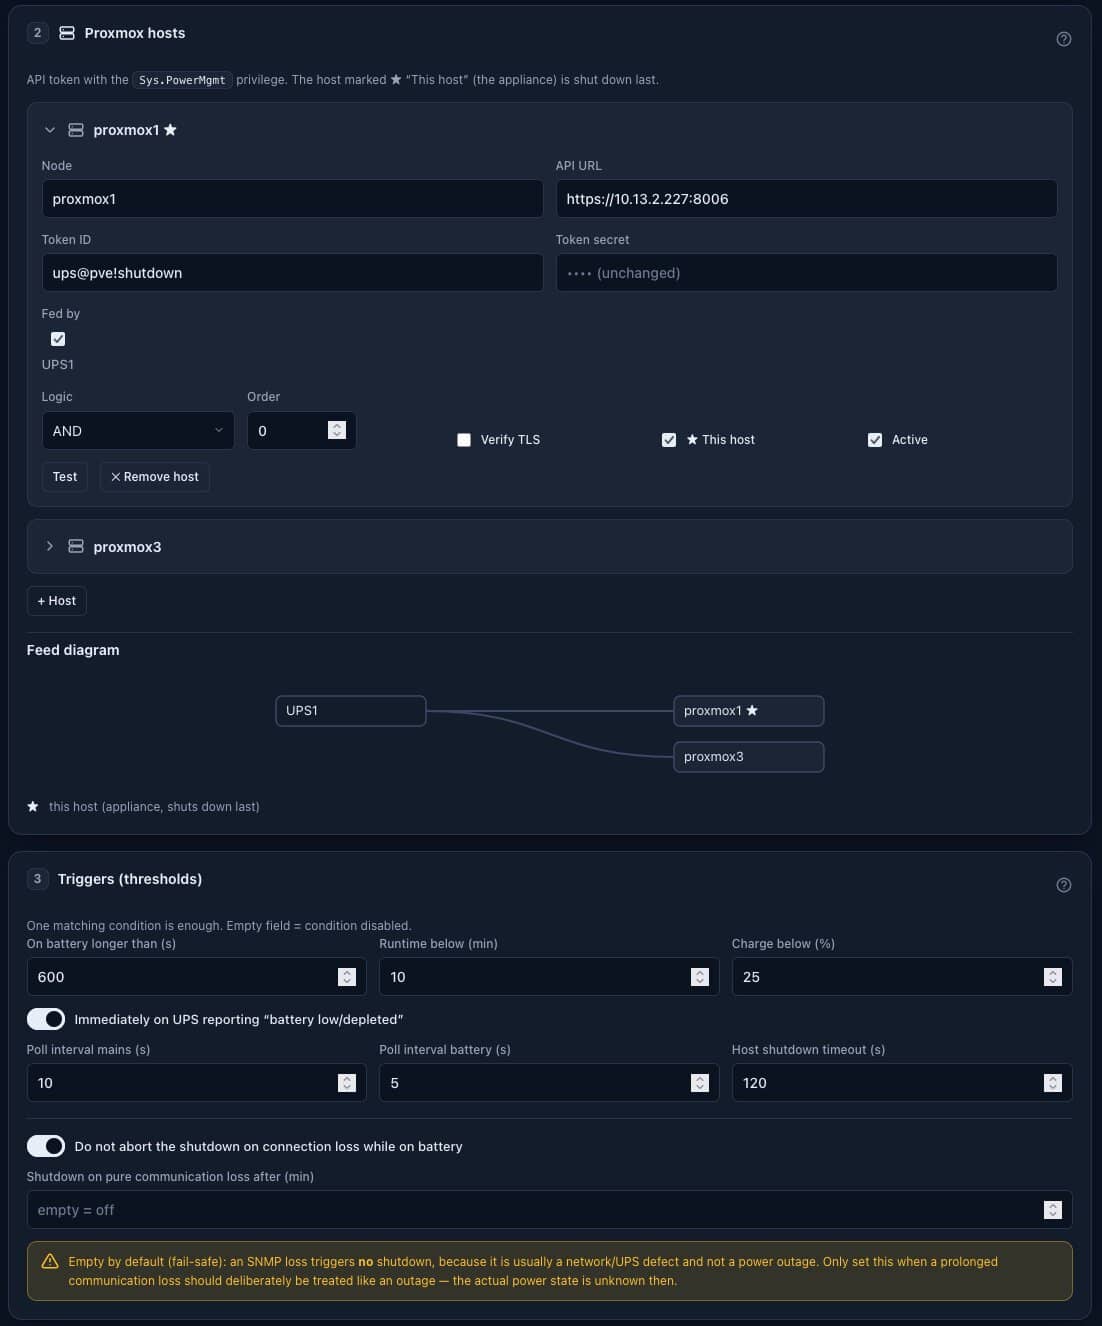
Adding a Proxmox host is just as easy as adding a UPS device. During the installation the guide has you create a local Proxmox user with an API token. Input that information, hostname and URL. If needed, adjust the trigger settings.
If you have more than one Proxmox host, you can add them here as well. Make sure to mark the Proxmox host which is running the PVE-UPS as This host. If you are running a Proxmox VE cluster you only need to create the user and API token once. To add the additional Proxmox hosts in the cluster use other Proxmox host names but use same API token.
Time for Testing
PVE-UPS is very responsive and within a few seconds of a power outage it registered that the UPS was on battery. The dashboard updates in real time and keeps you apprised of the shutdown status.
Summary
Brand new to the community is the PVE-UPS service for Proxmox VE. It’s a lightweight LXC container or Docker container that supports both SNMP-based UPSes and being a NUT client. It supports multiple UPSes, multiple Proxmox hosts, and is very configurable. The installation and configuration is very simple and straightforward. It only took me a few minutes to get it up and running. If you are running Proxmox VE I highly recommend this package to make sure your hosts are shut down properly in the event of a power outage.