When building a smart home based on Matter it is critical that you get networking gear with working IPv6 multicast support. This post covers how to configure both IGMP (IPv4) and MLD (IPv6) snooping for TP-Link Jetstream (business class) managed switches.
Finding a switch with working IPv6 multicast support is easier said than done. For example, both QNAP and some Ubiquity Unifi gear have a track record of broken IPv6 multicast support that can wreck havoc on your Matter smart home. The primary symptom of buggy network gear is mDNS timeout entries in your Matter server logs. In Apple Home this can manifest itself as a Matter device randomly becoming unresponsive. For a VERY deep dive on Thread/Matter, check out my three part series: Smart Home Matter and Thread Deep Dive and see why multicast DNS is so critical for a stable Matter smart home.
I personally had a buggy QNAP switch, and one of the Home Assistant Matter developers had buggy Unifi gear. Both of us moved to TP-Link Jetstream switches and saw massive, massive improvements in Matter device stability. In fact, for both of us Matter has been rock solid with the new TP-Link switches. Not a single mDNS timeout for me, which was a massive problem with QNAP. Matter is now working as intended for all 18 of my Thread/Matter devices. Both Apple Home and Home Assistant are now rock solid.
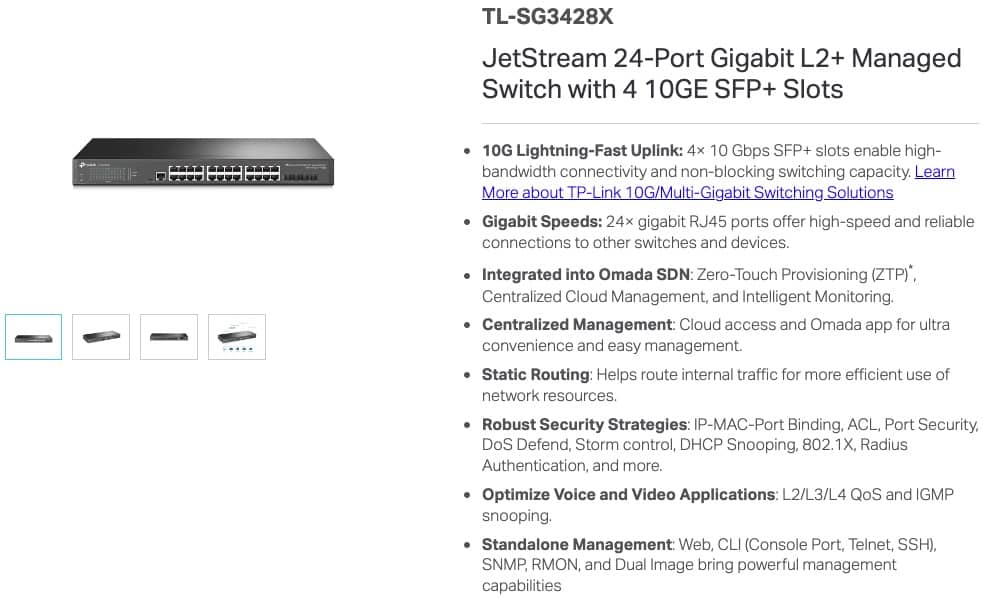
The two TP-Link Jetstream switches that I’ve personally verified are rock solid and have awesome MLD snooping support are the TL-SG3428Xand TL-SG3428X-M2. Both switches feature 24 primary ports and 4 10Gbps SPF+ ports. The new M2 version uses 24x 2.5Gbps multi-gig ports, whereas the base version only uses 24x 1Gbps ports. There is also a PoE version of the M2, the TL-SG3428XPP-M2. However, as of Oct 2023, the 2.5Gbps PoE version is not yet widely available. All SFP+ ports will accept a 10Gbps/Multi-gig copper SFP.
When looking at TP-Link business class managed switches, make sure it supports the full suite of IGMP and MLD features.
FYI, as of October 2023, their Omada software controller is very much lacking robust IGMP and MLD support. And unfortunately you can only manage their switches with EITHER the local web interface (all features) OR their gimped Omada controller, not both. So don’t use these switches with their Omada controller until they add robust IGMP and MLD support.
Configure IGMP Snooping (IPv4)
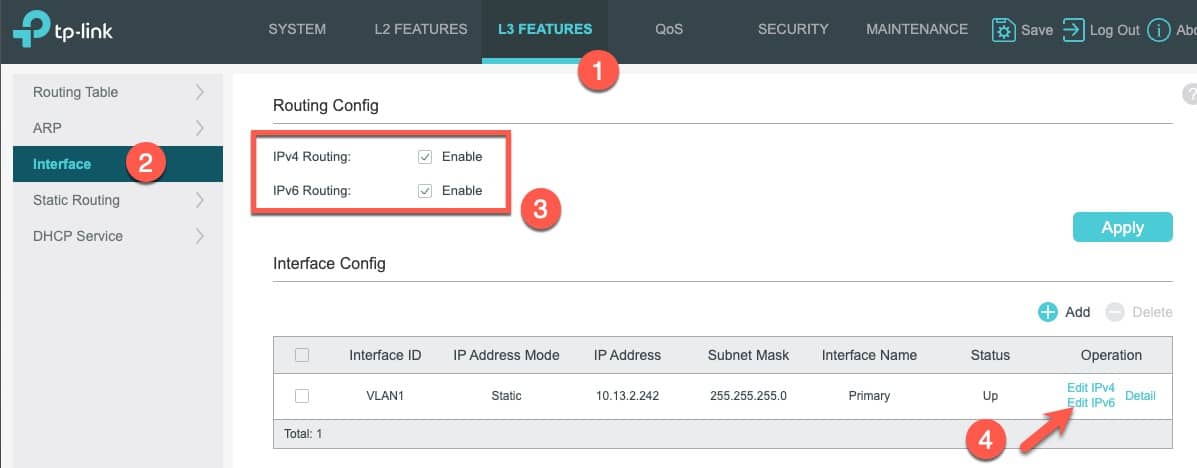
Login to the admin interface. Go to L3 Features -> Interface. Check IPv4 and IPv6 routing.
Click on Edit IPv6 under Operation.
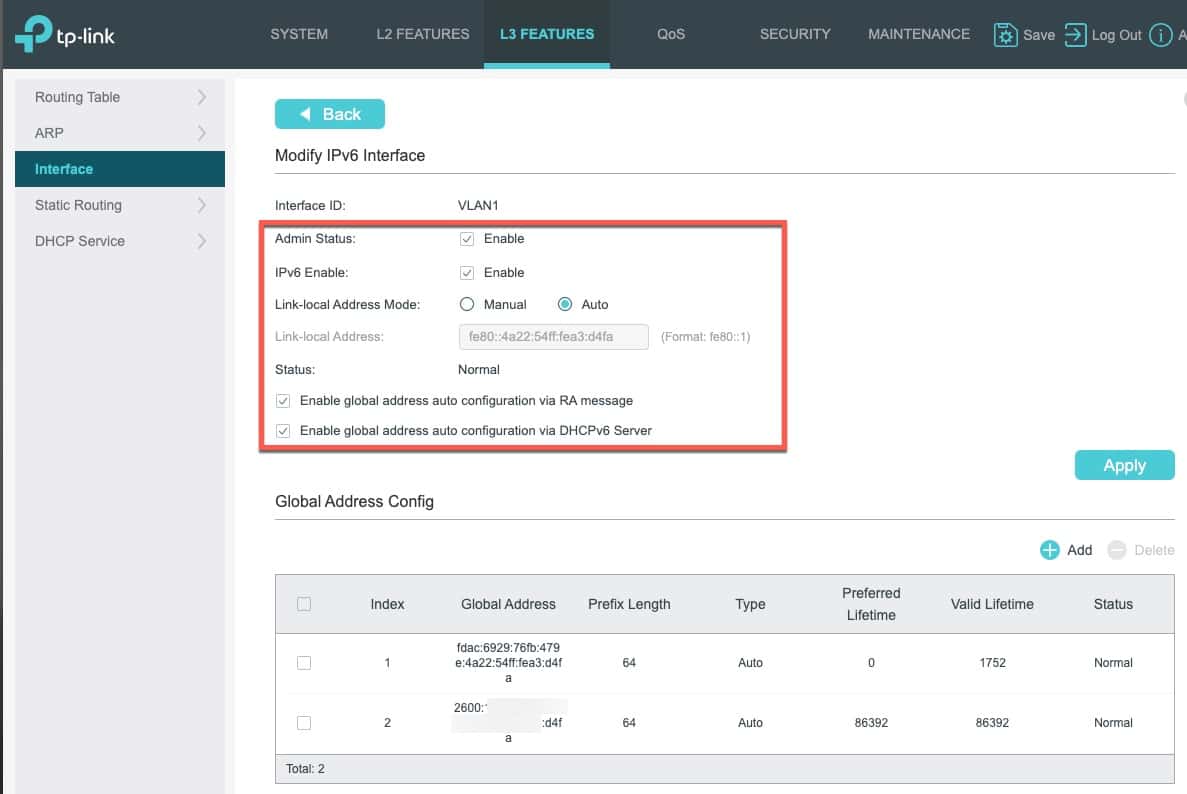
3. On the Modify IPv6 Interface screen enable Admin Status, IPv6 Enable, and check both Enable Global.. boxes. Click Apply. 4. Go Back, then back into the IPv6 settings. Verify that you have at least two IPv6 addresses under the Global Address Config. 5. In the upper half of the screen copy the Link-local Address to the clipboard.
Note: I have a Firewalla Gold Plus firewall which has a IPv6 DHCP server. It pulled my ISP assigned IPv6 prefix and uses that prefix for LAN addressing. My prefix starts with 2600:. If your LAN doesn’t have a DHCPv6 server your results may vary for what addresses the switch will assign.
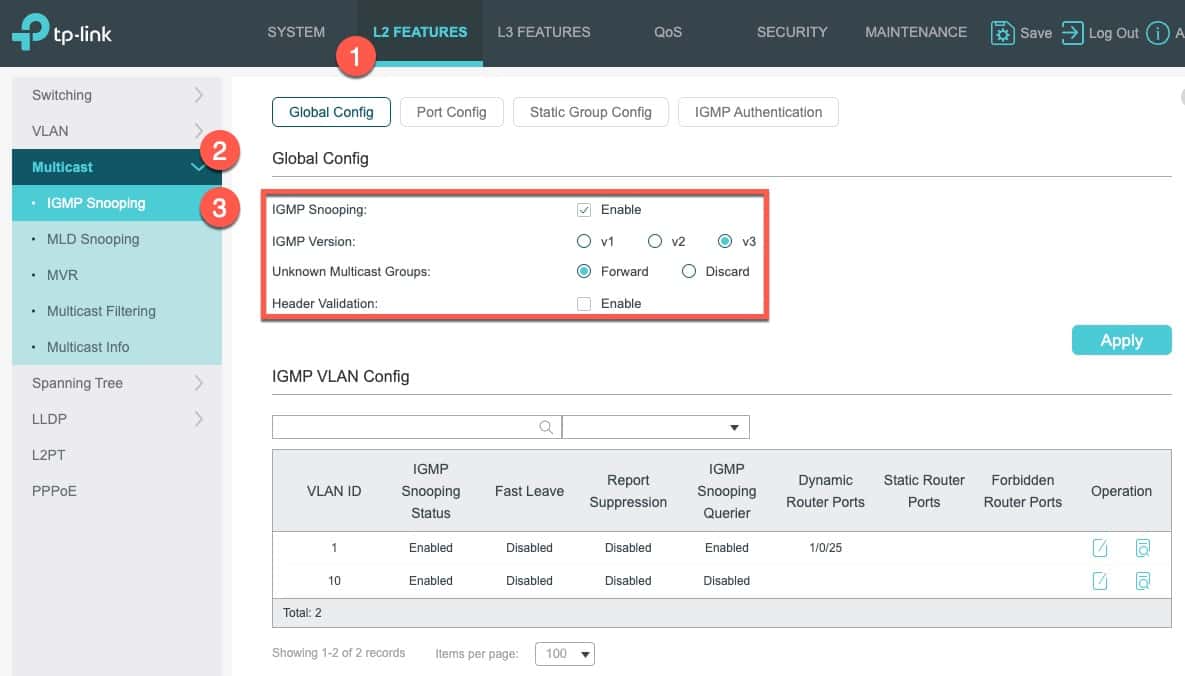
6. Go to L2 Features -> Multicast -> IGMP Snooping. 7. Enable IGMP Snooping, use IGMP version 3, and forward Unknown Multicast Groups. 8. For the VLAN that you want to enable for IGMP snooping, click on the paper/pencil icon under Operation.
9. Enable IGMP Snooping Status and enable IGMP Snooping Querier. Do NOT turn on Fast Leave. 10. Enter the switch’s IP address for General Query Source IP. Click Save.
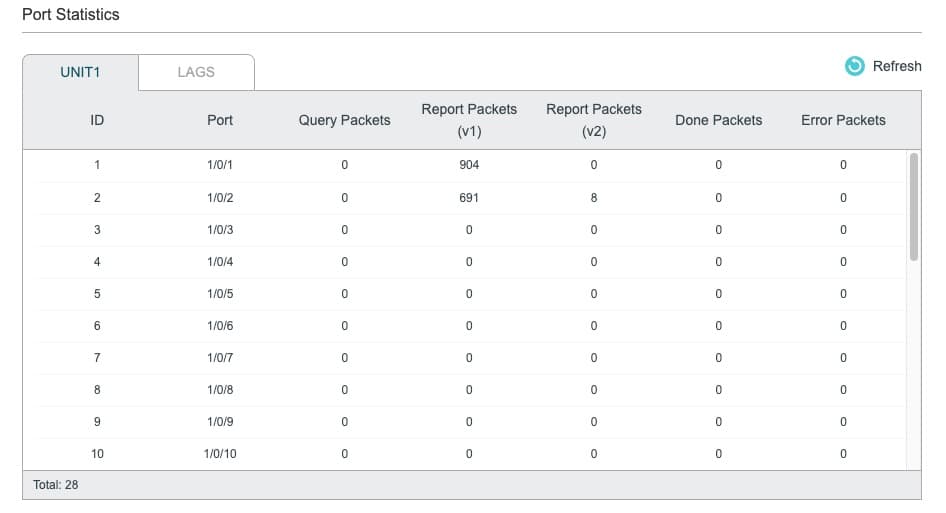
11. To verify IGMP snooping is working go to L2 Features -> Multicast -> Multicast Info -> IPv4 Multicast Table. 13. Each network will be different, but it’s likely you should see some multicast groups appearing. 14. You can also click on IPv4 Multicast Statistics.
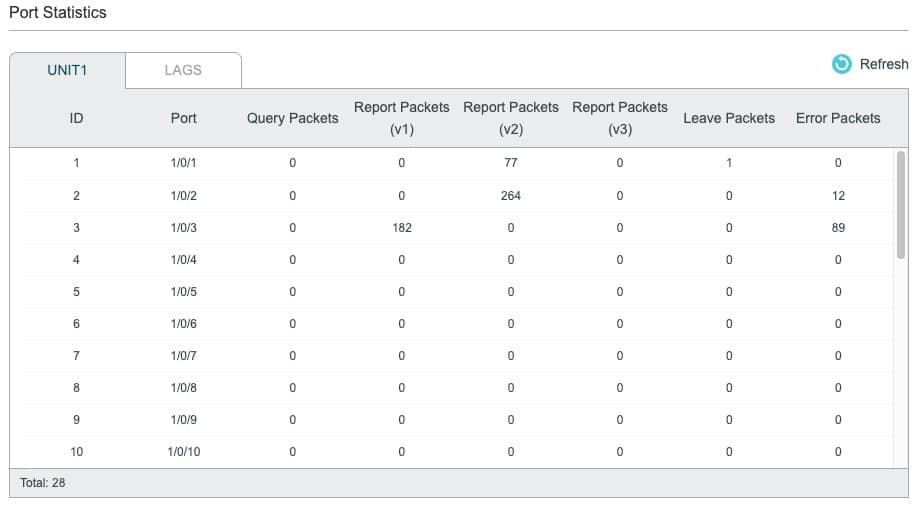
15. TP-Link provides a lot of great multicast stats for each port on the switch.
Configure MLD Snooping (IPv6)
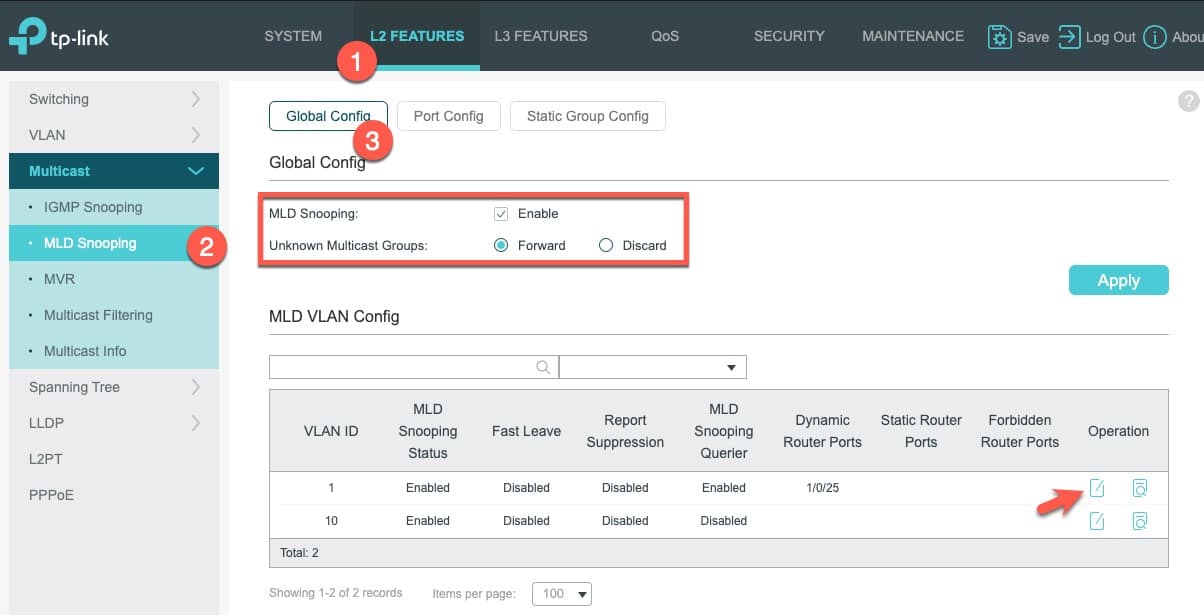
Go to L2 Features -> MLD Snooping -> Global Config.
Enable MLD Snooping and Forward Unknown Multicast groups.
Click on the paper/pencil icon next to the VLAN you want to enable for MLD snooping.
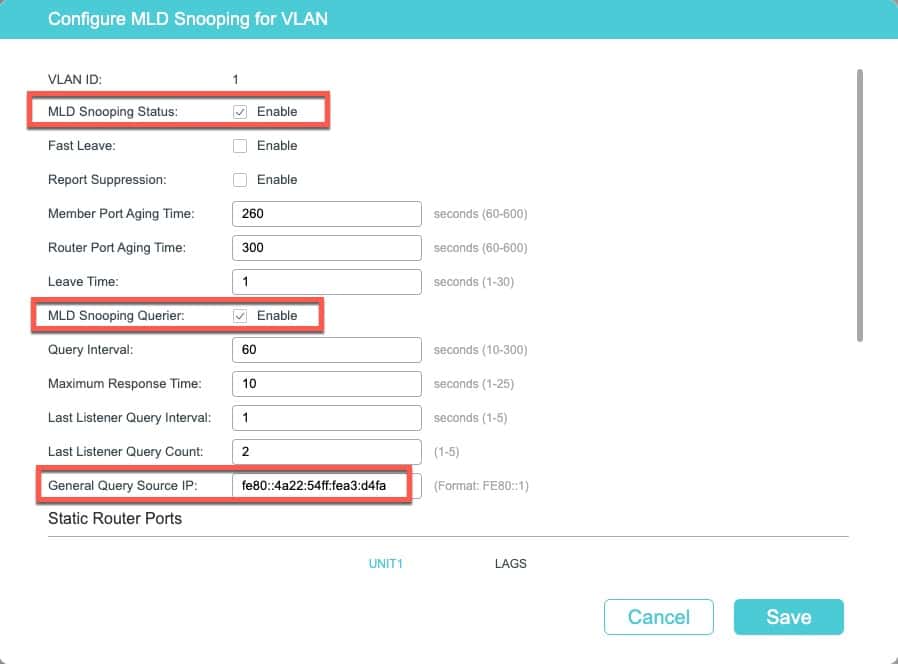
4. Enable MLD Snooping Status and MLD Snooping Querier. Do NOT turn on Fast Leave. 5. Paste the IPv6 link-local address that you copied to the clipboard earlier in this procedure into the General Query Source IP box. Click Save.
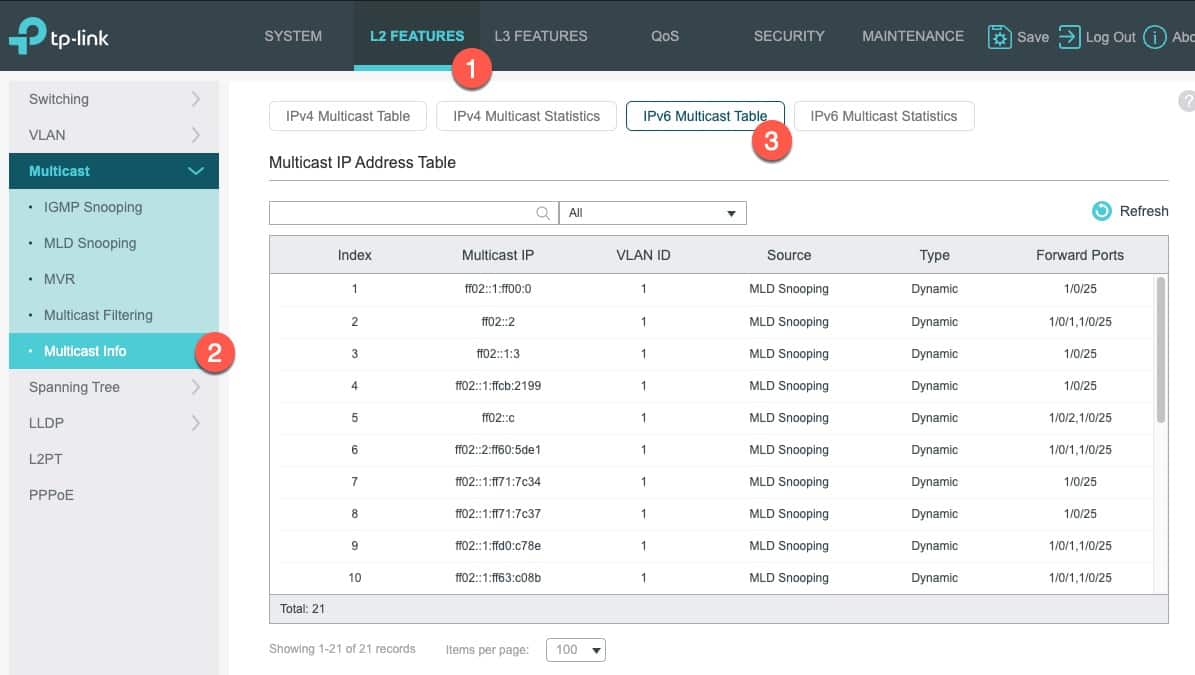
5. To verify MLD snooping is working go to L2 Features -> Multicast -> Multicast Info -> IPv6 Multicast Table.
6. You can also click on IPv6 Multicast Statistics. TP-Link provides a lot of great multicast stats for each port on the switch.
7. After all of the configuration is complete make sure you click Save in the upper right so you don’t lose your changes.
Summary
The TP-Link business class managed switches provide amazing support for both IPv4 (IGMP) and IPv6 (MLD) snooping. IGMP and MLD snooping is key to minimizing multicast traffic on your network and can really help with the stability of your smart home Matter devices. Some consumer (and even business class) switches have faulty firmware that can cause significant mDNS issues, which in turn can make Matter devices very unstable.
TP-Link also provides a wide array of snooping stats for each port, and a full listing all IPv4 and IPv6 multicast groups. Since replacing my QNAP switch with a TP-Link all of my Matter mDNS timeout issues went away. Every single mDNS issue….poof…fixed with the TP-Link switch!
If you are looking for a new switch for your smart home, I strongly recommend the TP-Link business class Jetstream switches with their robust IGMP/MLD snooping features. And when you register the switch you get a lifetime warranty and lifetime tech support. You really can’t beat that for their very affordable prices.
5 thoughts on “Configuring TP-Link IGMP & MLD Multicast Snooping”
Gonçalo
Using TP-Link equipment, have you ever needed to use an Omada Controller? Would you recommend a hardware or software solution? And would it make sense to build a VM in Proxmox for an Omada software controller?
I briefly used their Omada VM controller on Linux. It was fine..except the version I used a few months ago was lacking MLD configuration AND MLD group membership stats, which you get in the web UI of the switch. But using Omada disables the switch’s web UI, so you lost access to MLD data that I wanted. Hopefully the Omada controller will mature to add full MLD configuration AND group membership status. If so, I’d consider going back to it.
Hey, great post! I have this same switch and want to set this up, but I’m using the Omada controller. If I remove the device from the controller, configure it using the switch’s web interface, and then re-add it to the controller, do you think the settings will remain intact?


Using TP-Link equipment, have you ever needed to use an Omada Controller? Would you recommend a hardware or software solution? And would it make sense to build a VM in Proxmox for an Omada software controller?
I briefly used their Omada VM controller on Linux. It was fine..except the version I used a few months ago was lacking MLD configuration AND MLD group membership stats, which you get in the web UI of the switch. But using Omada disables the switch’s web UI, so you lost access to MLD data that I wanted. Hopefully the Omada controller will mature to add full MLD configuration AND group membership status. If so, I’d consider going back to it.
TTeck has a great Omada controller installation script for Proxmox. I used that, and it was super easy. Strong recommend!
Hey, great post! I have this same switch and want to set this up, but I’m using the Omada controller. If I remove the device from the controller, configure it using the switch’s web interface, and then re-add it to the controller, do you think the settings will remain intact?
I’m not sure if any settings ‘stick’ or not.