Do you own a Synology NAS with DSM 7.0 or 7.1 and run Docker containers? Would you like those containers to use a Wireguard VPN provider for increased privacy and security? If the answer is yes, then keep reading.
In order to get Wireguard working for Docker containers on your Synology we need to get a Wireguard package installed and running on the ‘bare metal’ NAS. Once you have a working Wireguard binary on your Synology NAS, then Docker containers can leverage it. This package provides the ‘wg0’ interface Docker containers need.
If you want to use a commercial VPN provider for the Wireguard VPN, that provider will need to allow you to generate Wireguard configuration files. Many do not support this feature, such as PIA (as of this writing). VPN providers that do give you this level of control include Proton VPN and Mullvad. I personally have tested Proton VPN.
Note: Some containers by Binhex have PIA Wireguard support built in, which programatically downloads the proper Wireguard configuration in the background. This Wireguard config (as-is) is not compatible with Synololgy due to some odd parameters that are needed. Read on to see what you might need to change.
High level steps are:
- Locate the applicable pre-compiled Wireguard Synology package to match your DSM version (7.0 or 7.1 is preferred), and your NAS hardware platform type.
- Install the Wireguard package on your NAS and manually run a CLI command once to finish installation and start the service.
- Obtain a Wireguard conf file from your VPN provider, modify it, and upload to your NAS.
- Download the Docker container of your choice. I prefer ones that offer Wireguard as one of the VPN options and use a kill switch. Binhex has a ton of pre-configured containers for various purposes.
- Start your Docker container and verify that it can reach the internet and that name resolution works.
Note that there are instructions floating around on the internet that let your compile your own Wireguard Synology package. Frankly, that process can be highly tedious and fraught with headaches and dead ends. Avoid if you possibly can. The selection of pre-compiled Wireguard bundles that use recent versions of Wireguard are for DSM 7.0 and 7.1, and cover common Synology models. Walking someone through the compilation process is out of scope for this guide. If you are on DSM 6.2 and dying to try Wireguard and don’t mind a 2 year old package, you can packages here.
Tip: If you aren’t using Portainer on your Synology to manage your containers, I would strongly recommend it. I ran into a couple of weird Synology Docker UI issues when editing container folder mappings. And you also have easier access to container logs and the consoles are much more snappy.
Synology DSM 7.0/7.1 Wireguard Packages
When I was first trying to find Synology Wireguard packages, the first Google result was Runfalk’s Github repository which was quite old in terms of both DSM support (6.2), and an old Wireguard version. So I would not start there for installable packages. He does have a lot of other good info on using Wireguard with Synology, which I’ve shamelessly borrowed for this post. There are a couple of good resources for pre-compiled DSM 7.0/7.1 packages.
Wireguard package selection process:
- Determine the CPU architecture of your Synology NAS. Check out this Synology KB article. My DS918+ is apollolake, for example.
- Download the appropriate Synology SPK package based on your DSM version and CPU platform.
Synology DSM 7.0 Wireguard Package Repository
Synology DSM 7.1 Wireguard Package Repository
3. Start the Synology manual package installation and pick the Wireguard package you just downloaded.
4. Confirm the warning about no digital signature present.
5. On the Confirm settings page UN-check the Run after installation box and click Done.
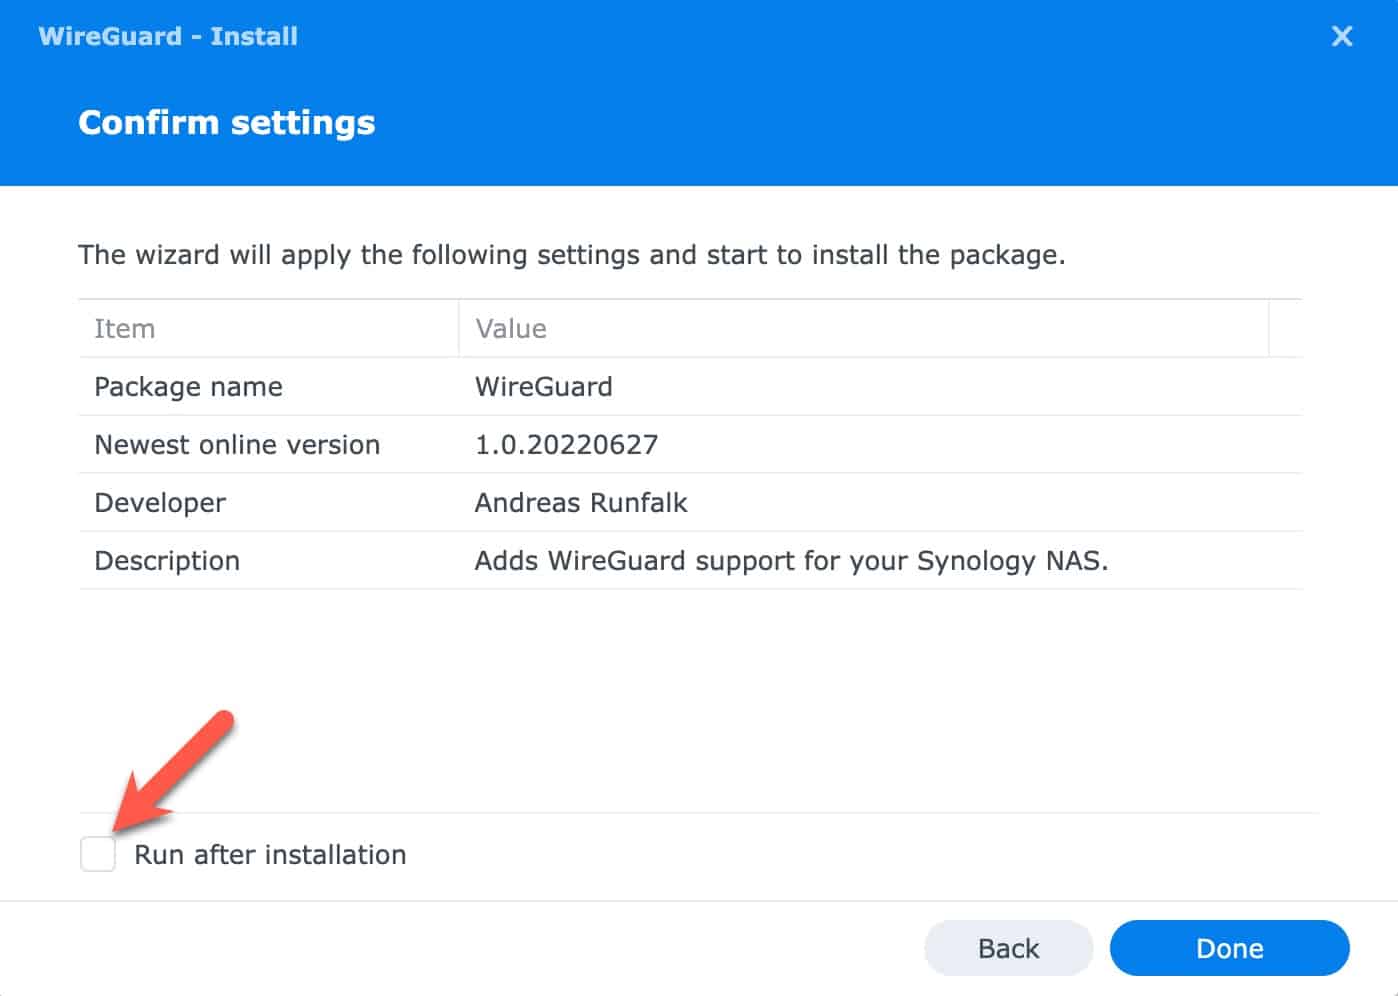
6. SSH into your Synology NAS and run the following command:
sudo /var/packages/WireGuard/scripts/start
7. The Wireguard package should now show as running back in the Synology web interface.
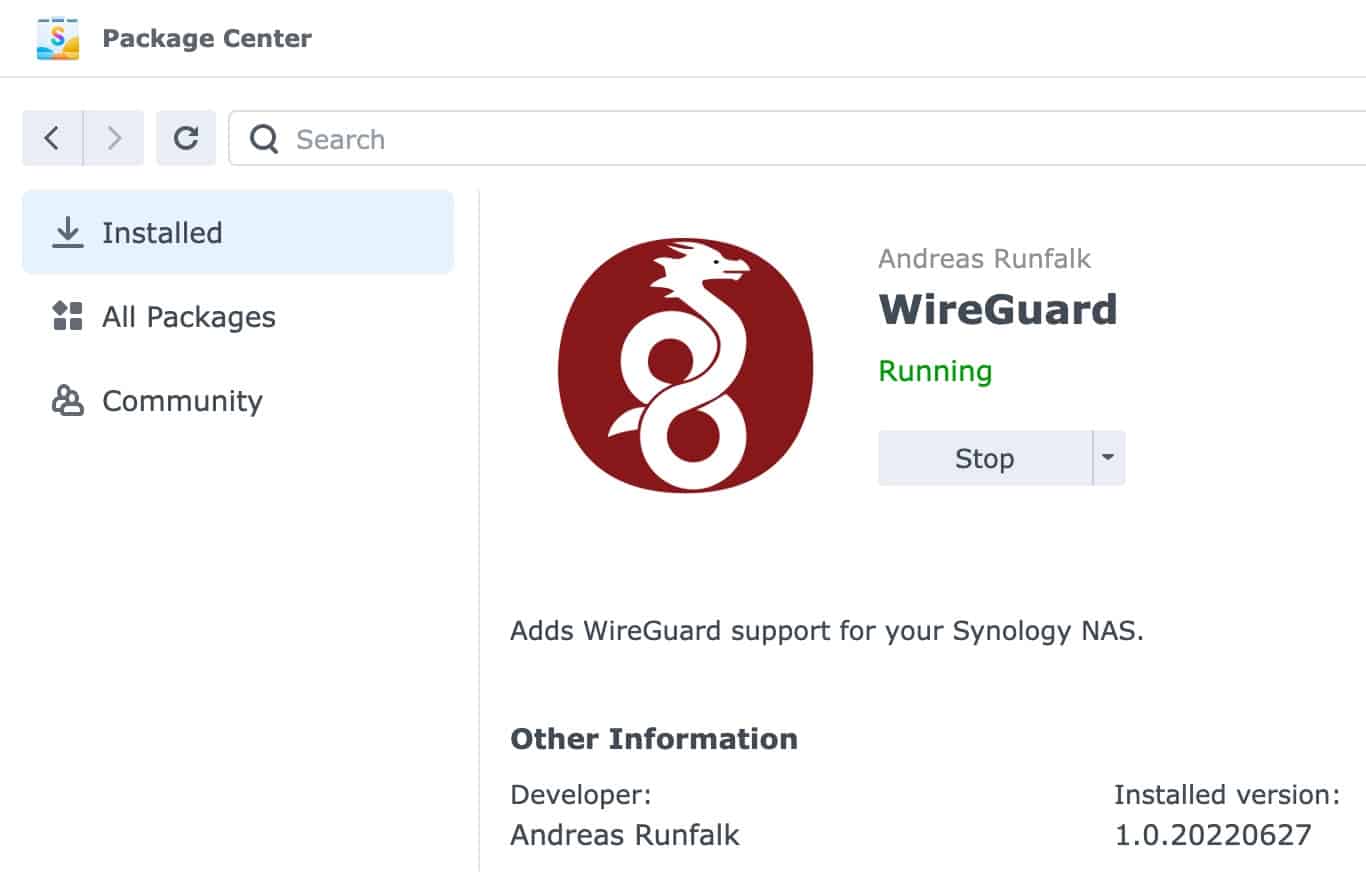
8. Now that the package was manually started once, it will auto-start whenever your Synology reboots. No need to manually start it again.
Docker Container Wireguard Configuration
Due to some unique networking that Synology has done within DSM, getting Wireguard to properly work takes a bit of tweaking. In this section I’ll cover what tweaks the community has come up with, and work for me.
When you create the Docker container from the CLI you need to change a couple of lines in order to give it the proper privileges. First, REMOVE the line:
–cap-add=NET_ADMIN \
Then add the –sysctl and –privileged switches:
docker run -d \
    --sysctl="net.ipv4.conf.all.src_valid_mark=1" \
    --privileged=true \
Next, we need to modify the wireguard config file from your VPN provider. A typical generic Wireguard config file will look something like the example below.
					[Interface]
PrivateKey = xxxxx
Address = 10.2.0.2/32
DNS = 1.1.1.1

[Peer]
PublicKey = xxxxxx
AllowedIPs = 0.0.0.0/1
Endpoint = x.x.x.x:51820
However, for a Docker container on Synology, some changes need to be made. These changes were posted on Reddit, so I can’t take credit for coming up with this solution. The critical changes to the config are:
- Add Synology unique PostUp/PostDown commands
- Modify the AllowedIPs to add a second address range of 128.0.0.0/1
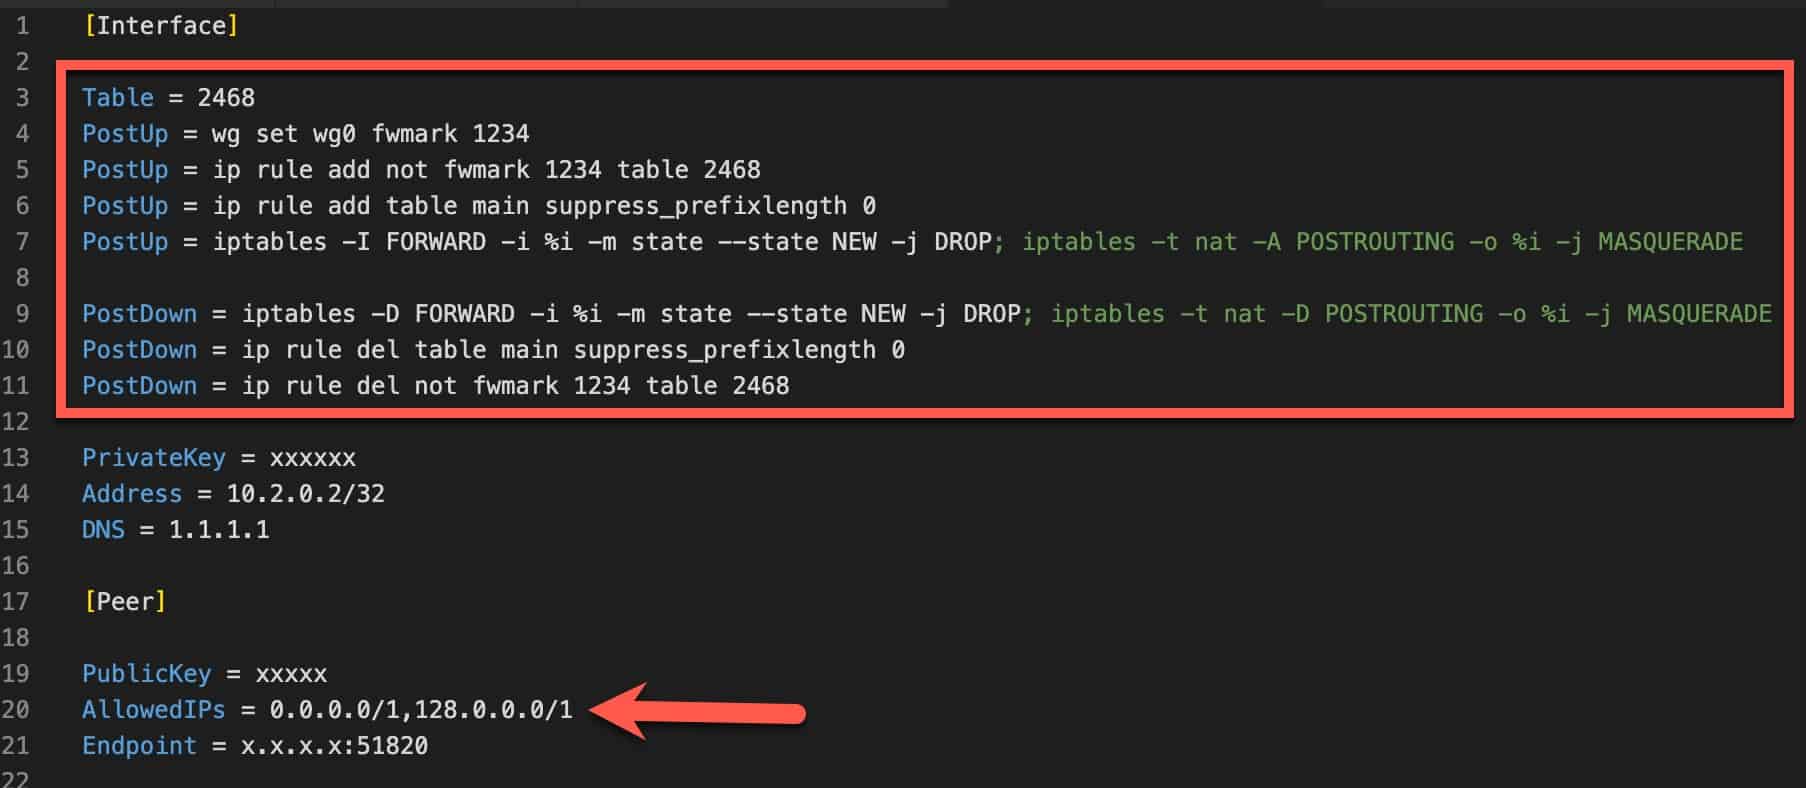
[Interface]
Table = 2468
PostUp = wg set wg0 fwmark 1234
PostUp = ip rule add not fwmark 1234 table 2468
PostUp = ip rule add table main suppress_prefixlength 0
PostUp = iptables -I FORWARD -i %i -m state --state NEW -j DROP; iptables -t nat -A POSTROUTING -o %i -j MASQUERADE

PostDown = iptables -D FORWARD -i %i -m state --state NEW -j DROP; iptables -t nat -D POSTROUTING -o %i -j MASQUERADE
PostDown = ip rule del table main suppress_prefixlength 0
PostDown = ip rule del not fwmark 1234 table 2468

PrivateKey = xxxxxxx
Address = 10.2.0.2/32
DNS = 1.1.1.1

[Peer]
PublicKey = xxxxxxx
AllowedIPs = 0.0.0.0/1,128.0.0.0/1
Endpoint = x.x.x.x:51820
Once you properly massage the Wireguard wg0.conf file, then you are ready to try it out. Follow the instructions for your container on where to put the Wireguard config file, and how to start up the tunnel. But after the tunnel comes up, you can run wg show within the container’s console to validate that the transfer stats are listed and slowing increasing with traffic. In general to bring up the tunnel it would look something like:
					wg-quick up /config/wireguard/wg0.conf
wg show
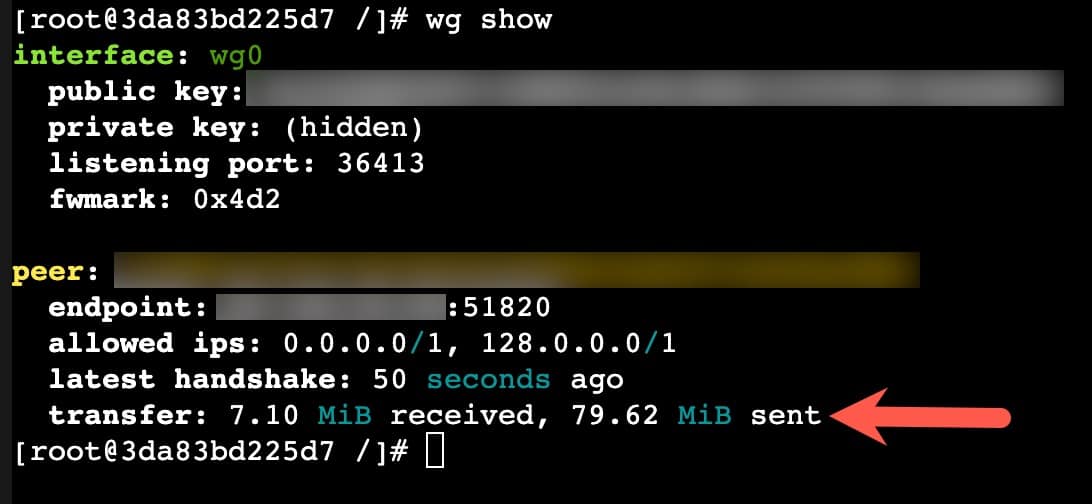
At this point I would recommend you now ping internet addresses, such as 1.1.1.1 and also do a DNS lookup to verify name resolution works. If both of those work, then you can be confident your container has a working Wireguard VPN. Depending on the configuration of your container, pings might work but name resolution fails. Debug as necessary.
Note 1: If you want to use Binhex containers that support a VPN configuration, then it’s a bit more work and slightly messy. Check out the next section for Binhex containers.
Note 2: There might be VPN providers that require another addition to the wg0.conf file. Start without this line and only try it if you run into problems. ProtonVPN does NOT need this line.
PostUp = iptables -A FORWARD -p tcp --tcp-flags SYN,RST SYN -j TCPMSS --clamp-mss-to-pmtu
Binhex Containers with Wireguard on Synology
Note: This is my personal workaround for the time being. I have reached out on the Binhex community forums to see if there is a more elegant and permanent solution. I’ll update this post as needed.
The Binhex containers that support native VPN and a IP tables killswitch programatically massage the Wireguard config file. Binhex adds custom PostUp and PostDown commands, which in the process strip out the Synology specific PostUp and PostDown commands. As a result, pings to the internet work but TCP/IP communications is blocked.
The high level process is:
- Create Binhex container with proper Docker CLI
- Upload modified Wireguard config to your Synology
- Start your Binhex container
- Immediately over-write the Binhex modified wg0.conf file with your original file
- Wait a couple of minutes and verify everything works via the container console
Detailed Steps:
- Obtain your VPN provider’s Wireguard config like normal and modify it per the previous section, adding the PostUp/PostDown lines and changing the AllowedIPs.
- At the exact locations as shown below (lines 8 and 12) add the commands shown. Order and placement of these additions is critical or they won’t work. Basically the added PostUp and PostDown commands need to be the last command within their respective section.
PostUp = iptables -A FORWARD -p tcp --tcp-flags SYN,RST SYN -j TCPMSS --clamp-mss-to-pmtu
PostUp = '/root/wireguardup.sh'
PostDown = '/root/wireguarddown.sh'
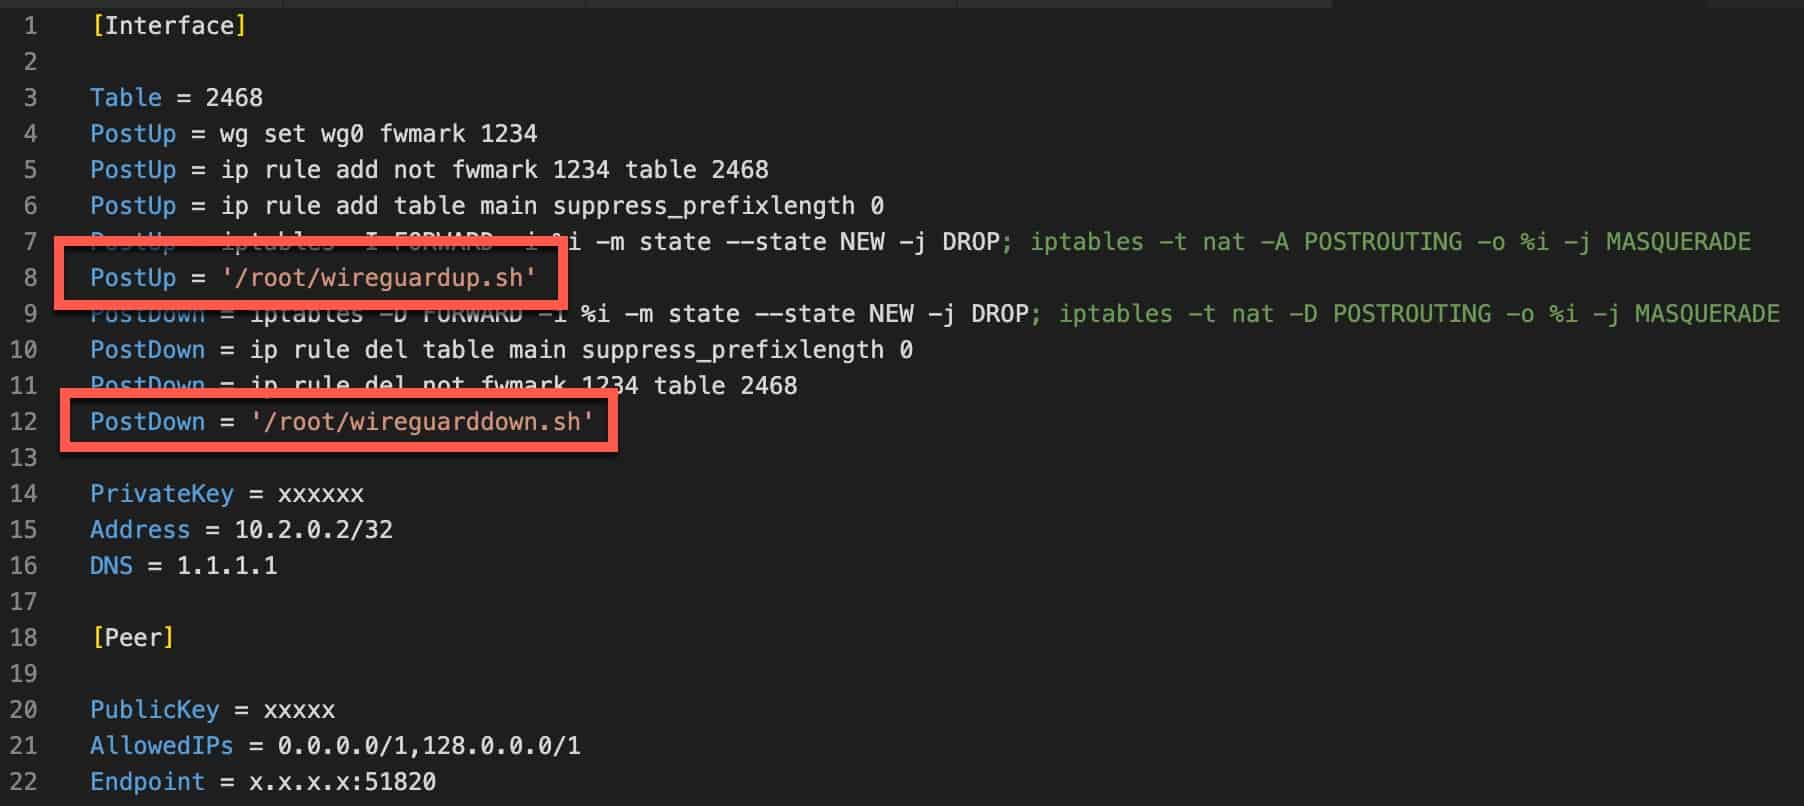
[Interface]

Table = 2468
PostUp = wg set wg0 fwmark 1234
PostUp = ip rule add not fwmark 1234 table 2468
PostUp = ip rule add table main suppress_prefixlength 0
PostUp = iptables -I FORWARD -i %i -m state --state NEW -j DROP; iptables -t nat -A POSTROUTING -o %i -j MASQUERADE
PostUp = '/root/wireguardup.sh'
PostDown = iptables -D FORWARD -i %i -m state --state NEW -j DROP; iptables -t nat -D POSTROUTING -o %i -j MASQUERADE
PostDown = ip rule del table main suppress_prefixlength 0
PostDown = ip rule del not fwmark 1234 table 2468
PostDown = '/root/wireguarddown.sh'

PrivateKey = xxxxxx
Address = 10.2.0.2/32
DNS = 1.1.1.1

[Peer]

PublicKey = xxxxx
AllowedIPs = 0.0.0.0/1,128.0.0.0/1
Endpoint = x.x.x.x:51820
3. The Docker container variables for the Binhex container need a slight modification. First, change the VPN_CLIENT type to wireguard, change the VPN_PROV to your provider (outside of PIA I don’t think the name matters for Wireguard), then add a VPN_DEVICE_TYPE set to wg0. The screenshot below is from Portainer. But you should set these variables in the Docker CLI when you create the container (more below).
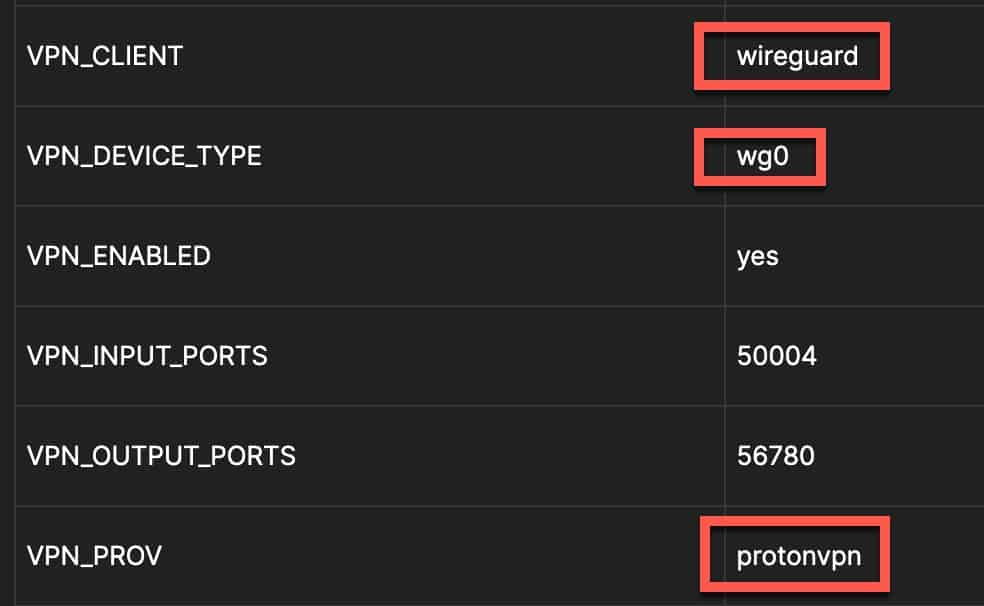
4. I would recommend setting the DEBUG variable to true so you can see what’s going on in case there’s a problem.
5. If you want to create the Docker container entirely from the CLI, below is an example of what it could look like. Please note that each Binhex container has a few unique variables and several need to be changed for your environment. So this is merely an example, but you WILL need to modify as needed. Not all variables are needed, and other containers may have more not listed. The important settings are the top two sysctl and priviledged lines, plus the variables previously mentioned. PUID and PGID might also be different, as well. To get those, SSH into your Synology and type id. The uid is your PUID and the gid is your PGID.
docker run -d \
    --sysctl="net.ipv4.conf.all.src_valid_mark=1" \
    --privileged=true \
    -p 6881:6881 \
    -p 6881:6881/udp \
    -p 8080:8080 \
    -p 8118:8118 \
    --name=xxxxxx \
    -v /volume1/downloads:/data \
    -v /volume1/docker/xxxxxx/config:/config \
    -v /etc/localtime:/etc/localtime:ro \
    -e VPN_ENABLED=yes \
    -e VPN_PROV=protonvpn \
    -e VPN_CLIENT=wireguard \
    -e VPN_DEVICE_TYPE=wg0 \
    -e STRICT_PORT_FORWARD=yes \
    -e ENABLE_PRIVOXY=yes \
    -e LAN_NETWORK=10.13.2.1/24 \
    -e NAME_SERVERS=1.1.1.1 \
    -e VPN_INPUT_PORTS=50004 \
    -e VPN_OUTPUT_PORTS=56780 \
    -e DEBUG=true \
    -e WEBUI_PORT=8080 \
    -e UMASK=000 \
    -e PUID=1024 \
    -e PGID=100 \
    binhex/arch-xxxxx
6. If you haven’t already created your Docker binhex container with all the proper variables and switches, do that now. I strongly recommend doing it via CLI and not use the Synology Docker UI.
7. Follow the Binhex instructions on where to drop your wireguard configuration file. Important: Make a copy of your tweaked Wireguard config and place it in another directory on your NAS for safe keeping (maybe up one folder level in your Docker container directory). You will need this in the next step.
8. Start the Binhex container and give it like 10 seconds or so. In the wireguard/config folder for the container open the programmatically generated wg0.conf file. It should have many fewer lines. Replace all the contents with your modified config file that has all the additional PostUp/PostDown lines and other changes.
9. Open a console or review the logs of the container and watch that everything starts to come up the next time it retries to bring up wg0. The container may be trying DNS resolution for a couple of minutes, so be patient. It should cycle the wg0 interface at some point which reads in the file contents you just replaced.
10. If the debug console/logs look good, then you are now set! I would open a console to the container and just do your own pings and nslookup to validate everything is good.
Note: At this time when you restart the container the wg0.conf gets reset back to the default (broken) config. So those contents will need to be replaced upon each container start. Hopefully the community/Binhex will provide a permanent solution. I will update this post with any community input on making this “hack” more elegant and permanent.
Additional Info: Binhex has a great FAQ for the containers that use a VPN configuration.
Summary
Getting Wireguard running on a Synology for Docker containers is a bit of a tedious process. Due to the way Wireguard works, it’s not as simple as setting up a Docker container to use OpenVPN with a service provider. However, Wireguard can be significantly faster than OpenVPN and one could argue more secure. I’ve only tried Binhex containers with Wireguard, so other containers may need other massage that isn’t covered here. But this blog post should get you pointed in the right direction.
Troubleshooting: If you run into any issues with Wireguard on Synology, check out this Reddit post. The community has since posted a variety of pre-compiled DSM 7.0/7.1 packages, so you can skip the Reddit OP’s recommendation to compile your own package.


When running the wg-quick command, I am getting the following:
Error: argument “suppress_prefixlength” is wrong: Failed to parse rule type
Any idea why?
Thank you.
Nice work on the tutorial! I’m using Linuxserver.io image of wireguard works fine..
You can stop overwriting of wg0.conf by mapping wireguard folder read only:
-v /volume1/docker/xxxxxx/config/wireguard:/config/wireguard:ro
All mapped volumes should look like this:
-v /volume1/downloads:/data
-v /volume1/docker/xxxxxx/config/wireguard:/config/wireguard:ro
-v /volume1/docker/xxxxxx/config:/config
-v /etc/localtime:/etc/localtime:ro
thanks!
If i set wg0.conf read only docker wont start, I would like to add additional IP range into AllowedIPs 192.168.x.0/24
First, thank you for writing this blog and the add-on, Derek.
Second, has anyone managed to use this in conjunction with the Synology Proxy server?
I’d love to move away from OpenVPN profiles.