Everyone is probably very familar with Google Analytics, for tracking page views and many other stats for your website. However, you may not be as familiar with Google Tag Manager. Google tag manager is a highly advanced analytics 'hub' that lets you create various triggers and tags, which can then be processed by a variety of analytics engines. GTM can allow you to track down to the 'click' level on your site, for example. Or it can track form submissions, or a whole host of other actions. The sky is limitless with what you can do with Google Tag Manager. In this blog post we will configure my WordPress blog site for Google Tag Manager and track a click. Once you get the basics down, you can go wild with tracking what people do on your site.
Google Tag Manager Account
First we need to configure a Google Tag Manager account, which is separate from your Google Analytics account. I will assume you have a Google Analytics account, which will be used as the 'target' for the click data we will be collecting.
1. Go to Googletagmanager.com and sign in with the same Google account you use for Analytics.
2. Click on Create Account.

3. Fill in the account name and country data. I used the URL for my website. Click Continue.

4. Now enter a container name. This can be anything you want. I used Container-1. Or you could use something like the address of your site. Whatever tickles you pink.
5. Select the Web option. Click Create.

6. On the next page accept the Google terms and conditions.
7. On the Install Google Tag Manager screen locate your 'GTM' number and copy it to the clipboard.
8. Close the script window as we don't need that code.

9. On the left in the main Tag Manager screen click on Variables, then Configure.

10. Scroll down in the varibles list and select everything under Clicks and Forms.

We now have the basics in Google Tag Manager configured. Next up we will configure WordPress to use GTM and validate the GTM code is working properly. After that we will configure a tag to track clicking on a menu item.
Wordpress Google Tag Manager Configuration
1. Navigate to your WordPress Admin site and install/activate DuracellTomi's Google Tag Manager for WordPress.

2. At the top of your WordPress installation look for the red warning bar and click on enter your GTM ID.

3. On the GTM screen enter your GTM ID and also select the Codeless injection option. Save the changes.

4. Open Chrome and install the Tag Assistant by Google extension. We will use this later to validate the tags are working.

5. Back in Google Tag Manager click on Submit.

6. On the next screen just leave the form blank and click on Publish. On the next screen leave the form blank unless you want to add a version description, then click Continue.
7. Open Chrome and go to your website.
8. Click on the Tag Manager extension icon. Click enable then refresh the webpage. Review the status in the Tag Manager window. It should show green for your analytics and your tag manager. If its red, then you have a problem. Check out some troubleshooting here. Once it is green, continue.

Google Tag Manager All-Click Trigger
Next up we need to now do additional configuration in GTM to setup triggers and tags. Triggers and tags are what send data to Google Analytics and other services for analysis. For this example we will trigger on a specific click action, and on a form submission. These are merely examples what you can do. The sky is the limit of what you could configure. These steps appear to work best in Chrome, but I have had intermittent success in Firefox.
1. Return to the GTM workspace. In the upper right corner click on Preview. You should now see an orange box in the middle Workspace pane.


2. In the same browser session open a new tab and go to your website. If all goes well you should see a Google Tag Manager debug console at the bottom of the screen. If it does not appear, then some troubleshooting is in order. We can't proceed until the console is available.

Now you need to decide on what click event you want to trigger on. This could be a link to an external source, a menu item, image, ad, etc. For my example I'll use a menu item. Depending on what you want to trigger on, the exact configuration will vary. But the basic principle is the same. First we need to configure a trigger for all click events. Then we can use that data to create another trigger for the click we want.
3. In the GTM Workspace click on Triggers and then New.

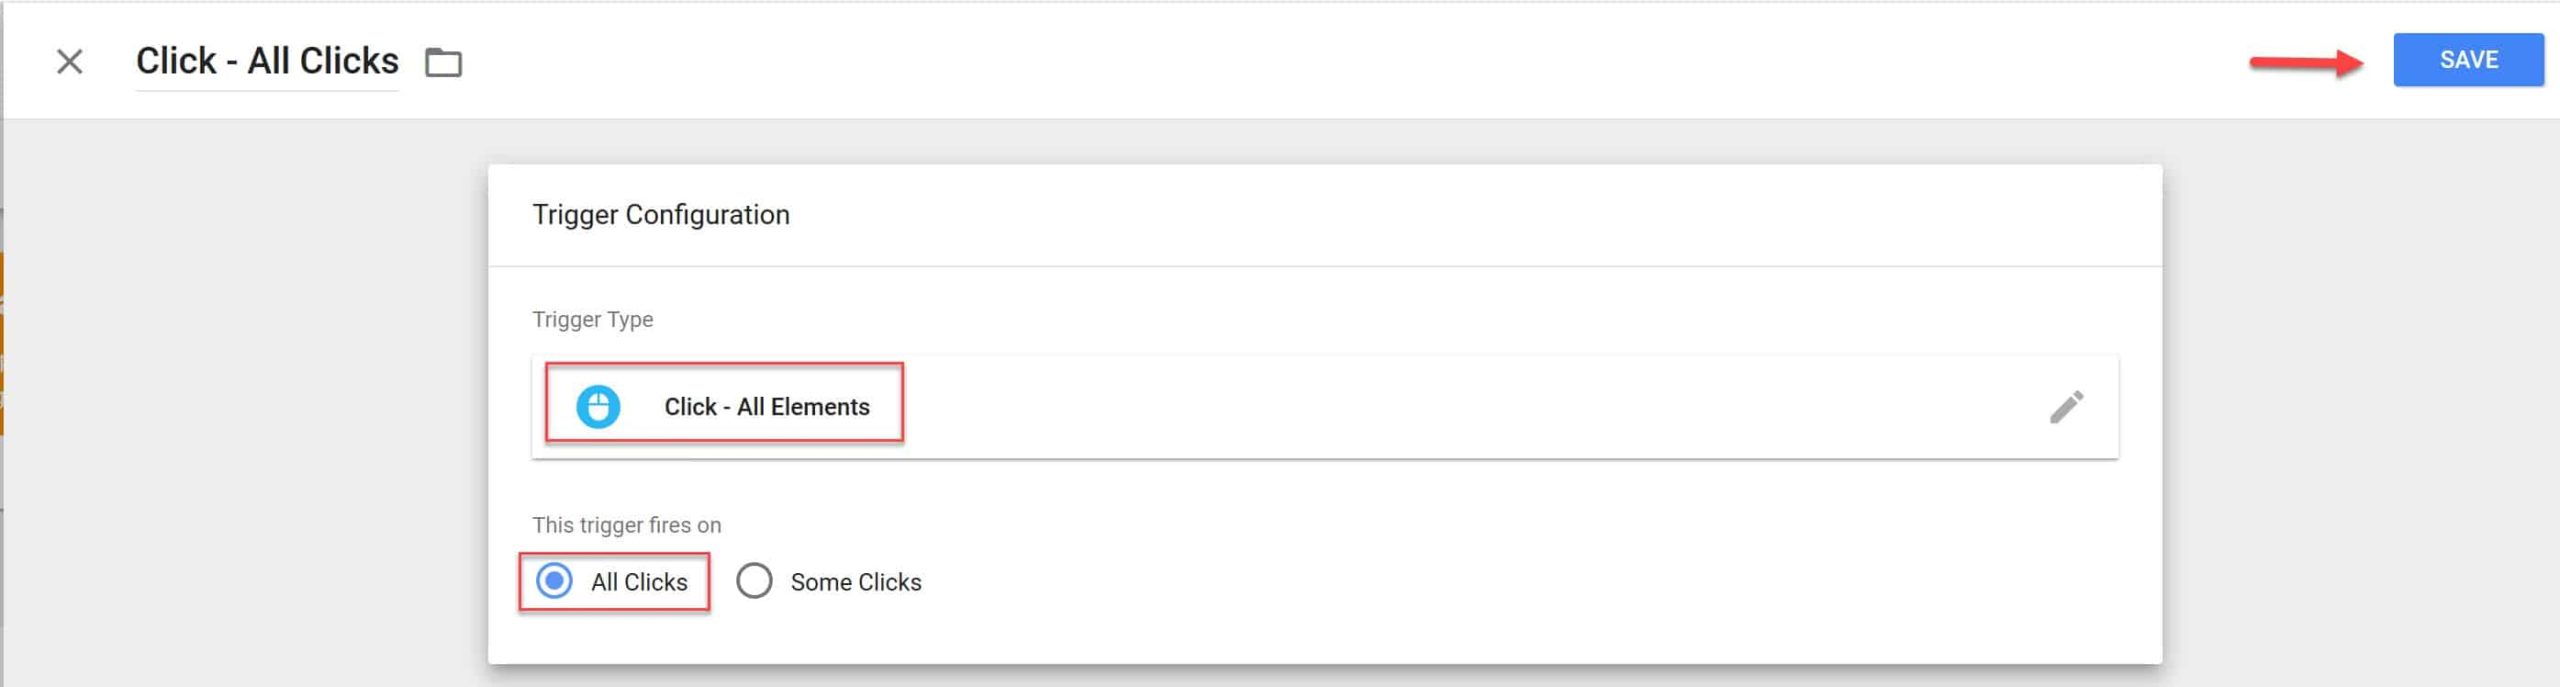
4. Name the trigger Click - All Clicks. Then click in the trigger box.

5. Under Click select All Elements. Leave the default trigger fire of All clicks. Click on Save.

6. Back in the GTM console, click Refresh.

Now we can test the GTM Debug console and verify that clicks are being registered. If GTM clicks are not registered, something went wrong and you need to troubleshoot before proceeding.
7. In the browser tab with the GTM debug console, hold down the Control/Command key and click on any link or menu item on your page. In the left Summary pane of GTM you should see a gtm.click event. Now that we have working click events, let's move on to creating a new trigger for a specific click event, and then creating an associated tag to push that click information into Google Analytics.

Google Tag Manager Click Trigger & Tag
1. In the browser tab with the GTM Debug console, locate the link/menu/item that you want to track clicks for. Press the control/command key and click on the link. As in the last step, you should get a new event in the GTM Summary console pane (and a new browser tab will open).
2. Click on the last gtm.click even then click on Variables in the GTM console. Now comes the part where what you do will diverge from my example. In my case I want to track a click on a menu item. So depending on your theme and configuration, the variable and variable value will be different. You must pick at least one variable to match against. In my example I'll do two variables. One for filtering on menu-text and the other the actual menu item name (click text).

3. Let's create a new trigger. Go back to the main GTM console window and in the left click on Triggers, then click on NEW.

4. Enter a the trigger name. I like to use a naming standard, so you can keep triggers organized. So I'll use Click - Vembu, as I want to track clicks on my Vembu menu item. Then click in the middle triggers area to open the Choose Trigger type flyout menu.

5. In the flyout menu locate the Click section and select All Elements.

6. Change the selection to Some Clicks, and then configure your filters appropriately. In my case I configured two, one for just menu items and the other for the Vembu menu item itself. The variable data is case sensitive, so make sure it matches exactly the GTM debug variable value results. Click Save.

7. In the main GTM console on the left click on Tags, then NEW.

8. In the next window enter the tag name in the upper left corner. Then click Tag Configuration.

9. Now select the tag type you want. For this demo we want the click data sent over to Google Analytics.

10. Next up we need to configure what data is fed over to Google Analytics. First, change the track type to Event. Next, enter free form data in the Category, Action and Label fields.

11. Finally, click on the Google Analytics Settings variable drop down. If this is your first trigger, it will be blank. Run through the new variable wizard and use your Google Analytics Tracking ID.
12. At the bottom of the Tag Configuration screen click on Triggers. Select the trigger that you want to track. Save the new trigger.

Testing your Google Tag Manager Click Tag
1. Back in the GTM main console, click on the orange Refresh button.
2. In the upper right corner of the GTM console click on Submit. Follow the wizard to publish, but you need not enter any descriptions if you don't want to.

3. Refresh the browser tab that has your GTM debug console.
4. Hold down the control/command key and now click on the menu/link/object that you setup the trigger for. If all goes well a new tab should open, and you will see a newly fired event in your GTM console that matches the object you configured.

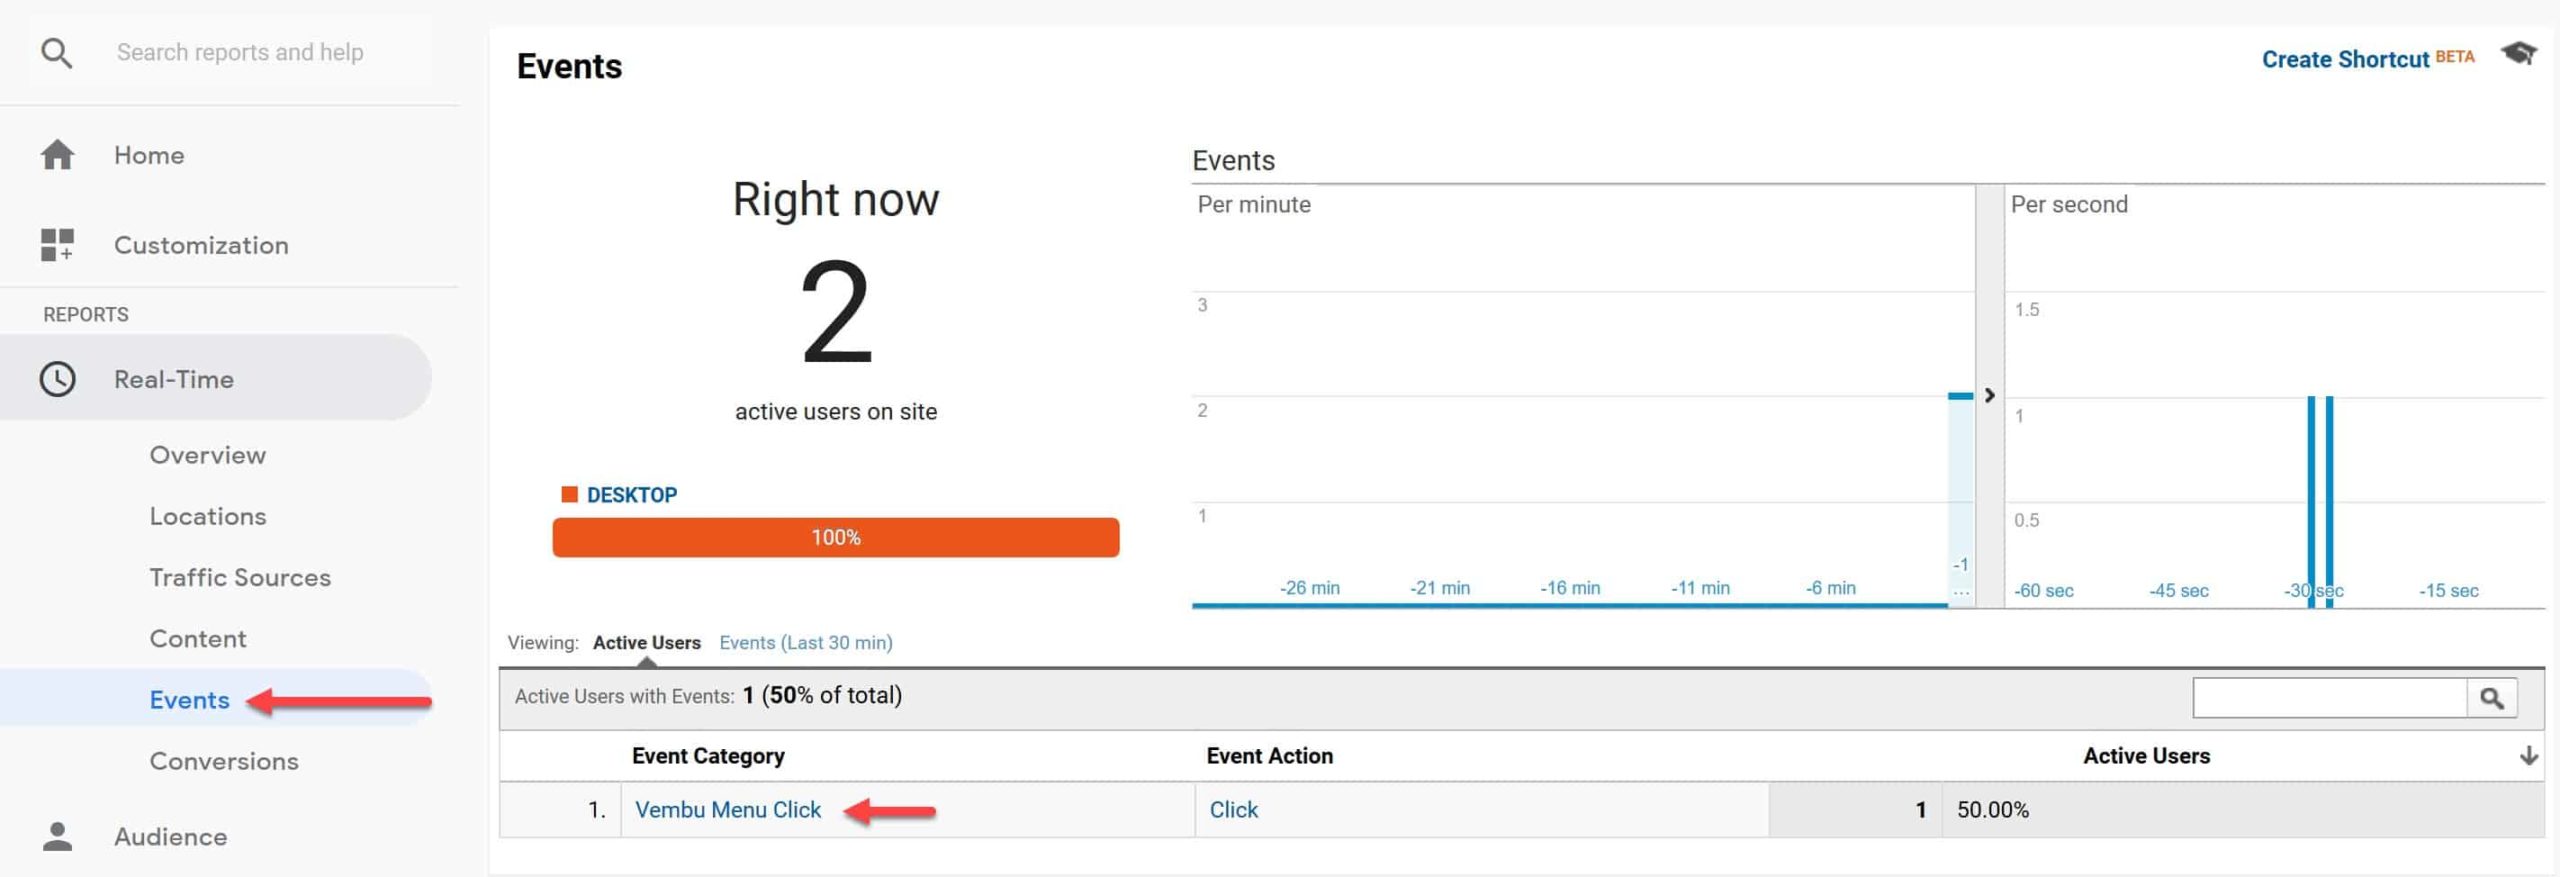
5. Now we need to make sure Google Analytics is actually getting the event. Go to your Google Analytics page and find the real-time stats. Then click on Events. Now back in your browser click on the link that is tagged. You should almost instantly see the result in Google Analytics.

Summary
While not a complex process, it is a bit tedious to setup your first Google Tag Manager tag for tracking a click. Now that you understand how to track a click, you can create more triggers and tags to push additional click data over to Google Analytics. You can also track form submission, and all kinds of other actions. The sky is the limit. You could also push analytics to other platforms like Facebook and LinkedIn.