Windows 8 and Windows Server 2012 have a number of brand new boot-time security features to help combat malware. While this article is not going to discuss them in depth, I will briefly describe them so you understand what they are and how to configure one feature, Secure Boot. Microsoft has a good blog article herefor additional details on boot-time security enhancements.
Secure Boot
Secure boot is a feature which defines an enforcement policy which ensures that only trusted (digitally signed) software is executed during the Windows boot process. Unsigned code, like a rootkit, does not execute. In fact, Windows will attempt an automatic repair process if tampered code is detected. Yes, malware like Flame, which was digitally signed with a fraudulent Microsoft certificate, could possibly go undetected. Another part of the secure boot process is Early-launch Anti-Malware (ELAM), which ensures that anti-malware software is loaded very early in the secure boot process before malware has a chance to load and ‘hide.’ For a detailed whitepaper on ELAM, see this Microsoft whitepaper.
Secure Boot is required for all retail Windows 8 computers that get Microsoft’s stamp of approval. Individually sold motherboards for built-it-yourself PCs can also implement secure boot. To support secure boot the BIOS must be UEFI based, and also specifically support the Windows 8 secure boot extensions and embedded Microsoft certificates. A TPM (trusted platform module) is NOT required for secure boot or ELAM.
Measured Boot
Measured boot provides anti-malware software with a trusted log of all boot components that are started before the anti-malware software. If the anti-malware software supports Measured Boot, it can validate that the boot process was not tampered with. To ensure a trusted log is created, a TPM is required, as each component is recorded in the TPM. The anti-malware software uses the evidence in the TPM to attest the boot state of the PC.
In enterprise environments one can leverage remote attestation, where only trusted computers (via the Secure Boot and Measure Boot process) are allowed to access resources, increasing the confidence that the computer has not been compromised. For an excellent Microsoft whitepaper on this subject check out this download. To see how Microsoft uses a TPM in Windows Server 2012, check out this article.
Configuring Windows 8 Secure Boot
New security features in Windows always pique my interest, and secure boot was no exception. So this weekend I built myself a new PC, which I specifically pieced together to support Windows 8 secure boot. After extensive motherboard research, I ended up with an Asus P8Z77-M Pro motherboard, which is Windows 8 ready. Flashing it with the latest BIOS enabled the Windows 8 secure boot UEFI feature. You can check out other Asus Windows 8 motherboards here.
Now the tricky part was figuring out exactly how to install Windows 8 to leverage the new UEFI secure boot extensions of my motherboard. After a lot of re-installs and testing, the process is actually not that difficult and there’s even a powershell command to tell you if secure boot is enabled and functioning so you aren’t guessing whether the process worked or not.
The instructions are specific to my motherboard and firmware revision, so your screens and features may not be the same and require some tweaking to get the right combination of settings to work.
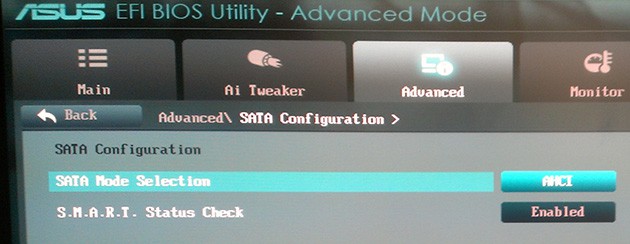
There is a problem with Asus firmware version 1406 for my motherboard which does not allow Windows 8 in UEFI boot mode to recognize hard drives when the SATA mode selection is set to “RAID”. I wanted to use Intel Smart Response with my SSD to boost access to my legacy spinning drive, but that’s out of the question until Asus fixes their firmware. So for now I’m using AHCI mode and no Intel Smart Response. According to Intel RAID+EUFI is a supported configuration, and they’ve even released firmware for their own motherboards to fix the same problem on their boards.
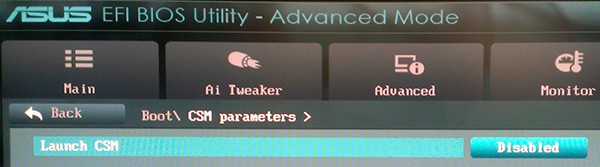
Next you need to disable boot CSM (compatibility support mode), which helps lock down the boot process and turns off the legacy BIOS support for option ROMs.
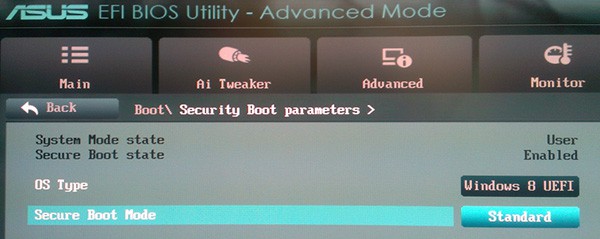
Now you should change the OS type to Windows 8 EUFI and ensure secure boot mode is set to standard mode, as shown below.
In order to boot Windows 8 into EUFI mode you need to either write the ISO image to physical DVD media, or boot from a FAT32 formatted USB stick specially prepared via these instructions (just do steps 1-2). Note that NTFS formatted USB sticks do NOT work with UEFI. Note that installing Win8 from USB is super fast, even to a legacy magnetic hard drive. Total install time was about 7 minutes.
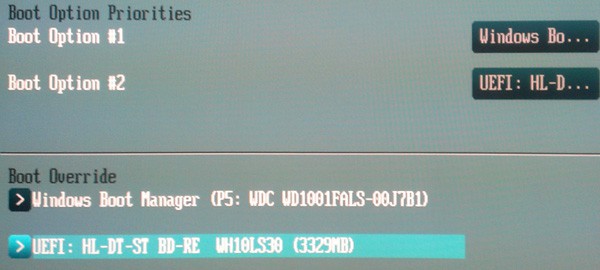
Power off your PC, insert the Windows 8 media of your choice, then power on your PC and immediately enter the UEFI configuration screen. On the Boot menu of my Asus motherboard I saw my Blu-ray drive was a boot option and it was prefixed by UEFI, which means it will boot into the EFI mode, which is what we want. I happened to have an existing Win8 installation due to prior installs, so that’s why you see the Windows Boot Manger listing in the screenshot below. You will not see that on your system, unless Win8 is already installed in EFI mode.

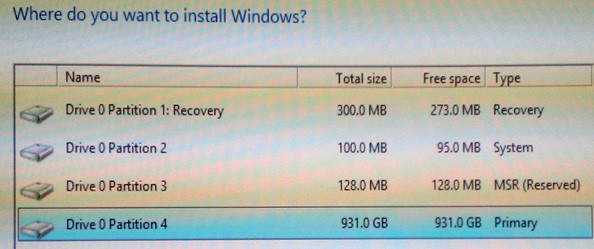
Assuming you want to use the whole disk for Windows 8, a neat trick is to select Next on this screen WITHOUT creating any partitions manually. If you do that, Windows will magically create all of the required partitions (four of them) with the appropriate sizes and partition designators.
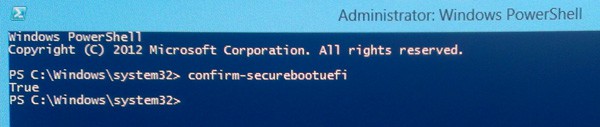
At this point you can let the installation rip (which is extremely fast, even from legacy DVD media). Once you reach the Windows 8 start screen, open an elevated powershell command prompt and type:
confirm-SecureBootUEFI
And if secure boot is enabled and properly functioning it should return a value of TRUE. If you get any other response (not supported command, etc.) then you are not using secure boot. As you can see below, I was successful in installing Windows 8 to use secure boot!
For an additional resource you can check out the geeky Microsoft whitepaper Installing Windows on UEFI Systems. For some additional details on WHQL certification and secure boot requirements for machines that bear the Windows 8 logo, check out this MSDN article.


Interesting article, thanks. What graphics card did you use? I am asking because it seems that even the latest NVIDIA/AMD cards do not support UEFI GOP. In consequence, I can’t disable the CSM and Secure Boot will not work.
I used the built-in Intel HD graphics.
Thanks for your reply!
Another question, there’s a blog post by some Intel guy that also explains how to enable Secure Boot (http://communities.intel.com/community/vproexpert/blog/2012/06/26/microsoft-windows-8–enabling-secure-boot). There it is mentioned (Section ‘Enabling Secure Boot’, Steps 4-9) that you first need to load the keys in the UEFI/Bios before switching back to standard mode. Did you (perhaps accidentally) also follow these steps?
The reason why I ask is that I am trying to nail down why exactly Secure Boot does not work on my machine. I followed your tutorial closely but the ‘confirm-securebootuefi’ command is not even recognized.
Just to help a little on my setup, with a non compatible VGA adapter (Ati 5850).
I removed my VGA adapter & disabled CSM. Then i installed Windows 8 in UEFI mode. After succesful install, i enabled Windows 8 UEFI Security boot (and YES, you have to choose ‘Custom’ and then load default security keys in the “custom” menu).
When you have loaded the defaults in security, switch it back to ‘Standard’. Check in powershell if it has booted in security mode.
After that i installed my Ati card again, i enabled CSM, and set Boot Device to UEFI only, and the rest to UEFI first (except for network, which i set to ignore).
My system still boots in UEFI and secure mode after this. So this should work.