When dealing with hypervisors it is not uncommon to be required to supply specific drivers in order to recognize the virtual hardware, such as NICs and SCSI controllers. A while back I wrote blog articles on how to inject VMware drivers (PVSCSI and VMXNET3) into a Windows Server 2008 R2, Windows 7 image and Windows Server 2012. You can check out those articles here and here. But if you use the Nutanix Acropolis hypervisor (based on KVM), you will need a different set of drivers.
This article will show you how to inject the VirtIO drivers into your Windows Server 2012 R2 ISO, so that it will recognize the virtual KVM hardware. Do keep in mind that in the future Nutanix will be redistributing the Fedora VirtIO drivers, after we get them WHQL signed by Microsoft. So while this article uses unsigned Fedora drivers, in the future you can use fully signed and supported drivers. Stay tuned for that release!
The process below injects the required drivers into the Windows Server 2012 R2 installation boot files, and the actual Window Server operating system, for a fully KVM aware image. The drivers include Balloon, NetKVM, serial, rng, SCSI, and stor.
1. Download the Windows 8 ADK (Assessment and Deployment Kit) from here. Never mind that it says Windows 8, as it will work with Windows Server 2012 R2.
2. Start the installation process and after a long download select the two options below (Deployment Tools and Windows Preinstallation Environment (Windows PE)). WinPE is optional, but in case you need it in the future, I’d install it anyway. If you are in a hurry and won’t ever use WinPE, just select Deployment tools.

3. Mount the Windows Server 2012 R2 ISO. Navigate to the Sources directory and copy boot.wim and install.wim to your computer, say on the C: drive under C:\WIM.
4. Download the Fedora VirtIO Drivers from here, or when they are released, the Microsoft-signed Nutanix Acropolis driver bundle. Fedora packages the drivers as an ISO, so mount that ISO to your VM. I’m using the Z drive for my CD-ROM.
5. Create a folder on the C: drive called Mount. This will be the WIM mounting target.
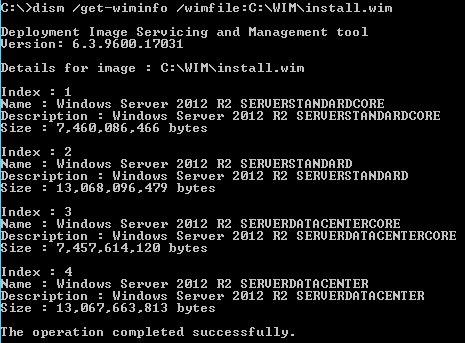
6. Depending on your Windows Server 2012 R2 ISO image, it may have varying amounts of images included in the WIM. The VL ISO I have contains four indexes, or images. You can list the indexes with the following command:
dism /get-wiminfo /wimfile:C:\WIM\install.wim
 Decide which index you want to inject the drivers in. Open the provided batch file found here and modify the IDX variable as needed. You could run the script multiple times and do all indexed images, if you wish.
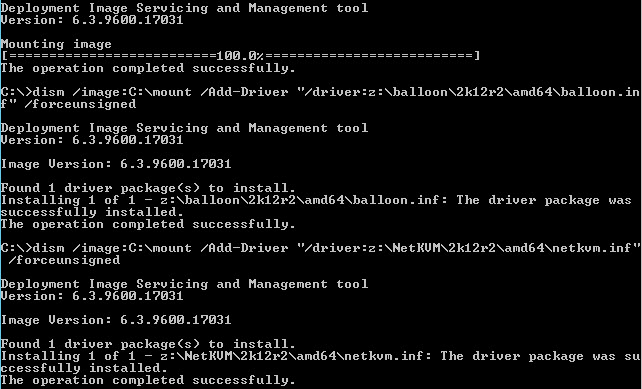
7. Run the batch file and wait for it to complete. It should take a few minutes, depending on the speed of your disks. Make sure you monitor the output for any errors, in case you messed up the paths to the files.
8. Now you can re-build the Windows ISO with the updated WIM files, and you are set. Just create a VM shell on Nutanix Acropolis, then mount the updated ISO, and it will be all set for a smooth installation. If you don’t have an ISO building tool, I recommend UltraISO. It’s not free, but I’ve exceptionally good luck with it for many years.
Download the batch file here.