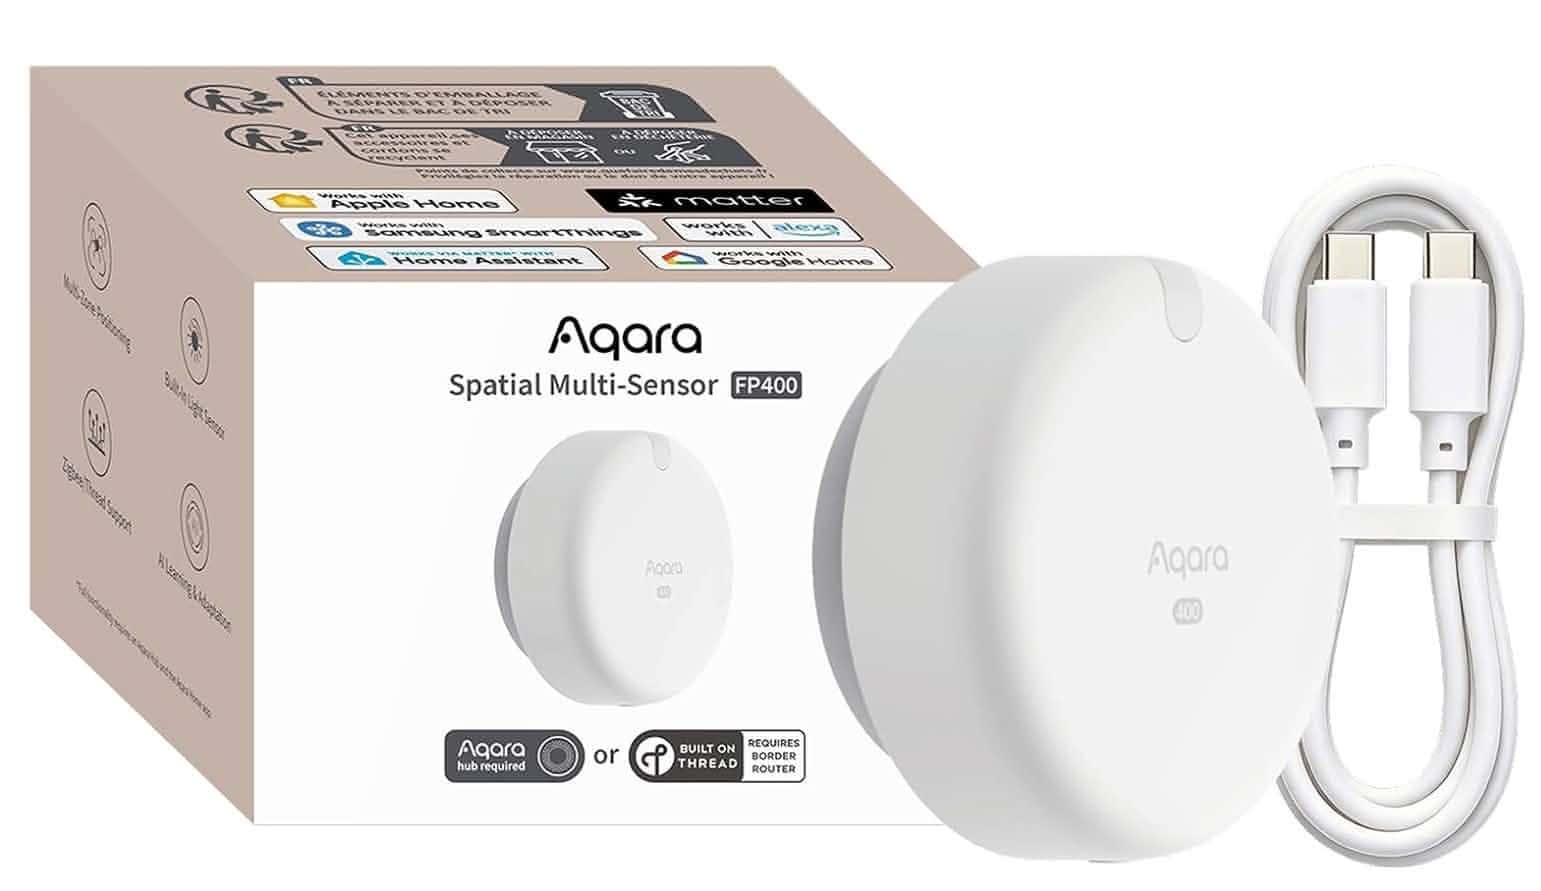
In January 2026 at CES Aqara announced the Spatial Multi-Sensor FP400, their latest USB-C powered mmWave presence sensor. The FP400 finally made its public debut in the US in September 2026. This is the Aqara FP2 (2023) successor and Aqara has added a number of new features and improvements to the FP400. The majority of this post is focused setting up the FP400, and applies to any smart home platform. However, I do have a section at the end for Home Assistant users.
What's Covered in this Guide?
- Presence Sensor vs. Motion Sensor
- Aqara FP400 Specs
- Multi-Zone Detection
- Aqara FP300 vs. FP400
- Aqara FP400 Room Placement Tips
- Initial Aqara FP400 Setup
- Fine Tuning the Room Map
- Additional FP400 Configuration
- Home Assistant Integration
Presence Sensor vs. Motion Sensor
How is a presence sensor different from a PIR (passive infrared) motion sensor? A presence sensor uses mmWave technology (microwaves) to continuously monitor a space for people even if they are extremely still. mmWave is sensitive sensitive enough to detect humans breathing, and can register and maintain their presence state even if they are extremely still.
When would you use a presence sensor vs. a motion sensor? If you have areas that people are just transiting through, such as a hall or stairs, you would want to use a traditional PIR motion sensor. They are inexpensive and work great for that purpose. However, if you have areas that are occupied for periods of time (living room, bedroom, bathroom, office, etc.) then a presence sensor is a better choice. Gone are the days of waiving your arms in the air to turn on the lights because the PIR motion sensor stopped detecting you.
I’ve been using several Aqara FP2s for over three years, and they were a total game changer for home automation. I’ve had them in a number of rooms with very good results once they stabilized the firmware. The FP400 is the successor to the FP2 with several improvements.
Aqara FP400 Specs
The Aqara FP400 has the following features:
- Simultaneous multi-person presence detection — up to 10 people
- Up to 8 user definable presence detection zones
- Next-generation 60 GHz mmWave sensor (5x the density of the FP2)
- Dual-Protocol (Thread and Zigbee; no Wi-Fi)
- Multi-ecosystem support (Home Assistant, Apple Home, Alexa, Google Home, SmartThings, etc.)
- Ambient light sensor
- Smarter people detection and filtering of non-human objects like pets and robot vacuums
- Wide 120 degree field of view
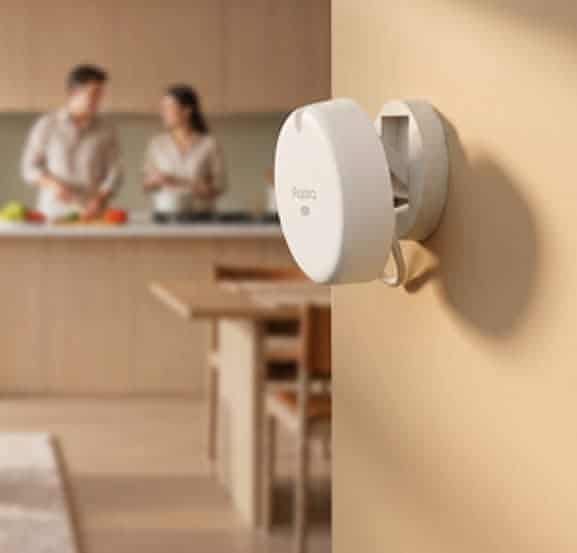
- Flexible magnetic mount
- Supports side, corner, and ceiling mounting options
- Aqara hub is required to access the full feature set
- USB-C powered (no batteries)
What’s very interesting about the FP400 is that Aqara ditched Wi-Fi in favor of Thread and Zigbee. This is the same playbook as the Aqara FP300 (battery-powered presence sensor), which is also dual-protocol. I’ve been extremely happy with the FP300, so I’m very excited to see the FP400 has in store.
If you use the FP400 in Thread mode, it can NOT act as a Thread router. It presents itself as a Thread end device. This means it will not strengthen your Thread network. This is a bit of a bummer, as it’s wall-powered and could easily act as a Thread router. They are probably using common Thread firmware between their battery and wall-powered devices.
Multi-Zone Detection
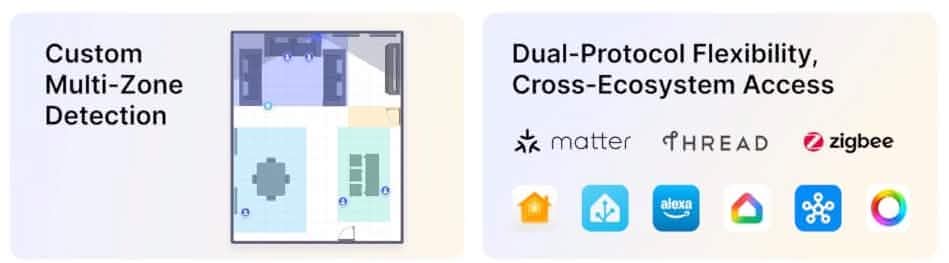
The Aqara FP400 supports up to 8 detection zones. Why would you want to use multiple detection zones? Here are a few examples: You have a large living room with a large sofa, and two reading chairs. In this case you could setup three detection zones: one for the sofa, one for each of the reading chairs. If you had floor lamps next to each of the reading chairs, you could turn on the light next to that chair when someone is in the chair. Or, if people are sitting on the sofa and you turn on the TV, you trigger a movie night scene and dim the lights.
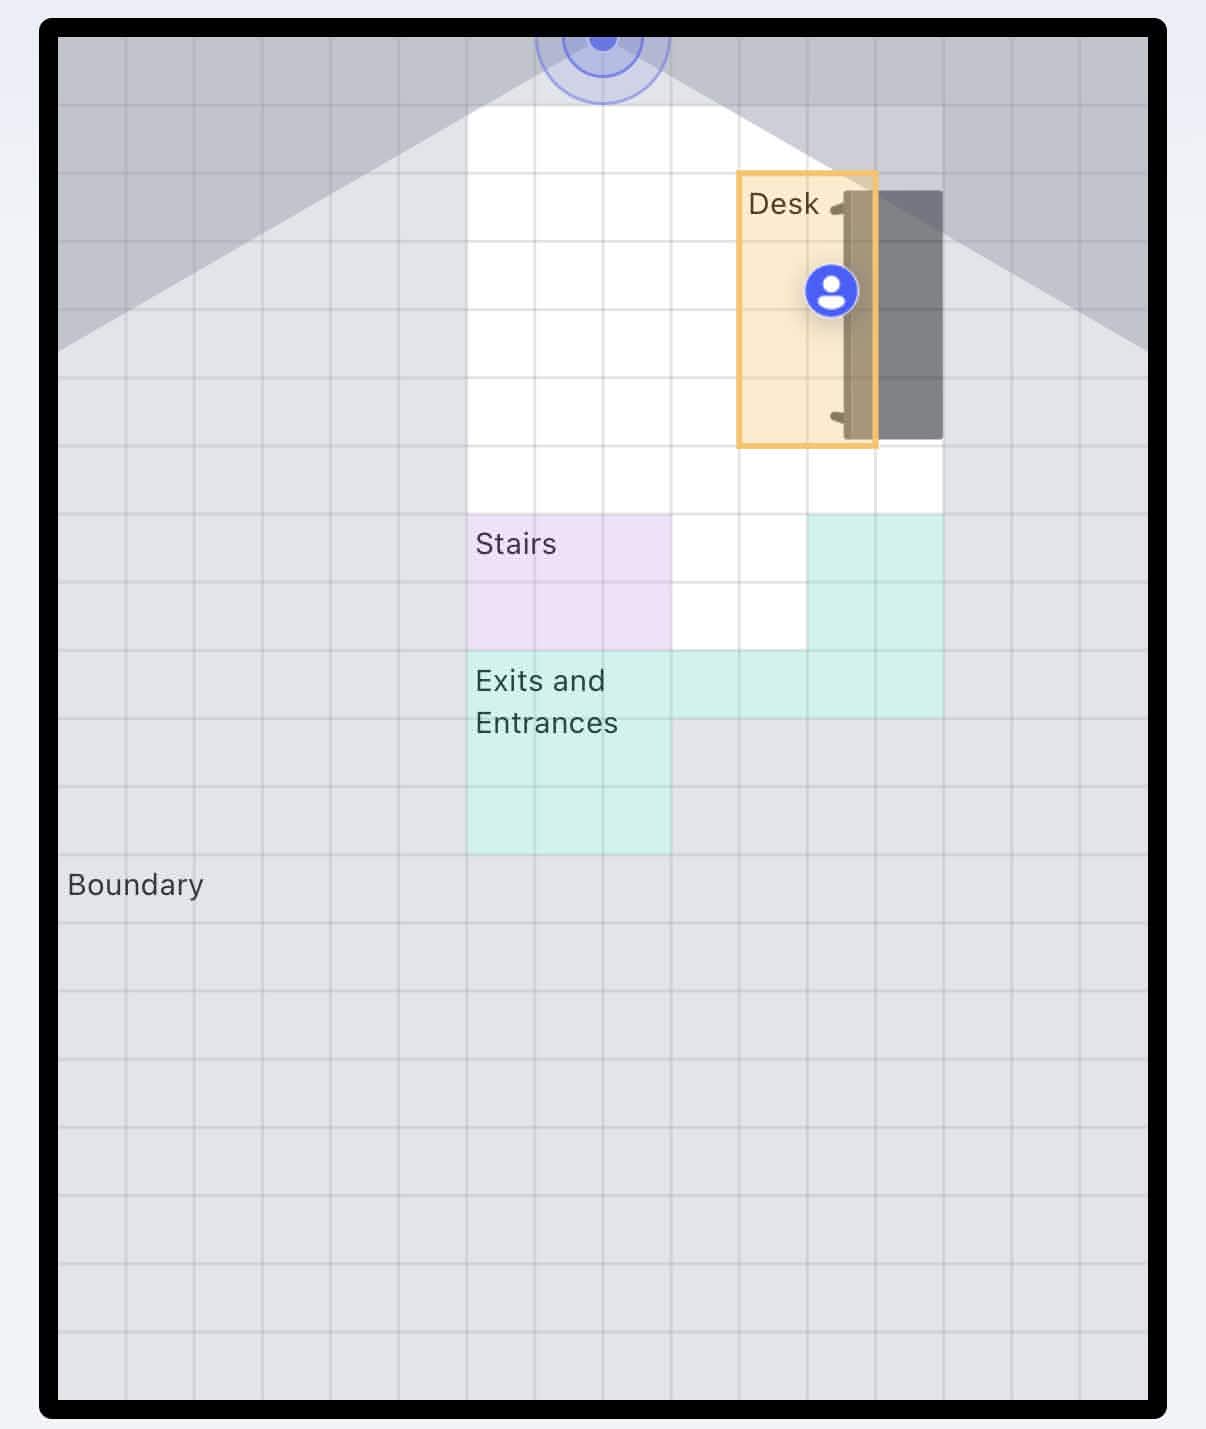
In addition to custom detection zones, the FP400 supports a global room presence sensor. So for example, if you have two custom detection zones, you will see three presence sensors in your home automation platform (one global and two custom). I use this in my office where I have a detection zone for my desk and a detection zone for the stairs leading to the loft.
Unfortunately with the Aqara FP400 your detection zones cannot overlap. So when mapping out your room in the Aqara Home app, any particular ‘square’ can only be part of one detection zone. Other presence sensors do allow detection zones to overlap, which can be helpful in some cases.
Aqara FP300 vs. FP400
Earlier in 2026 Aqara released the FP300. The FP300 is a battery-powered presence sensor that uses Zigbee or Thread. I’m a big fan of the FP300, and have almost a dozen of them in my home. However, I also had several of the FP2s around the house for specific use cases. I’m in the process of replacing the FP2 with the FP400s. For a full review of the Aqara FP300, check out my post: Aqara FP300: The Ultimate Presence Sensor (Home Assistant Edition).
Here’s my thoughts on when to use the FP300 vs. FP400:
- If you need user-defined detection zones, the FP400 is the way to go. You can define up to 8 custom detection zones. The FP300 does not support zones, although you can adjust the sensing range.
- If you need a presence sensor in a location that’s not near an outlet, the FP300 is the way to go.
- The FP300 supports temperature, humidity and light level sensing. This is perfect for a bathroom, where you might want to trigger a fan when someone is in the shower. The FP400 only supports light level sensing.
- The FP300s can be used with the Aqara W200 thermostat as remote temperature sensors.
- The FP300 is cheaper than the FP400, so it’s more cost effective if you need multiple presence sensors.
- If you have a bedroom, for example, where you want multi-hour presence detection, the FP400 is the way to go since it’s USB-C powered and better suited for monitoring you while you sleep. The FP300 is battery powered and may lose presence detection during the night.
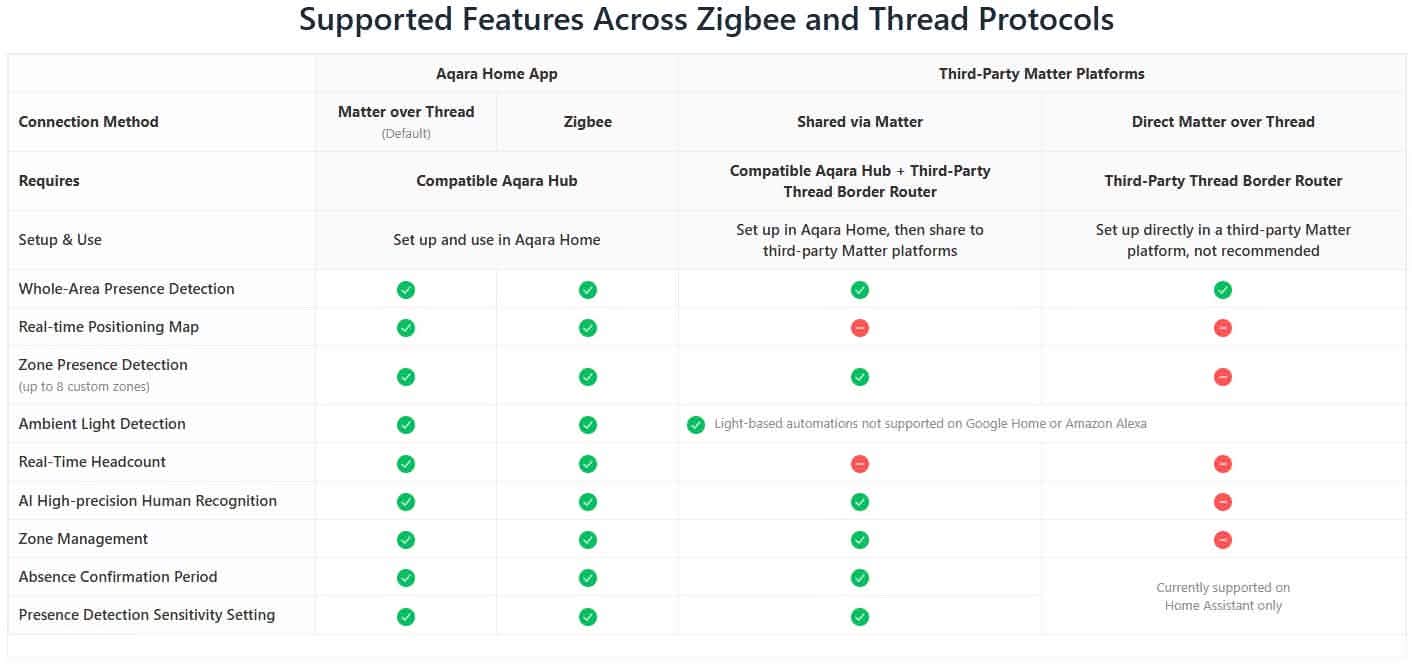
- When used in Zigbee mode, the FP300 can be paired directly to Home Assistant and with Zigbee2MQTT you have full access to all of the configuration parameters. The FP400 is best used in Thread mode with an Aqara hub so you can access the room map and customization the settings.
Aqara FP400 Room Placement Tips
- Room placement is key to having the FP400 perform optimally. Depending on how many zones you want, entrances/exits, etc. those will play a role in where to place the FP400.
- Place the FP400 on a wall between 150 cm and 400 cm (60 to 158 inches) off the floor. Be careful of objects that can cause microwave reflections (TVs, floor standing speakers, mirrors, etc.) which may interfere with the FP400 and cause ghosting.
- Consider deadzones of the FP400, as coverage is approximately 120 degrees. Make sure the areas you want covered are firmly within sensor range.
- Be mindful of obstacles in the room such as floor lamps, tall plants, curtains, etc. to make sure the FP400 has clear line of sight to your zone(s) of interest.
- The FP400 needs an outlet somewhat near by, so take that into consideration.
- If you decide to move the FP400 during or after you build a room map, re-validate all zone placement. Even minor placement changes can result in the need to tweak your room map.
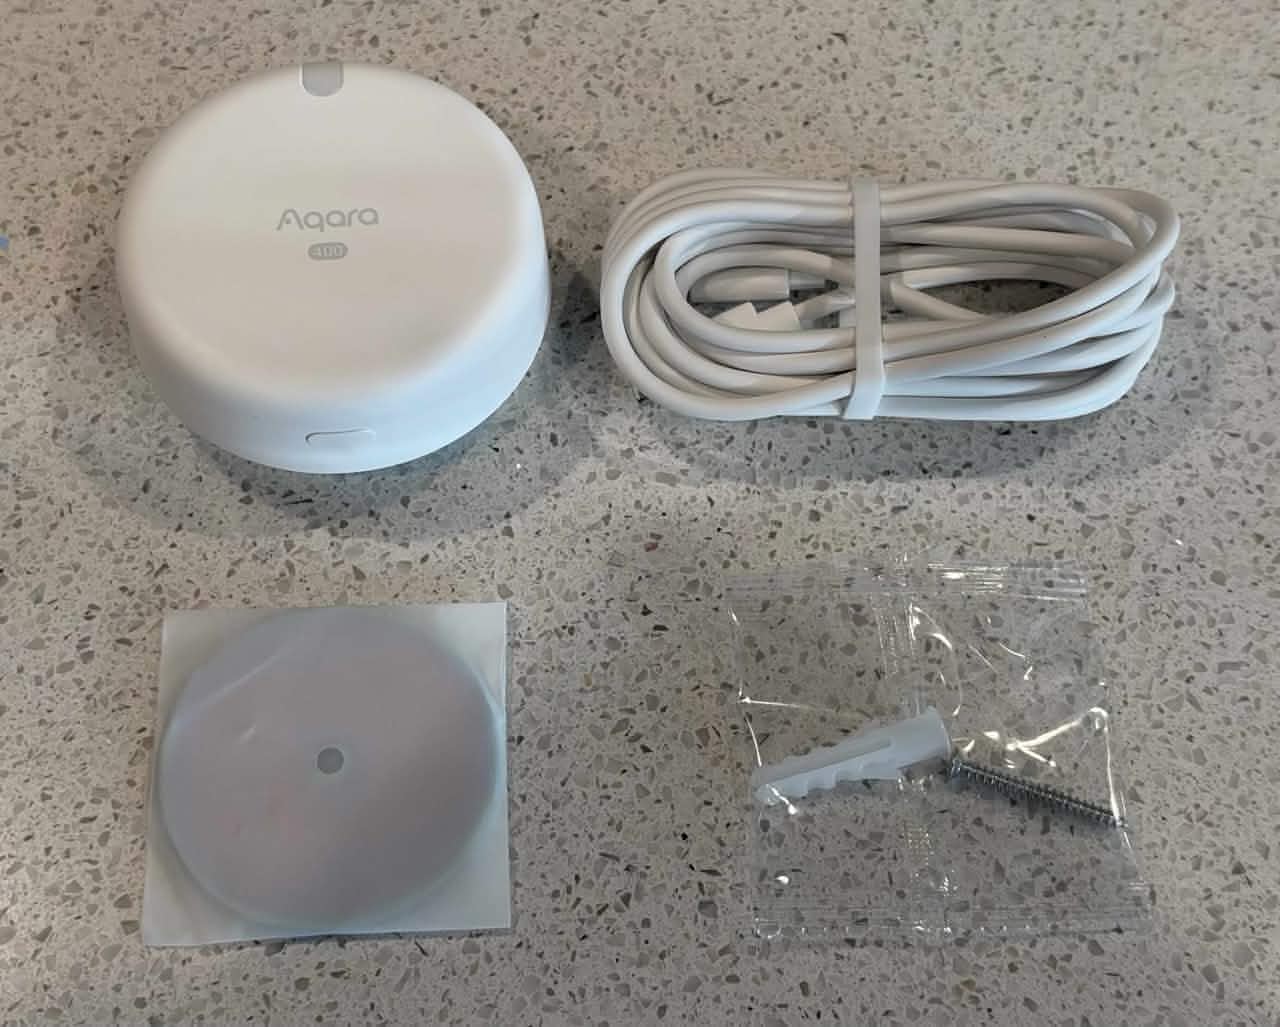
The Aqara FP400 kit comes with a metal magnetic mount, screw, and USB-C cable. The rear portion of the FP400 has an articulating arm that allows you to adjust the angle of the FP400 for optimal coverage. Please note that a USB-C power adapter is not included, so bring your own.
Initial Aqara FP400 Setup
To get the most out of the Aqara FP400 you need one of Aqara’s hubs. It’s compatible with the Aqara Hub M3, M200, M230, M100, Camera G350, Doorbell G410 and Thermostat W200. I opted to use my camera G350. You can NOT use the M1S/M1S Gen 2, Hub M2 or Camera hub G2H/G2H Pro, or camera hub G3.
My primary home automation system is Home Assistant and I opted to use the Thread protocol for the FP400. All of the initial setup was done using the Aqara Home app on my iPhone. I have a mix of Apple TV 4Ks (Gen 3 and Gen 4) and two Aqara hubs (camera G350 and W200 thermostat). Once everything was setup in the Aqara app, the last step was to ‘share’ it to Home Assistant via Matter. But let’s not get ahead of ourselves.
Setup process:
- On your iPhone download the Aqara Home app, if you don’t already have it.
- Mount the FP400 in your desired location and power it up.
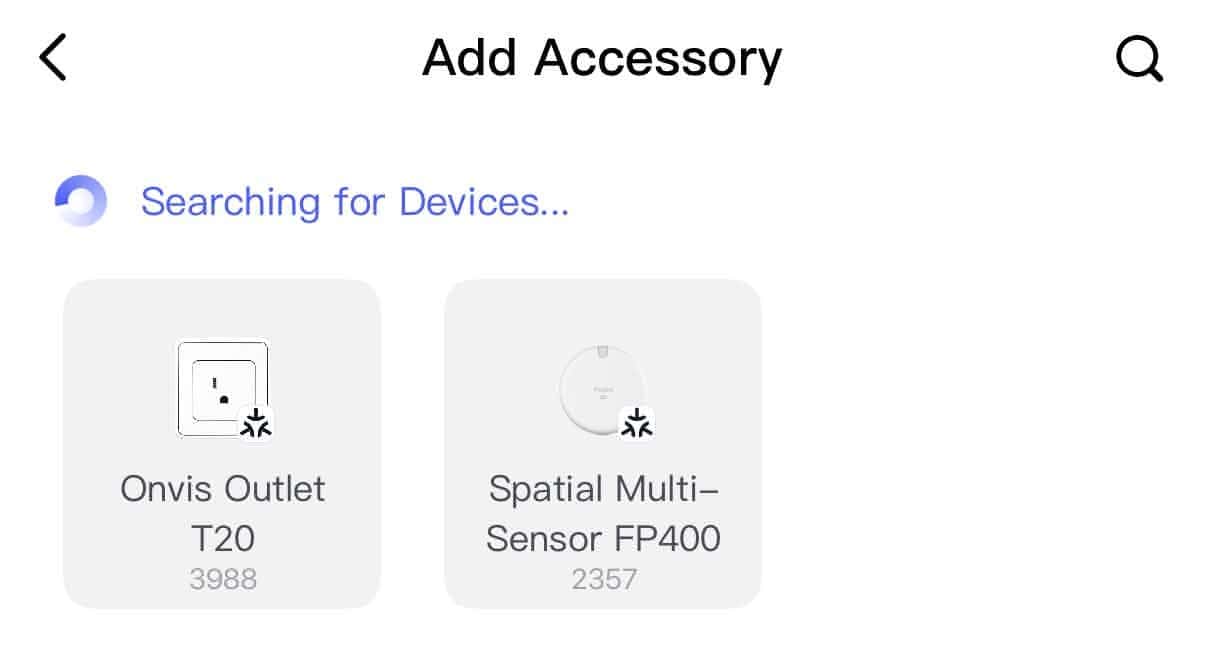
- Open the Aqara Home and in the upper right tap on the + sign and tap Add Accessory.
- It should automatically detect the FP400.
5. Select the device protocol you want to use. I suggest Thread. Tap Next.
6. Scan the Matter QR code, NOT the Aqara MagicPair QR code.
7. Tap the Aqara hub you want to use with the FP400.
8. Tap Set Up.
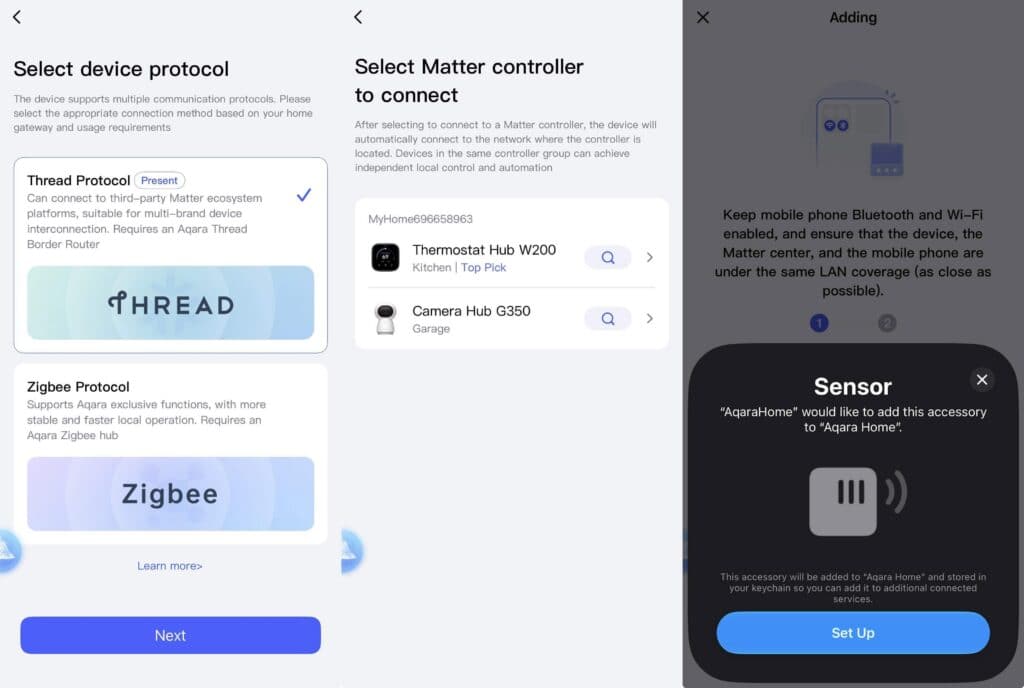
9. Give the FP400 a name. Tap Done.
10. Change the Location to the room that the FP400 is in. Tap Next.
11. Modify the Device Card Information as desired. Tap Next card.
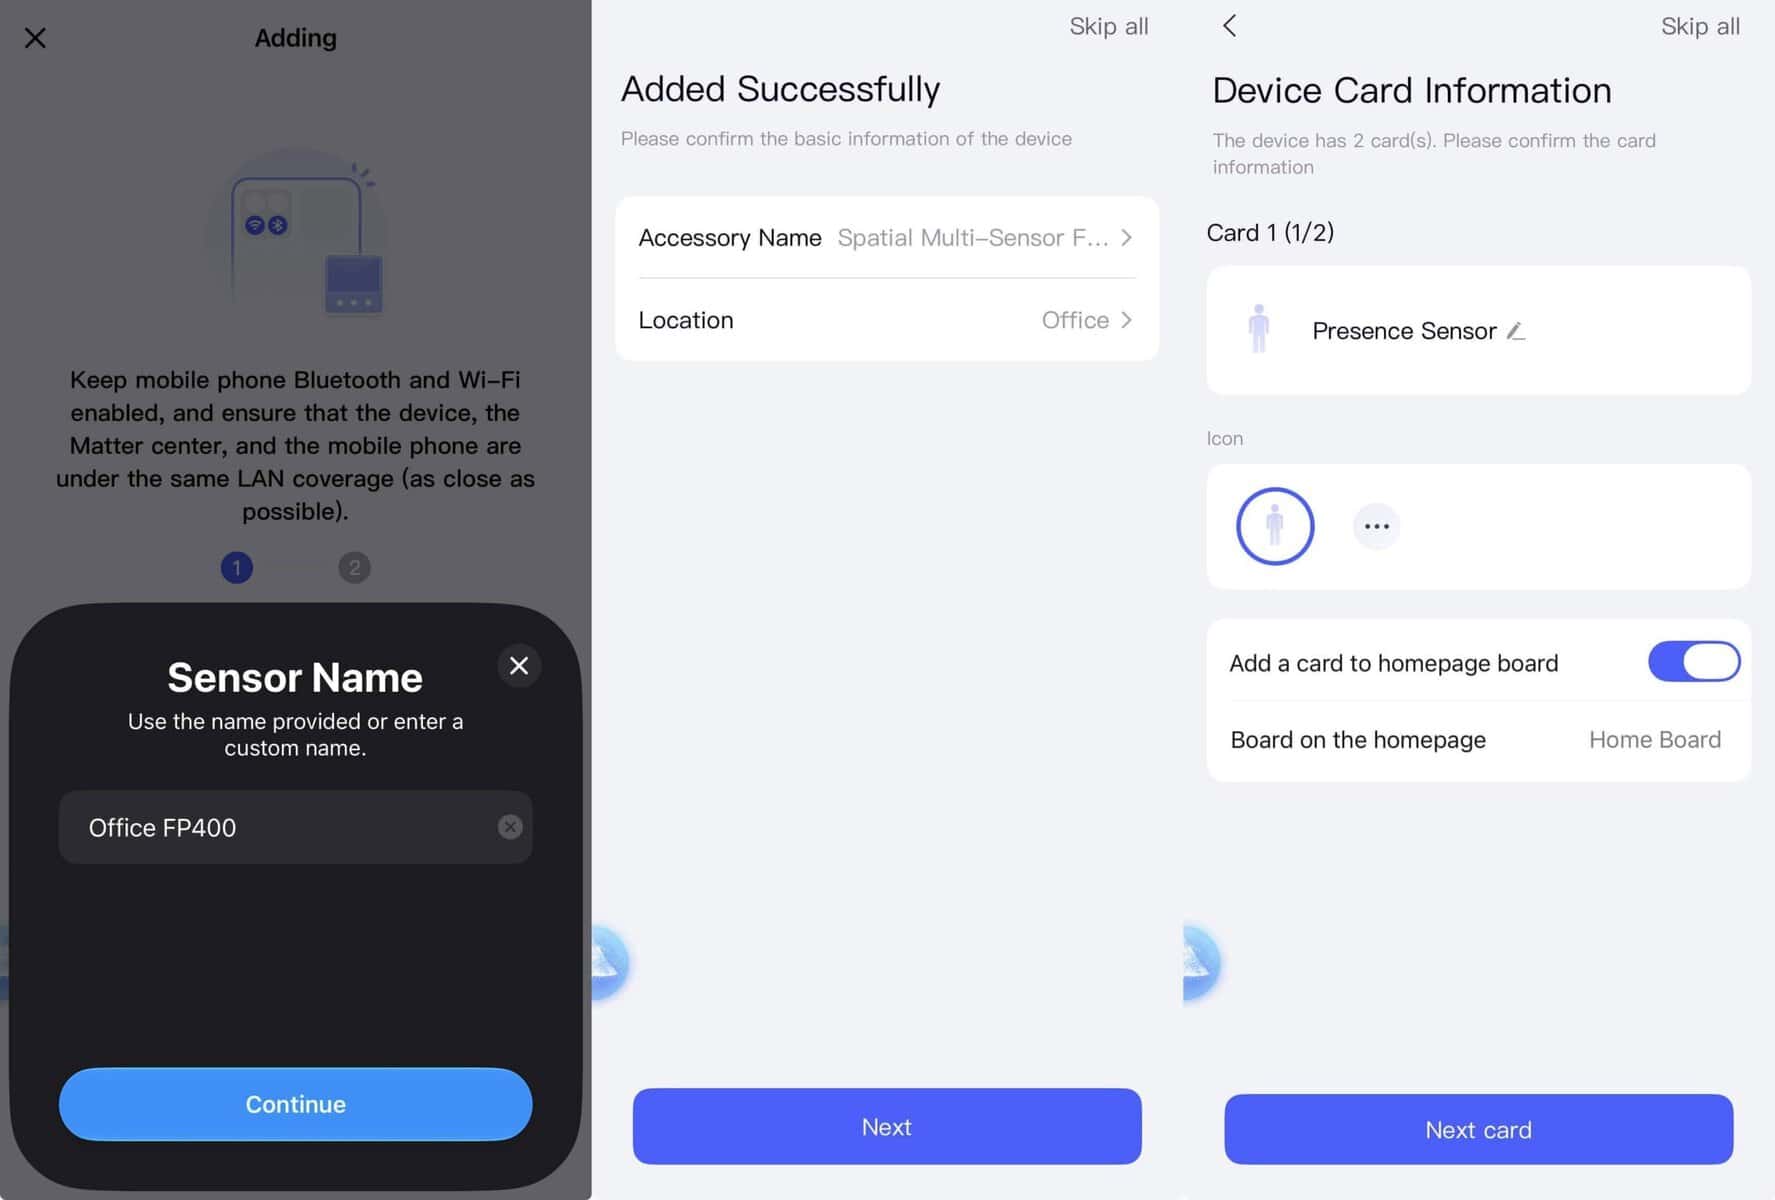
12. One the second device card, modify as you desire. Tap Done.
13. Select your installation method. Tap Next.
14. Select your installation position. Tap Next Step.
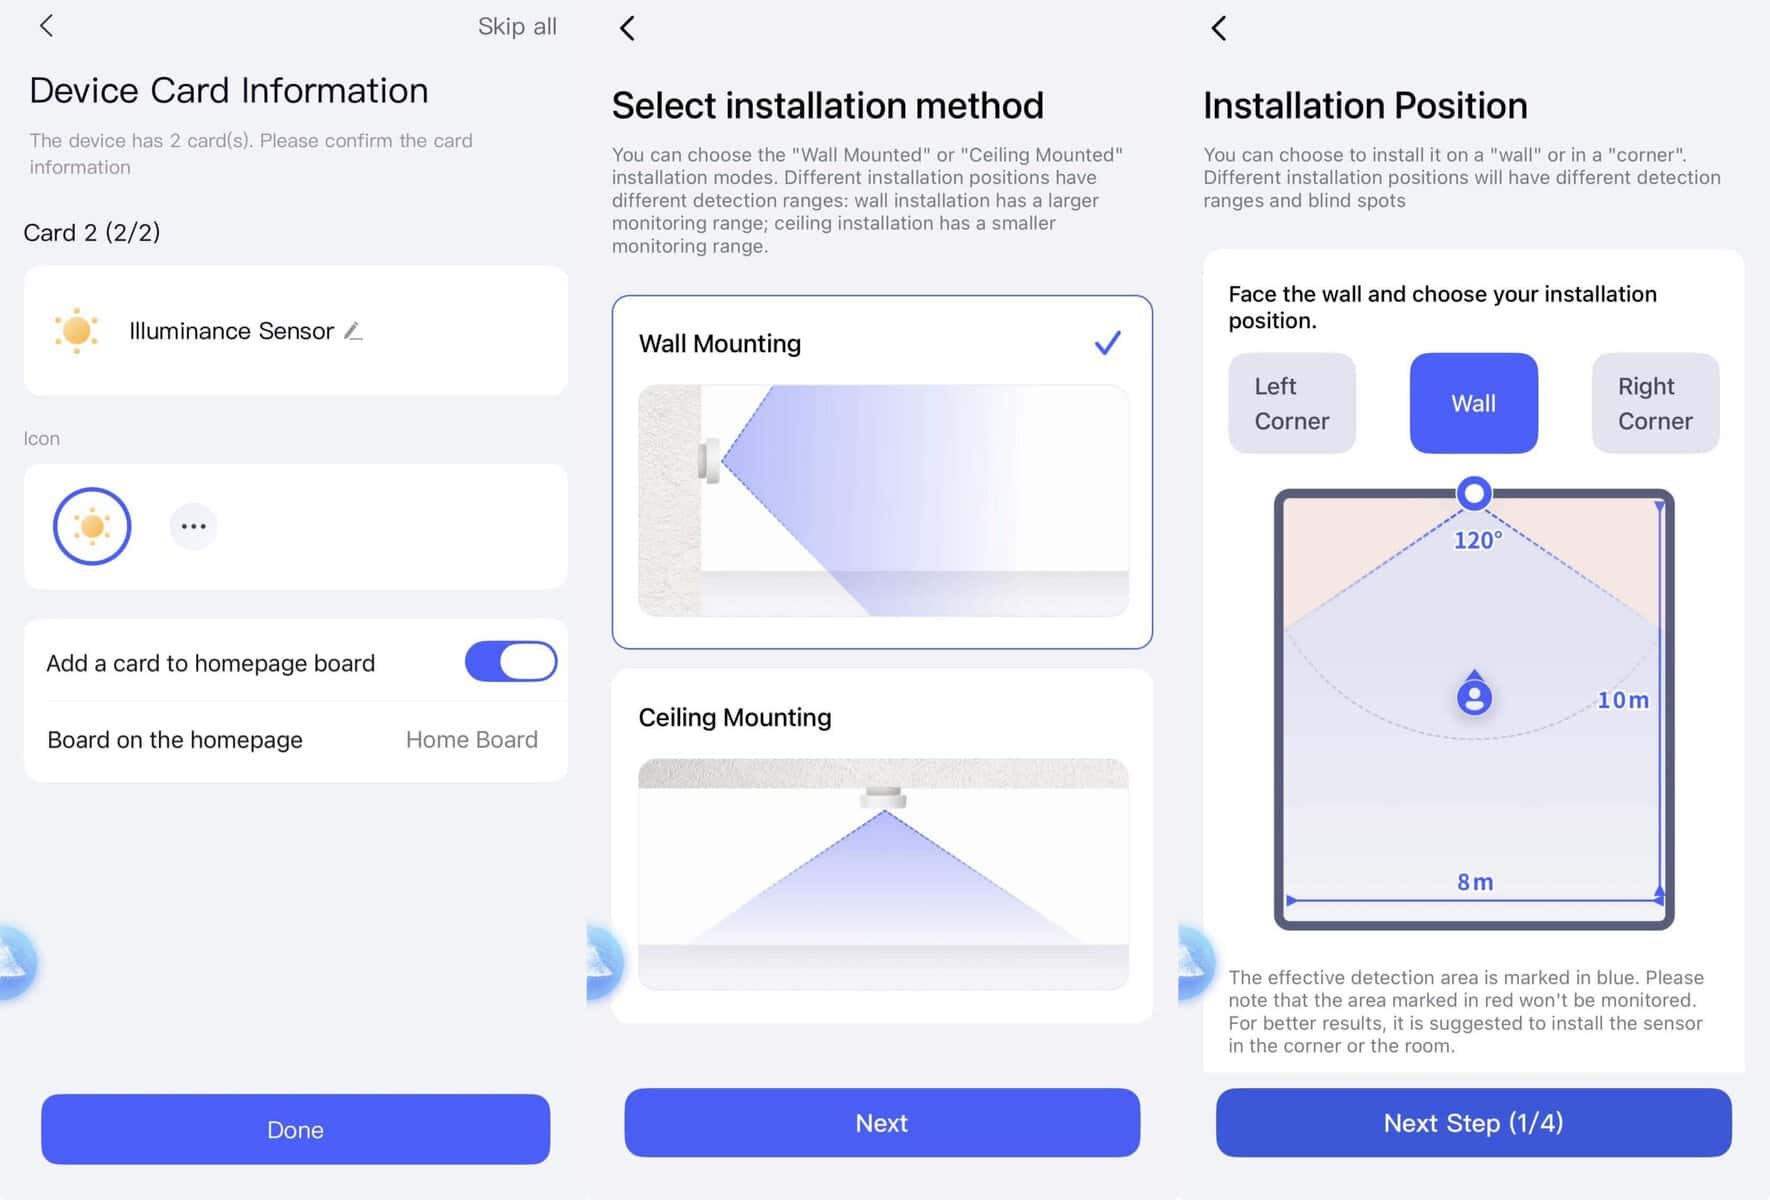
15. Review the Installation Guide summary. Tap Next Step.
16. Review the Device Angle Detection summary. Tap Next Step.
17. Use a tape measure and measure the hight of the FP400 and enter it (cm only). Tap Complete Installation.
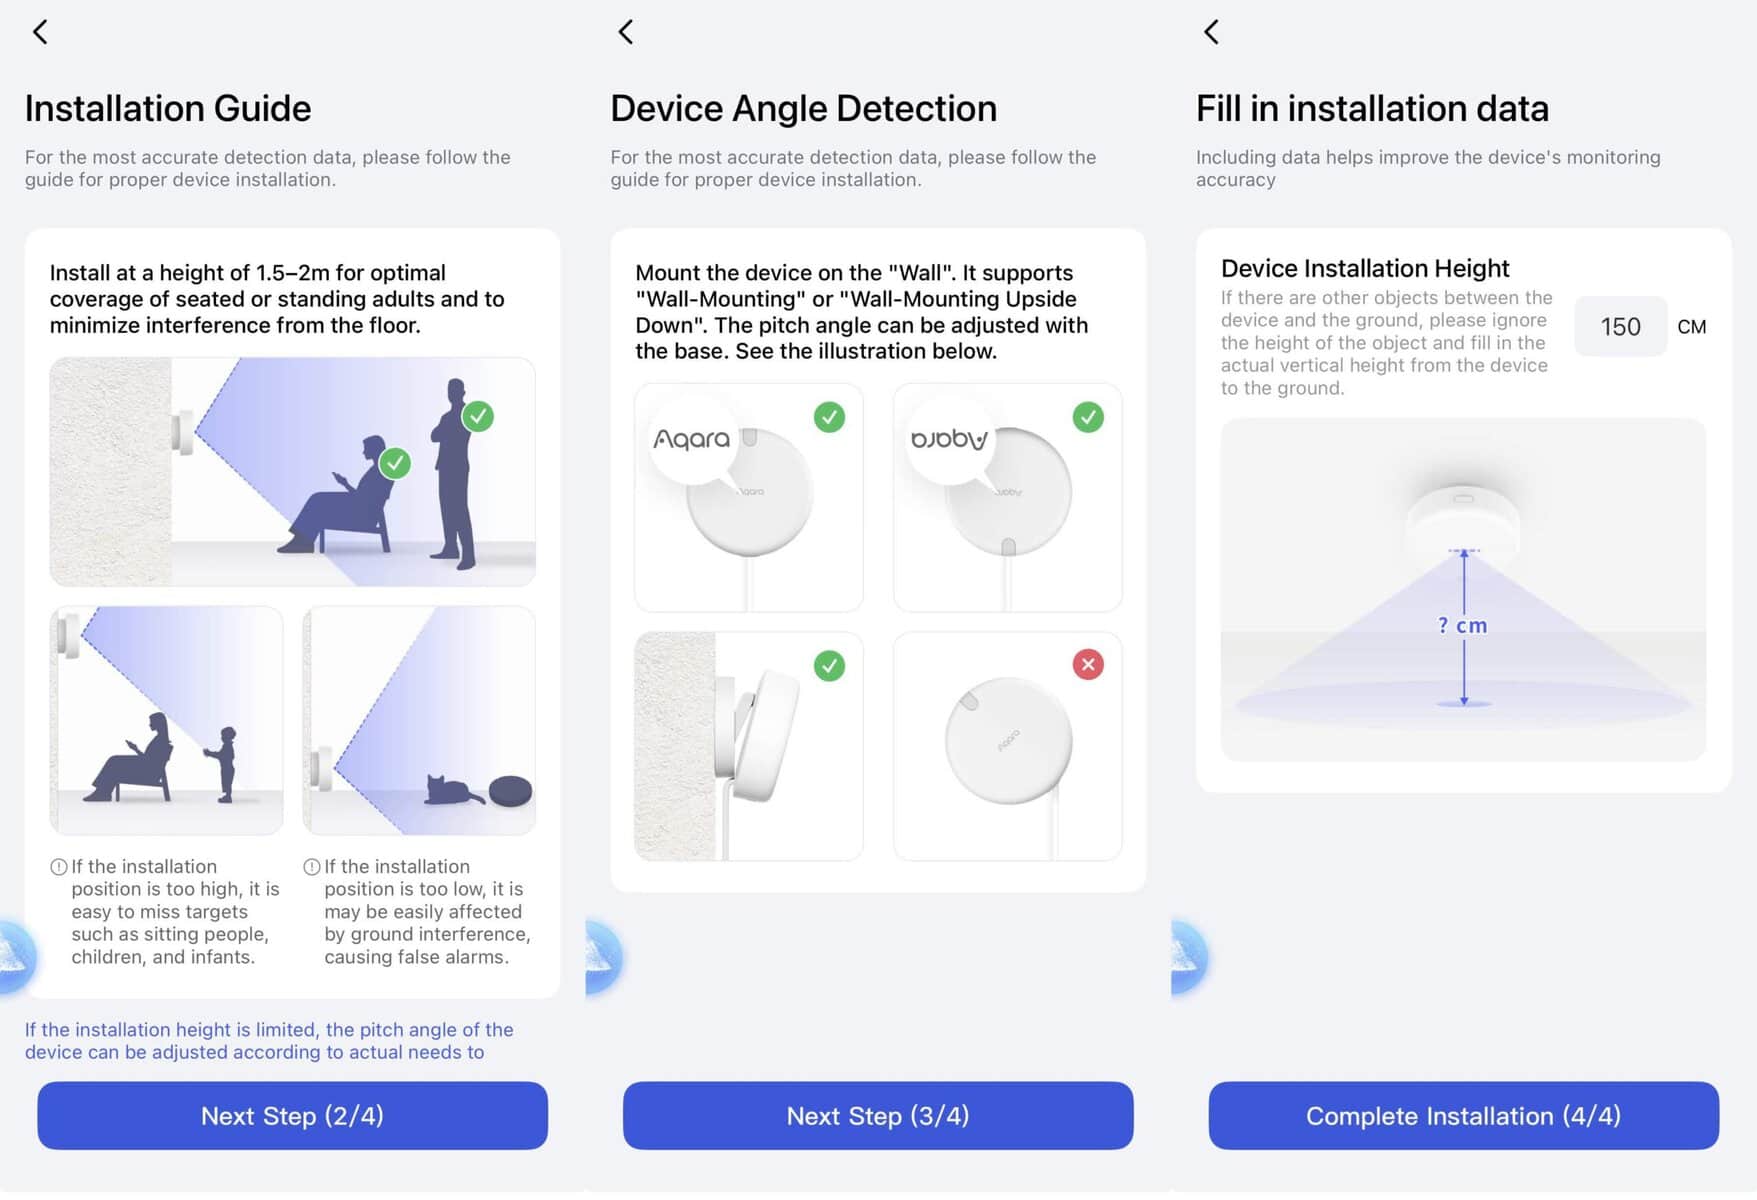
18. On the Set Monitoring Area tap Start Setup.
19. On the Set Monitoring grid screen tap Start walking.
20. Walk the perimeter of the room a couple of times to create a room map. It doesn’t have to be perfect, but at least get the outline of the room decently covered. Tap Done.
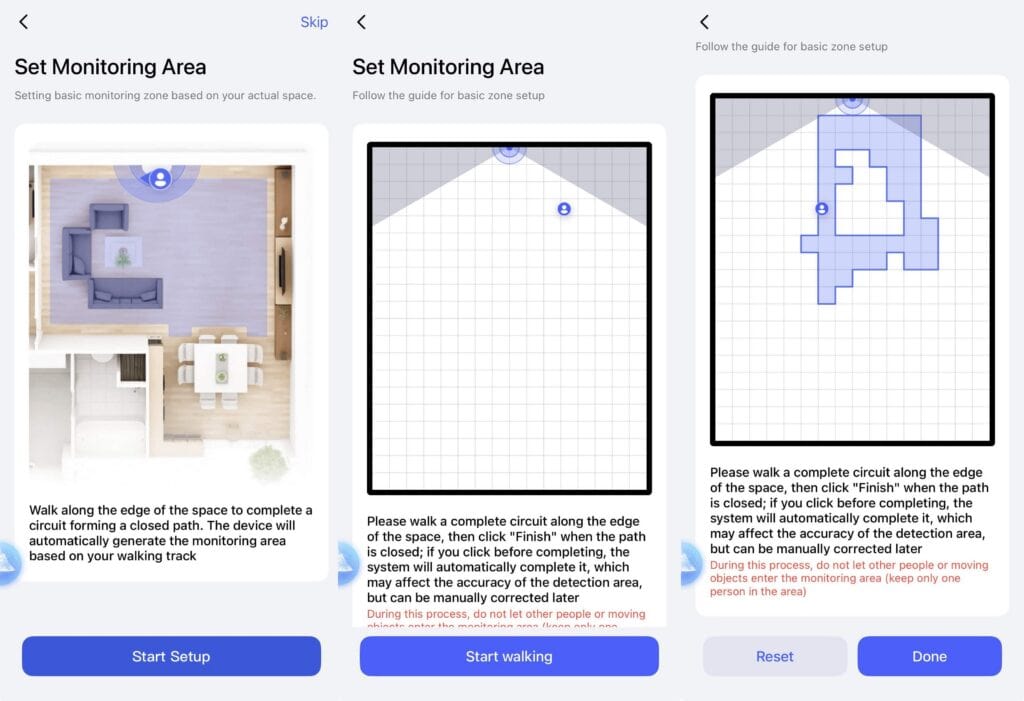
21. Tap Next Step on the map screen.
22. On the Home Screen Layout I suggest using the Full View option. Tap Complete.
23. When the AI Spatial Learning screen appears, completely exit the room.
24. Tap Start Learning, then Confirm.
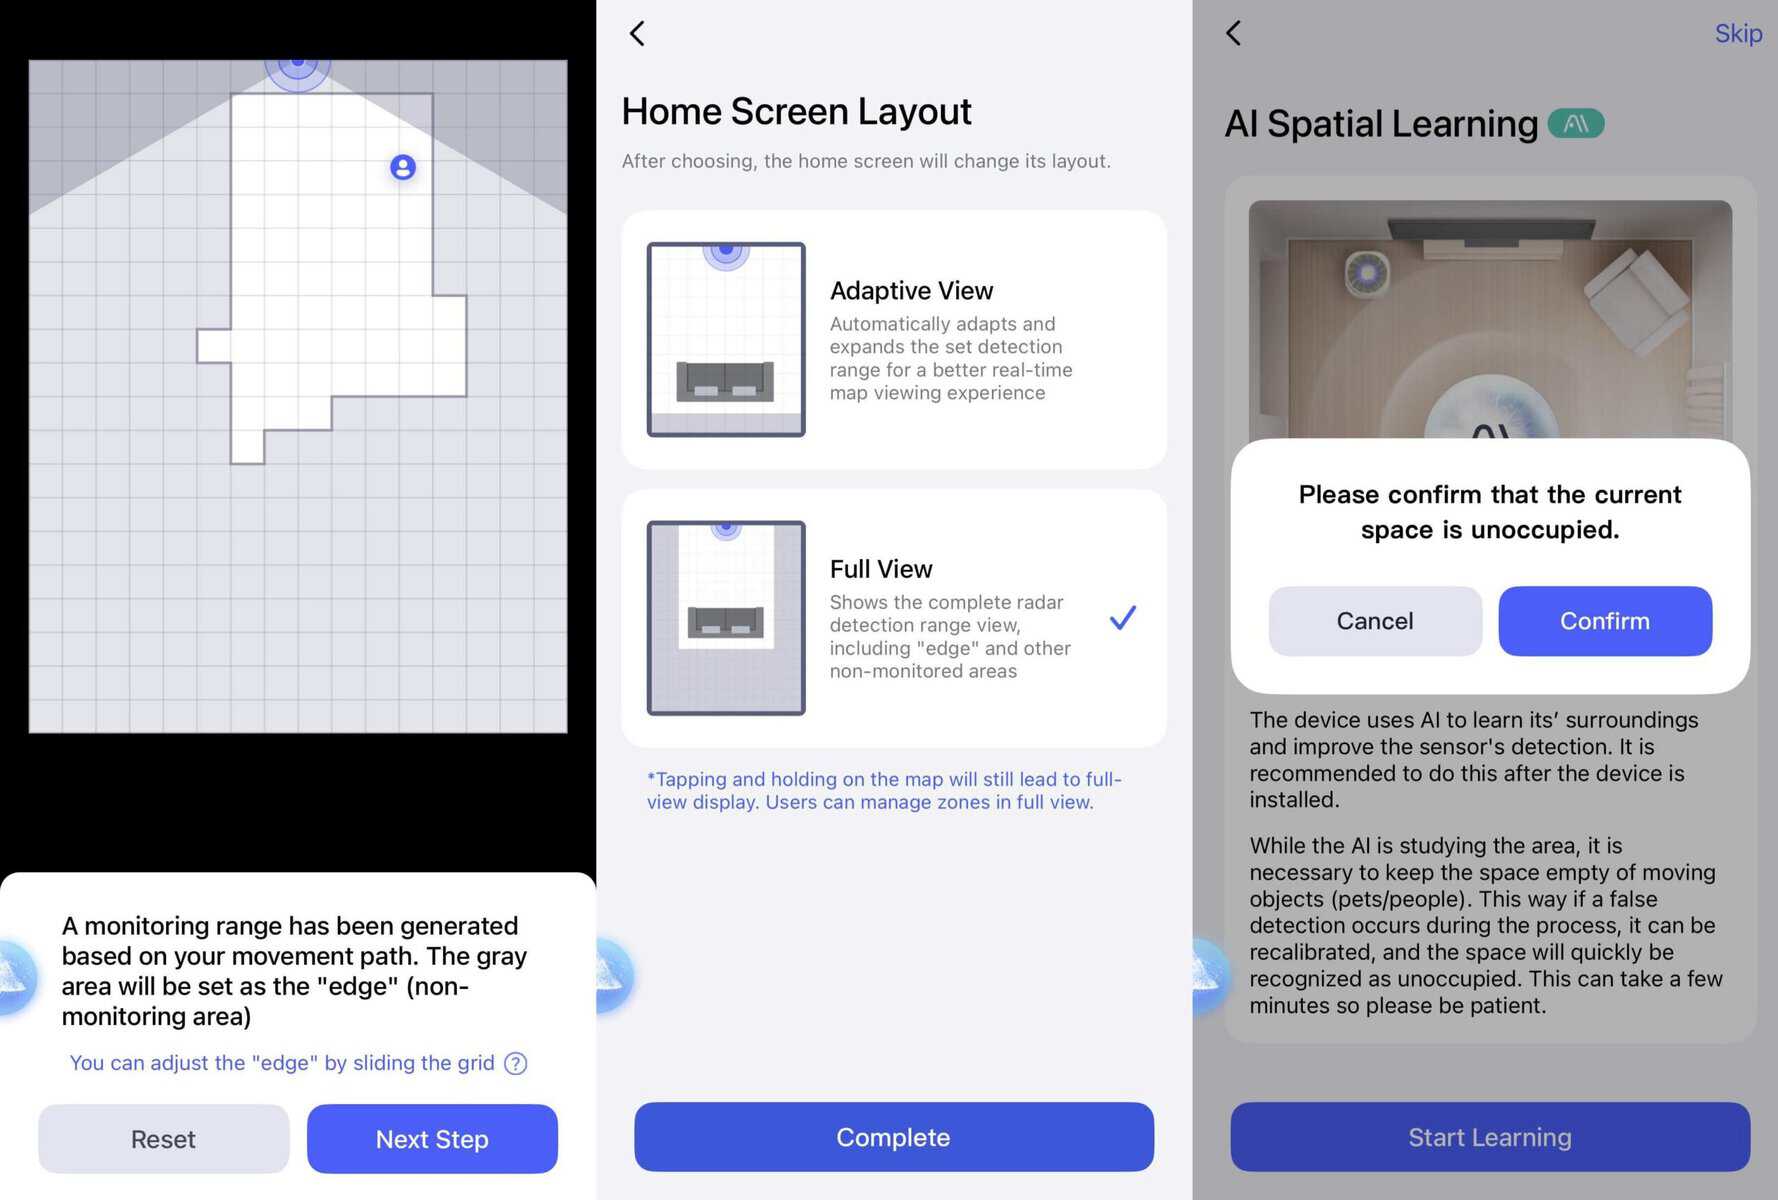
24. Wait for the AI Spatial Learning to complete. Tap Start Now.
25. You should now see the rough room map.
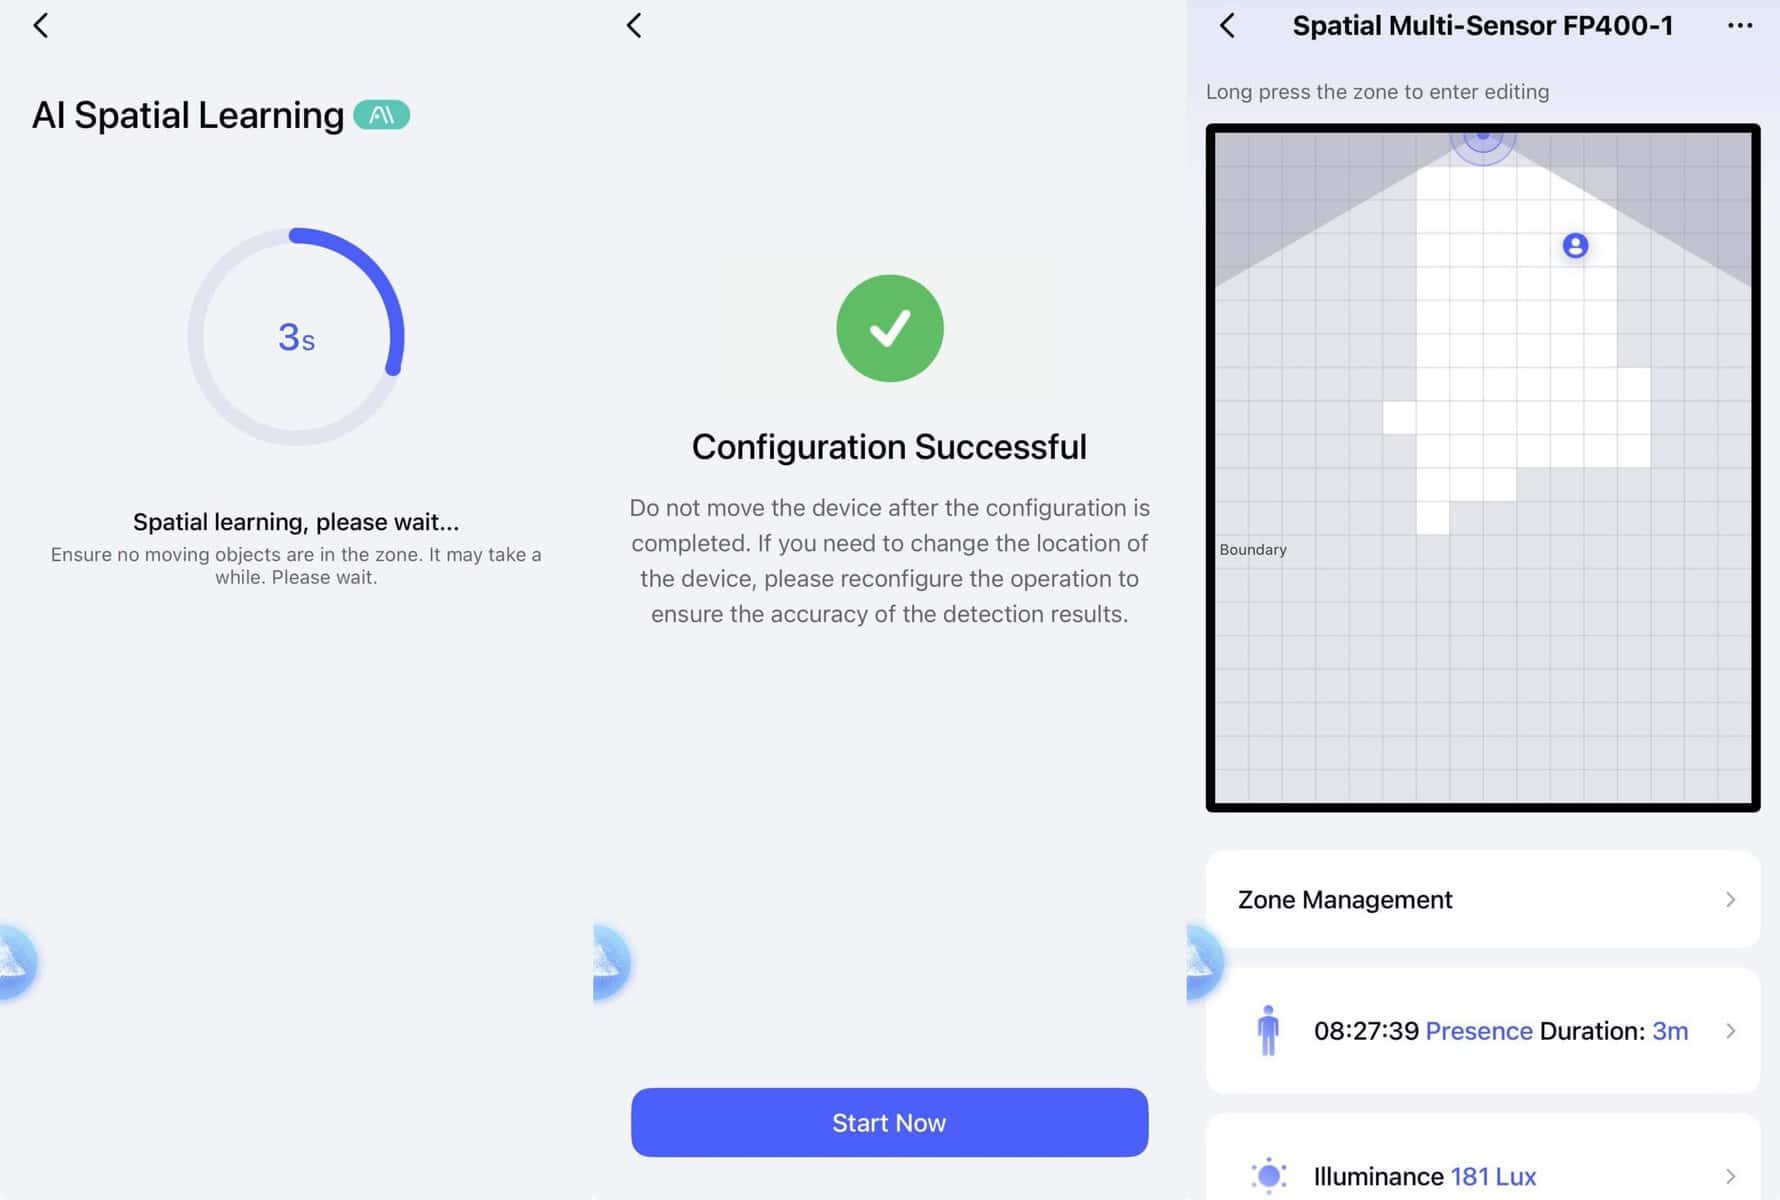
Fine Tuning the Room Map
Fine tuning the FP400 room map is absolutely critical to giving the best chance at rock solid presence detection. Here’s my suggested fine tuning process:
- Long press the grey boundary section so you go into edit mode. Walk the perimeter of the room again and tap on the grey or white squares as needed to fine tune wall boundaries. Once you are happy with the wall boundaries, tap on the check mark.
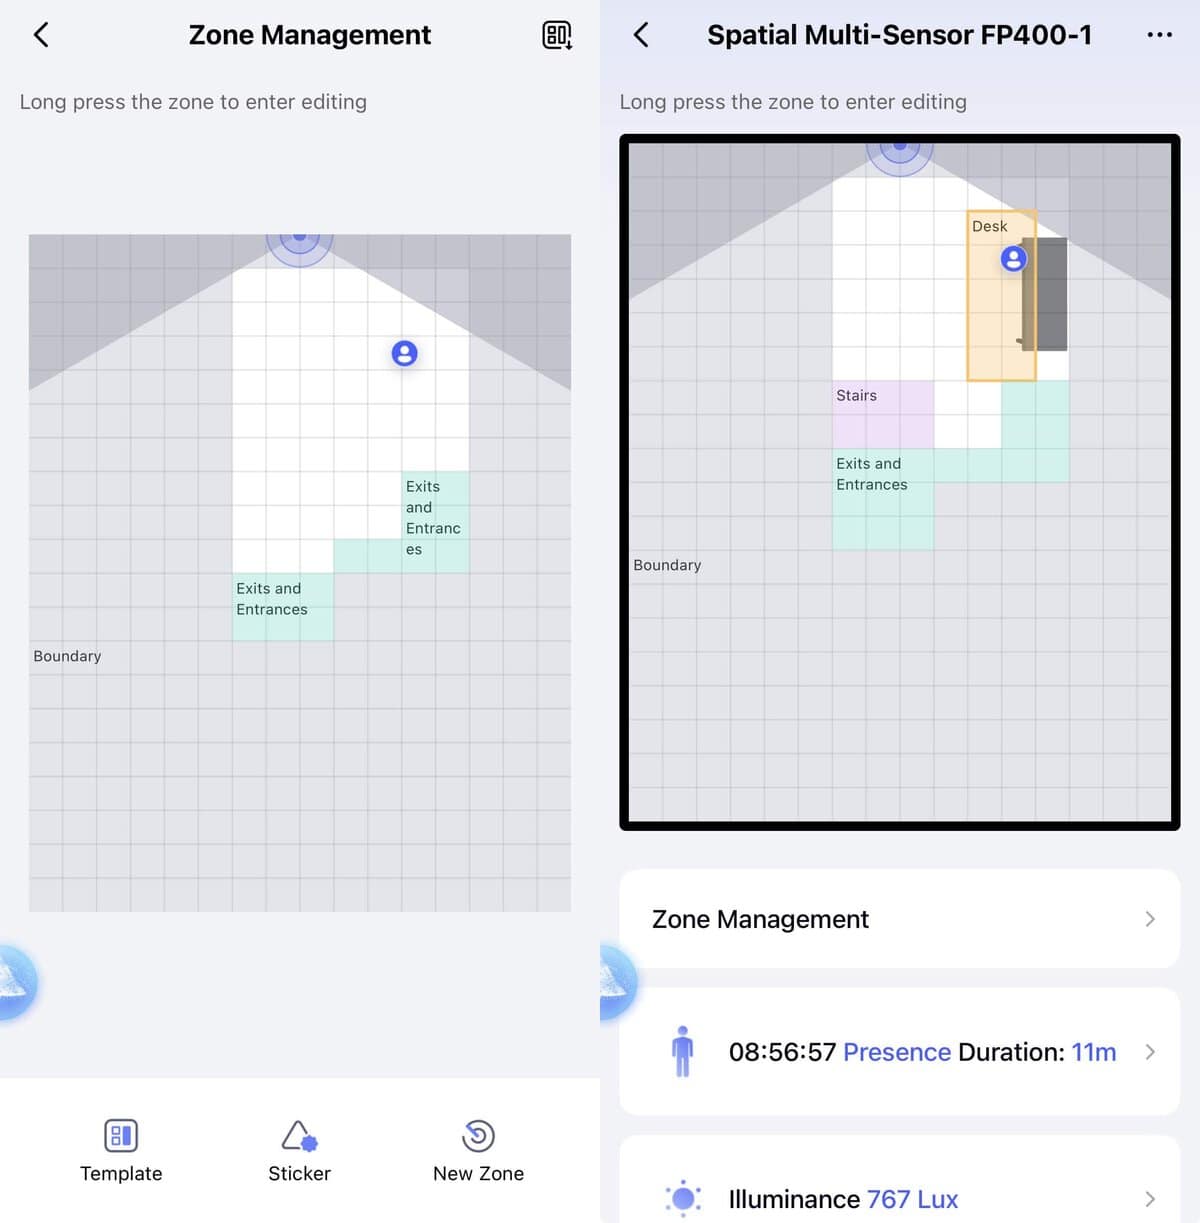
- Tap on New Zone. Tap Exits and Entrances. Tap Next Step. Tap Got it. Walk to each area where you can enter or exit the room. Tap each square that registers your presence. If you have an open concept room, tap every square where you can enter or exit the room boundary even if it’s not a ‘door’. This is VERY important.
- If you want to add a detection zone, tap New Zone. Tap Detection Zone. Change the color as desired. Change the Type as needed to match the area you want to detect. Walk around the detection zone and tap on the squares that register your presence. Change the name of the zone as needed. Tap the Check Mark. Add additional detection zones as needed.
- If desired, add Stickers to the room map for various objects such as desks, beds, lamps, etc. No need to go crazy, but it can be helpful to have a visual representation of the room. You can change the size and orientation of the stickers as needed.
- If you happen to encounter any ‘ghosting’ issues (a person is detected, but there’s no human there), you can define interference zones. You may need these for things like mirrors, TVs, ceiling fans, etc. I would only add an interference zone if you actually have an issue. For the initial setup, I would not add an interference zone. Wait to see what the FP400 detects over time.
- In the upper right corner of the screen tap on the square icon. Enter a template name (e.g. Office). Optionally, take a photo of the FP400 in the room in question. Tap Save. This will save your room map as a template for future use.
As you can see in the room maps below, I’ve defined the boundaries of the room, exit/entrance zones, and detection zones. My office is an open concept room with stairs to the loft, so my map is a bit more complex than a typical room. For home automations I define two zones: my desk and the landing at the bottom of the stairs. This will allow me to detect when I’m at my desk or when I approach the stairs to go to the loft. Each of these detection zones will show up as an entity in Home Assistant.
Additional FP400 Configuration
Now that you have your room map set up with zone, we can look at few more advanced features to get the most out of the FP400.
1. Let’s update the firmware. On the main FP400 screen tap on the three dots in the upper right corner of the screen. Scroll down to Firmware Update. Tap Upgrade, if it’s available. When using the Matter protocol the update to 1.2.0.0 took about 25 minutes.
2. Tap on Monitoring Settings. Tap on Proximity Sensing Distance. The default is Medium. Adjust as needed if you have a large room.
3. If you experience blips in your presence detection tap on Absence Confirmation Period and adjust as needed. I left mine at the default of 10 seconds.
4. If you have robotic vacuums or pets, tap on Advanced Functions and turn on AI Enhanced Person Detection.
Home Assistant Integration
Bringing the Aqara FP400 Presence Sensor into Home Assistant is very easy via Matter.
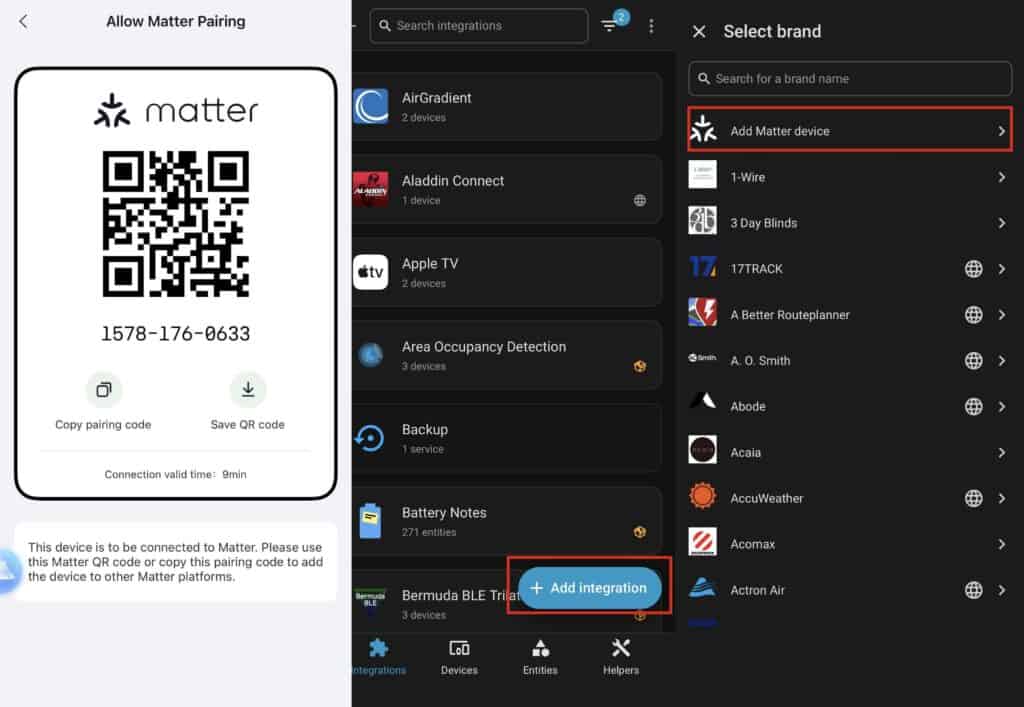
1. In the Aqara Home app locate your FP400 and tap on the three dots in the upper right corner of the screen. Tap Matter. Tap Matter Pairing Code.
2. Once the Matter pairing code is displayed, tap Copy pairing code.
3. In the Home Assistant Companion app on your iPhone, tap on the upper left hamburger menu. Tap on Settings -> Devices & Services -> Add Integration -> Add Matter Device.
4. Tap Yes. It’s already in use. Tap Other controllers. Paste the Matter pairing code you copied from your Aqara Home app. Tap Add device.
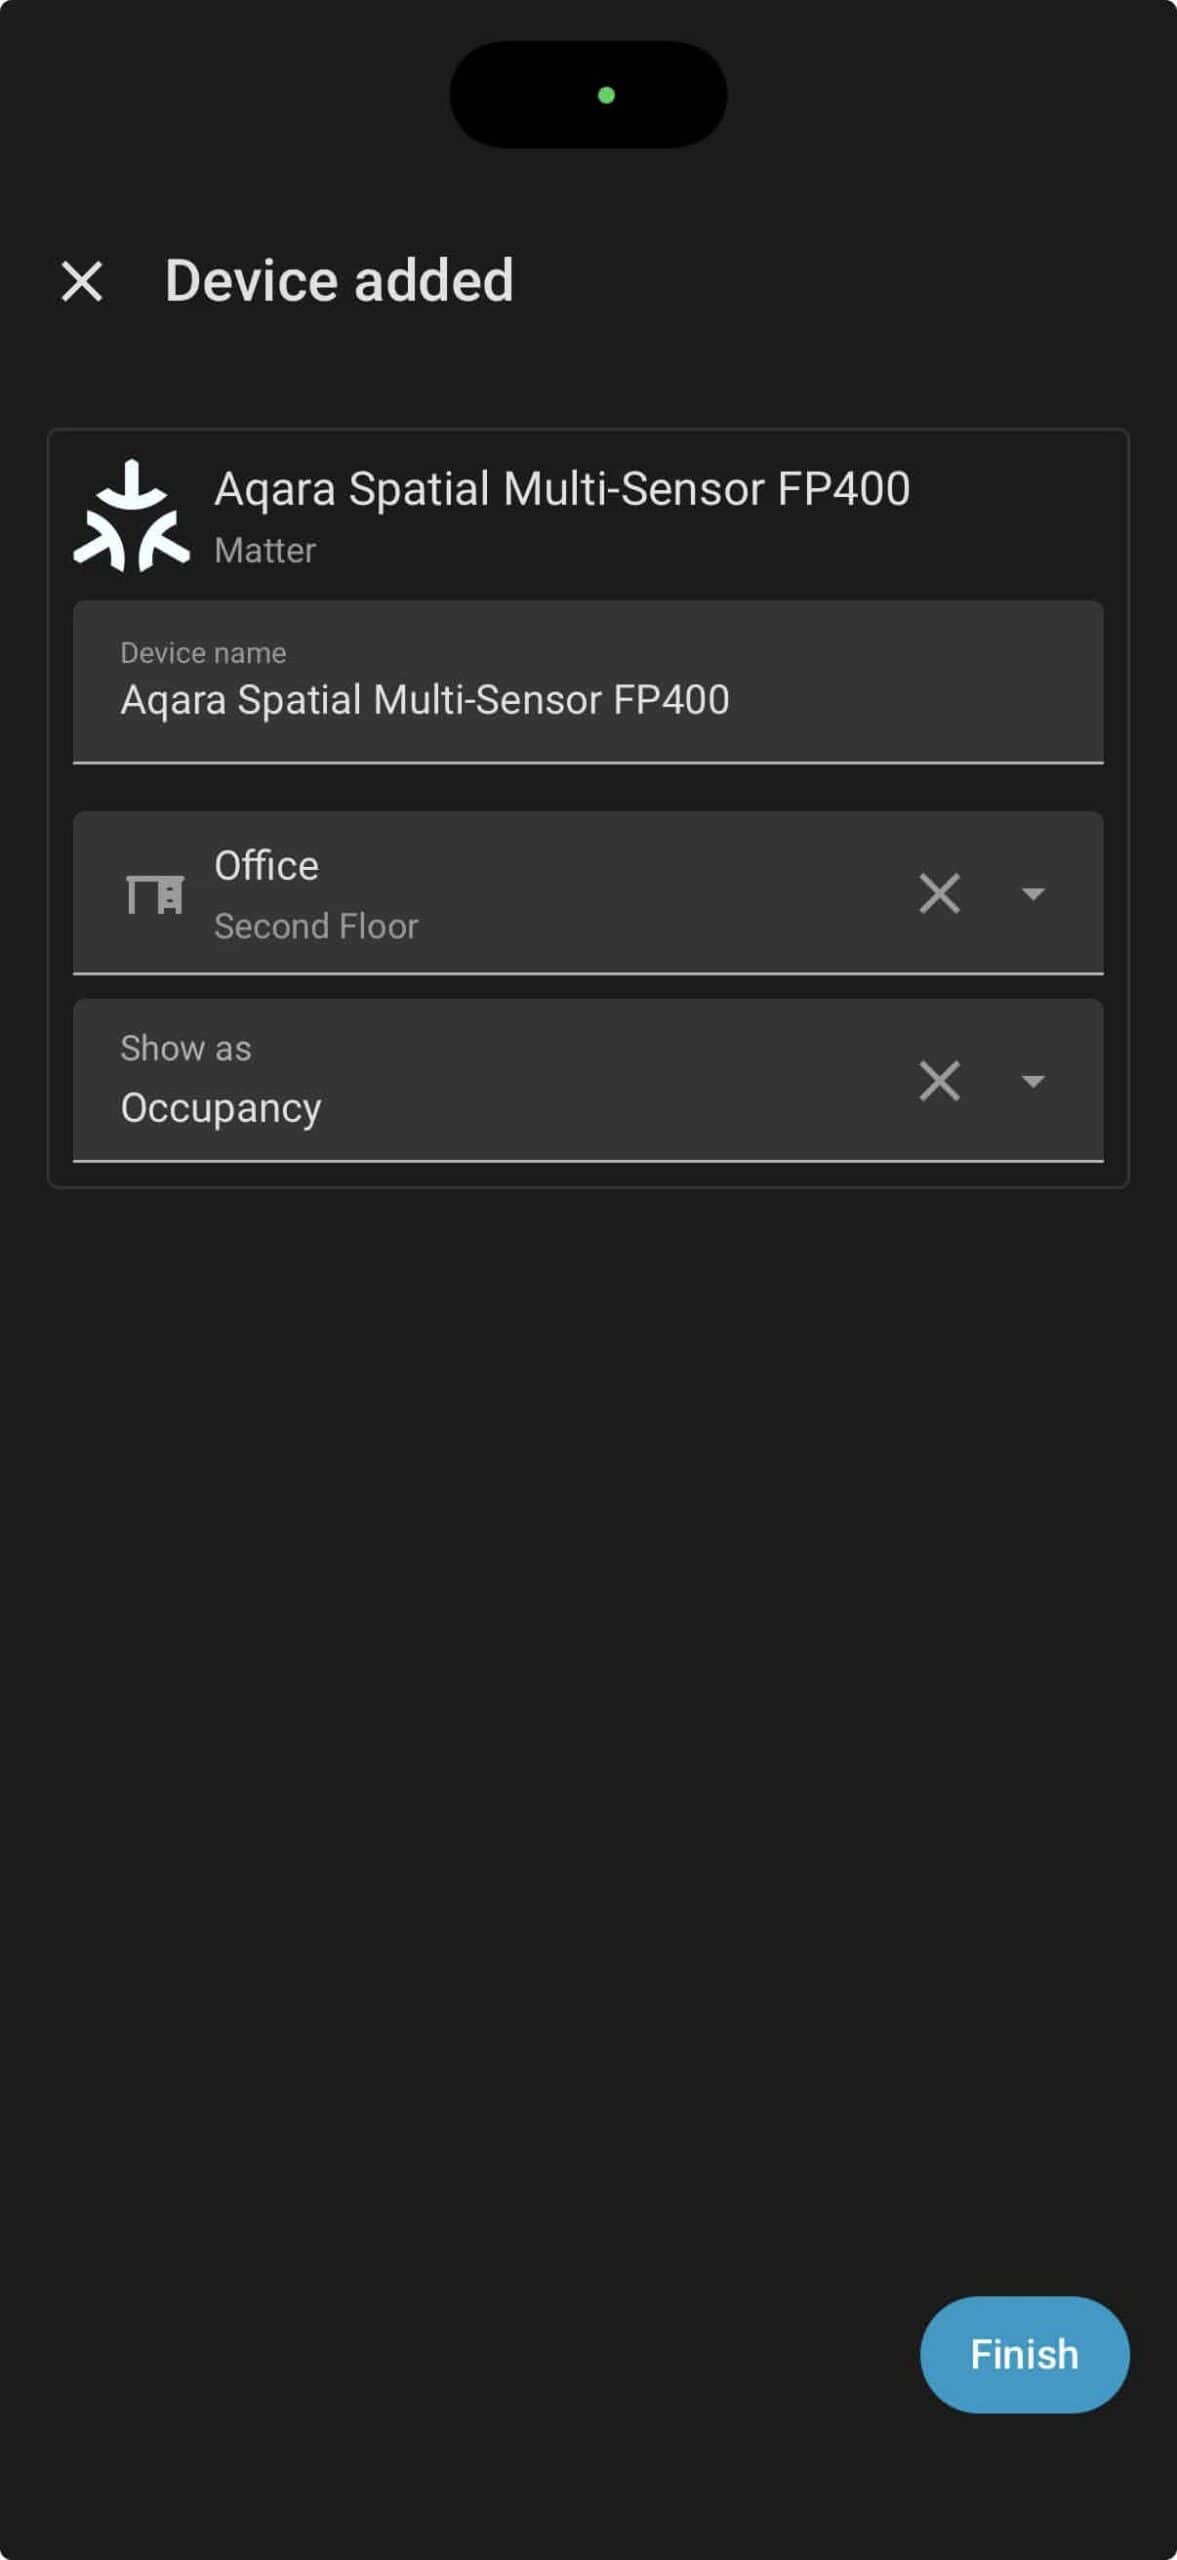
5. Rename the FP400 as needed, and select the room in which it is located. Tap Finish.
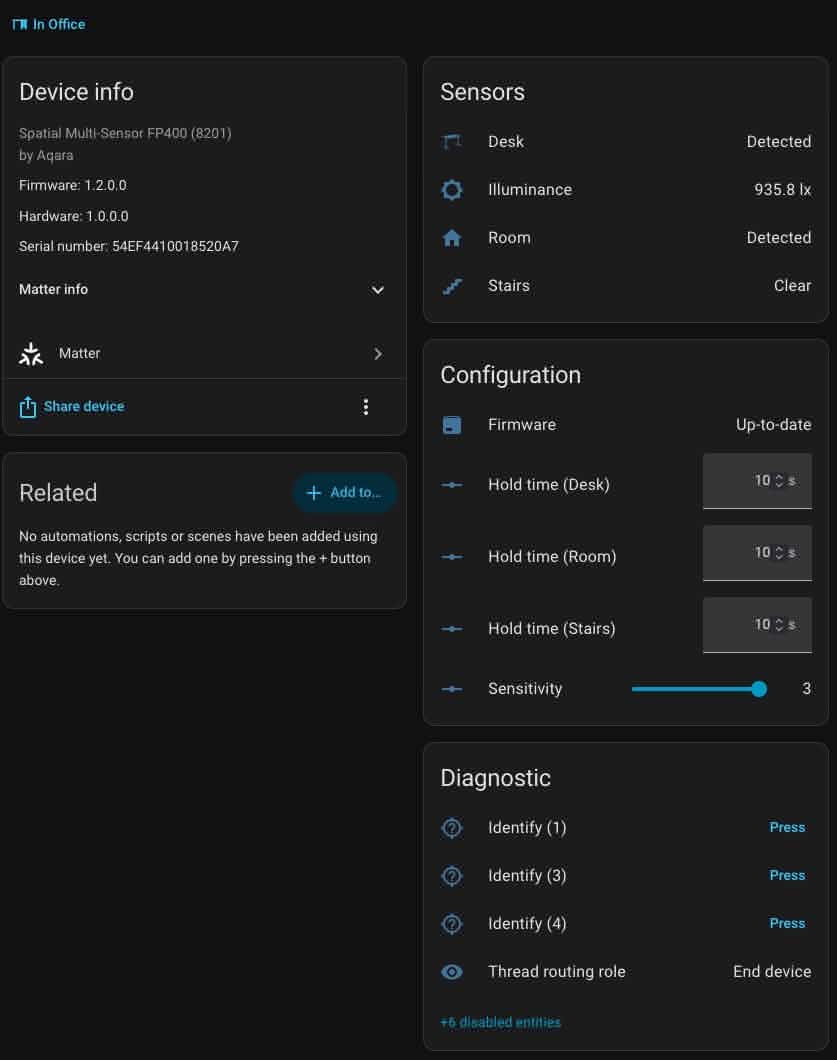
If you open the FP400 device page you should see sensors for each of your custom detection zones, plus one for the entire room. It will also show the light level as well. You will need to rename the sensors to match the detection zones you created in the Aqara Home app. You can also modify the hold times for each of your zones.
If you are OCD about your entity names, tap on the three dots in the upper right corner and click Recreate entity IDs after you rename the sensors.
Now that you have the sensor entities in Home Assistant you can create any automations that you want using the FP400 sensors.
Upgrade from the Aqara FP2?
As previously mentioned, I have a number of FP2s around the house for over three years. After they stabilized the firmware they have been rock solid for me. My primary home automation system is Home Assistant, and the FP2s worked great via the HomeKit integration. If you have FP2s and they are working well for you, there’s not much reason to upgrade to the FP400.
If you are still having ghosting issues or other issues with the FP2, then I’d recommend upgrading to the FP400 and see how they do. The 5x increase in spatial resolution may really help. I’ve also noticed much less ghosting with the FP400s. Since the FP400 uses the same mounting hardware as the FP2, you can physically swap out the FP2 in just a couple of minutes. The FP400 setup process is also a lot more streamlined than the FP2
Summary
The Aqara FP400 is the latest wall-powered mmWave presence sensor from Aqara. It’s the successor to the Aqara FP2, which I’ve been using for the past several years. The mounting options for the FP400 are the same as the FP2, so I was able to directly replace the FP2 with the FP400 with no issues. The FP400 has a 5x higher density of the mmWave sensor, and now integrates via Thread or Zigbee. You can setup up to 8 custom presence detection zones, and it can even count how many people are in the room.
Since the FP400 supports Matter, it’s compatible with a very wide range of smart home platforms including Home Assistant, Apple Home, Alexa, Google Home, SmartThings, and more. Setup is pretty quick and easy. Using the Aqara Home app you can map out your room and set up the presence detection zones.
If you are in the market for a wall-powered mmWave presence sensor, the Aqara FP400 is a great choice. It’s perfect for bedrooms, living rooms, offices, and more. Unlike a traditional PIR motion sensor, you won’t need to waive your arms when the lights unexpectedly turn off.