
Throughout this series I’ve maintained a standard naming convention for all of the computer objects needed for this installation. In the end we will end up with five, yes five, computer objects for this cluster. Two are the SQL server nodes themselves, one for cluster aware updating (-CAU), one for the AlwaysOn Availability group (-AG1), and one for the AlwaysOn Availability group listener (-AG1L). The listener is the name which you would use in ODBC connections to talk with the SQL AlwaysOn cluster and the clustered databases. Don’t use any of the other computer names, as they may appear to work but would result in problems when failing over between nodes.
You can host non-AAG enabled databases on these SQL servers, but would of course not be protected by AAG. In that case you would use SQL server node name in the ODBC connection name, not the AAG listener. Mix and match as you wish, depending on your business requirements.
Blog Series
SQL 2014 Always-on AG Pt. 1: Introduction
SQL 2014 Always-on AG Pt. 2: VM Deployment
SQL 2014 Always-on AG Pt. 3: Service Accounts
SQL 2014 Always-on AG Pt. 4: Node A Install
SQL 2014 Always-On AG Pt. 5: Unattended Node B
SQL 2014 Always-on AG Pt. 6: Cluster Configuration
SQL 2014 Always-on AG Pt. 7: TempDB
SQL 2014 Always-on AG Pt. 8: Max Mem & Email
SQL 2014 Always-on AG Pt. 9: SQL Maintenance
SQL 2014 Always-On AG Pt. 10: AAG Setup
SQL 2014 Always-On AG Pt. 11: File Share Witness
Windows Firewall
1. Download my basic SQL AlwaysOn firewall script from here. Open a Windows command prompt and type the following command:
SQL-Firewall-AG.cmd <AlwaysOn Partner IP>
2. Repeat the same process on the other SQL node, using the other node’s IP address.
Always-On Availability Group Preparation
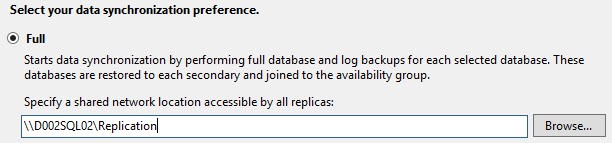
1. On S drive (or another drive of your choosing) of your first SQL node create a folder called Replication. This is where SQL will stage the replication data.
2. Change the NTFS permissions on the folder and add the SQL service account with full permissions.
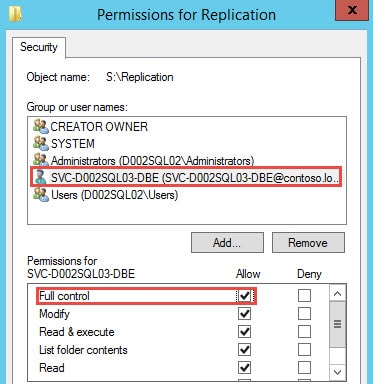
3. Right click on the Replication folder and select the Sharing tab. Click Share. Verify the Database engine account is listed as a read/write member. Click on Share.
4. Launch SQL Manager, right click on Databases and select New Database. Create a new database called SeedDB and leave all other parameters at their default.
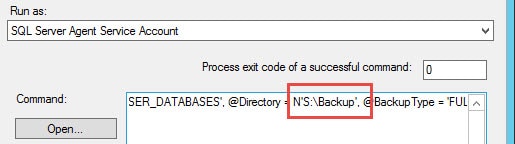
5. Expand the SQL Server Agent node in the left pane and locate the DatabaseBackup — User_Databases – Full job. Open the properties of the job, click on Steps in the left pane, and edit Step 1. Modify the path of the backups to S:\Backup.
6. If you want to use the other backup jobs, open them and modify the backup path as well.
7. Run the DatabaseBackup — User_Databases – Full job by right clicking on it and selecting Start job at step.
8. Open SQL Server Configuration Manager and locate the SQL Server service. Open the properties click on the AlwaysOn High Availability. Check the box to enable AlwaysOn.
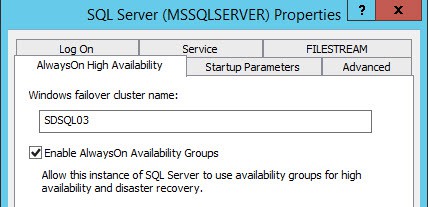
9. Restart the SQL service.
Always-On Availability Group Configuration
1. Open Active Directory Users and Computers (ADUC) and create a new computer object using the cluster name with a suffix of –AG1 (e.g. SDSQL03-AG1). Change the description of the object to SQL Cluster <Cluster Name> Availability Group.
2. On the first SQL server cluster node in SQL Server Management Studio navigate to AlwayOn High Availability, right click and select New Availability Group Wizard.
3. For the availability group name use the format of: <Cluster Name>-AG1 (e.g. SDSQL03-AG1). This should be the same name as step 1 in this subsection.
4. On the Select Databases screen the SeedDB database should be listed, and it should meet the prerequisites. Check the box next to the database and click Next.
5. On the Specify Replicas screen add the second SQL server cluster node. Configure the automatic failover and synchronous commit options as shown below. Make the second node a readable secondary.

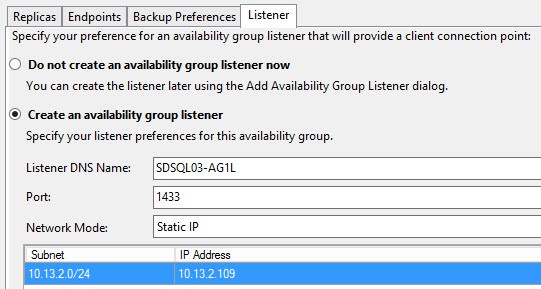
6. On the Listener tab create an availability group listener. For the DNS name, use the same name as the AG (e.g. SDSQL03-AG1) but with an “L” suffix added (e.g. SDSQL03-AG1L), using port 1433. Assign an IP address on the same subnet as the SQL server. If you don’t see the Add button under the network mode box expand the size of the window.
 7. Configure the data replication synchronization using the Replication file share on the first SQL node, as shown below.
8. Review the validation results and verify all are successes.
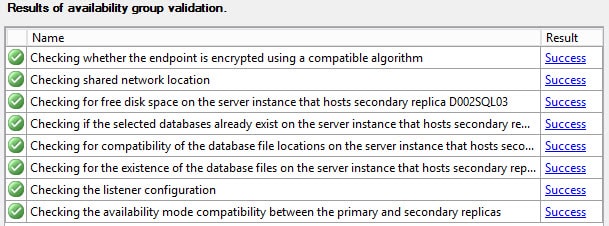
9. Proceed through the rest of the wizard and validate all steps are successful.
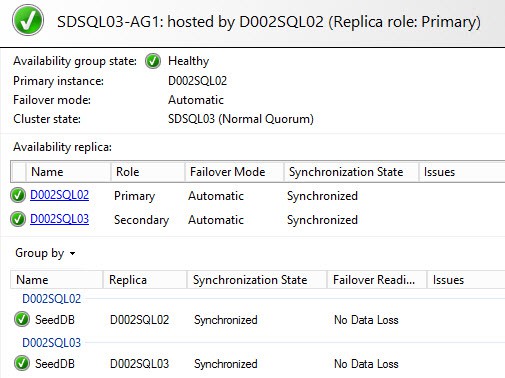
10. In SQL Server Management Studio right click on the AG and select Show Dashboard. Verify all objects are in a healthy state, as shown below.
Summary
Now that we have a SQL AlwaysOn Availability group up and running, there’s still a bit of configuration left to do. So future installments will cover configuring a file share witness, Kerberos, and SSL certificates. Yes, the all important SSL! Don’t quit now and think that you are done. While we are almost there, you will want to follow through the rest of the configuration. Check out Part 11 here.


Hi Derek. Thank you for the procedure thus far. Can I submit one issue I'm facing following your procedure? When configuring the AAG via the wizard, the listener is not created and I get the following error; The WSFC resource control API returned error code 5057. Can you perhaps elaborate on the mechanism(s) involved creating the listener, and why I get this error? Reading the KB did not get me on the right track instantly. Thanks!
Great Series Derek – I ran into an issue with creating the listener, I fixed it by pre-provisioning the SDSQL03-AG1L computer object, then adding & giving full permission to the SDSQL03$ on the security tab.
Hope this helps someone else out
You also could pre-stage the computerobject for the listener.
Just create the Computer Account ""<cluster>-AG1L"" in Active Directory and give the "<cluster>" Full Control.
https://blogs.msdn.microsoft.com/alwaysonpro/2014…
Hi Derek,
Everything is just great so far !!!!!
I am at the stage of configuring the firewall now, unfortunately there is no scripts assigned on dropbox.
Was it moved to any other location ?
When I built the 2014 VMs a couple years back, I let our DBA install and configure AAG. That outcome didn’t look anything like this. I’m using this as guide for MY deployment of SQL2017 VMs and SQL. So far so good!
On Step 8, I initially got a failure because the cluster computer couldn’t create the AD object for the listener. Using this article from Microsoft (https://blogs.msdn.microsoft.com/alwaysonpro/2014/03/25/create-listener-fails-with-message-the-wsfc-cluster-could-not-bring-the-network-name-resource-online/), I simply prestaged the listener computer object and gave the cluster computer object full permissions on it. After that, it sailed through without issues.